Whole Genome Bi-sulphite Sequencing (WGBS)
Klaus H. Kaestner Lab, Suzanne Shapira
Abstract
The molecular mechanisms that underlie islet dysfunction in Type 1 (autoimmune) and Type 2
diabetes are not fully understood, and genetic risk factors are of limited clinical and predictive value. Epigenetic modifications to histones or DNA provide a potential readout of environmental influence from sources such as diet and the microbiome. DNA methylation is an epigenetic modification of cytosine residues that alters DNA accessibility and downstream gene expression patterns. Whole genome bisulphite sequencing (WGBS) is a technique that interrogates such genome-wide DNA methylation patterns. Treatment with sodium bisulfite converts unmethylated cytosine residues to uracil, which then appear as thymine bases after sequencing; thus, this technique allows for identification of methylated and unmethylated DNA with single base pair resolution. WGBS can be used to identify differentially methylated regions between samples from non-diabetic and diabetic pancreatic tissue.
Steps
Fragmentation
1. Covaris Fragmented gDNA: 55ng. Fragmentation program: 200bp as the Covaris recommended in 130µL in the low TE buffer by using snap-cap microtube (Covaris, cat#520045)
Bisulfite by using Ultralow Methylation-seq with TrueMethl oxBS (NuGEN, CAT#0541) Only use the indicated mock-oxidation steps in the following
1. Book thermo cycler and qPCR macine
Table 3. Thermal Cycler Programming 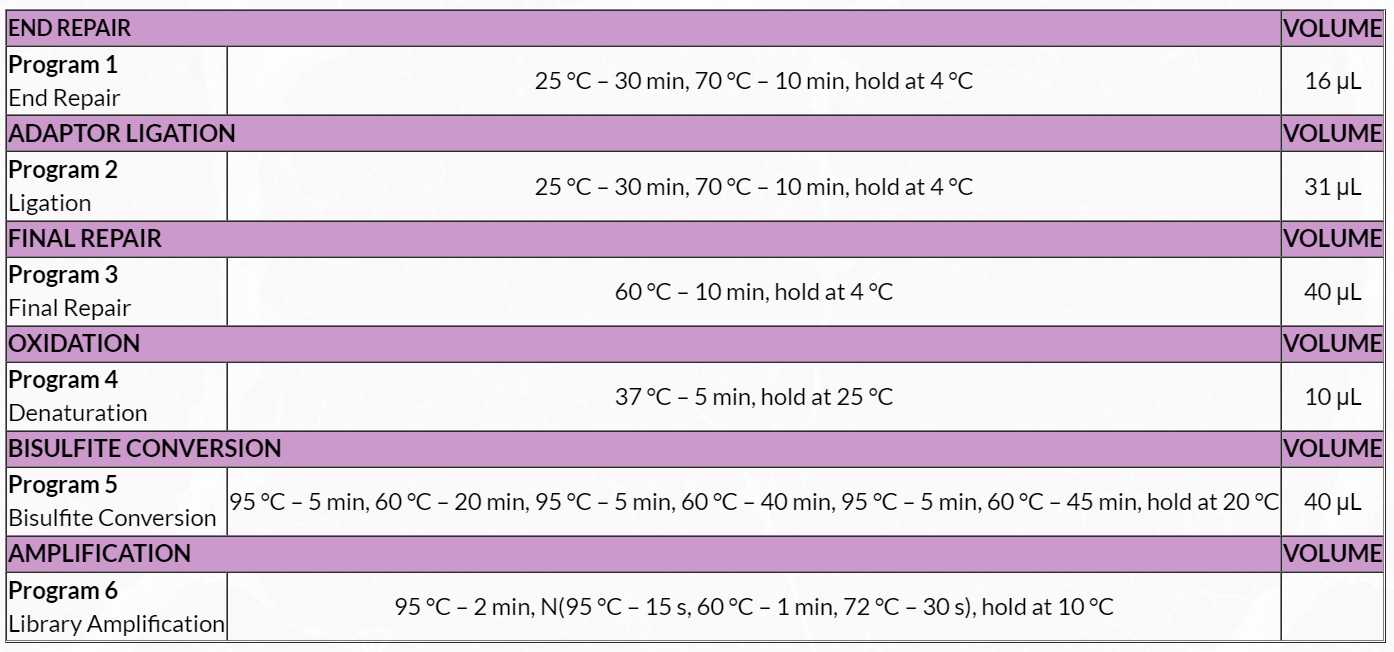
Fragmented DNA Purification
1. Choose a nucleic acid column-based purification system that allows small volume elution, such as the MinElute® Reaction Cleanup Kit (QIAGEN, Cat. #28204). Alternatively, you may use the Agencourt bead- based purification protocol detailed below, which is provided for your convenience. This protocol is designed to work with a starting volume of 50µL of fragmented DNA. If your starting volume is different, change the volume of beads added in Step 5 to 1.8 times the volume of your fragmented DNA.
2. Ensure the Agencourt beads and Nuclease-free Water (D1) have completely reached room tempera- ture before proceeding.
3. Resuspend beads by vortexing the tube. Ensure beads are fully resuspended before adding to sample. After resuspending, do not spin the beads.
4. Prepare a fresh 70% ethanol wash solution.
5. Briefly spin down samples.
6. Add 90µL (1.8 volumes) of bead suspension to each reaction. Mix thoroughly by pipetting 10 times.
7. Incubate at room temperature for 10 minutes.
8. Transfer the tubes to the magnet and let stand 5 minutes to completely clear the solution of beads.
9. Carefully remove the binding buffer and discard it
10. With the tubes still on the magnet, add 200µL of freshly prepared 70% ethanol and allow to stand for 30 seconds.
11. Remove the 70% ethanol wash using a pipette.
12. Repeat steps 9 and 10 for a total of two 70% ethanol washes.
13. Air dry the beads on the magnet for 5–10 minutes. Inspect each tube carefully to ensure that all the ethanol has evaporated.
14. Remove the tubes from the magnet.
15. Add 14µL room temperature of 1X low-EDTA TE buffer or Nuclease-free Water (green: D1) to the dried beads. Mix thoroughly to ensure all the beads are resuspended.
16. Transfer the tubes to the magnet and let stand for 5 minutes to completely clear the solution of beads.
17. Carefully remove 13µLof the eluate, ensuring as few beads as possible are carried over; transfer to a fresh set of PCR tubes and place on ice.
End Repair
Table 5. End Repair Master Mix 
1. Thaw ER1 at room temperature. Mix by vortexing, spin down and place on ice.
2. Spin down ER2 and ER3 and place on ice.
3. Obtain 13µL of fragmented DNA sample (10–300 ng) from the DNA Purification protocol.
4. Prepare a master mix by combining ER1, ER2 and ER3 in a 0.5mLcapped tube, according to the volumes shown in Table 5 .
5. Add 3µL of End Repair Master Mix to each sample tube for a total of 16µL .
6. Mix by pipetting, cap and spin tubes and place on ice.
7. Place tubes in a pre-warmed thermal cycler programmed to run Program 1 (End Repair; see Table 3 ):
 a. `25°C`– 30 min


 b. `70°C` – 10 min


 c. hold at `4°C`
8. Remove tubes from the thermal cycler, spin to collect condensation and place on ice.
Adaptor Ligation
1. Remove Agencourt beads from 4°C. Place on the bench top to reach room temperature for use in the next step.
Table 6. Ligation Master Mix 
2. Spin down L3 and place on ice. 3. Thaw adaptor plate on ice, spin down, and return to ice. 4. Thaw L1 at room temperature. Mix by vortexing, spin down and place on ice. Add adaptors to each sample as follows:a. If using adaptors from 32-plex Adaptor Plate (S02694), add 3µLof the appropriate Ligation Adaptor Mix to each sample. Mix thoroughly by pipetting.b. If using adaptors from 96-plex Adaptor Plate (S02169), add the entire 16µL of sample to the appropriate adaptor well, mix well by pipetting, then transfer the entire sample to a PCR tube
5. Prepare a master mix by combining D1, L1 and L3 in a 0.5mLcapped tube, according to the vol- umes shown in Table 6 . Mix by pipetting slowly, without introducing bubbles, spin and place on ice. Use the master mix immediately.
6. Add 12µL Ligation Master Mix to each reaction for a total of 31µL . Mix thoroughly by pipetting slowly and gently, spin down and place on ice. Proceed immediately with the incubation.
7. Place tubes in a pre-warmed thermal cycler programmed to run Program 2 (Ligation; see Table 3 ):
 a. `25°C`– 30 min


 b. `70°C` – 10 min


 c. hold at `4°C`
8. Remove the tubes from the thermal cycler, spin to collect condensation and place on ice.
Post-Ligation Purification
1. Ensure the Agencourt beads and D1 have completely reached room temperature before proceeding.
2. Resuspend the beads by vortexing the tube. Ensure the beads are fully resuspended before adding to the sample. After resuspending, do not spin the beads.
3. At room temperature, add 45µL(1.5 volumes) of the bead suspension to each reaction. Mix thor- oughly by pipetting 10 times.
4. Incubate at room temperature for 10 minutes.
5. Transfer the tubes to the magnet and let stand 5 minutes to completely clear the solution of beads.
6. Carefully remove the binding buffer and discard it.
7. With the tubes still on the magnet, add 200µL of freshly prepared 70% ethanol and allow to stand for 30 seconds.
8. Remove the 70% ethanol wash using a pipette.
9. Repeat steps 7 and 8 for a total of two 70% ethanol washes.
10. Air dry the beads on the magnet for 5–10 minutes. Inspect each tube carefully to ensure that all the ethanol has evaporated. It is critical that all residual ethanol be removed prior to continuing.
11. Remove the tubes from the magnet.
12. Add 16µL room temperature of 1X low-EDTA TE buffer or D1 to the dried beads. Mix thoroughly to ensure all the beads are resuspended.
13. Transfer the tubes to the magnet and let stand for 5 minutes to completely clear the solution of beads.
14. Carefully remove 15µL of the eluate, ensuring as few beads as possible are carried over; transfer to a fresh set of PCR tubes and place on ice.
Final Repair
1. Remove the TrueMethyl oxBS Module Magnetic Bead Solution, Binding Buffer 1 and Binding Buffer 2 from 4°C and place at room temperature for use in the next step.
Table 7. Final Repair Master Mix 
2. Spin down FR2 and place on ice. 3. Thaw FR1 at room temperature. Mix by vortexing, spin down and place on ice. 4. Prepare a master mix by combining FR1 and FR2 in a 0.5mL capped tube, according to the volumes shown in Table 7 . 5. Add 5µLof the Final Repair Master Mix to each sample tube for a total of 20µL . 6. Mix by pipetting, cap and spin tubes and place on ice.
7. Place the tubes in a pre-warmed thermal cycler programmed to run Program 3 (Final Repair; see Table 3 ).
8. 60°C – 10 min, hold at 4°C
9. Remove the tubes from the thermal cycler, spin to collect condensation and place on ice.
10. If using the True Methyl oxBS Module, continue with section H. DNA Purification and Denaturation. For alternative bisulfite conversion methods, perform bisulfite conversion according to the manufac- turer recommendations and proceed to protocol section L. Library Amplification Optimization with qPCR .
DNA Purification and Denaturation
- Remove the TrueMethyl oxBS Module Oxidant Solution from
-20°Cand thaw on ice for use in the next step.
Table 8. Magnetic Bead Binding Solution 1 Master Mix 
2. Remove Acetonitrile, Ultra Pure water, and Denaturing Solution from storage and place on bench top. 3. Prepare a fresh stock of 80% acetonitrile, using the Ultra Pure water provided with the kit. Mix by vortexing or inversion and place at room temperature. 4. Ensure Magnetic Bead Solution and Binding Buffer 1 have reached room temperature before proceeding. 5. Mix Binding Buffer 1 by inversion until homogenized. 6. Vortex Magnetic Bead Solution until homogenized. 7. Prepare a master mix of Magnetic Bead Binding Solution 1 (MBBS1) as directed in Table 8 .
8. Vortex MBBS1 master mix thoroughly to ensure the beads are homogenized in solution.
9. At room temperature, add 30µL water of Ultra Pure water to each sample for a total of 50µL .
10. Add 100µL of MBBS1 master mix to each 0.2mL tube containing 50µL NGS library for a total of 150µL . Mix by pipetting and centrifuge briefly.
11. Incubate at room temperature for 20 min.
12. Transfer tubes to a magnetic separation plate and incubate at room temperature for 5 minutes to completely clear the solution of beads.
13. Keeping the tubes on the magnet, carefully remove the supernatant and discard it.
14. With the tubes still on the magnet, carefully add 200µL of 80% Acetonitrile wash to the tubes with- out disturbing the bead pellet.
15. Remove and discard the 200µL80% Acetonitrile wash, carefully avoiding aspiration of the bead pellet.
16. Repeat Steps 13 and 14 twice to perform 3 x 200 μL 80% Acetonitrile washes in total. Remove as much of the final wash as possible.
17. Air dry the bead pellets for 5 minutes at room temperature, leaving the lids of the tubes open.
18. Remove the tubes from the magnet.
19. Add 10µL of Denaturing Solution directly onto the bead pellet. Mix thoroughly to ensure all beads are resuspended.
20. Centrifuge briefly to collect solution at bottom of the tubes.
21. Place the tubes in a pre-warmed thermal cycler programmed to run Program 4 (Denaturation; see Table 3 ):
   a. `37°C` – 5 min


   b.  hold at `25°C`
22. Remove the tubes from the thermal cycler, spin to collect condensation and transfer to the magnet.
23. Incubate at room temperature for 2 minutes.
24. Carefully remove 9µL of the eluate, ensuring as few beads as possible are carried over, transfer to a fresh 1.5mL microcentrifuge tube and place at room temperature.
25. Remove Ultra Pure water from storage and place on bench top.
26. Set a heat block to 40°C .
27. Prepare individual oxidation and mock oxidation reactions as follows:
a. Do not do: For each sample to be processed through the oxBS workflow, add 1 μL of oxidant solution to 9 μL of DNA for a total of 10 μL.
b. Only do: For each sample to be processed through the MOCK oxBS workflow, add 1 μL of Ultra Pure water to 9 μL of DNA for a total of 10 μL.
28 . Mix reactions by vortexing and centrifuge briefly.
29. Place tubes in heat block and incubate for 10 min at 40°C .
30. Centrifuge reactions at 14000 x g for 10 minutes at room temperature to pellet any black precipitate. MOCK treated samples will remain clear and will not have any black precipitate.
31. Transfer the orange supernatant to a fresh 0.2mL PCR tube and place at room temperature. Proceed immediately to the next step.
Bisulfite Conversion
1. Set a heat block or heated orbital incubator to 60°C .
2. Remove Bisulfite Diluent and Bisulfite Reagent aliquots from storage and place on bench top. Remove 1 aliquot of Bisulfite Reagent for every 20 reactions to be processed.
3. Prepare Bisulfite Reagent Solution by adding 700µL of Bisulfite Diluent to each aliquot of Bisulfite Reagent.
4. Seal the lid of each aliquot with Bisulfite Reagent Solution tightly.
5. Incubate the aliquots of Bisulfite Reagent Solution for 15 min at 60°C . Vortex regularly until the Bisulfite Reagent Solution is completely dissolved.
6. Spin down Bisulfite Reagent Solution briefly and place at room temperature.
7. Ensure oxidized DNA samples from previous step are at room temperature before proceeding.
8. Prepare Bisulfite Conversion Reaction mix by adding 30µL of Bisulfite Reagent Solution to each 10µL of DNA for a total of 40µL . Ensure that each sample pair being processed through the oxBS and MOCK oxBS workflow is treated with the same aliquot of Bisulfite Reagent Solution. Mix by pipetting, spin down and place at room temperature.
- Mix by pipetting, spin down and place at room temperature.
10. Place the tubes in a pre-warmed thermal cycler programmed to run Program 5 (Bisulfite Conversion, see Table 3 ):
   a. `95°C`  – 5 min, `60°C`  – 20 min


   b. `95°C`  – 5 min, `60°C`  – 40 min


   c. `95°C`  – 5 min, `60°C`  – 45 min


   d.  hold at `20°C`
11. Once the bisulfite conversion is complete, centrifuge samples briefly to collect solution at bottom of the tubes.
12. Transfer samples to 1.5mL tubes and centrifuge for 10 min at 14000 x g.
13. Continue to K. Bisulfite-Converted DNA Desulfonation and Purification while the samples are in the centrifuge.
Bisulfite-Converted DNA Desulfonation and Purification
1. Remove Desulfonation Buffer, Binding Buffer 2, Magnetic Bead Solution and Elution Buffer from stor- age and place at room temperature for a minimum of 30 minutes before use.
Table 9. Magnetic Bead Binding Solution 2 Master Mix 
2. Prepare a fresh stock of 70% Ethanol. Mix by vortexing or inversion. 3. Mix Binding Buffer 2 by inversion until homogenized. 4. Vortex Magnetic Bead Solution until homogenized. 5. Prepare a master mix of Magnetic Bead Binding Solution 2 (MBBS2) as directed in Table 9 .
6. Transfer 40µL of the supernatant to a fresh set of 0.2mL PCR tubes. Avoid disturbing the pellet in the oxBS-treated samples.
7. Vortex MBBS2 thoroughly to ensure the solution is homogenous before aliquoting.
8. Carefully add 160µL of MBBS2 to each tube containing 40µL bisulfite converted sample for a total of 200µL . Mix thoroughly by pipetting slowly and gently, spin down and place at room temperature.
9. Incubate at room temperature for 5 minutes.
10. Centrifuge briefly to collect solution at bottom of the tubes.
11. Place the tubes onto the magnet and incubate at room temperature for at least 5 minutes to com- pletely clear the solution of beads.
12. Carefully remove the supernatant and discard it.
   **13.**  Remove the tubes from the magnet.


   **14.**  Add `200µL` of 70% Ethanol to each sample tube. Resuspend the beads completely by pipetting.
13. Place the tubes on the magnet and incubate at room temperature for 5 minutes to completely clear the solution of beads.
14. Carefully remove the 70% Ethanol wash and discard it. Remove as much of the wash as possible.
15. Remove samples from the magnet.
16. Add 200µL of Desulfonation Buffer with EtOH added directly onto the bead pellet. Resuspend the beads completely by pipetting.
17. Close lids of sample tubes securely and place the tubes into the magnetic separation rack. Incubate at room temperature for 5 minutes to completely clear the solution of beads.
18. Remove the tubes from the magnet, open the tubes, and return to the magnet.
19. Carefully remove 200µL of the Desulfonation Buffer and discard it. Remove as much of the Desulfonation Buffer as possible without disturbing the bead pellet.
20. Remove the tubes from the magnet.
21. Add 200µL of 70% Ethanol to each sample tube. Resuspend the beads completely by pipetting.
22. Place the tubes onto the magnet and incubate at room temperature for 5 minutes to completely clear the solution of beads.
23. Remove the 200µL 70% Ethanol wash and discard it.
24. Repeat Steps 23-25 to perform 2 x 200 μL 70% Ethanol washes in total. Remove as much of the final wash as possible.
25. Air-dry the the beads on the magnet for 15 minutes. Inspect each tube carefully to ensure that all of the ethanol has evaporated.
26. Remove the tubes from the magnet.
27. Add Elution Buffer directly onto the bead pellet and resuspend completely by pipetting:
a. For Library Amplification Optimzation with qPCR (recommended), resuspend beads in 23µL Elution Buffer.
b. If qPCR optimization is not required, resuspend beads in 21µL Elution Buffer.
28. Incubate at room temperature for 5 minutes to elute the TrueMethyl converted DNA from the beads.
29. Centrifuge briefly to collect sample at bottom of the tubes.
30. Place the tubes onto the magnet and incubate at room temperature for 5 minutes to completely clear the solution of beads.
31. Carefully transfer eluate into a fresh 0.2mL tube:
a. For Library Amplification Optimzation with qPCR (recommended), transfer 22µL eluate.
b. If qPCR optimization is not required, transfer 20µL eluate.
Library Amplification Optimization with qPCR
Table 10. Library Amplification qPCR Master Mix 
1. Aliquot 2µL of each sample into a fresh set of 0.2mLtubes. Reserve the remaining 20µLof sample on ice. 2. Add 14µL of Low-EDTA TE Buffer to each sample for a total of 16µL . Mix well by pipetting, spin down and place on the bench top.
3. Aliquot 3.75µL of each sample into an appropriate PCR plate or optically clear strip tubes, in tripli- cate. Mix well by pipetting, spin down and place on ice.
4. Prepare a master mix by combining P2, P3 and 20x EvaGreen in an appropriately sized capped tube according to the volumes shown in Table 10 . Add P3 at the last moment and mix well by pipetting, taking care to avoid bubbles. Spin down and place on ice.
5. On ice, add 6.25µL of Library Amplification qPCR Master Mix to each 3.75µL of sample, in triplicate, for a total of 10µL per replicate.
6. Mix well by pipetting, spin down and place on ice.
7. Perform qPCR with the following cycling conditions:
a. `95°C` – 2 min, 35x(`95°C` – 15s


b. `60°C` – 1 min, `72°C`  – 30s)
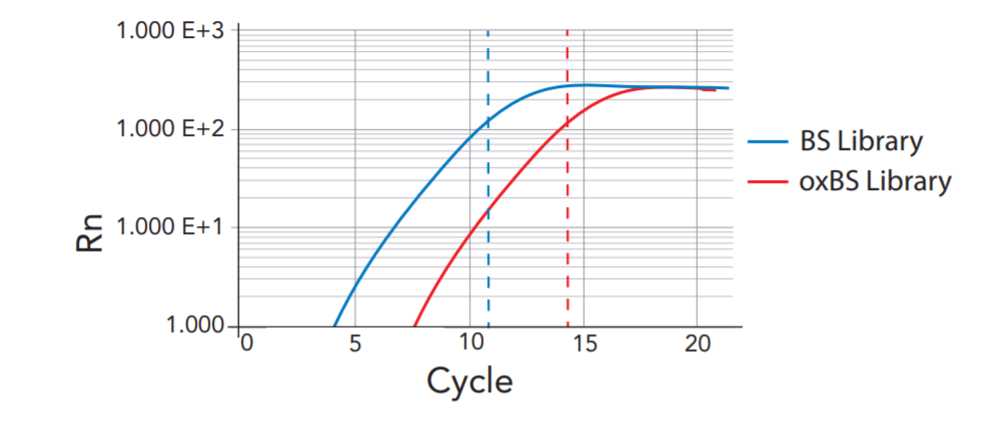
8. Examine the log fluorescence vs. cycle number plot from the qPCR system to determine the appro- priate number of library amplification cycles.
 a. First, select a cycle number within the late exponential phase of the amplification plot. In the example in  **Figure 5** , this is 11 cycles the ‘BS Library’ (blue dotted vertical line, left) and 14 cycles in the ‘oxBS Library’ (red dotted vertical line, right).


 b. Next, subtract 3 from the selected cycle to determine the number of PCR cycles to perform in the next step (M. Library Amplification). This compensates for the 1:8 dilution of sample used in the qPCR reaction.
Figure 5. Stylized qPCR amplification plot
Library Amplification
Table 11. Library Amplification Master Mix 
1. Remove Agencourt beads from 4°C . Place on the bench top to reach room temperature for use in the next step. 2. Thaw P3 on ice if needed. Spin down and place on ice. 3. Thaw P2 at room temperature. Mix by vortexing, spin and place on ice. 4. Prepare a master mix by combining P2 and P3 in an appropriately sized capped tube according to the volumes shown in Table 11 . Add P3 at the last moment and mix well by pipetting, taking care to avoid bubbles. Spin down and place on ice.
5. On ice, add 30µL of Library Amplification Master Mix to each 20µL of reserved sample for a total of 50µL .
6. Mix well by pipetting, spin down and place on ice.
7. Place tubes in a pre-warmed thermal cycler programmed to run Program 6 (Library Amplification; see Table 3 ):
a. `95°C`  – 2 min, N (`95°C`  – 15 s, `60°C`  – 1 min `72°C`  – 30 s)


b. hold at `10°C`
8. Remove the tubes from the thermal cycler, spin to collect condensation and place on ice.
Amplified Library Purification
1. Ensure the Agencourt beads have completely reached room temperature before proceeding.
2. Resuspend the beads by inverting and tapping the tube. Ensure the beads are fully resuspended before adding to samples. After resuspending, do not spin the beads.
3. Add 50µL (1 volume) of the bead suspension to each reaction. Mix thoroughly by pipetting 10 times.
4. Incubate at room temperature for 10 minutes.
5. Transfer the tubes to the magnet and let stand 5 minutes to completely clear the solution of beads.
6. Carefully remove the binding buffer and discard it.
7. With samples still on the magnet, add 200µL of freshly prepared 70% ethanol.
8. Remove the 70% ethanol wash using a pipette.
9. Repeat steps 7 and 8 for a total of two washes.
10. Air dry the beads on the magnet for 10 minutes. Inspect each tube carefully to ensure that all of the ethanol has evaporated. It is critical that all residual ethanol be removed prior to continuing.
11 . Remove the tubes from the magnet.
12. Add 20µL Low-EDTA TE Buffer to the dried beads. Mix thoroughly to ensure all beads are resuspended.
13. Transfer the tubes to the magnet and let stand for 5 minutes to completely clear the solution of beads.
14. Carefully remove 18µL of the eluate, ensuring as few beads as possible are carried over and transfer to a fresh set of PCR tubes.
Quantitative and Qualitative Assessment of the Library
1. Quantify the libraries using a fluorometric assay and/or qPCR.
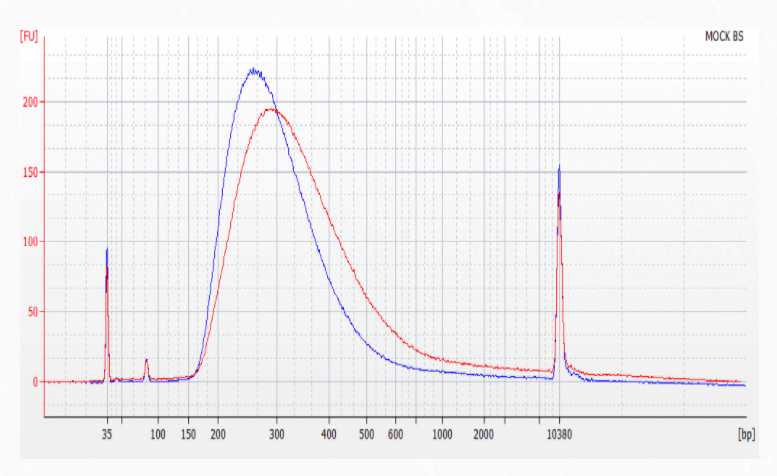
2. Validate libraries using the hsDNA kit for BioAnalyzer or an equivalent assay. An example trace using 1µLof 5 ng/uL library on the hsDNA chip is shown in Figure 6 below.
Figure 6. Fragment distribution when 1 μL of 5 ng/μL library is loaded into a High Sensitivity DNA assay from 200 ng human DNA input.
3. Normalize and pool libraries following the Illumina guidelines “Best practices for manually nor- malizing library concentrations” and the “Low-Diversity Sequencing” guidelines for your specific sequencer. See Appendix A . of this guide for guidelines on color balancing and multiplexing of Tecan libraries.
Appendix A: Barcode Sequences and Guidelines for Multiplexing
1. Barcode sequences and multiplexing guidelines for adaptors used in the Ultralow Methyl-Seq library prep kit can be found in Tables 12 and 13 .
- All barcode sequences are separated by an edit distance of three. For further details on the barcode design strategy, please refer to Faircloth BC, Glenn TC (2012) Not All Sequence Tags Are Created Equal: Designing and Validating Sequence Identification Tags Robust to Indels. PLoS ONE 7(8): e42543. doi:10.1371/journal.pone.0042543.
Table 12. Barcode sequences for adaptors used in the Ultralow Methyl-Seq 32-plex Adaptor Plate (S02694, Part No. 0366)
Note:
Barcodes in the Ultralow Methyl-Seq 32-plex Adaptor Plate are color balanced in pairs (i.e. A01 + B01, C01 + D01, etc.) and in sets of 8 by column.
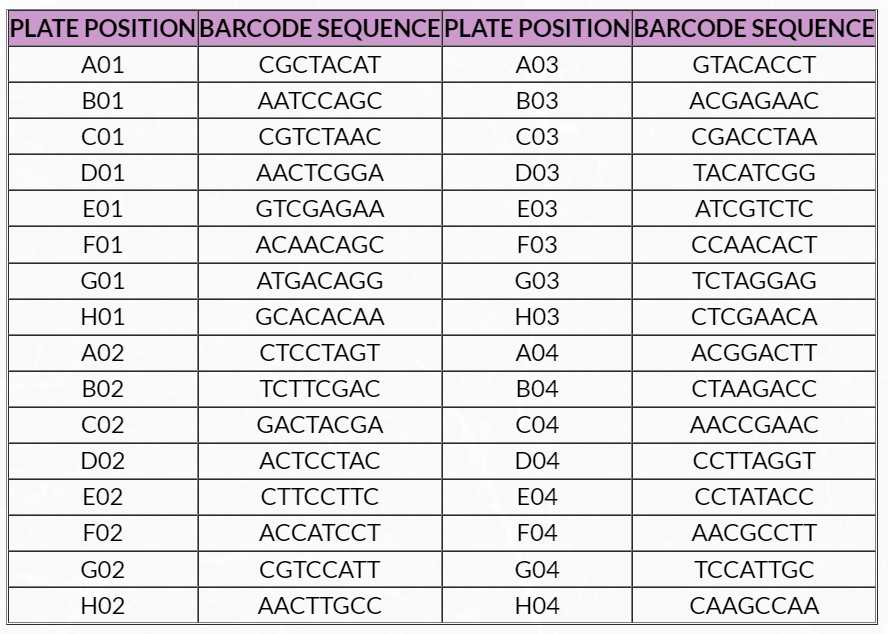
Table 13. Barcode sequences for adaptors used in the Ultralow Methyl-Seq 96-Plex Adaptor Plate (S02169, Part No. 9113) Barcodes in the Ultralow Methyl-Seq 96-plex Adaptor Plate are color balanced in sets of 8 by column. 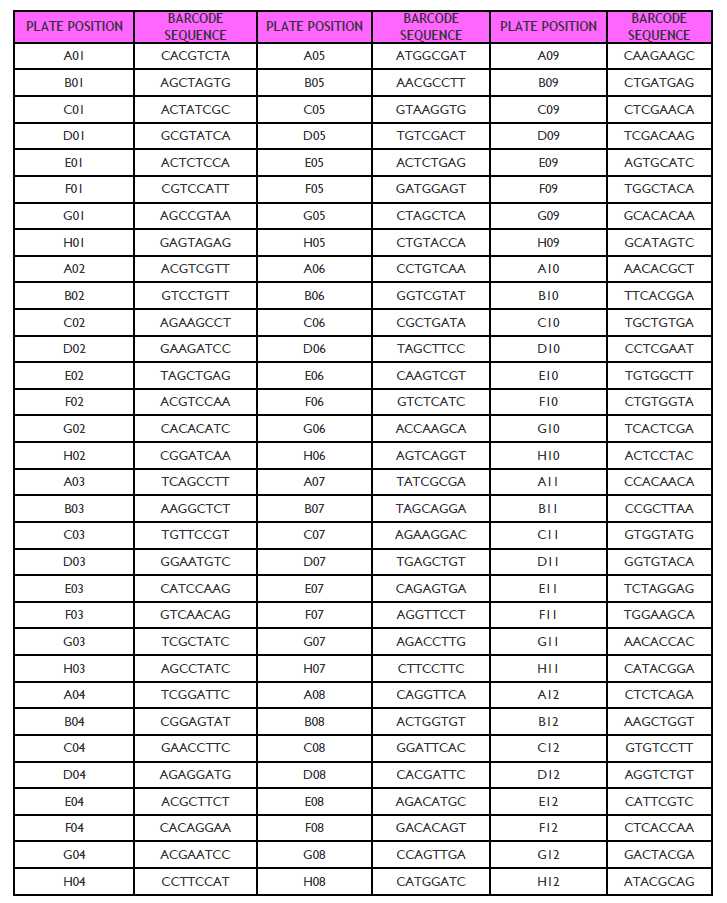
Oxidant Color Changes
1. Upon receipt of the kit, the color of the thawed Oxidant Solution should resemble Solution A in Figure7 .
2. If the Oxidant Solution looks dark yellow or green with considerable amounts of black precipitate (Solution D or E), it is a sign that the reagent has become exposed to contaminants or CO2. If you suspect that this has occurred, please do not use the Oxidant Solution and contact Tecan NGS technical support for advice.
Figure 7. Expected Oxidant Solution Color Changes 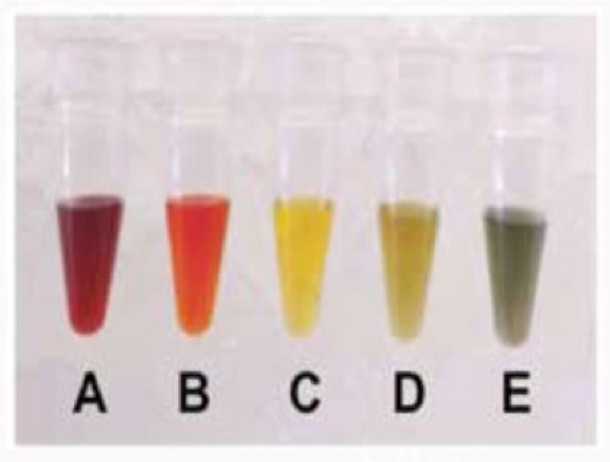
3. Figure description-
A. Oxidant Solution stock concentration supplied in the TrueMethyl oxBS Module.
B. 10-fold dilution of the Oxidant Solution in alkaline solution.
C. Working oxidant concentration (WOC).
D. 5:1 molar excess of WOC:ethanol.
E. 20:1 molar excess of ethanol:WOC.
4. During oxidation (section V. I.), the color of the oxidation reaction should be similar to Solution B or C in Figure 7 . It is normal for a small amount of black precipitate to form during the oxidation reaction. The purpose of the strong centrifugation step following oxidation is to pellet the dark precipitate and enable removal of the clear orange/yellow solution without this contaminant. After the oxidation reaction and subsequent 10 minute centrifugation are complete, the solution should remain orange indicating a successful oxidation.
5. If the post-oxidation color appears as Solution D, it suggests partial decomposition of the oxidant, indi- cating that oxidation of the DNA samples was successful. However, if the post-oxidation color resembles Solution E, significant decomposition of the oxidant has likely occurred, resulting in incomplete con- version of 5-hmC --> U. In this instance, it is recommended to re-purify the sample in order to remove contaminants from the starting DNA sample solution. To avoid contaminants, ensure all guidance regarding oxidation solution sensitivity in section III. D. is followed, including the use of only Ultra Pure Water provided with the TrueMethyl oxBS Module in steps containing the oxidant.
6. As a final note on color changes, samples that have been processed using the Oxidant Solution may also take on a light grey color after addition of the Bisulfite Conversion Solution (section V. J.). This is normal and will not impact downstream processing.
a. Next steps
b. Qubit and BioAnalyzer to do the concentration
c. Kapa concentration using Kapa kit (KK4808)
d. Me-seq for balance
e. Nova-seq 6000 for final sequencing
