Whole-genome CRISPR Screening of stably expressing Cas9 Cancer Organoid Lines
Charlotte Beaver, Tessa Fowler, Jade Smith, Adam Jackson, Agnieszka Andres, Emily Souster, Hazel Rogers, Alexandra Beck, Mathew Garnett
Cancer Organoids
CRISPR/Cas9
gRNA Library titration
gRNA Library transduction
Antibiotic titration
Whole-genome CRISPR Screening
organoid
organoids
Abstract
This protocol is for whole-genome CRISPR screening of stably expressing Cas9 cancer organoid lines in triplicate using the commercially available minimal genome-wide human CRISPR Cas9 library. The protocol uses lentiviral transduction as a method for gRNA delivery. This method can be adapted for other gRNA libraries.
The protocol can be followed assuming the following is known:
-
The number of days required for screening
-
The size of the gRNA library
-
The required coverage of the library
To allow for efficient scale up of the organoid culture for screen, a 5% suspension culture method can be used. This is not essential to be able to perform whole-genome CRISPR screening of stably expressing Cas9 cancer organoid lines, but provides a more scalable, ergonomic and cost efficient culturing method.
Prior to commencing the screen a puromycin antibiotic titration is used to identify the most suitable puromycin concentration for the selection of Cas9 positive cancer organoid lines transduced with gRNA library virus.
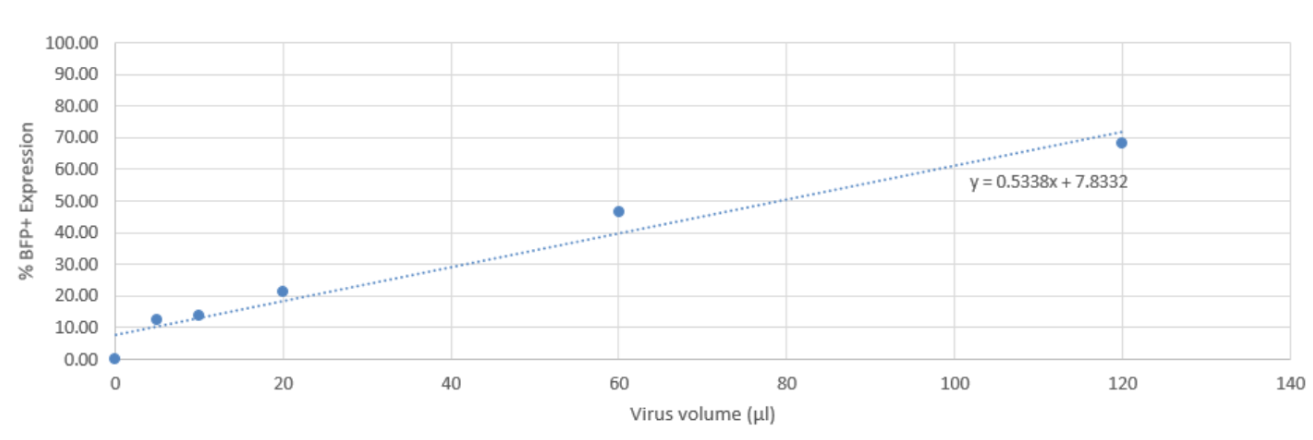
A gRNA library titration is then performed to determine the volume of library virus required to transduce Cas9 cancer cells at 30% transduction efficiency which is calculated using FACS analysis. This is to avoid host cells taking up more than one gRNA copy per cell, therefore an MOI of 30% should be aimed for.
Process Diagram

This protocol uses a 21-23 day screen process.
Before start
Prior to each process, pre-warm culture media to room-temperature.* Where required, prepare an aliquot of 1mg/ml puromycin (working concentration) by diluting a 10mg/ml stock 1:10 with sterile water.
- On Day 4 of the puromycin titration process, bring Cell Titer-Glo 2.0 reagent to room temperature. (It is light-sensitive and so it is advisable to keep the reagent covered at all times to avoid exposure to light when using).
- Prior to gRNA library transduction, thaw an aliquot of (10mg/ml) polybrene
- Where required, thaw the required volume of lentivirus for each process stage.
- When fixing organoids, dilute 37% formaldehyde solution 1:10 with DPBS and store at
4°C
Steps
Puromycin titration
Day 1: Titration plate set up
Pre-warm organoid specific culture media to room temperature.
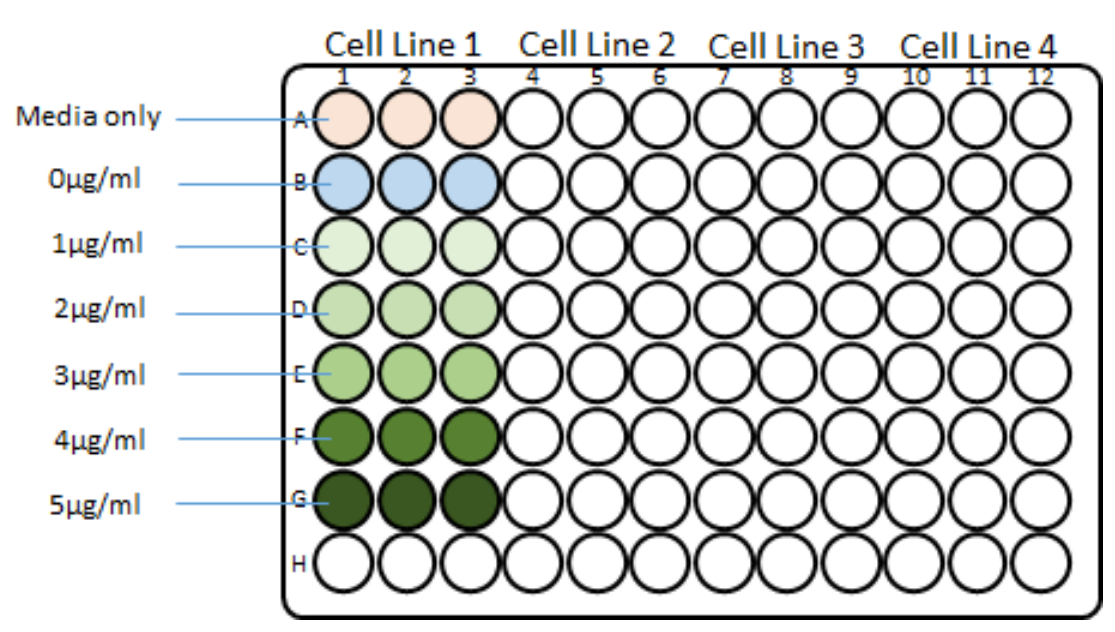
Resuspend 2.4x10⁶ cells in 2.7 ml of organoid specific culture media + 300µL BME2 (this will give a final seeding density of 8x10⁴ cells per well once plated, Rows B-G of Fig 1).
Prepare a control stock solution containing organoid specific culture media with 5% BME2 (Row A of Fig 1).
Set up the titration plate as detailed in Fig 1 below;
Incubate the plate at 37°C 5% CO2 for 0h 10m 0s to allow the BME2 to polymerise.
Using a 1 mg/ml stock, prepare puromycin antibiotic solutions at 2x concentrations in organoid specific culture media in 5 ml tubes as outlined below. (Table 1).

Remove the plate from the incubator and pipette 100µL of the relevant 2x puromycin stock into each well (Rows B-G) to achieve the final require puromycin concentration according to the plate layout in Fig 1.
Incubate the plate for 72h 0m 0s at 37°C 5% CO2.
Plate any remaining cells from step 1.10 into a 5% BME2 suspension culture by seeding cells into a solution of 19mL organoid specific culture media + 1mLBME2 using an ultra-low attachment T75 flask.
Incubate the ultra-low attachment T75 flask at 37°C 5% CO2.
Aspirate media from each well of the organoid culture plate plate and add 2mL TrypLE to each well.
Using a cell-scraper detach BME2 drops containing the cancer organoids from the plate and transfer the organoid suspension to an appropriately sized tube.
Pipette the suspension up and down multiple times to dissociate organoids from the BME2.
Incubate at 37°C 5% CO2.
Check the organoid suspension under the microscope every 15 minutes to assess and
monitor the dissociation of the organoids. Mix the suspension thoroughly prior to each check to help dissociate the organoids.
Centrifuge at 800x g,0h 0m 0s for 0h 2m 0s.
Aspirate the supernatant and resuspend the pellet in an 10 ml of organoid specific culture media.
Perform a cell count to calculate the total number of cells.
Day 4: Assessing cell viability using CellTiter-Glo
Thaw CellTiter-Glo 2.0 reagent and equilibrate to room-temperature prior to use.
Run a CellTiter-Glo 2.0 viability assay following the manufacturer’s instructions.
celltiterglo-2-0-assay-protocol.pdf
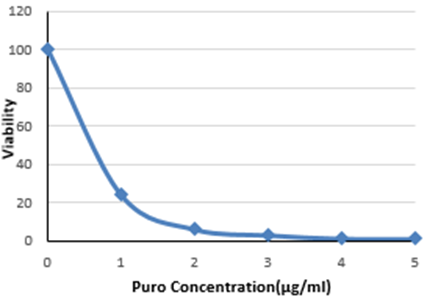
Using the luminescence data plot a kill curve to ascertain the lowest concentration of puromycin which results in approximately 100% cell death after 72 hours. (Fig 2).
Guide RNA library titration of Cas9 expressing organoid lines
Day 1: gRNA library titration set up
Pre-warm organoid specific culture media to room temperature and thaw a 10 mg/ml aliquot of polybrene.
Perform a cell count to calculate the total number of cells.
Prepare a preparation mix using the cell suspension and transduction media to achieve a final concentration of 5.6x10⁶ cells in a total volume of 11.2mLplus 14µL 10 mg/ml polybrene.
Thaw an aliquot of the gRNA library to room temperature. If the gRNA library is not being used
neat, dilute the required volume of the gRNA library in organoid complete culture media.
Add the appropriate volume of gRNA library virus (Table 2) to each bioreactor tube.
Mix well by pipetting and transfer the bioreactor tubes to the incubator at 37°C 5% CO2 for
overnight incubation.
Passage all remaining organoids in 5% BME2 organoid specific suspension culture media.
Prepare transduction media, by adding 12.5µL of 10millimolar (mM) Y-27632 (Rock inhibitor) to 50mL organoid specific culture media (2.5micromolar (µM) final concentration).
Collect the organoid suspension culture (from step 1.18) in a 50 ml tube and centrifuge at 800x g,0h 0m 0s for 0h 2m 0s.
Aspirate the supernatant and resuspend the pellet in 15 ml to 20 ml of TrypLE.
Pipette the suspension up and down multiple times to dissociate organoids from the BME2.
Incubate at 37°C 5% CO2.
Check the organoid suspension under the microscope every 15 minutes to assess and
monitor the dissociation of the organoids. Mix the suspension thoroughly prior to each check to help dissociate the organoids.
Centrifuge at 800x g,0h 0m 0s for 0h 2m 0s.
Aspirate the supernatant and resuspend the pellet in an appropriate volume of transduction media.
Day 2: Plating
Transfer the 6x bioreactor tubes to the centrifuge ensuring the centrifuge bucket lid is
secure.
Centrifuge at 800x g,0h 0m 0s for 0h 2m 0s.
Aspirate the supernatant from the tubes and resuspend each cell pellet in1.9mL of transduction media (prepared on Day 1) and add 100µL of 100% BME2 to make a 5% BME2 solution. Mix well and transfer all 2 ml into each well of a low attachment 6wp. (Fig 3).
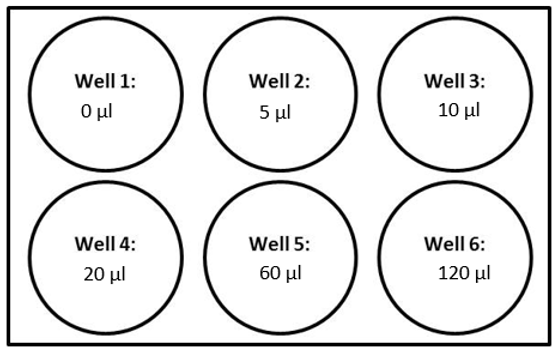
Incubate at 37°C 5% CO2 until Day 6.
Formaldehyde fixation of organoids
Day 6: Fixing and staining organoids for flow cytometry analysis.
Prepare Live/Dead stain solution or antibodies.
Add 1mL PBS to each tube
Centrifuge at 800x g,0h 0m 0s for 0h 2m 0s.
Aspirate supernatant and resuspend in 500µL of 3.7% formaldehyde. Mix well by pipetting to ensure cells are fixed as single cells.
Incubate at 4°C for 0h 10m 0s.
Centrifuge at 800x g,0h 0m 0s for 0h 2m 0s.
Carefully aspirate supernatant (in chemical fume hood).
Resuspend the pellet in 500µL (dependent on pellet size) PBS or alternative FACs buffer, and store at 4°C until ready for analysis by flow cytometry.
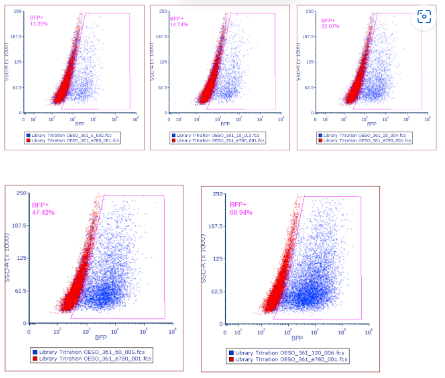
Using collected flow cytometry data create a plot showing side scatter area vs BFP+ expression, gating the positively expressed BFP+ cells.
Using the %BFP expression for each titration point, plot a titration curve to calculate the volume of virus required to obtain 30% BFP expression. (Fig 5).
Collect the suspension culture from each well of the ultra-low attachment 6wp into individual 2 ml tubes.
Centrifuge at 800x g,0h 0m 0s for 0h 2m 0s.
Aspirate the supernatant and resuspend in 1mL of Trypsin-EDTA (0.25%).
Incubate for 0h 15m 0s, until organoids have broken down to single cells.
Once organoids have broken down to single cells stop the reaction by adding 1mL (diluting 1:1) of media containing serum.
Centrifuge at 800x g,0h 0m 0s for 0h 2m 0s.
Aspirate supernatant and resuspend pellets in 200µL Live/Dead dye solution (or specific antibody of choice).
For the Live/Dead solution, incubate at room temperature for 0h 5m 0s. (Follow specific guidelines for your antibodies).
Guide RNA Library transduction and screen of Cas9 expressing organoid lines
Day 1: gRNA library transduction
Pre-warm organoid specific culture media to room temperature. Thaw a 10 mg/ml aliquot of polybrene and a 10millimolar (mM) aliquot of Y-27632 (Rock inhibitor).
Thaw an aliquot of the gRNA library to room temperature. If the gRNA library is not being used
neat, dilute the required volume of the gRNA library in organoid complete culture media.
Carry out each library transduction in triplicate. Prepare each replicate in a 250 ml erlenmeyer flask as per Table 3. Mix gently by pipetting.

Incubate the control bioreactor and replicate flasks prepared in step 6.11 and 6.12 overnight at 37°C5% CO2.
Collect the organoid suspension culture from step 3.16 in a 50 ml tube and centrifuge at 800x g,0h 0m 0s for 0h 2m 0s.
Aspirate the supernatant and resuspend the pellet in 30 ml of TrypLE.
Pipette the suspension up and down multiple times to dissociate organoids from the BME2.
Incubate at 37°C 5% CO2.
Check the organoid suspension under the microscope every 15 minutes to assess and
monitor the dissociation of the organoids. Mix the suspension thoroughly prior to each check to help dissociate the organoids.
Centrifuge at 800x g,0h 0m 0s for 0h 2m 0s
Aspirate the supernatant and resuspend the pellet in an appropriate volume of organoid specific culture media.
Perform a cell count to calculate the total number of cells.
Day 2: Plating
Collect and transfer the replicate solutions into labelled 50 ml tubes and centrifuge alongside the control bioreactor tube at800x g,0h 0m 0s for0h 2m 0s .
Aspirate the supernatant and resuspend each replicate pellet in 19mL organoid specific culture media with 5µL of 10millimolar (mM) Y-27632 (Rock inhibitor) and 1mL of BME2 to make a 5% BME2 solution.
Mix the suspension well by gentle pipetting and transfer each replicate into x1 ultra low-attachment T75 flask and incubate at 37°C 5% CO2.
For the control sample, aspirate the supernatant from the tube and resuspend the cell pellet in 1.9 ml of organoid specific culture media containing 0.5µL 10millimolar (mM) Y-27632 (Rock inhibitor) and add 100µL of BME2 to make a 5% BME2 solution.
Mix well by pipetting and transfer into 1 well of an ultra-low attachment 6wp and incubate at 37°C 5% CO2.
Day 6: Puromycin selection and flow cytometry analysis.
Using a pipette, collect 0.5-1 ml from each replicate and transfer to individual 2 ml tubes. Collect all of the control and transfer to another 2 ml tube, this is done to test infection efficiency using flow cytometry.
Incubate at 37°C 5% CO2.
Fix each organoid sample and analyse by flow cytometry following steps 5.1 to 5.17.
The pass rate for transduction efficiency is 30%, calculated from step 5.19 . However a value between 15-50% is acceptable. This is to try and ensure only 1 copy of the library has been transduced per cell. If a value outside of this range is obtained at this stage the screen should be failed. (Fig 6). If the pass rate has been reached, continue to step 8.4.
For each replicate; collect the suspension culture in a 50 ml tube using a stripette or by pouring the suspension.
Mix the suspension well by pipetting to break down any larger clumps of BME2/aggregates
before centrifugation.
Centrifuge at 800x g,0h 0m 0s for 0h 2m 0s.
Aspirate the supernatant and resuspend the pellet in 10mL organoid specific culture media.
Prepare the ultra-low attachment T75 flask with the appropriate remaining volume of media, BME2 and puromycin (Table 5 and 6) (Puromycin should be added at a concentration previously calculated in Fig 2).


Mix the cell suspension well by pipetting, then transfer cell suspension to the individual ultra-low attachment T75 flasks.
Day 9-20: Maintenance of screens. (The following steps outline a 1:2 passage)
Collect suspension for each replicate in 50 ml tubes.
Centrifuge at 800x g,0h 0m 0s for 0h 2m 0s.
Aspirate the supernatant and resuspend the pellet in an appropriate volume of TrypLE.
Mix well by pipetting and incubate at 37°C 5% CO2 for 0h 10m 0s.
Centrifuge at 800x g,0h 0m 0s for 0h 2m 0s.
Aspirate the supernatant and resuspend each pellet in 20mL organoid specific culture media.
Prepare 2x ultra-low attachment T75 flasks with the appropriate remaining volume of media, BME2 and puromycin per replicate (Table 5 and 6).
Mix the cell suspension well by pipetting, then transfer half the cell suspension to each new ultra-low attachment T75 flask.
Incubate at 37°C 5% CO2.
Day 21-23: Assessment of final selection efficiency
Using a pipette, collect 0.5-1 ml from each replicate and transfer to separate 2 ml tubes.
Fix each organoid sample and analyse by flow cytometry following steps 5.1 to 5.17.
The pass rate for post-puromycin selection is between 60-100%. This ensures efficient selection of organoids that have been transduced with the viral library. If a value below this range is obtained at this stage the screen should be failed. (Fig 7). If the pass rate has been reached continue to step 11.1.
Day 21-23: Pelleting using Cell Recovery Solution
Collect suspension for each replicate in 50 ml tubes.
Aspirate the PBS and store the pellets at -80°C ready for downstream processing.
Centrifuge at 800x g,0h 0m 0s for 0h 2m 0s.
Aspirate the supernatant and resuspend each pellet in an appropriate amount of Cell Recovery Solution (up to 30mLper replicate) to remove BME. Mix well by pipetting.
Incubate on ice for1h 0m 0s.
Once the sample tubes have been on ice for 0h 30m 0s; mix the suspensions well by pipetting and take aliquots from each replicate to perform a cell count.
Following 1h 0m 0s on ice, based on the required number of cells per pellet, transfer the required volume of cells per pellet into 15 ml tubes.
Centrifuge at 800x g,0h 0m 0s for 0h 2m 0s.
Aspirate the supernatant and resuspend in 10 ml of 4°C PBS to wash and remove the Cell Recovery Solution from the pellets.
Centrifuge at 800x g,0h 0m 0s for 0h 2m 0s.

