Synthesis of Silver Nanoparticles
Eric S McLamore, Raphael D. Ayivi, Bukola Adesanmi, Sherine O. Obare
Disclaimer
Any opinions, findings, and conclusions or recommendations expressed in this piece are those of the author(s) and do not necessarily reflect the views of the National Science Foundation.
Abstract
This protocol describes the synthesis of silver nanoparticles for colorimetric sensing of environmental samples and for other biochemical applications. The protocol requires 110 minutes to complete (excluding working solution prep the protocol requires 65 min).
Before start
Be sure to wear appropriate safety PPE throughout (lab coat, gloves, eyewear).* Electronic or physical lab notebook may be used throughout
- See experimental plan guide for tips on planning your work
Steps
SECTION 1) Preparation
Prepare stabilizer solution (0.01 M Sodium citrate; Na3C6H5O7)
- Prepare a glass beaker with 50 ml of deionized water and label
- Weigh 0.1290 g of trisodium citrate on scale
- Dissolve sodium citrate powder in prepared glass beaker with deionized water
- Place magnetic stir bar in beaker and place on a stir plate
- Stir for 15 minutes at 150-200 rpm
- After stirring, inspect the beaker to ensure dissolution of the solute
- The trisodium citrate serves as the stabilizer and is ready to be used for particle synthesis
Prepare precursor solution (0.01 M Silver nitrate; AgNO3)
- Prepare a glass beaker with 50 ml of deionized water and label
- Weigh 0.085 g of silver nitrate on scale
- Dissolve powder in prepared glass beaker with deionized water
- Place magnetic stir bar in beaker and place on a stir plate
- Stir for 15 minutes at 150-200 rpm
- After stirring, inspect the beaker to ensure dissolution of the solute
- The silver nitrate is the precursor and is ready to be used for particle synthesis
Prepare reducing agent solution : (0.01 M Sodium borohydride (NaBH4)
-
Prepare a sealable container with 50 ml of 0.1N NaOH and label. Place container in the chemical hood
NoteNote : If preferred, smaller volumes of sodium borohydride (1ml is sufficient for this protocol) may be prepared fresh prepared and kept in ice-cold environment rather than preparation of a large 50ml solution as described. -
Cool the NaOH solution in an ice bath under the chemical hood (cool to approximately 0 to 5°C)
-
Working under a chemical hood, weigh 0.020 g of sodium borohydride on scale
-
Immediately return sodium borohydride powder to proper storage system (away from moisture or water, stored under inert gas in a flammable containment unit)
-
Dissolve sodium borohydride powder in cooled 0.1N NaOH and label
-
Seal the container with the sodium borohydride
-
Place magnetic stir bar in beaker and place on a stir plate
-
Stir for 15 minutes at 150-200 rpm
-
After stirring, inspect the beaker to ensure dissolution of the solute
-
The sodium borohydride serves as the reducing agent and is ready to be used for particle synthesis
-
Store the sealed container at 4°C until used (best practice is to place in a secondary spill container, particularly if sealed container is glass)
NoteSafety note : Sodium borohydride is a strong reducing agent. Solutions should always be kept in ice-cold environment. 
GHS Classification for sodium borohydride :Chemicals which, in contact with water, emit flammable gases (Category 1; H260)Acute toxicity, Oral (Category 3; H301) Skin corrosion (Category 1B; H314)Serious eye damage (Category; H318)Reproductive toxicity (Category 1B; H360)
SECTION 2) Particle synthesis
Combine stabilizer and precursor solutions
- In an Erlenmeyer flask, add 18.5ml of deionized water
- Add a magnetic stir bar to the flask
- Pipette 0.5 ml of 0.01M sodium citrate to the flask
- Pipette 0.5 ml of 0.01M silver nitrate to the flask
- The resulting mixture in the flask should be gently stirred for 3 minutes at a temperature of 10°C. The stir rate should be the lowest stirring rate that maintains constant agitation
Add reducing agent solution to mixture
- Slowly pipette 0.5 ml of 0.01M NaBH4 to the solution to the flask containing the reaction mixture with a stir rate no higher than 50 rpm.
- Slowly pipette 0.5 ml of 0.01M NaBH4 to the solution to the flask containing the reaction mixture with a stir rate no higher than 50 rpm.
* Seal Erlenmeyer flask after 0.5 ml has been transferredNote
Critical step : Reducing agent should be slowly added to ensure gentle nucleation and proper growth of nanoparticles. - Under a chemical hood, carefully transfer solution to container with lid and label as AgNP solution
- Wrap container in aluminum foil
- Transfer AgNP solution from flask to container and seal
SECTION 3) Particle analysis (post reaction)
Qualitative analysis (color)
- The first step of qualitative analysis is visual inspection of the solution color
- The color of the reaction mixture (gold or yellow) confirms the formation of AgNP and completion of the synthesis reaction.
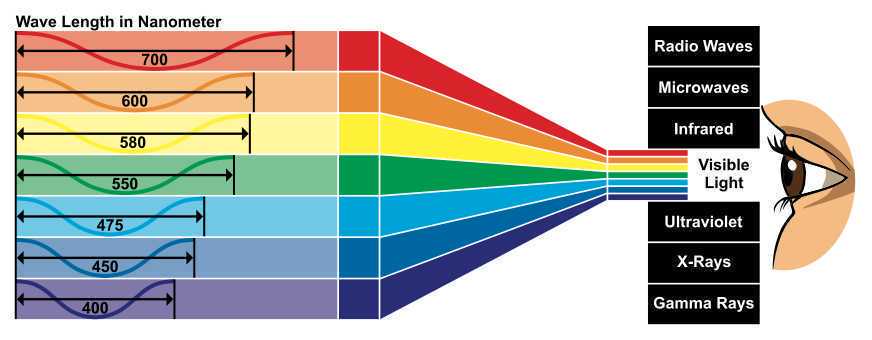
- Analysis of polychromatic visible (VIS) color is an important quality control mechanism in particle synthesis, and may be carried out manually or using instrumentation ( Fig 1 )

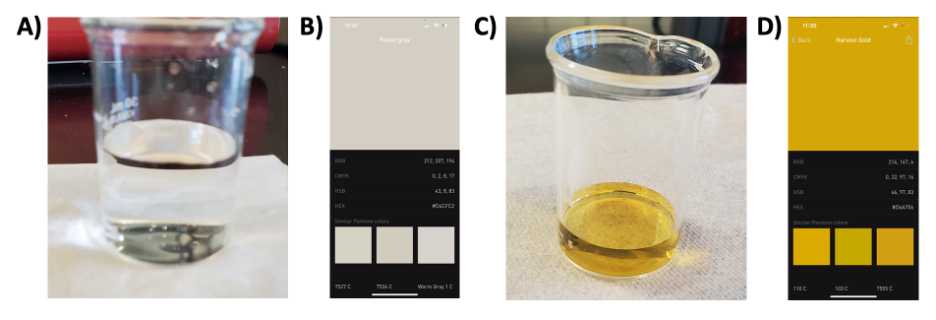
- A representative example of color analysis is shown in Fig 2
- Photographs before ( Fig 2A ) and after ( Fig 2C ) reaction are shown. Color analysis via a mobile phone app are also shown for before ( Fig 2B ) and after ( Fig 2D ) the reaction.
Note
Note : If preferred, a cell phone app may be used to detect the color of the sample.See Fig 2 . For example, Color Name AR is a useful tool that is available for both iPhone and Android (as well as tablets) (Note: If preferred, a cell phone app may be used to detect the color of the sample.See Fig 2. For example, Color Name AR is a useful tool that is available for both iPhone and Android (as well as tablets) (https://apps.apple.com/us/app/color-name-ar/id906955675)) 
Figure 2. Qualitative analysis of solution color before and after particle synthesis. A) Photograph depicts colorless reactant solution before and at onset of reaction, and B) Color analysis; sample identified as Pasel grey; RGB 212, 207, 194). C) Photograph of AgNP particle solution after reaction, and D) Color analysis; Sample identified as Harvest gold; RGB 214, 167, 006). Color analysis was conducted using Color Name AR on iPhone 12.
Quantitative analysis (UV-VIS)
- If required, turn on the computer for the Agilent UV-VIS Cary-60 instrument and then turn on the instrument and wait until the LED stops blinking.
- Open the Agilent software and wait until the instrument fully initializes.
- To select experimental parameters, select Setup in the Agilent software.
- Select wavelength range if desired (default is 190-1100 nm)
- Click the baseline tab, select “Baseline correction” and select OK.
- Click on “Zero” for lamp intensity correction. When performing this procedure, the sample compartment has to be empty.
- Click on “Baseline”.
- Fill an empty cuvette with DI water (blank) and another cuvette with the silver nanoparticle (AgNP) sample
- Wipe the blank cuvette with a Kimwipe and inspect the surface for any debris
- Place the blank cuvette in the sample compartment.
- Close the lid of the chamber
- Click OK to scan the baseline
- Remove the blank
- Wipe the sample cuvette with a Kimwipe
- Insert the sample cuvette into the holder
- Click Start to run the scan
- When finished with measurement, select Finish
- If processing multiple samples with the same parameters, select OK after each run.
- If processing a large batch of samples (>20), scan a blank cuvette every 7 samples as a quality control (QC) procedure
- After the scan is complete, save the file under a unique name (see data management section)
- After finishing the experiments, close the software.
- Leave both the instrument and the computer on.
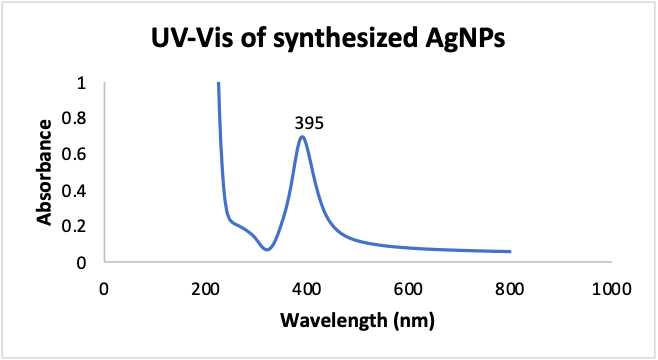
- Representative UV-VIS absorbance for the AgNP solution using an excitation wavelength of 190nm is shown in Fig 3
- A clear peak at 395nm is observed for the AgNP solution prepared using this protocol (no custom emission filters or signal processing was performed).

Quantitative analysis (fluorescence)
- If required, turn on the Horiba Fluoro-Max 4 Fluorometerinstrument and wait for the software and hardware to initialize
- Open the Horiba software
* Choose the “Experiment Menu” ButtonNote
Note : The instrument auto-calibrates on startup (initializes monochromator drives, assigns calibration wavelengths). However, it is a good practice to periodically check the instrument calibration. This check verifies the wavelength calibration of excitation monochromator. To perform check, close the lid and select “Experiment Menu” Button, Choose “Spectra”, then “Excitation”, and click “Run”. The spectra should show a peak at 467 nm if working properly. If not working properly, see user manual to manually adjust (section 3-6; link to user’s manual in Equipment section”). A similar process may be periodically conducted for checking the emission photomultiplier tube calibration. - Choose “Spectra”,
- then “Emission”
- Click the Experiment File field, and enter a new file name or select a previously saved file (see data management section)
- Verify that experimental parameters are correct
- Prepare a blank sample in a cuvette and the AgNP solution
* Wipe the blank cuvette with a Kimwipe and inspect the surface for any debrisNote
Note : Blank samples should be research-quality, triple-distilled or de-ionized water. Impure samples of water will cause elevated background levels as well as distorted spectra with (perhaps) some unwelcome peaks. - Place the blank cuvette in the sample compartment.
- Close the lid of the chamber
- Click “Run” to scan the baseline
- Enter a name for the project, or browse for an existing project, then click OK
- Open the lid and remove the blank sample from the compartment
- Wipe the sample cuvette with a Kimwipe
- Insert the sample cuvette into the compartment
- Close the lid and then click “Run”
- When finished with measurement, select Finish
- If processing multiple samples with the same parameters, select Ok after each run.
- If processing a large batch of samples (>20), scan a blank cuvette every 7 samples as a quality control (QC) procedure
- After the scan is complete, save the file under a unique name (see data management section)
- After finishing the experiments, close the software.
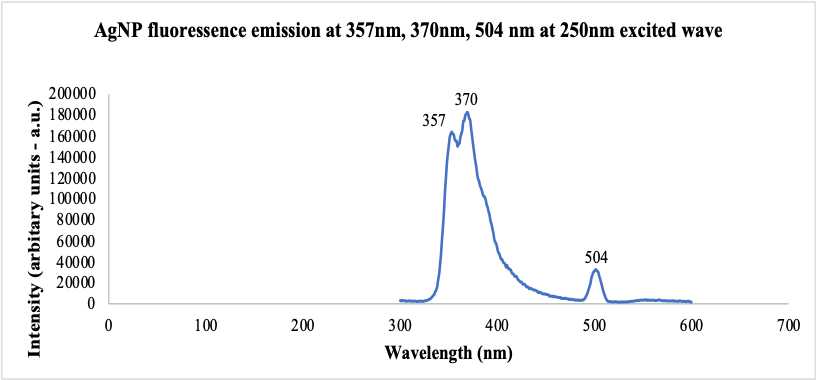
- A representative fluorescence emission for the AgNP solution using an excitation wavelength of 250nm is shown in Fig 4 .
- No custom emission filters or signal processing was performed
- A bimodal peak contains distinct peaks at 357nm and 370 nm, and an isolated smaller peak at 504nm are common.

SECTION 5) Cleanup
Clean up space and dispose of waste
-
Turn off magnetic stir plate and all equipment used
-
Wrap storage vials in aluminum foil
-
Store solution(s) in the dark at 4°C.
-
Dispose of used chemicals according to the lab safety plan
NoteCritical step : There is a dedicated chemical disposal container for waste materials from this protocol in the satellite accumulation area. -
Wash all glassware with mild detergent and warm water.
-
Clean up the chemical hood
-
Rinse used pipette tips or other materials used for handing reducing agents (collecting rinse in waste jar)
-
Dispose of rinsed tips per solid waste handling procedures (without this rinse step, used materials contain residue)
SECTION 6) Data management
File naming : For saving all files from spectrometer, use the following file structure or similar structure as appropriate for each laboratory:
AgNP_(instrument name)_(date of experiment)_(iniatials of researchers).txt
- File storage : Store all spec data in the Desktop folder connected to the instrument using the naming procedure above.
- Backup files : At least once per year, ensure that the folder is backed up on the lab external hard drive.

