Subrenal capsule (SRC) implantation of tumor tissue
Shubhangi Agarwal, donna.peehl, Renuka Sriram
Abstract
This protocol describes the steps required for the successful implantation of tumor tissues under the subrenal capsule. The subrenal capsule is an optimum site for the propagation of tumor tissue as it provides an environment rich with blood vessels and growth factors.
Steps
Preparation before surgery
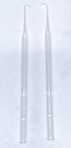
Fire bent glass pipette: Prepare the bent pipette by exposing the pipette tip to fire and slightly bending it into an inverted C shape with the help of forceps. The image below shows an example of bent pipettes.
Note: Make sure there are no sharp edges on the pipette tip as that will cause a tear in the renal capsule.
Preparation of surgical instruments and supplies: All of the instruments and supplies should be sterilized.
Surgery record sheets
| A | B | C | D |
|---|---|---|---|
| PI | |||
| Personnel | |||
| Date | |||
| Procedure name | Sub-renal implantation | ||
| Protocol # | |||
| Type | Survival Surgery | ||
| Species | Mouse | ||
| Experimental agents administered | Tumor tissue | ||
| Anesthetics | Isoflurane | Dosage: (1-5 % or mg/kg; mL) | Route: Inhalation |
| Analgesics | (1) Lidocaine | Dosage | Route: |
| (2)Buprenorphine | Dosage | Route: | |
| A | B | C |
|---|---|---|
| Mouse ID | ||
| Mouse weight | ||
| Anesthesia start time | ||
| Analgesics | (1) Lidocaine | Time administered: |
| (2) Buprenorphine | Time administered: | |
| Tumor tissue implantation time | ||
| Anesthesia end time |
Preparation of the PDX tissues for implantation from fresh tissue
Prepare an ice bucket with ice and a petri dish with 10mLHBS.
Euthanize the tumor-bearing mouse and extract the tumor.
Blot the tumor on a Kim-wipe to get rid of excess blood.
Weigh the tumor and note the weight.
Using a dissecting scissor, cut the tumor tissue into small sections approximately 1 mm in diameter.
Place the tissue sections in a petri dish containing 10mL HBS.
Preparation of the PDX tissues for implantation from frozen biobank
A cryovial containing frozen tumor sections/slices should be placed on ice to thaw before the surgery.
Transfer the contents of the cryovial into a petri dish containing fresh HBS.
Preparation of surgical space
Station 1: Fur removal

Place a disposable sterile pad on a heating pad.
Aseptically sterilize the surgical area by spraying with 70% ethanol.
Station 2: Surgery
 sterilized surgery instruments, 2) sterile dissolvable sutures, 3) lidocaine (0.5%) and 4) buprenorphine, 5) 70% ethanol prep pad, 6) povidone-Iodine prep pads, 7) sterile cotton tipped applicators, 8) disposable sterile pad, 9) eye ointment, 10) 1 cc syringe, 11) sterile PBS, 12) ice box with ice, 13) tumor tissue in a sterile petri dish containing sterile PBS, 14) weighing scale, 15) kimwipes, 16) bead sterilizer and 17) nose cone and bain tubing.")
Place a disposable sterile pad on a heating pad.
Aseptically sterilize the surgical area by spraying with 70% ethanol.
Place all the autoclaved surgical instruments within the sterilized surgical area.
Heat: Animal should be kept on a heating pad or circulating water blanket/pad during the entire procedure and, after the surgery is over for approx. 2-4 hrs.
Anesthetization and fur removal of mouse
Weigh the animal and note the weight.
Place the animal in a knock-down box circulating with a gas mixture of Isoflurane @ 1.4-2.0% and O2 @ 1-1.2 lt/min inhalant, maintained via a bain-closed system. Note the start time of anesthesia.
Move the animal to the station 1 nose cone and apply ophthalmic ointment on the animal’s eyes to prevent them from drying out during the procedure.
Determine the anesthetic depth by pinching the animal’s foot for a reflex response.
Depilate the left dorsal side of the mouse starting from the rib cage till about 4 cm below.
Surgical procedure
Move the mouse to the station 2 nose cone and place it on its abdomen.
Disinfect the surgical area on the mouse with betadine scrub, rubbing in a circular motion. Apply 70% alcohol pads to the surgical area to remove the betadine and loose hair. Repeat this process 2 or more times.
Make a vertical incision using the straight scissors through the skin along the animal’s top curve of the spine (i.e., ~ 0.5 cm below the rib cage) towards the left side of the spine
Turn the animal so that is laying on its right side.
Place right thumb on the animal’s abdomen, applying very light pressure, and with the left hand pull the skin down, so that the kidney is in view. Once the kidney is located, make a 0.5 cm incision horizontally on the animal’s left side with surgical scissors.
With the aid of the thumbs apply a little pressure on the abdomen to expose the kidney and pop it out of the body cavity. Place the kidney such that it is held by the abdominal wall.
If the incision is made too large, then the kidney will not stay popped out. This incision is critical to the success of this procedure. Do not try to pull on the kidney with forceps as it will cause damage to the kidney and renal vessels

Prevent the kidney from drying out by applying sterile saline using the 1 cc syringe.
Make a small tear with dissecting scissors in the caudal-lateral aspect of the kidney capsule. With your left hand, hold and gently pull up the capsule layer using forceps. With the right hand, place the insert the bent glass pipette under the kidney capsule layer and glide it from side to side in order to make space for the tissue slice. (Note: Be careful not to puncture the kidney or tear the capsule).
Use tweezers to place the tumor tissue under the kidney capsule. Advance the tissue slice towards the cranial pole, so that it stays in place and does not leak out once the kidney is placed back in the body cavity.

Return the kidney to the abdominal cavity by lifting the surrounding muscle layer with forceps and letting the kidney slide back into the body cavity.
Once the kidney is in the body cavity, suture the muscle layer, using absorbable sutures. Pull the skin layer upward and clamp the skin together using a sterile wound clipper, making sure that all of the skin is closed together, and no gaps are left.
Upon completion of the surgery administer buprenorphine and lidocaine subcutaneously in the right flank. Note the time of administration
Sterilize the surgical instruments using the bead sterilizer by placing them inside for ~ 10 secs.
Start prepping the next mouse for surgery.
Post-Op care and monitoring
Place the animal in a clean cage on a warm heating pad to aid in regaining its body temperature.
Observe the animal until it has regained full consciousness and is walking around in the cage.
Remove the clips using the clip remover one week from the surgery
Observe the animal on a daily basis until sacrificed
