Running the Titan_Illumina_PE Workflow on Terra.bio
Jill V Hagey, Kevin Libuit, Technical Outreach and Assistance for States Team, Frank J Ambrosio
Illumina
Sequencing
MiSeq
iSeq
MiniSeq
NextSeq
NovaSeq
Paired-End
Next Generation Sequencing
NGS
SARS-CoV-2
Covid
Pangolin
Short-Read
Coronavirus
Genomics
Genetics
Virology
Molecular Biology
Disclaimer
The opinions expressed here do not necessarily reflect the opinions of the Centers for Disease Control and Prevention or the institutions with which the authors are affiliated. The protocol content here is under development and is for informational purposes only and does not constitute legal, medical, clinical, or safety advice, or otherwise; content added to protocols.io is not peer reviewed and may not have undergone a formal approval of any kind. Information presented in this protocol should not substitute for independent professional judgment, advice, diagnosis, or treatment. Any action you take or refrain from taking using or relying upon the information presented here is strictly at your own risk. You agree that neither the Company nor any of the authors, contributors, administrators, or anyone else associated with protocols.io, can be held responsible for your use of the information contained in or linked to this protocol or any of our Sites/Apps and Services.
Abstract
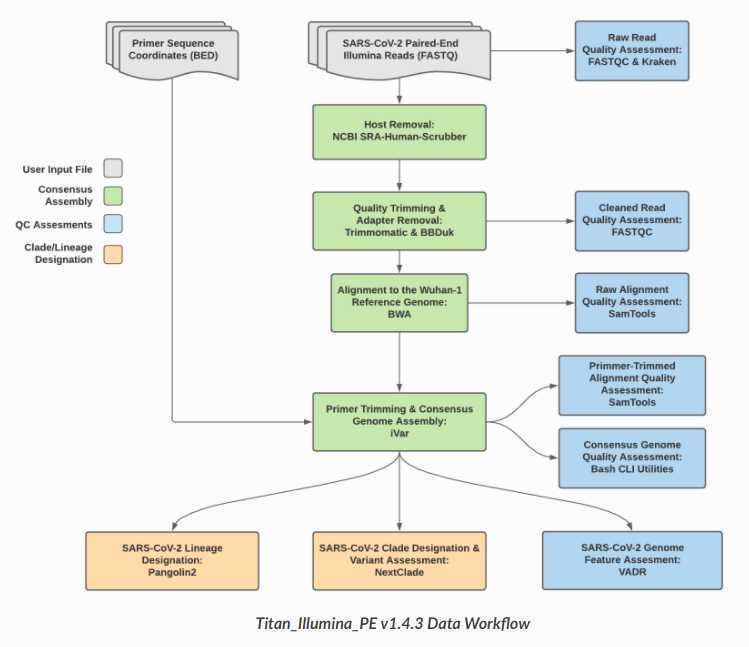
The Titan_Illumina_PE workflow is a part of the Public Health Viral Genomics Titan series for SARS-CoV-2 genomic characterization. Titan_Illumina_PE was written specifically to process Illumina paired-end (PE) read data. Input reads are assumed to be the product of sequencing tiled PCR-amplicons designed for the SARS-CoV-2 genome. The most common read data analyzed by the Titan_Illumina_PE workflow are generated with the ARTIC V3 protocol. However, alternative primer schemes such as the QIAseq Primer Panel are also suitable for this workflow. The primer sequence coordinates of the PCR scheme utilized must be provided in BED format along with the raw Illumina read data. Upon initiating a Titan_Illumina_PE job, the input primer scheme coordinates and raw paired-end Illumina read data provided for each sample will be processed to perform consensus genome assembly, infer the quality of both raw read data and the generated consensus genome, and assign lineage or clade designations as outlined in the Titan_Illumina_PE data workflow diagram below.
Additional technical documentation for the Titan_Illumina_PE workflow is available at:
Required input data for Titan Illumina PE:
Illumina paired-end read data (forward and reverse FASTQ files per sample)
Primer sequence coordinates of the PCR scheme utilized in BED file format
Video Instruction:
Theiagen Genomics: Titan Genomic Characterization
https://www.youtube.com/watch?v=zP9I1r6TNrw
Theiagen Genomics: Titan Outputs QC
https://www.youtube.com/watch?v=Amb-8M71umw
For technical assistance please contact us at: TOAST@cdc.gov
Attachments
Steps
Running the Titan Illumina PE Workflow
To run the Titan workflow, click on the 'Workflows' panel in the newly created workspace. It should bring you to the following page. if you do not see the Titan_Illumina_PE workflow in your workspace, please see our video on importing a workflow to Terra.bio: https://youtu.be/ZRpQylIDMzo).

Click on the 'Titan_Illumina_PE' tile and it will take you to a new page (if you do not see the Titan_ClearLabs workflow in your workspace, please see our video on importing a workflow to Terra.bio: https://youtu.be/ZRpQylIDMzo). Double check that you are using the latest version of the workflow. Alternately, you may specify another version, but should only pick a stable version (with numbers) NOT a 'main' or 'dev' version.

Click the 'Run workflow(s) with inputs defined by data table' option button and then in the 'Select root entity type' pull-down menu, select 'sample' or whichever entity type you specified in the sample table. The first four rows in the 'Inputs' tab should each have a yellow caution icon. These four rows represent variables that have to be provided by the user. This is the information that we populated the sample data table with in the previous steps.
Make sure "Use call caching" is checked and then select the root entity type for the data you wish to analyze (here it's sample).
NOTE: Call caching allows Terra to identify and skip jobs that have been run previously; this option is by default enabled to avoid unnecessary compute costs. More information on Terra call caching, including examples of when you may want to disable this feature, is available through the Terra Support Documentation.

For the first row, click on the 'Attribute' text box and then click 'workspace.Artic_V3_primers' (or whatever you named the primer bed file). In the second row we input our primer_bed file of choice, which should be saved as a workspace element in Terra (if you do not have this saved as a workspace element please see our video on uploading a workspace element: https://youtu.be/Qrbz7uRtwmQ). For the next row, the 'read1_raw' variable, click on the 'Attribute' text box and then click 'this.rea1'. In the third row, the 'read2_raw' variable, click on the 'Attribute' text box and then click 'this.read2'. Finally, in the third row, the 'samplename' variable, click on the 'Attribute' text box and then click option that displays your root entity in the notiation: 'this.root_entity'. Click the 'Save' button on the top right-hand side of the page. The yellow caution icons should disappear.

Next, click the "output" tab and select "use defaults" to autofill in the names of the output files according to the sample names. If you forget to select this option, you will have trouble accessing the results! Save changes by clicking the 'Save' button.
<img src="https://static.yanyin.tech/literature_test/protocol_io_true/protocols.io.bzykp7uw/frrkbi9m78.jpg" alt="Setting output names by clicking "use defaults"" loading="lazy" title="Setting output names by clicking "use defaults""/>
You are now ready to run the Titan_Illumina_PE workflow! Click the blue 'select data' button and select the samples you want to run or click the check box at the very top left to select all of them to be run.

Click on the 'Run Analysis' button to the right of the 'Outputs' tab. A popup window should appear titled 'Confirm launch'. If the 'Run Analysis' button is greyed out, you need to save your recent changes by clicking the 'Save' button.

Click the 'Launch' button to access the 'Job History' panel where each sample will be queued for the Titan_Illumina_PE analysis.

The status will change from 'Queued' to 'Submitted' to 'Running.' After the workflow finishes, the status column will indicate either 'successful' or 'failed.'
If you run into any trouble at all please feel free to check out our video on Running the Titan_Illumina_PE Workflow, or reach out to our support email: support@terrapublichealth.zendesk.com
