RNA-Stable Isotope Probing
Roey Angel, Eva Petrova, Ana Lara
Abstract
The following protocol describes how to perform an RNA-Stable Isotope Probing experiment. The scope of this protocol only covers the parts involving separating labelled RNA from unlabelled RNA using ultracentrifugation in a caesium trifluoroacetate density gradient and downstream quantification to evaluate whether the labelling and separation of the RNA were successful. Total RNA should be extracted from an environmental sample or an enrichment culture that was incubated with an isotopically-labelled substrate. Labelling can be of the carbon, oxygen or nitrogen in the RNA (or any combination of the 3). For environmental samples, we recommend extracting RNA using our protocol Total Nucleic Acids Extraction from Soil and purifying it using the Purification of RNA from Crude NA Extract protocol. This protocol is based on the following papers: Whiteley et al. (2007); Dumont et al. (2011); Angel and Conrad (2013). For a comprehensive discussion on how to design a SIP experiment and how to analyse the resulting data, we recommend referring to the recent book on the subject: Stable Isotope Probing: Methods and Protocols, especially chapters: 1-3 and 9-18.
Before start
Prepare all buffers and solutions in advance (see Step 1).1. Wipe all surfaces and apparatus with an RNase eliminating solution (e.g. RNAse Away).
- Equilibrate CSTFA to room temperature (about 30-60 min).
- Prepare one 50 ml tube (for up to 8 gradients; depending on the size of the centrifugation tubes) and one ultracentrifugation tube for each gradient.
Steps
Solutions for SIP
Prepare the following solutions:
Gradient buffer (0.1 M Tris-HCl, 0.1 M KCl, 1 mM EDTA) 8.0 :
15.76g
7.455g
0.37224g
Dissolve the salts in RNase-free water and fill up to1000ml. Filter sterilise (0.1-0.2 μm). Autoclave.
Store atRoom temperature
Molecular-grade ethanol solution (75% (v/v)):
75ml
25ml
Store at -20°C
If preparing CsTFA solution from powder:
- Pour
17.2mldirectly into a50gvial. - Mix by hand at
Room temperatureand then allow for the residues to fully dissolve during several hours or overnight. - If particle impurities are visible, filter the solution into a fresh bottle using a 0.1 or 0.2 μm filter.
- Store at
4°C.
Gradient preparation
Calibrate the refractometer with RNAse-free water at20°C .
30µL
Following calibration, the device should read 1.3330 ± 0.0002 nD-TC
Equipment
| Value | Label |
|---|---|
| AR200 Automatic Digital Refractometer | NAME |
| Digital Refractometer | TYPE |
| Reichert | BRAND |
| 13950000 | SKU |
For every two gradients, mix the following in a 50 ml tube (assuming 6 ml Ultracrimp, PA centrifugation tubes):
9.696ml
2.166ml
65Room temperature
Equipment
| Value | Label |
|---|---|
| Thermo Scientific TUBE PA ULTRACRIMP 6ML PK/50 | NAME |
| Ultracentrifugation tubes | TYPE |
| Thermo Fisher Scientific | BRAND |
| 03945 | SKU |
Mix by inverting several times, pipette30µL and measure the density in a refractometer. Make sure the density is: 1.3702 ± 0.0002 nD-TC. Otherwise, add either CsTFA or GB to correct.
Add3.56% (v/v) HiDi (422µL if the volume was not corrected).
Measure the density. Make sure the density is: 1.3725 ± 0.0002 nD-TC.
Transfer ca.5.8ml of the mixture to each centrifugation tube using a micropipette. Make sure the volume reaches only the bottom of the neck.
Add the RNA sample. For downstream PCR purposes, ca. 200-350 ng is more than enough. Preferably, use a highly concentrated RNA solution to avoid diluting the gradient.
4µL
150ng/µl
Weigh each tube together with the caps and make sure every opposite pair of tubes weighs no more than 0.1 g apart from each other. Otherwise, adjust the weight by adding gradient mix solution.
Close the caps (using an appropriate crimper or by hand, depending on the type of tubes).
Equipment
| Value | Label |
|---|---|
| Thermo Scientific TOOL ULTRACRIMP EA | NAME |
| Tube crimper | TYPE |
| Thermo Fisher Scientific | BRAND |
| 03920 | SKU |
Place the tubes in the rotor, screw only the caps for the positions that contain tubes using a torque wrench up to about 120 in.-lb.
Ultracentrifugation
Centrifuge
130000x g,20°C
Maximum acceleration and deceleration.
Fractionation
Prepare a rack filled with 2.0 ml low-binding collection tubes (one per fraction).
Equipment
| Value | Label |
|---|---|
| DNA LoBind Tubes | NAME |
| Microcentrifuge tubes | TYPE |
| Eppendorf | BRAND |
| 0030108051 | SKU |
Fill a 20 ml syringe with RNase-free water. Remove any air bubbles.
Attach a female Luer fitting to one end of a precision pump tube (about 0.5 m long) and a male Luer fitting to the other end. Attach the syringe to the precision pump tube on the female Luer fitting side. Attach a sterile 23G needle to the other end of the tube on the male Luer fitting side. Lightly press the syringe piston to get water into the tube and mount the syringe on an automatic syringe pump.
Equipment
| Value | Label |
|---|---|
| NE-300 Just Infusion™ Syringe Pump | NAME |
| Automatic syringe pump | TYPE |
| New Era Pump Systems, Inc. | BRAND |
| NE-300 | SKU |
Equipment
| Value | Label |
|---|---|
| Masterflex L/S® Precision Pump Tubing, Peroxide-Cured Silicone, L/S 14; 25 ft | NAME |
| Silicone tube | TYPE |
| Masterflex | BRAND |
| 96400-14 | SKU |
Equipment
| Value | Label |
|---|---|
| Masterflex Fitting, Polycarbonate, Straight, Female Luer to Low-Profile Semi-Rigid Barb Hose Adapter, 1/16" ID; 25/PK | NAME |
| Luer fitting | TYPE |
| Masterflex | BRAND |
| 45501-16 | SKU |
Equipment
| Value | Label |
|---|---|
| Masterflex Fitting, Polypropylene, Straight, Male Luer Lock to Hose Barb Adapter, 1/16" ID; 25/PK | NAME |
| Luer fitting | TYPE |
| Masterflex | BRAND |
| 30800-16 | SKU |
Equipment
| Value | Label |
|---|---|
| Disposable needles Sterican® long bevel facet, 30 mm, 0.60 mm, Blue | NAME |
| Disposable needles | TYPE |
| Sterican | BRAND |
| X129.1 | SKU |
Set the Rate to 1 ml min-1 -1 and collect fractions in0h 0m 30s steps. If using a 6 ml tube, this will yield 12 fractions. Volume should be set to "off" and diameter to "22 mm".
Switch the pump on to test the system and also to get rid of air trapped inside the needle and any air bubbles in the tube. Switch the pump back off.
Stop the ultracentrifuge. Remove the rotor and open the screw-caps. Take the first tube out of the rotor and carefully mount it on a stand with a clamp holder just above the collection tubes.
Pierce the ultracentrifugation tube, just below the neck, using the needle attached to to the precision pump tube.
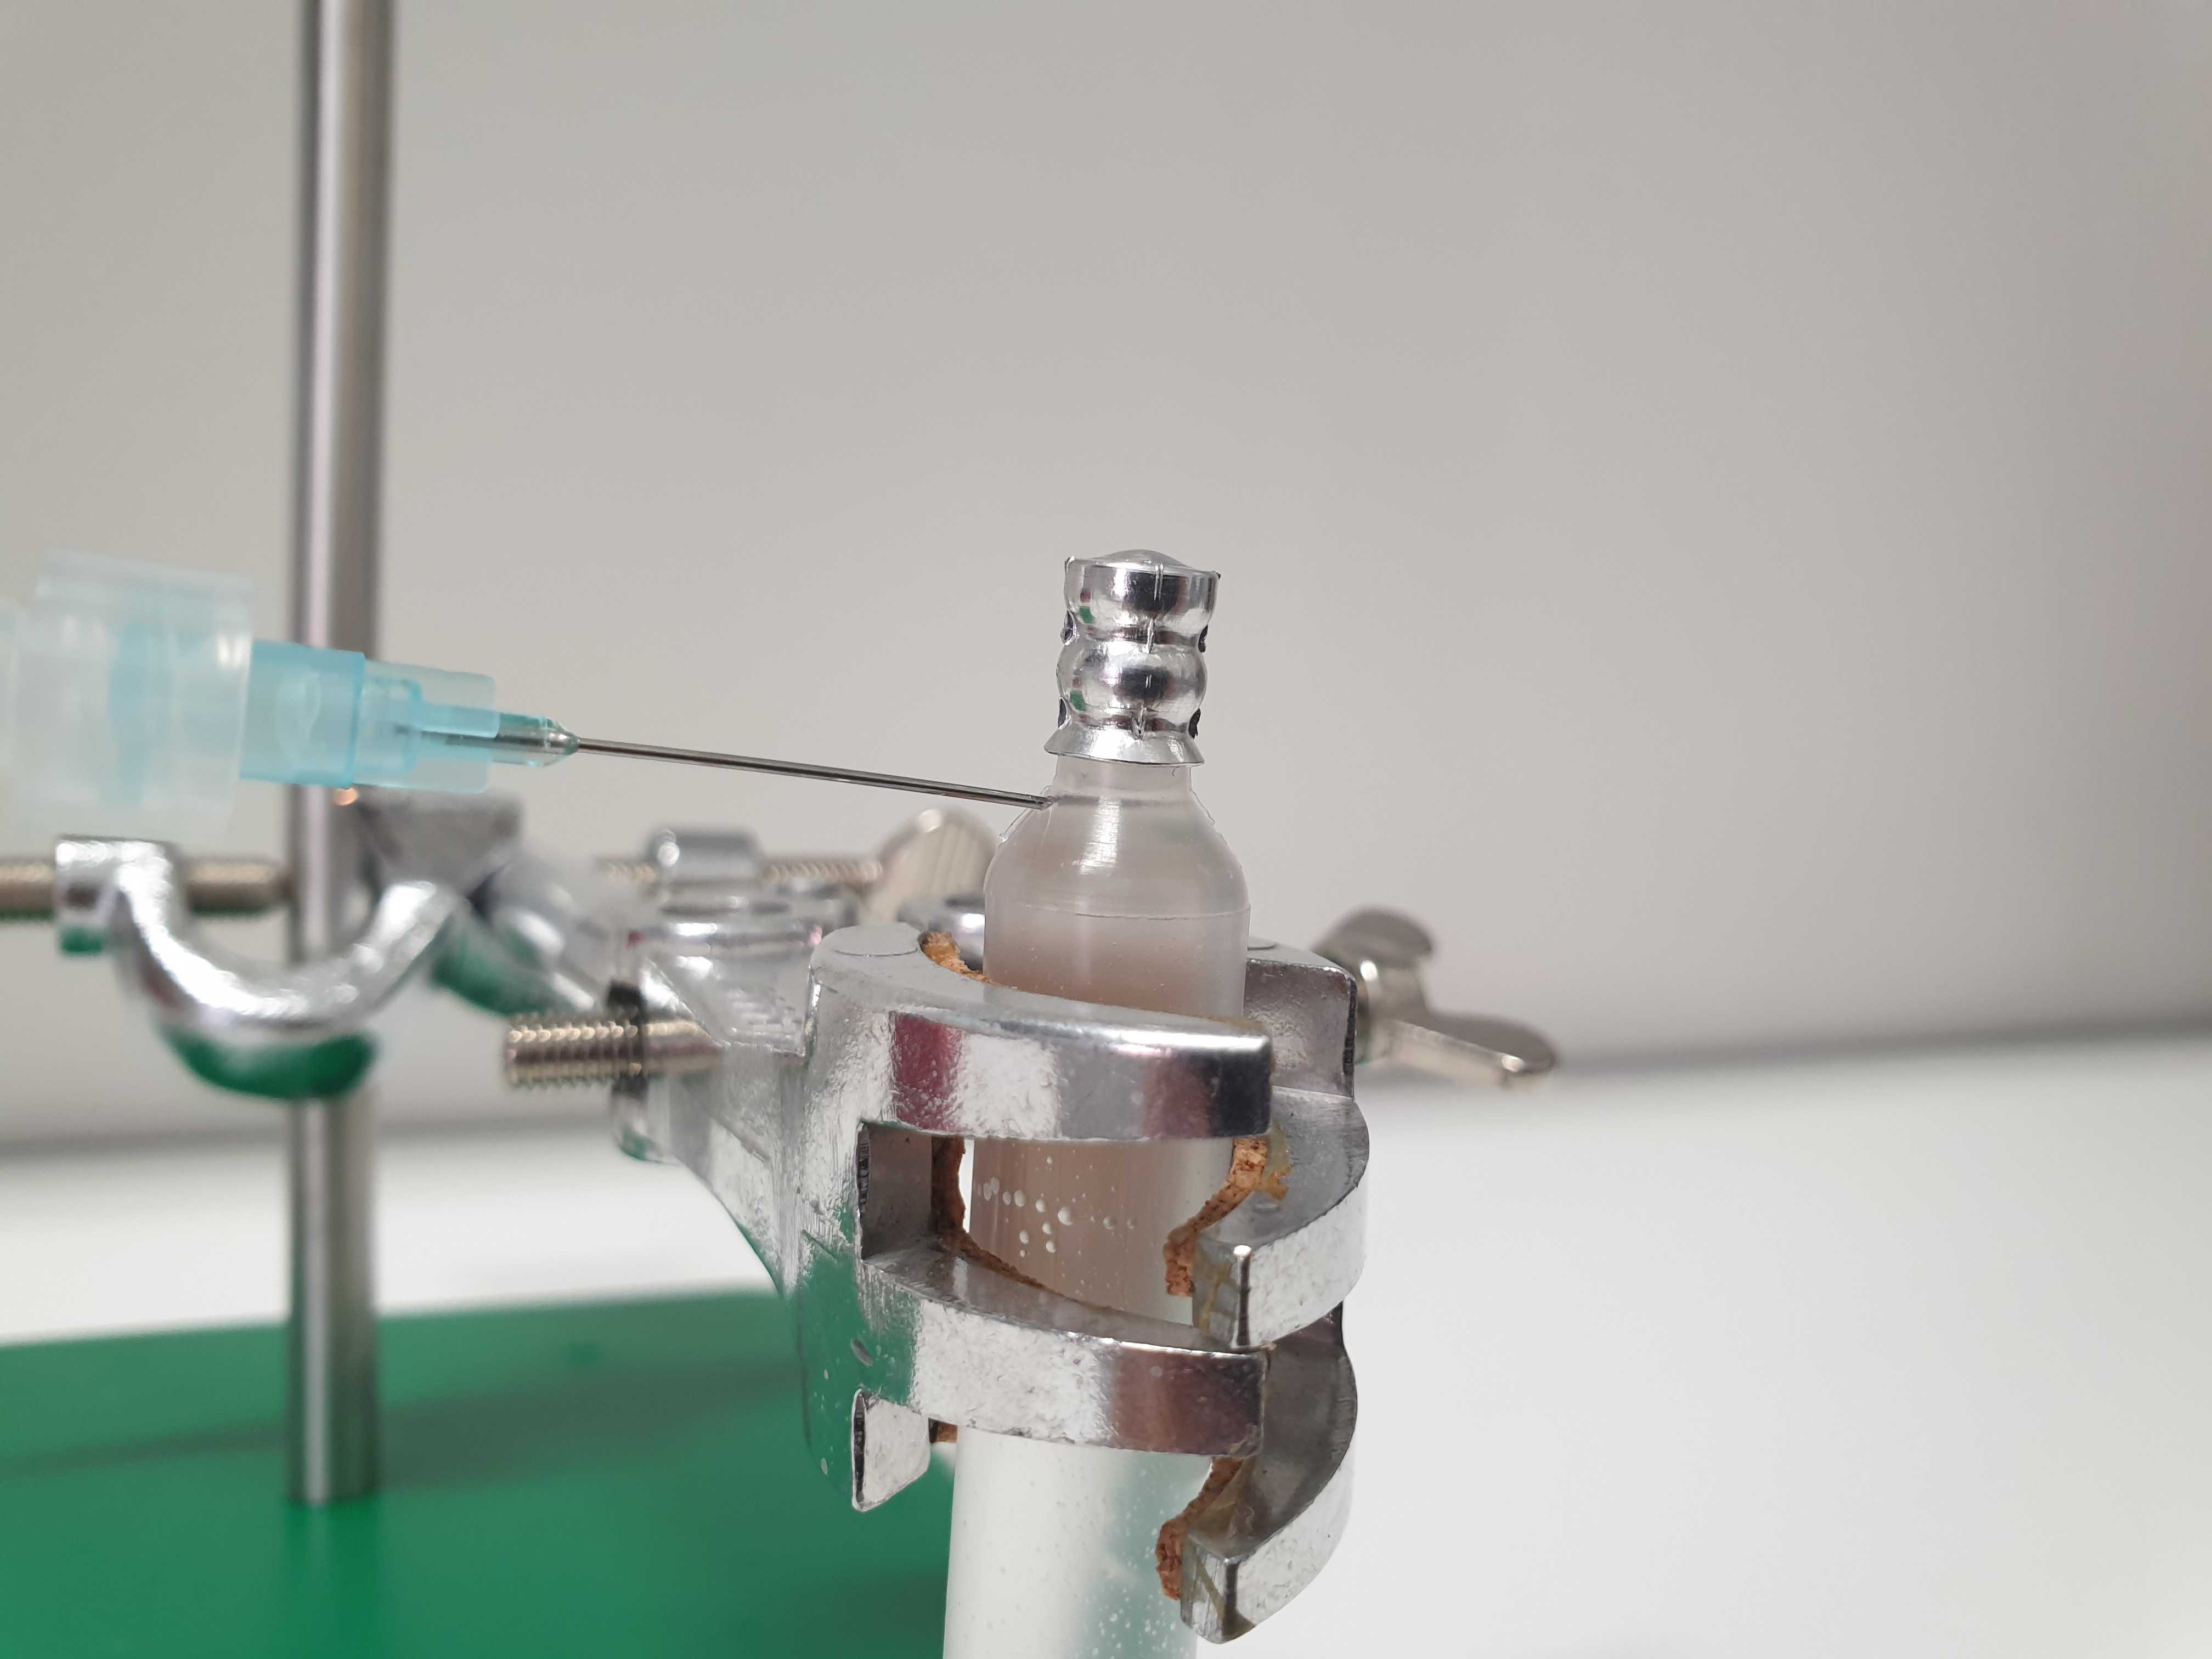
Take a new, sterile 26G needle, carefully puncture a hole at the bottom of the ultracentrifugation tube and remove the needle. The tube should not leak at this stage.
Equipment
| Value | Label |
|---|---|
| Disposable needles Sterican® long bevel facet, 25 mm, 0.45 mm, Brown | NAME |
| Disposable needles | TYPE |
| Sterican | BRAND |
| c718.1 | SKU |
Open all the collection tubes in the rack and make sure the first tube is positioned just below the bottom hole of the ultracentrifugation tube.
Your set-up should look like this:

Start the pump, as soon as the first drop falls off the ultracentrifugation tube start the stopwatch
After 0h 0m 30s (or your chosen time interval), shift the rack so that the drops will fall into the second collection tube. Continue in a similar fashion until all tubes have been filled. Close the tubes to avoid contamination and label them.
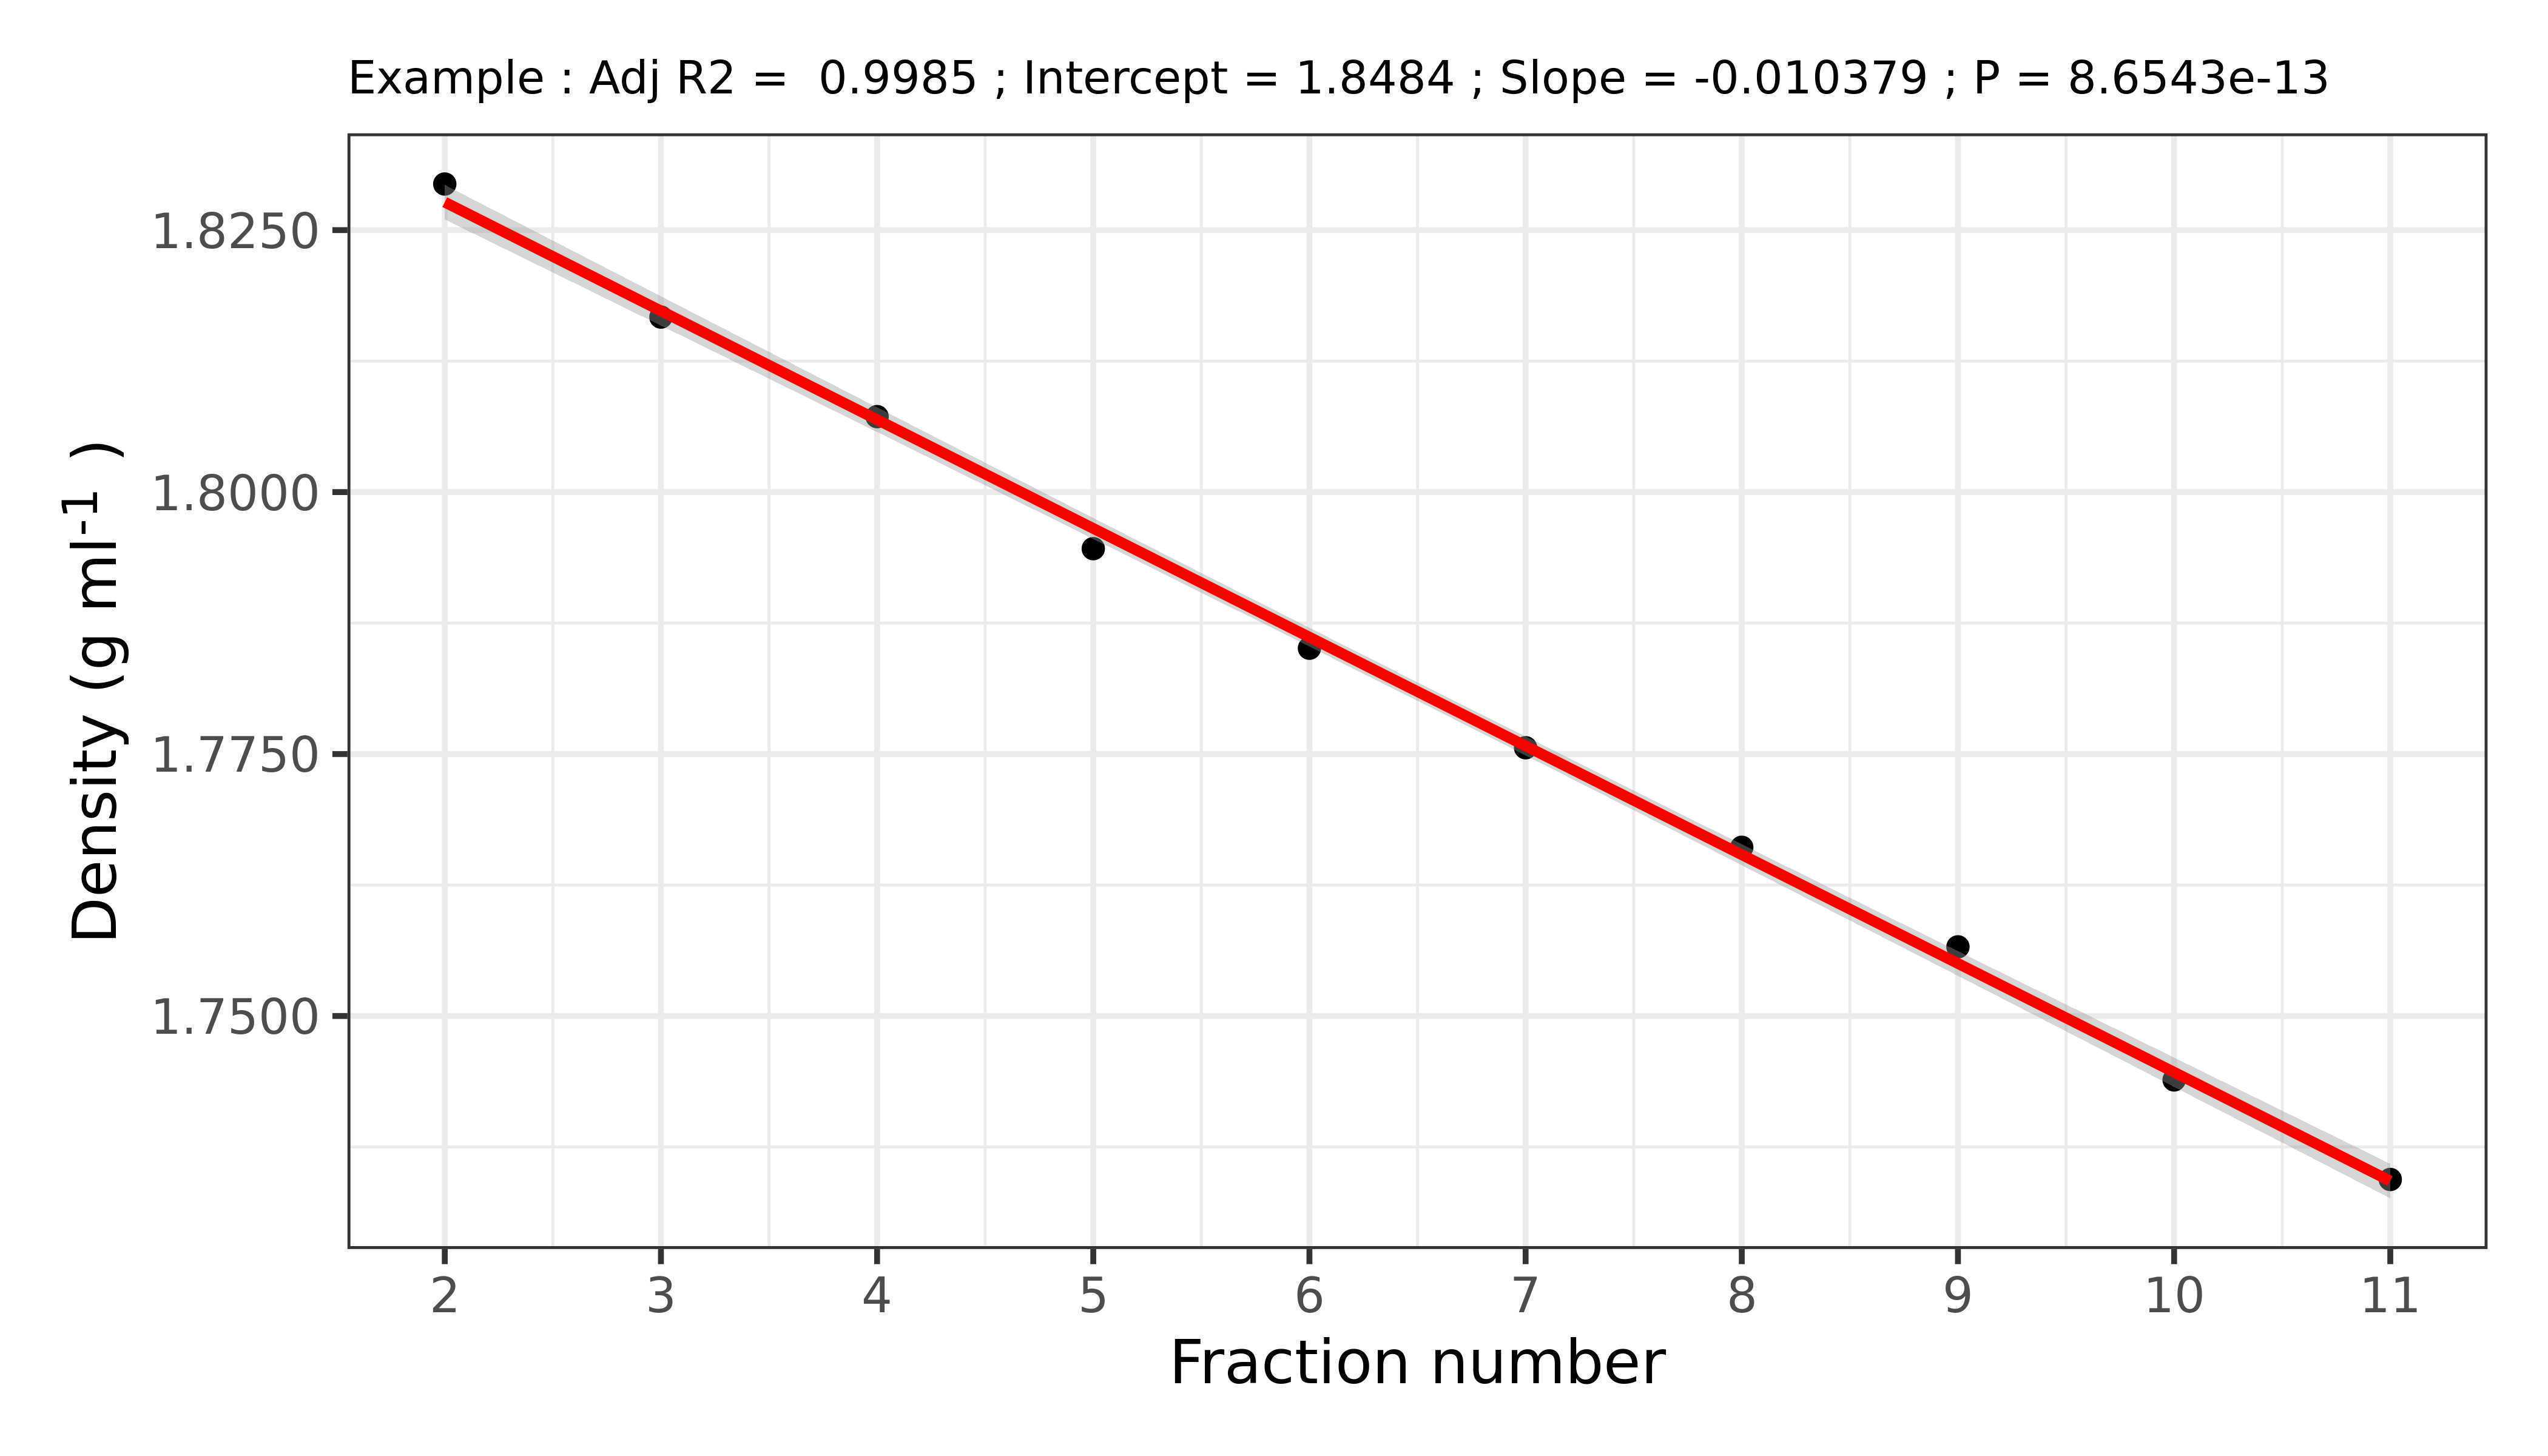
Measure the density of each fraction using the refractometer. Start from the last (the lightest) fraction.
30µL
The density of the fractions should increase at a linear rate as you progress from the lighter to the heavier fraction.
The conversion between refractive index (n) to density (ρ) is (empirically):
And can be easily determined in the lab by weighing a known volume of several fractions and establishing a calibration curve.
The gradient should range between 1.75 and 1.84 g ml-1, assuming a vertical rotor was used (a fixed-angle rotor will yield a steeper gradient, meaning a wider range of densities).
RNA precipitation
To each tube add 2µL of GlycoBlue, 10% (v/v) Na-Acetate (3Molarity (M) ), and 250% (v/v) of absolute ethanol. Assuming 500µLfractions were collected and 30µL were spent for determining the density, add 47µL Na-acetate and 1175µL.
Incubate at -80°C for 0h 30m 0s.
Centrifuge at 14000rpm,4°C.
Decant the supernatant, wash once with 1ml, invert the tube several times.
Centrifuge at 14000rpm,4°C.
Remove as much as possible from the supernatant first using a 1 ml tip, spin down the remaining drops in the tube, and remove them with a 100 μl tip.
Leave the tubes open at room temperature for around 5 min (preferably under a flame or in a laminar-flow hood) in order to evaporate the remaining ethanol. Alternatively, the pellets can be dried under a filtered stream of air.
0h 5m 0s
Resuspend the pellets in 10µL RNase-free water or the RNA Storage solution.
cDNA synthesis
For each fraction, prepare the following mixture in a PCR tube:
10µL3µL(50micromolar (µM)diluted 20x in RNase-free water:2.5micromolar (µM))
Incubate the mixture at 65°C for 0h 5m 0s in a thermocycler and chill at 4°C for at least 0h 1m 0s.
Prepare the following mixture (times the number of fractions) and add 7µL into each tube:
4µL1µL1µL0.2µL0.2µL0.1µL0.5µL
Incubate the mixture in a thermocycler for 0h 10m 0s at 23°C followed by 1h 0m 0s at 50°C and then 0h 10m 0s at 80°C . Chill at 4°C.
Dilute 1µL cDNA in 14µL RNase-free water for use as qPCR template. No dilution is required for use as a PCR template.
Evaluate the level of enrichment
Evaluate the level of isotopic enrichment using a qPCR assay. We recommend
Plot the cDNA copy numbers against the density of each fraction. It is common to normalise the qPCR results to the highest copy number in the gradient or to the total copy numbers of all the fractions in the gradient.

Plot_SIP_example.RMD Frac_density_example.csv qPCR_SIP_example.csv
