Prepare Samples for Miseq
FishFloorUCL
Abstract
(MiSeq nano V2 chip 300 cycle), MiSeq multiplexes sequences, allowing you to DNA sequence multiple samples at once. This is particularly useful for genotyping fish with mosaic genotypes, such as F0 knockouts.
@FishFloorUCL
Steps
Design Miseq Primers
Design primers surrounding your site of interest
- Optimal amplicon size 200bp
- As far as possible, the site of interest should be in the middle of the designed amplicon. (This is so that it has the best chance of being read by both the forward and reverse reads)
- If possible, try and avoid designing primers in non-coding regions of DNA since these regions are more likely to have variation and SNPs, which might affect the efficacy of your primer.
I usually use the NCBI Primer-Blast tool. Enter ~300bp of DNA sequence around your region of interest under 'PCR Template' and set the 'Range' for the forward and reverse primer so that your site of interest is more or less in the middle of the PCR product. NCBI Primer-Blast tool. Enter ~300bp of DNA sequence around your region of interest under 'PCR Template' and set the 'Range' for the forward and reverse primer so that your site of interest is more or less in the middle of the PCR product.
If you previously used a set of primers to check your TALLEN/CRISPR efficiency using Melt Curve Analysis, or if you have your primer sequence from CHOPCHOP, you can use the same sequence to design the primers for MiSeq. Anecdotally this seems to work well for most people on their first try.
Add miseq tags/overhangs to your primer sequence.
- Universal forward (F) tag: 5' TCGTCGGCAGCGTCAGATGTGTATAAGAGACAG 3'
- Universal reverse (R) tag: 5' GTCTCGTGGGCTCGGAGATGTGTATAAGAGACAG 3'
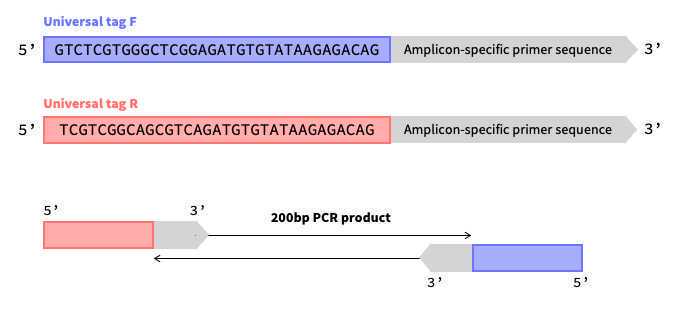
These overhang sequences correspond to the Illumina nextera transposase overhangs and will be compatible with Illumina kits using Nextera XT
(Optional) Test primers (including tag) for secondary structure formation (e.g., dimers and hairpins) using this online IDT OligoAnalyzer tool
NB. It is unlikely that you will have high scores due to the length of the primers and amplicon restrictions. Just pick the best
Order primers - standard desalted primers are fine for this application.
If the primers arrive as dry pellets, reconstitute the primers in autoclaved distilled or nuclease-free water to create a stock solution and working solution.
100micromolar (µM)stock solution by adding nuclease-free water. IfnMoles of your primer (check the tube), resuspend the dry pellet in µL of water 10micromolar (µM)working solution
(Optional) Test Primers
Run a PCR
I have designed a handy master mix calculator master mix calculator for Taq , Platinum Taq and Pre-mix Schier PCR mix.
Here is an example of a PCR mix for a single well with a total volume 10µL total volume
| A | B |
|---|---|
| Autoclaved, distilled (nuclease free) water | 6.46 μL |
| 10X PCR Buffer, -Mg | 1 μL |
| 50 mM MgCl2 | 0.3 μL |
| 10 mM (each) dNTP Mix | 0.2 μL |
| 10 μM forward primer | 0.5 μL |
| 10 μM reverse primer | 0.5 μL |
| Taq DNA Polymerase | 0.04 μL |
| Template DNA (from 100μL HotShot) | 1 μL |
Note, Taq is unstable and should be taken out of the freezer for the shortest amount of time possible. It is sensible to prepare PCR mix on ice.
Suggested PCR programme:
95°C,0h 5m 0s95°C,0h 0m 30s(Denaturation step)- Temperature gradient* around
60°C,0h 0m 30s(Annealing step) 72°C,0h 0m 30s(Extension step)- Repeat steps 2-4, 25-35 times
72°C,0h 5m 0s(Final extension step)10°Chold
*For your test run, you should use a gradient PCR to test the ideal temperature for your primers (Note. By default, CHOPCHOP designs primers for an optimal melting temperature of 60°C). We usually run a gradient PCR for five different temperatures, with 60°C being optimal, then varying 1°C-1.5°C above and below.
Run on a 1% agarose gel
Prepare samples for miseq
Amplify up PCR products to analyse by MiSeq.
I have designed a handy master mix calculator.
Here is an example of a PCR mix for a single well with total volume 10µL total volume
| A | B |
|---|---|
| Autoclaved, distilled (or nuclease free) water | 7 μL |
| 10X PCR Buffer, -Mg | 1 μL |
| 50 mM MgCl2 | 0.3 μL |
| 10 mM (each) dNTP Mix | 0.2 μL |
| 10 μM forward primer | 0.2 μL |
| 10 μM reverse primer | 0.2 μL |
| Platinium Taq DNA Polymerase | 0.1 μL |
| Template DNA | 1 μL |
Note, Taq is unstable and should be taken out of the freezer for the shortest amount of time possible. It is sensible to prepare PCR mix on ice.
Suggested PCR programme:
95°C,0h 5m 0s(Initial Denaturation Step)95°C,0h 0m 30s(Denaturation step)60°C*0h 0m 30s(Annealing step)72°C,0h 0m 30s(Extension step)- Repeat steps 2-4, 25-35 times
72°C,0h 5m 0s(Final extension step)10°Chold
*Or Tm of your given primer pair
Run on a 1% gel to confirm a single band at the anticipated weight. This is just to check the PCR worked. To save time, just run a couple of your samples.
Clean up your samples
Traditional column-based PCR clean-up kits would work fine, but we recommend using ExoSAP,
- Transfer
5µLof your PCR product into a new plate - Add
2µLof ExoSAP reagent to each well - (Vortex optional) Spin down & run the ExoSAP programme thermocycler.
0h 15m 0sat37°C– Degrade the remaining primers and nucleotides0h 15m 0sat80°C– Inactivate ExoSAP
Check the concentration of your clean PCR product. This can be done using Nanodrop or Qubit. I would recommend Qubit due to its superior accuracy and reliability. We recommend only testing a few of your samples to save time and money.
We usually use the following kit from Thermo Fisher, which comes with a working solution.
Setup and label the lids of the required number of assay tubes for your samples plus two standards (Use thin-wall, clear, 0.5-mL Qubit Assay PCR tubes (Cat. No. Q32856)).
- Add
190µLQubit™ 1X dsDNA working solution to each standard tube - Add
10µLof each Qubit standard to the appropriate standard tube - Add
199µLQubit™ 1X dsDNA working solution to each sample tube - Add
1µLof each sample to the appropriate tube All tubes should have a final volume of200µL

Read concentration using the Qubit machine and note them down.
Prepare your samples for miseq:
You need to submit a minimum of 6µL at a final concentration of 15-25 ng/μL
