Modified NEBNext® VarSkip Short SARS-CoV-2 Library Prep Kit for Illumina Platforms - adapted for wastewater samples
Padmini Ramachandran, Tamara Walsky, Amanda Windsor, Maria Hoffmann, Christopher Grim
Disclaimer
This method is under development and assessment for suitability of use. It is likely that modifications will be made to improve the method.
Abstract
PURPOSE:
This method was developed at the FDA’s Center for Food Safety and Applied Nutrition for GenomeTrakr’s pandemic response project, monitoring SARS-CoV-2 variants in wastewater. Protocols developed for this project cover wastewater collection, concentration, RNA extraction, RT-qPCR, library prep, genome sequencing, quality control checks, and data submission to NCBI.
This modified protocol details methods for cDNA synthesis and library preparation for sequencing of wastewater samples containing SARS-CoV-2. The protocol is based primarily on the NEBNext® ARTIC SARS-CoV-2 Library Prep Kit (Illumina®), NEB #E7650S/L 24/96 reactions, with a few modifications. Primarily, VarSkip Short primers are used in place of the ARTIC V3 primers. These primers are available in the NEBNext®ARTIC SARS-CoV-2 FS Library Prep Kit (Illumina®); however, for optimal variant detection from wastewater, sequenced fragments should be as large as possible, so we discourage fragmentation prior to end prep.
There are a couple of decision points in this protocol. Examining cDNA amplicon samples on an Agilent TapeStation system or similar fragment analyzer is extremely helpful in making these decisions.
Before start
Note: The amount of RNA required for detection depends on the abundance of the RNA of interest. In general, we recommend, using ≥ 10 copies of the (SARS-CoV-2) viral genome as input, however, results may vary depending on the quality of the input. In addition, we recommend setting up a no template control reaction and that reactions are set-up in a hood .
The presence of carry-over products can interfere with sequencing accuracy, particularly for low copy targets. Therefore, it is important to carry out the appropriate no template control (NTC) reactions to demonstrate that positive reactions are meaningful.
Steps
cDNA Synthesis
Gently mix and spin down the LunaScript RT SuperMix reagent. Prepare the cDNA synthesis reaction as described below:
| A | B |
|---|---|
| COMPONENT | VOLUME |
| RNA Sample | 8 µl |
| (lilac) LunaScript RT SuperMix | 2 µl |
| Total Volume | 10 µl |
For no template controls, mix the following components:
| A | B |
|---|---|
| COMPONENT | VOLUME |
| (white) Nuclease-free Water | 8 µl |
| (lilac) LunaScript RT SuperMix | 2 µl |
| Total Volume | 10 µl |
Flick the tubes or pipet up and down 10 times to mix followed by a quick spin.
Incubate reactions in a thermocycler* with the following steps:
| A | B | C | D |
|---|---|---|---|
| CYCLE STEP | TEMP | TIME | CYCLES |
| Primer Annealing | 25°C | 2 minutes | 1 |
| cDNA Synthesis | 55°C | 20 minutes | |
| Heat Inactivation | 95°C | 1 minute | |
| Hold | 4°C | ∞ |
*Set heated lid to 105°C
Targeted cDNA Amplification
Gently mix and spin down reagents. Prepare the split pool cDNA amplification reactions as described below:
For Pool Set A:
| A | B |
|---|---|
| COMPONENT | VOLUME |
| cDNA (Step 2) | 4.5 µl |
| (lilac) Q5 Hot Start High-Fidelity 2X Master Mix | 6.25 µl |
| NEBNext VarSkip Short SARS-CoV-2 Primer Mix 1 | 1.75 µl |
| Total Volume | 12.5 µl |
For Pool Set B:
| A | B |
|---|---|
| COMPONENT | VOLUME |
| cDNA (Step 2) | 4.5 µl |
| (lilac) Q5 Hot Start High-Fidelity 2X Master Mix | 6.25 µl |
| NEBNext VarSkip Short SARS-CoV-2 Primer Mix 2 | 1.75 µl |
| Total Volume | 12.5 µl |
Flick the tubes or pipet up and down 10 times to mix followed by a quick spin.
Incubate reactions in a thermocycler* with the following steps:
| A | B | C | D |
|---|---|---|---|
| CYCLE STEP | TEMP | TIME | CYCLES |
| Initial Denaturation | 98°C | 30 seconds | 1 |
| Denature | 95°C | 15 seconds | 35 |
| Annealing/Extension | 63°C | 5 minutes | |
| Hold | 4°C | ∞ | 1 |
*Set heated lid to 105°C
Combine the Pool A and Pool B PCR reactions for each sample.
Assess the quantity of the cDNA amplicon using the Qubit HS kit. (1µL
Cleanup of cDNA Amplicons.
Vortex the NEBNext Sample Purification Beads to resuspend.
Add 20µL to the combined PCR reaction. Mix well by pipetting up and down at least 10 times. Be careful to expel all of the liquid out of the tip during the last mix. Vortexing for 3-5 seconds on high can also be used. If centrifuging samples after mixing, be sure to stop the centrifugation before the beads start to settle out.
Incubate samples at -20Room temperature for at least 0h 5m 0s.
Place the tube/plate on an appropriate magnetic stand to separate the beads from the supernatant.
After 5 minutes (or when the solution is clear), carefully remove and discard the supernatant. Be careful not to disturb the beads that contain DNA targets.
Add 200µL to the tube/plate while in the magnetic stand. Incubate at -20Room temperature for 0h 0m 30s, and then carefully remove and discard the supernatant. Be careful not to disturb the beads that contain DNA targets.
Perform second Ethanol wash:
Add 200µL to the tube/plate while in the magnetic stand. Incubate at -20Room temperature for 0h 0m 30s, and then carefully remove and discard the supernatant. Be careful not to disturb the beads that contain DNA targets.
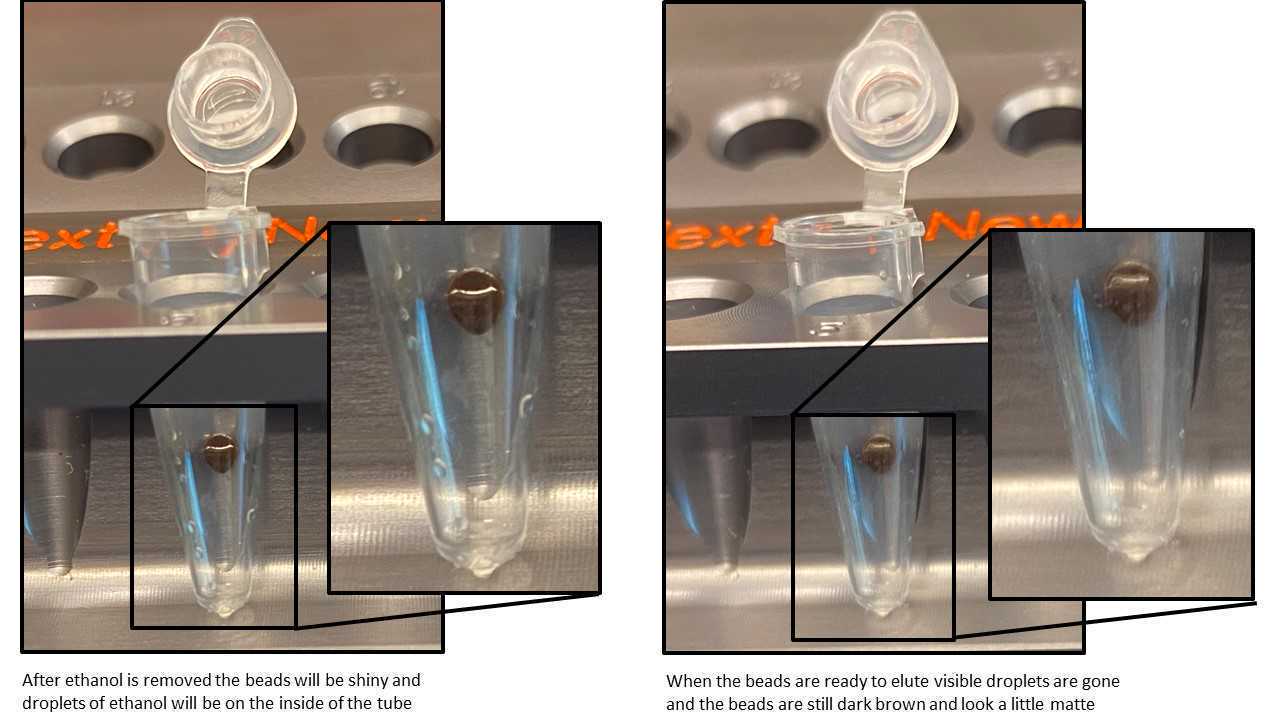
Be sure to remove all visible liquid after the second wash. If necessary, briefly spin the tube/plate, place back on the magnet and remove traces of ethanol with a p10 pipette tip.
Air dry the beads for up to 5 minutes while the tube/plate is on the magnetic stand with the lid open.
Remove the tube/plate from the magnetic stand. Elute the DNA target from the beads by adding 28µL. If not assessing cDNA (Step 24) elute DNA in 27µL.
Mix well by pipetting up and down 10 times, or on a vortex mixer. Incubate for at least 2 minutes at -20Room temperature. If necessary, quickly spin the sample to collect the liquid from the sides of the tube or plate wells before placing back on the magnetic stand.
Place the tube/plate on the magnetic stand. After 5 minutes (or when the solution is clear), transfer 26µL to a new PCR tube. If not assessing cDNA (Step 24) transfer 25µL to a new PCR tube.
We recommend assessing cDNA amplicon (from Step 23) concentrations with a Qubit fluorometer using Qubit HS DNA assay kit.
 and presence (B) of human primer controls.")
Quality checks on cleaned amplicons before proceeding to library prep
We have observed the following output for VSS amplicons based on viral titer in the wastewater samples:
1)Moderate to high viral titer samples: The cleaned amplicon quantity is expected to be 0.5 ng/µl to 8 ng/µl
2)Low viral titer samples: The cleaned amplicon quantity is expected to be 0 - 0.2 ng/µl
We recommend to proceed to library preparation for samples at 0.2 ng/µl or higher. Cleaned VSS amplicons below this value have not yielded sequencing results.
We recommend assessing cDNA amplicon (from Step 23) on Tape Station or Bioanalyzer using High Sensitivity kit.


NEBNext End Prep
This is library preparation Option 1, and the most common that will be used. You will use the Ultra II DNA workflow as described in the NEBNext® ARTIC SARS-CoV-2 Library Prep Kit (Illumina®) (cat# E7650S/L), with NEBNext®Multiplex Oligos for Illumina®(96 Unique Dual Index Primer Pairs) (cat# E6440S/L).
Add the following components to a sterile nuclease-free tube:
| A | B |
|---|---|
| COMPONENT | VOLUME |
| (green) NEBNext Ultra II End Prep Enzyme Mix | 1.5 µl |
| (green) NEBNext Ultra II End Prep Reaction Buffer | 3.5 µl |
| Targeted cDNA Amplicons* | 25 µl |
| Total Volume | 30 µl |
*When cleanup of the pooled cDNA amplicons is skipped, the amplicons must be diluted prior to library prep, please dilute the cDNA as mentioned here. Transfer 2.5 µl of the pooled cDNA amplicons to a fresh tube. Add 22.5 µl of 0.1X TE for a final volume of 25 µl. If cleanup is performed, use the cleaned targeted cDNA amplicons as the input.
Set a 100 µl or 200 µl pipette to 25 µl and then pipette the entire volume up and down at least 10 times to mix thoroughly. Perform a quick spin to collect all liquid from the sides of the tube.
Place in a thermocycler* and run the following program:
| A | B |
|---|---|
| TEMP | TIME |
| 20°C | 30 minutes |
| 65°C | 30 minutes |
| 4°C | ∞ |
*Set heated lid to 75°C
Adaptor Ligation
Add the following components directly to the End Prep Reaction Mixture:
| A | B |
|---|---|
| COMPONENT | VOLUME |
| End Prep Reaction Mixture (previous step) | 30 µl |
| (red) NEBNext Adaptor for Illumina** | 1.25 µl |
| (red) NEBNext Ultra II Ligation Master Mix* | 15 µl |
| Total Volume | 46.25 µl |
- Mix the Ultra II Ligation Master Mix by pipetting up and down several times prior to adding to the reaction.** The NEBNext adaptor is provided in NEBNext Oligo kits. NEB has several oligo options which are supplied separately from the library prep kit. Please see www.neb.com/oligos for additional information.
Set a 100 µl or 200 µl pipette to 40 µl and then pipette the entire volume up and down at least 10 times to mix thoroughly. Perform a quick spin to collect all liquid from the sides of the tube.
Incubate at 20°C for 0h 15m 0s in a thermocycler with the heated lid off.
Add 1.5µL to the ligation mixture from the previous step.
Mix well and incubate at 37°C for 0h 15m 0s with the heated lid set to ≥ 47°C.
Cleanup of Adaptor-ligated DNA
The following section is for cleanup of the ligation reaction.
Vortex the NEBNext Sample Purification Beads to resuspend.
Add 43µL to the Adaptor Ligation reaction. Mix well by pipetting up and down at least 10 times. Be careful to expel all of the liquid out of the tip during the last mix. Vortexing for 3-5 seconds on high can also be used. If centrifuging samples after mixing, be sure to stop the centrifugation before the beads start to settle out.
Incubate samples on bench top for at least 0h 5m 0s at 47Room temperature.
Place the tube/plate on an appropriate magnetic stand to separate the beads from the supernatant.
After 5 minutes (or when the solution is clear), carefully remove and discard the supernatant. Be careful not to disturb the beads that contain DNA targets.
Add 200µL to the tube/ plate while in the magnetic stand. Incubate at 47Room temperature for 0h 0m 30s, and then carefully remove and discard the supernatant. Be careful not to disturb the beads that contain DNA targets.
Repeat the previous step once for a total of two washes:
Add 200µL to the tube/ plate while in the magnetic stand. Incubate at 47Room temperature for 0h 0m 30s, and then carefully remove and discard the supernatant. Be careful not to disturb the beads that contain DNA targets.
Be sure to remove all visible liquid after the second wash. If necessary, briefly spin the tube/plate, place back on the magnet and remove traces of ethanol with a p10 pipette tip.
Air dry the beads for up to 5 minutes while the tube/plate is on the magnetic stand with the lid open.

Remove the tube/plate from the magnetic stand. Elute the DNA target from the beads by adding 10µL.
Mix well by pipetting up and down 10 times, or on a vortex mixer. Incubate for at least 0h 2m 0s at 47Room temperature. If necessary, quickly spin the sample to collect the liquid from the sides of the tube or plate wells before placing back on the magnetic stand.
Place the tube/plate on the magnetic stand. After 0h 5m 0s (or when the solution is clear), transfer 7.5µL to a new PCR tube.
PCR Enrichment of Adaptor-ligated DNA
Add the following components to a sterile strip tube:
| A | B |
|---|---|
| COMPONENT | VOLUME |
| Adaptor Ligated DNA Fragments (Step 45) | 7.5 μl |
| (blue) NEBNext Library PCR Master Mix | 12.5 μl |
| Index Primer Mix (E6440S)* | 5.0 μl |
| Total Volume | 25 μl |
- NEBNext Oligos must be purchased separately from the library prep kit. Refer to the corresponding NEBNext Oligo kit manual for determining valid barcode combinations.
Set a 100 μl pipette to 20 μl and then pipette the entire volume up and down at least 10 times to mix thoroughly. Perform a quick spin to collect all liquid from the sides of the tube.
Place the tube on a thermocycler** and perform PCR amplification using the following PCR cycling conditions:
| A | B | C | D |
|---|---|---|---|
| CYCLE STEP | TEMP | TIME | CYCLES |
| Initial Denaturation | 98°C | 30 seconds | 1 |
| Denaturation | 98°C | 10 seconds | 6-8* |
| Annealing/Extension | 65°C | 75 seconds | |
| Final Extension | 65°C | 5 minutes | 1 |
| Hold | 4°C | ∞ |
- The number of PCR cycles recommended should be viewed as a starting point and may need to be optimized for particular sample types. If you have cleaned up cDNA as input, use 8 cycles. If you have diluted cDNA as input use 6/7 cycles.**Set heated lid to 105°C.
Cleanup of PCR Reaction
Vortex NEBNext Sample Purification Beads to resuspend.
Add 22.5µL to the PCR reaction. Mix well by pipetting up and down at least 10 times. Be careful to expel all of the liquid out of the tip during the last mix. Vortexing for 3-5 seconds on high can also be used. If centrifuging samples after mixing, be sure to stop the centrifugation before the beads start to settle out.
Incubate samples on bench top for at least 0h 5m 0s at Room temperature.
Place the tube/plate on an appropriate magnetic stand to separate the beads from the supernatant.
After 5 minutes (or when the solution is clear), carefully remove and discard the supernatant. Be careful not to disturb the beads that contain DNA targets.
Add 200µL to the tube/plate while in the magnetic stand. Incubate at Room temperature for 0h 0m 30s, and then carefully remove and discard the supernatant. Be careful not to disturb the beads that contain DNA targets.
Repeat the previous step once for a total of two washes:
Add 200µL to the tube/plate while in the magnetic stand. Incubate at Room temperature for 0h 0m 30s, and then carefully remove and discard the supernatant. Be careful not to disturb the beads that contain DNA targets.
Be sure to remove all visible liquid after the second wash. If necessary, briefly spin the tube/plate, place back on the magnet and remove traces of ethanol with a p10 pipette tip.
Air dry the beads for up to 5 minutes while the tube/plate is on the magnetic stand with the lid open.

Remove the tube/plate from the magnetic stand. Elute the DNA target from the beads by adding 17µL.
Mix well by pipetting up and down 10 times, or on a vortex mixer. Incubate for at least 0h 2m 0s at Room temperature. If necessary, quickly spin the sample to collect the liquid from the sides of the tube or plate wells before placing back on the magnetic stand.
Place the tube/plate on the magnetic stand. After 5 minutes (or when the solution is clear), transfer 15µL to a new PCR tube and store at -20°C.
Check the size distribution on an Agilent Bioanalyzer or TapeStation. The sample may need to be diluted before loading. A peak size of ~520 bp is expected (Figure 56).
 or presence (B) of the human primer controls.")
Sample Sheet generation for NEBNext® ARTIC SARS-CoV-2 Library Prep Kit (Illumina®) with E6440 Index plate.E6440_ Forward Strand Workflow Sample Sheet.csv
