Low cost methods for Hydra care
Callen Hyland, Jennifer DeSantis
Education
invertebrates
regeneration
aging
animal care
developmental biology
undergraduate research
low cost
Abstract
Hydra, is genus of freshwater cnidarian polyp found in freshwater ponds and streams all over the world. Its remarkable ability to regenerate missing body parts, and even its whole bodies from fragments, has made Hydra a model system for regeneration and development for over 250 years. Despite their anatomical simplicity, much about Hydra’s basic biology and extraordinary regeneration caption remains mysterious.
The simplicity of caring for and doing experiments on Hydra makes it an accessible subject for undergraduate research, high school lab activities, or even a home hobbyist. This collection of protocols describes low-cost methods for maintaining Hydra cultures, including step-by-step instructions for preparing media, growing brine shrimp for feeding to Hydra, and caring for your Hydra colonies. We’ve focused on equipment that can be found in most high school and college labs, or consumer products that can be purchased online.
Experiments on Hydra can be incredibly simple. Much can be learned from dissecting a Hydra and observing its regeneration. Hydra’s response to varying environmental conditions can also be explored in a classroom setting with minimal resources. These simple experiments can be a bridge to cutting-edge molecular biology and stem cell research. Sequencing of the Hydra genome has opened the door for genetic manipulations and large-scale bioinformatics studies. Transgenic lines with fluorescently-labeled cell types and proteins, including neuron and muscle activity reporters, are available.
References:
Contents:
1: Storing brine shrimp cysts
2: Brine shrimp hatching medium
3: Hatch brine shrimp
4: Prepare stock solutions
5: Prepare Hydra medium
6: Harvest brine shrimp
7: Feed Hydra
8: Routine Hydra tank cleaning
9: Full cleaning of Hydra tanks
10: Monitor Hydra health
11: Emergency antibiotic treatment
Before start
Review the Guidelines section and make sure you have all equipment for keeping Hydra and growing brine shrimp before bringing Hydra into your lab. We recommend writing to a Hydra researcher and requesting the species and genetic lines that you want. Hydra can also be purchased from educational supply companies or collected in the wild.
Steps
Brine shrimp cyst storage
Store brine shrimp cysts:
Brine shrimp eggs can form thick-shelled cysts that remain dormant for many years until exposed to water. Freshly hatched nauplii (first developmental stage) of the brine shrimp Artemia franciscana are a convenient food for Hydra because they are easily stored and grown and the species has no natural defenses against Hydra.
Store unopened containers of brine shrimp cysts in the freezer (-20°C). They will keep for years.

Materials:
- San Francisco Bay brand brine shrimp cysts
- Lab scoop
- Funnel
- 50 mL conical tubes
- Parafilm
- Freezer
Note
Other strains and grades of brine shrimp cysts (such as Great Salt Lake Premium Grade) can be used, but their hatching may be less efficient.
When you are out of cysts and need to open a new container, remove the container from the freezer and allow it to come to -20Room temperature overnight. This will prevent condensation and absorption of moisture by the cysts.
Open the container and add the brine shrimp cysts to 50 mL conical tubes with a lab scoop and funnel. Cap the tubes tightly, seal with Parafilm, and return to the freezer until ready to use.
When cysts are needed, remove the conical tube from the freezer and allow it to come to -20Room temperature overnight. Store the cysts at -20Room temperature, tightly capped when not in use.
Brine shrimp hatching medium
Prepare brine shrimp hatching medium:
Brine shrimp cysts are hatched in medium with the same approximate salinity as seawater. Instant Ocean, a standard salt water aquarium mix can be used, but a much less expensive option is "solar salt" that is sold for water softeners. It can be purchased at many home goods and hardware stores. Kitchen baking soda can also be used in place of laboratory-grade NaHCO3.
Materials:
- Solar salt
- Sodium bicarbonate (NaHCO3)
- DI water
- 1 L graduated cylinder
- Electronic balance
- Lab scoops
- Weigh papers or weigh boats
- Glass or plastic bottle, or large carboy
Combine 12.5g of solar salt and 1g sodium bicarbonate (NaHCO3) to for every 1L DI water and mix until all of the salt is dissolved. NaHCO3 maintains 8 .
For example, to prepare 3L hatching medium, combine:
3L DI water
3g NaHCO3
37.5g solar salt
Store at Room temperature
Hatching brine shrimp
Set up your brine shrimp hatchery:
Brine shrimp can be hatched in any aerated container. You can buy special brine shrimp hatcheries, but more convenient, lower cost options are available. Imhoff sedimentation cones can hatch a large number of brine shrimp at a time and are easy to clean. An inverted 2 liter soda bottle with a hole cut in the bottom is a low cost alternative.
Brine Shrimp Direct sells stands for Imhoff cones, but anything that will hold an inverted cone will work, including a ring stand or a three liter soda bottle with the top cut off.
The Imhoff cone can be aerated with a standard aquarium pump attached to flexible tubing. You will also need a rigid tube to aerate the bottom on the cone. Brine Shrimp Direct sells long plastic tubes for this purpose, but a 5 mL or 10 mL serological pipette will also work.
Materials:
- Brine shrimp hatching medium (see above)
- Brine shrimp cysts
- Digital balance
- Weigh boat
- Imhoff cone
- Imhoff cone stand
- Aquarium bubbler
- Flexible air line
- Rigid tubing
- Plastic wrap
Assemble your hatchery. Put the rubber plug in the bottom of the Imhoff cone and attach the screw cap. Set the cone in the stand. Attach the air hose to the bubbler and attach the rigid tubing to the air hose. Set the rigid tubing into the Imhoff cone.

Add cysts and hatching medium to the Imhoff cone. The quantity of cysts and hatching medium can be adjusted according to your Hydra-feeding needs. Imhoff cones can accommodate up to 1L hatching medium and 1g of cysts. 500mL hatching medium with 0.5g cysts is enough for a few tanks of Hydra.
Plug in the bubbler and cover the top of the cone with plastic wrap. You can also use an appropriately sized food storage container lid or petri dish cover with a hole cut in it.
Hydra medium + stocks
Prepare concentrated stock solutions:
Hydra medium is a dilute salt solution similar in composition to freshwater ponds and streams. The solution below has a similar composition to pond water and contains essential ions - calcium, magnesium, sodium, potassium, and chloride. The sodium bicarbonate keeps it the pH between 7.5 and 8.
Materials:
-
Calcium chloride dihydrate (CaCl2*2H2O)
-
Magnesium sulfate anhydrous (MgSO4)
-
Sodium bicarbonate (NaHCO3)
-
Potassium chloride (KCl)
-
DI water
-
1 L graduated cylinder
-
Electronic balance
-
Lab scoop
-
Weigh papers or weigh boats
-
4 x 1 L glass or plastic bottles
-
10 mL serological pipettes
-
Automatic or thumb roll pipette pump
-
Large carboy
| A | B | C | D |
|---|---|---|---|
| Component | Final conc. in Hydra medium | Conc. in 1000X stock | quantity for 1 L 1000X stock |
| Calcium chloride dihydrate | 1.0 mM | 1 M | 111.56 g |
| Magnesium sulfate, anhydrous | 0.33 mM | 330 mM | 39.72 g |
| Sodium bicarbonate | 0.5 mM | 500 mM | 42.01 g |
| Potassium chloride | 0.03 mM | 30 mM | 2.24 g |
Chemical composition of Hydra medium
Prepare 1000X calcium chloride (CaCl2*2H2O) stock:
Dissolve 111.56g CaCl2*2H2O
in 800mL Nanopure water
Bring up to 1L with Nanopure water
Store in a screw-cap bottle at Room temperature
Prepare 1000X magnesium sulfate (MgSO4) stock:
Dissolve 39.72g MgSO4
in 800mL Nanopure water
Bring up to 1L with Nanopure water
Store in a screw-cap bottle at Room temperature
Prepare 1000X sodium bicarbonate (NaHCO3) stock:
Dissolve 42.01g NaHCO3
in 800mL Nanopure water
Bring up to 1L with Nanopure water
Store in a screw-cap bottle at Room temperature
Prepare 1000X potassium chloride (KCl) stock:
Dissolve 2.24g KCl
in 800mL Nanopure water
Bring up to 1L with Nanopure water
Store in a screw-cap bottle at Room temperature
Prepare Hydra medium:
Hydra medium can be prepared in any large carboy. These can be purchased from scientific supply companies or from a grocery or home goods store. We use a food grade 3 gallon carboy.
Use a graduated cylinder to add 1Lat a time to the carboy until you have reached it's maximum capacity. Note the number of liters and draw a line on the side of the carboy indicating where to fill to for that volume.
Fill the carboy to the fill line with Nanopure water. For every 1L added, remove 4mL.
For example, if your carboy is contains 8L, remove 36mL with either a serological pipette or by draining into a graduated cylinder.
For every liter, add 1mL of each 1000X stock solution.
For example, if your carboy contains 8L, add:
8mL 1000X CaCl2*2H2O stock
8mL 1000X MgSO4 stock
8mL 1000X NaHCO3 stock
8mL 1000X KCl stock
Shake the carboy vigorously to mix.
Store at Room temperature
Harvest brine shrimp
Harvest brine shrimp for Hydra feeding:
After 48 hours growth, your brine shrimp nauplii should be ready to feed to Hydra! Follow the steps below to harvest live nauplii from your hatchery.
Materials:
- Hydra medium
- 70% ethanol
- DI water
- Brine shrimp hatchery (see above)
- 10 mL serological pipette
- Automatic or thumb roll pipette pump
- Brine shrimp net
- Small dish or beaker
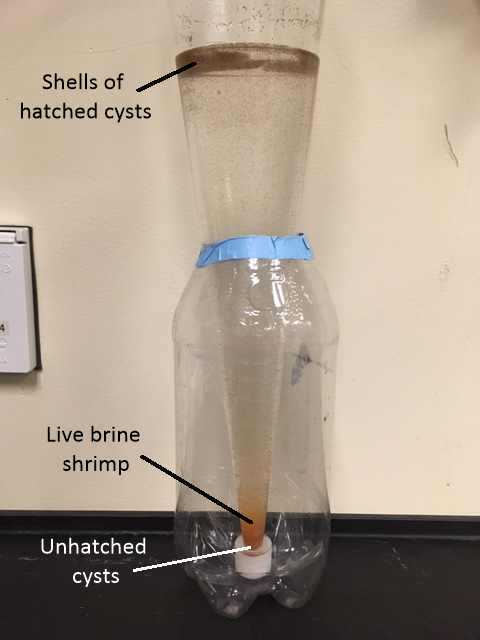
Turn off the bubbler and remove the tube from the Imhoff cone. Wait for 5-10 minutes for the nauplii to settle to the bottom of the cone. Unhatched cysts will sink to the bottom, shells from hatched cysts will float to the top and live shrimp will settle above the unhatched cysts.
While your cone is settling, rinse your brine shrimp net or sieve with DI water and add Hydra medium (see step 8 above) to a small dish or beaker.
With a 10 mL serological pipette and pipette pump, gently suck up the live shrimp from bottom of the cone. Get as many as you can while avoiding the unhatched cysts.

Dispense the shrimp from your pipette into the net or strainer and allow the medium to filter through. Rinse the shrimp with DI water to remove all of the salt.
If you are using a sieve, just set the sieve with the brine shrimp into the dish of Hydra medium. If you're using a net, turn the net inside out and submerge the brine shrimp in the dish of Hydra medium.

Clean up: Empty the hatchery, scrub it under tap water, rinse with DI water and spray it with ethanol to sterilize. Rinse the net and plastic tube with DI water and sterilize with ethanol. Leave the net, hatchery, and plastic tube on the bench for the ethanol to evaporate.
Hydra feeding
With your freshly hatched brine shrimp rinsed and suspended in Hydra medium, it's time to feed your Hydra.
Materials:
- Brine shrimp nauplii in Hydra medium
- Hydra tanks
- Plastic or glass Pasteur pipette
Use a plastic or glass Pasteur pipette to suck up some of the shrimp in the dish of Hydra medium. Add the shrimp drop-wise to each of your Hydra tanks, making sure to disperse them throughout the tank. Add as much as the Hydra can consume with little excess. Excess shrimp can contribute to fouling. Getting the quantity right will take some practice.
After Hydra eat, it will take 6-8 hours for them to regurgitate pellets of undigested material. A good schedule is to feed your Hydra in the morning and clean their tanks in the afternoon before you leave for the day. You will remove both uneaten shrimp and pellets at the same time.
Routine Hydra tank cleaning
Clean your tanks after every feeding:
Clean Hydra tanks to remove uneaten shrimp and regurgitated pellets on the same day that you feed your Hydra. While cleaning, take note of any changes to the health of your Hydra and the accumulating debris in the tanks that might indicate that it's time for a full cleaning (see below).
Materials:
- Hydra medium
- Large glass bowl
- Pasteur pipettes and bulbs
Gently swirl the medium in the tank to dislodge uneaten shrimp, pellets, and other debris. Pour the medium out of the tank into a large glass bowl.
Add a little more Hydra medium to the tank, swirl again, and pour into the glass bowl. Replace the Hydra medium in the tank with fresh medium.
It's likely that many Hydra were poured off along with the debris into the glass bowl. If there are only a few, or you have enough remaining in your tanks, you can discard the ones you've poured off.
If you want to recover these Hydra, a convenient method is to gently swirl the medium in the glass dish then set the dish on your bench until it stops swirling. The Hydra will collect in the center of the dish where they can easily be picked up with a pipette and transferred back into their tank.

If you have only a few Hydra in your tanks, you simply fill a new tank with Hydra medium and transfer your Hydra one by one with a Pasteur pipette.
Pour discarded Hydra medium into a bottle or beaker and treat with 10% bleach for 20 minutes before pouring down the drain. This is a precaution against releasing Hydra into the environment, which is especially important when you are working with transgenic lines.
Full cleaning of Hydra tanks
Approximately every month, or whenever you observe scum accumulating on the surface of your Hydra tanks, you will need to do a full cleaning of the tanks.
Materials:
- Hydra medium
- Latex or nitrile rubber gloves
- Large glass bowl
- Pasteur pipettes and bulbs
With a rubber glove on your hand, use your finger to scrape the Hydra off the surface of the tank until they are floating loose in the medium.
Pour the contents of the tank into your glass bowl and swirl to collect the Hydra in the center of the bowl (see Step 8.3 above).
Fill a clean tank halfway with Hydra medium. Use a Pasteur pipette to transfer the Hydra back into the tank, being careful to avoid any debris.
Wash the dirty tank by scrubbing with a brush under tap water. Rinse with DI water then spray with ethanol. If you are going to add Hydra directly back into the tank, wipe with a paper towel to remove residual ethanol.
Monitor Hydra health
As you are feeding and cleaning your Hydra, keep an eye out for any changes in the appearance of the animals that might indicate a decline in health. Make sure to examine your Hydra once per week under a dissecting microscope.
Things to look for:
- Tentacles look short and pointy.
- Hydra are contracted and don’t extend when left to rest.
- There is an excessive amount of debris accumulating on the surface of the tank.
- Hydra look like they are wearing fuzzy sweaters. This is a sign of a bacterial infection. Hydra normally have colonies of bacteria that live on their feet but sometimes the bacteria can start colonizing other parts of the animals. Usually this requires antibiotic treatment (see protocol below).
See Figure 2 from Bossert & Galliot (2021) for a detailed description of the stages of Hydra health degeneration.
Emergency antibiotic treatment
Treat infected Hydra with rifampicin:
These steps are optional for getting started with your Hydra experiments. They are provided here to assist with treating bacterial infections which may occasionally appear in your tanks.
Materials:
- Rifampicin powder
- Dimethyl sulfoxide
- Serological pipettes
- Automatic or thumb roll pipette pump
- Screw cap plastic microtubes
- Refrigerator
Prepare rifampicin stock:
Prepare 50mg/mL rifampicin stock solution in DMSO by adding the DMSO directly to the bottle of rifampicin.
For example, if you have a 1g bottle of rifampicin powder, add 20mL of DMSO.
Cap the bottle and invert it a few times to make sure all rifampicin in the bottle is dissolved.
Aliquot your rifampicin stock solution in screw cap plastic tubes and cap tightly. Store in the dark in the refrigerator at 4°C. DMSO becomes solid at 4°C so it will need to be thawed before use.
Prepare Hydra medium with rifampicin for treating infected Hydra.
Materials:
- Rifampicin stock solution (
50mg/mLin DMSO) - Hydra medium
- Adjustable volume micropipette and tips
- Glass or plastic bottle
Remove a tube of rifampicin stock from the refrigerator and allow it to thaw at Room temperature.
Dilute the rifampicin stock 1:1000 in Hydra medium for a final concentration of 50 µg/mL.
For example, to make 1L, add 1mL rifampicin stock to 999mL Hydra medium.
Store medium with rifampicin in the dark.
Treat infected Hydra:
Use Hydra medium with rifampicin in place of regular Hydra medium. Feed and clean your Hydra on your regular schedule, replacing the medium with fresh rifampicin-containing medium. Store Hydra being treated in the dark.
Continue treating with rifampicin for at least two weeks. If the infection is still there after two weeks, you can treat for longer.
