HyDrop-RNA v1.0
Florian De Rop, Suresh Poovathingal, Stein Aerts
scRNA-seq
hydrop
hydrogel
rna-seq
rna
single-cell
single cell
single
cell
droplet microfluidics
HyDrop
HyDrop-RNA
ASAPCRN
Abstract
Step-by-step protocol for performing HyDrop-RNA. The duration of each step assumes an experienced protocol user. For a first-time user, we recommend doubling the expected time for each step.
Steps
List of reagents:
List of oligonucleotides:
20210712_supp_methods_table_hydrop_oligonucleotide_list.xlsx
Please don't hesitate to contact us at hydrop.aertslab@gmail.com for any questions or remarks.
Microfluidics Preparation
Setting up the Microfluidic Framework
These steps need to happen in advance before the run can be started, as time between the preparation of the cell resuspension in RT mix and actual encapsulation needs to be minimised to preserve cell viability.
Boot up Droplet Genomics onyx.
Check syringe diameters in Onyx program. Any deviations from the true syringe diameter will result in biased flow rates, as the pump converts imposed flow rates to linear motion of the syringe plunger.
Connect laptop or tablet to Onyx
Fill two 3 mL syringes with ~1 mL fresh mineral oil each using a 1 mL pipette. Connect a needle after the syringes are filled. Do not fill the syringes by aspirating mineral oil through a pipette as this technique can introduce unwanted air bubbles. Moreover, mineral oil on the syringe needle will complicate connecting the tubing. Tap the syringe so that bubbles rise to the top, then push all air out. The syringe should be free of air bubbles.
Connect a ~15 cm piece of 1 mm inner diameter tubing to each syringe. The tubing should be long enough to comfortably reach from the syringe when it is in position to the inlet of the microfluidic chip. If the tubing is too long, it may get in the way during operation. If the tubing is too short, it may tear or come undone when you move the microfluidic chip around.
Using a 6 mm and 1 mm biopsy needle, punch out a small donut-shaped plug out of a ~1 cm thick PDMS slab. The outer diameter should snugly fit into the filterless pipette tip, and the inner diameter should firmly accomodate the microfluidic tubing.
Connect the syringe's tubing to the pipette tip through the PDMS plug. Now, mineral oil out of the syringe into the tubing until the micropipette tip is completely filled. Then, fix the syringes in the DG Onyx pump system, including the aspiration clamps. These syringes are now ready to aspirate the beads and cell sample respectively.
Later on, we will aspirate the cell and bead mix into the micropipette tip (NOT into the syringe, if we were to aspirate into the syringe, we would have too much dead volume in the tubing). When fixing the syringes to the DG Onyx pumps, some liquid may be pushed out or sucked in. This is normal and can be corrected later
Fill a 3 mL syringe with ~1.5 mL of RAN Biotech emulsion oil using a pipette tip, connect a needle and a piece of 1 mm tubing. Push the carrier oil all the way to the end of the tubing, and insert the syringe into the DG Onyx pump.
When fixing the syringes to the DG Onyx pumps, some liquid may be pushed out or sucked in. This is normal and can be corrected later
Take a HyDrop High Aspect 65/80 microfluidic chip and inspect each channel under a microscope for defects or dust. Fix the chip to the moving platform above the DG Onyx microscope using the chip holder. Make sure that at least 3 sets of channels are available for the run in case an error occurs.
Connect a short piece of tubing to the outlet. Then, take a DNA lo-bind 1.5 mL eppendorf, put it in a tube rack, and position it on top of the microscope platform. Put the outlet tube into the Eppendorf. This first outlet tube will be a "waste" tube used to collect the outlet until a stable emulsion is formed.
Keep 200 uL PCR strip tubes ready to collect samples in. Each tube will contain 50 uL of emulsion after the run ends.
Don't take a piece of tubing that is too long. This leads to a time delay between the end of the chip and the end of the outlet tube. Every now and then, during the run, you want to sample the droplets by touching a microscopy slide with the end of the tube and inspecting the droplets under the microscope. If you change flow parameters during the run, you want to be able to inspect the new droplet sizes and bead loading ASAP.
A finished set-up look should like so:
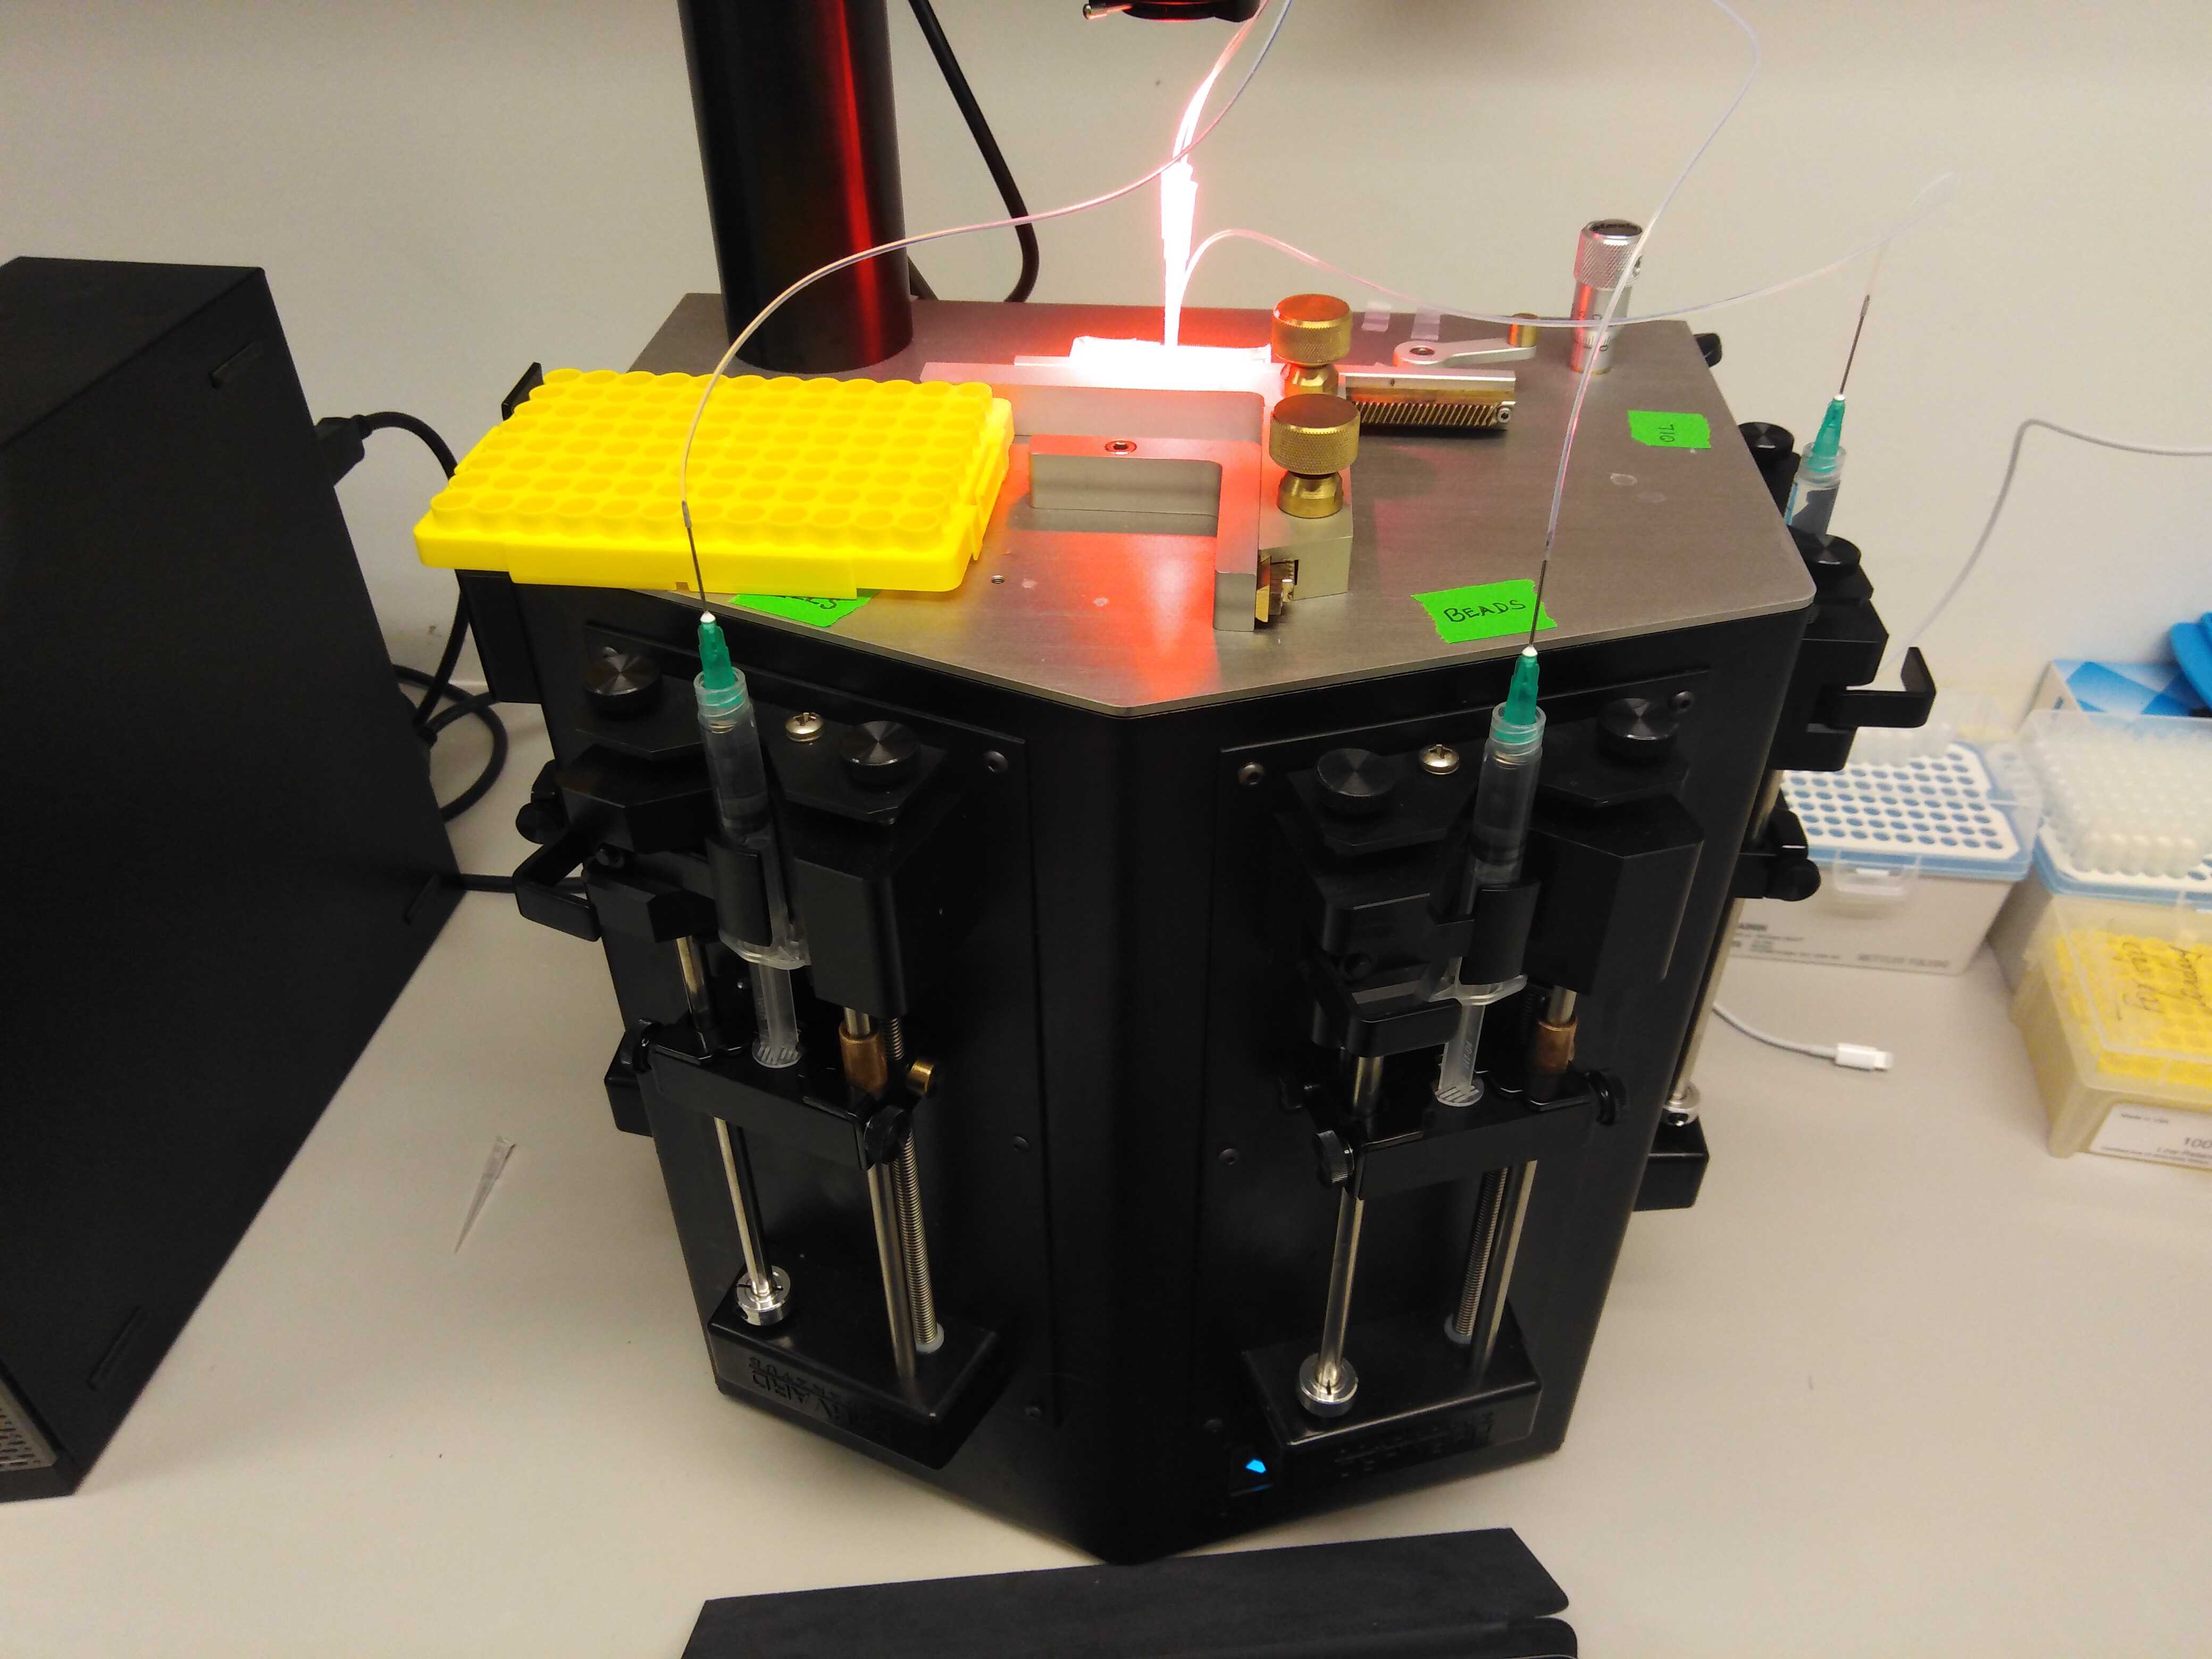
Note that we use a cover from a pipette tip box as a seating for the samples. For longer runs (10 minutes or more), we recommend that you use a small ice box or cold block to seat the samples as they are produced.
The plugged-in chip should look like so:
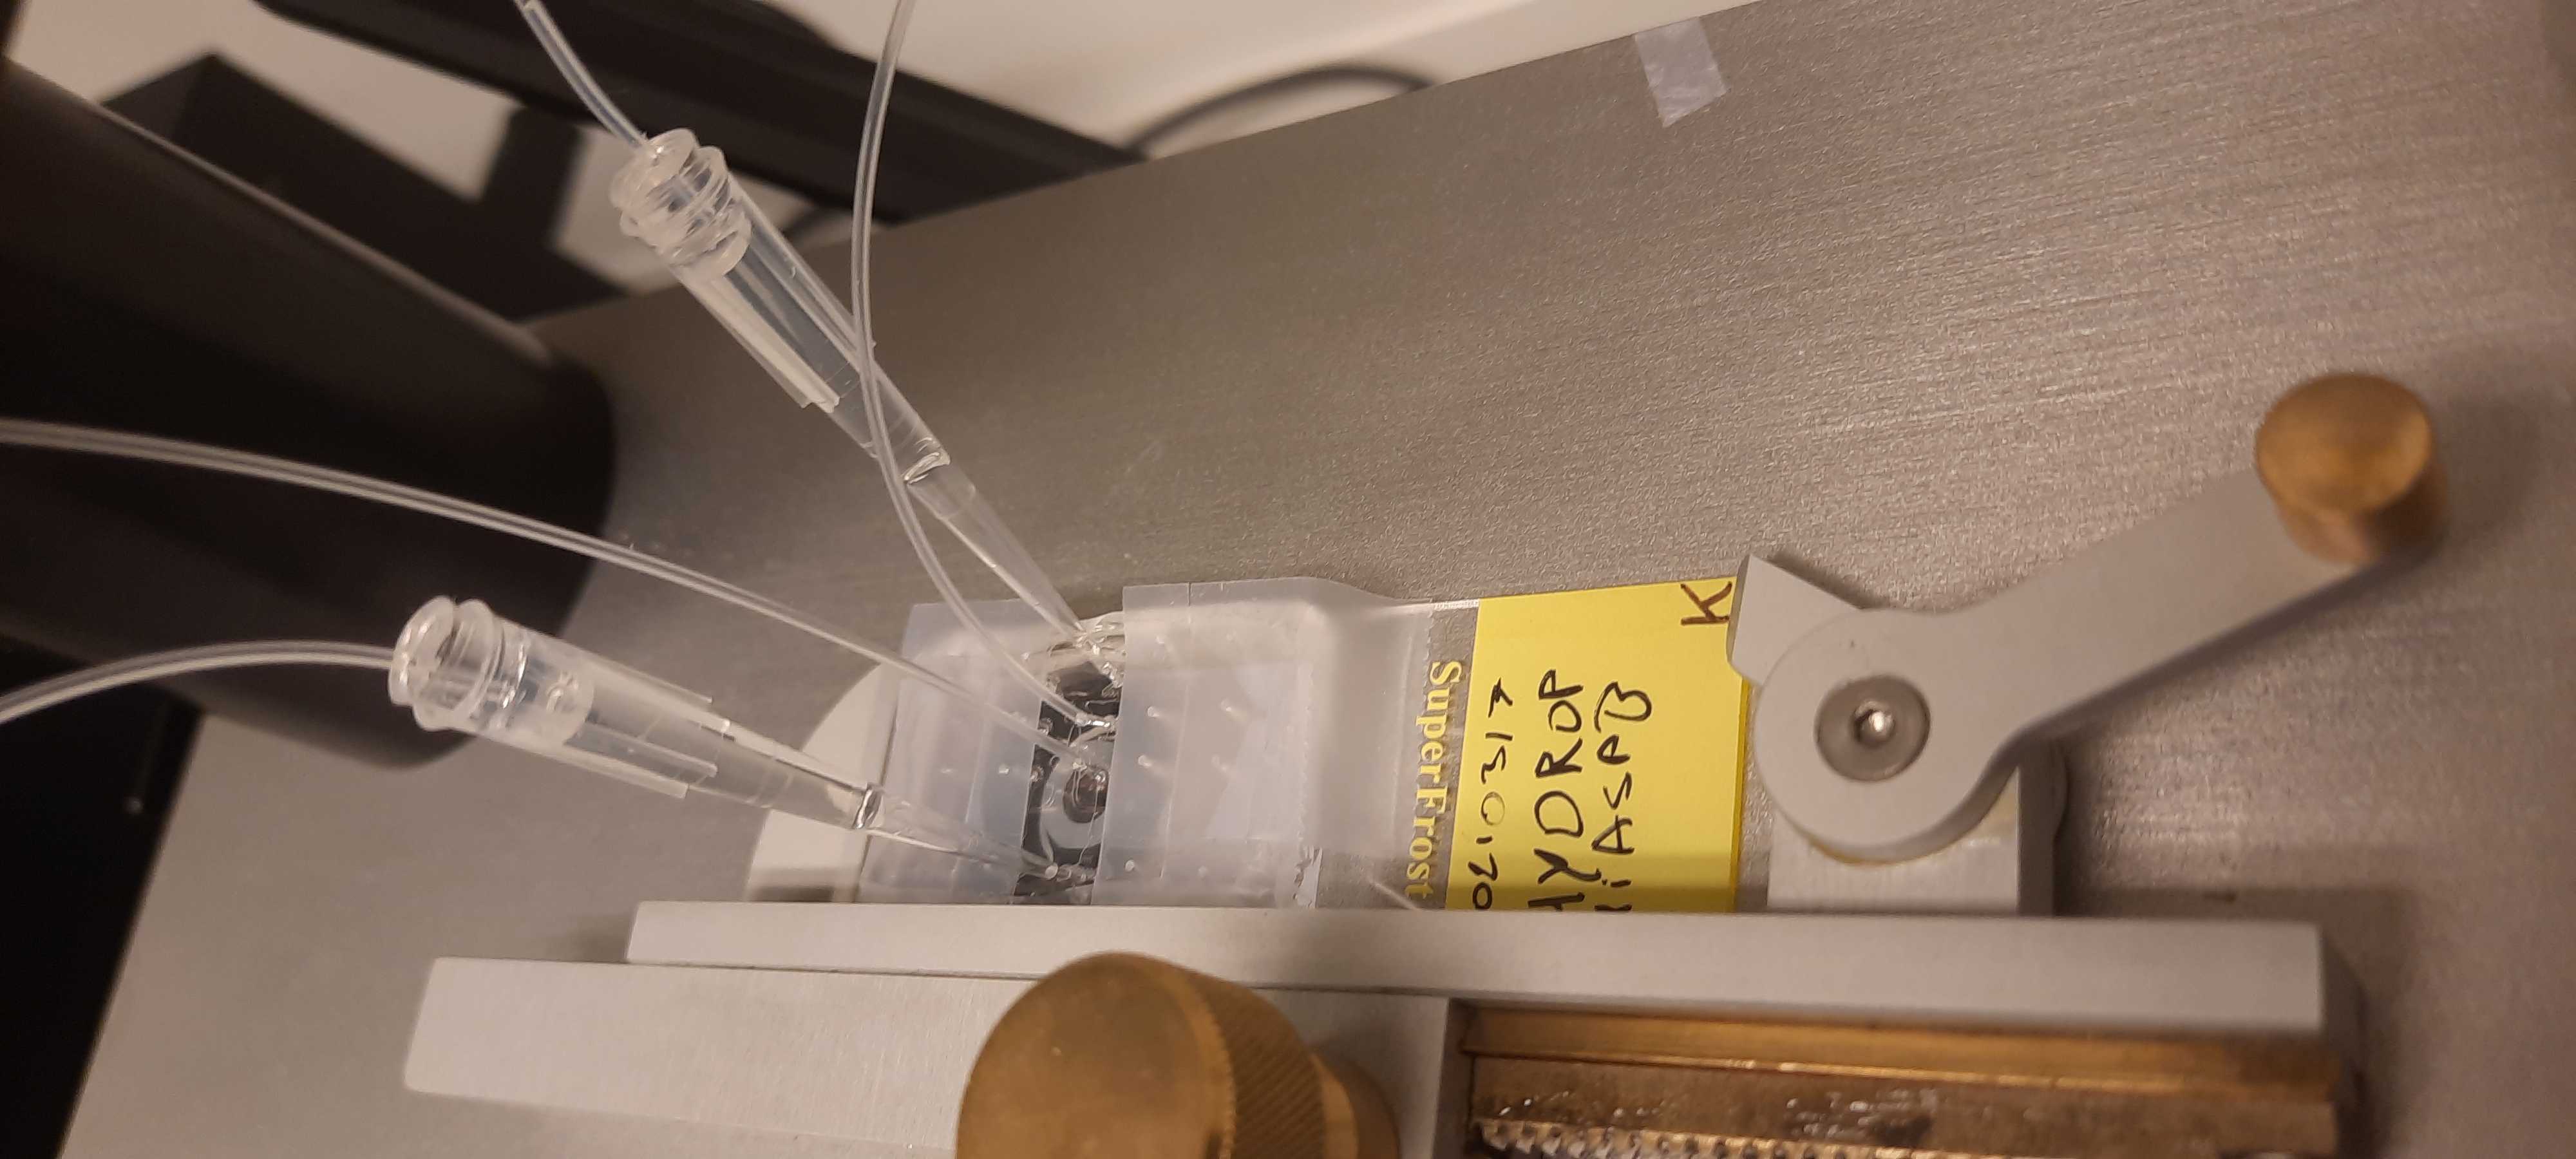
In this orientation, from north to south, you have the cell mixture, the oil, the outlet tube and finally the beads at the bottom.
Reagent Preparation
Preparing the reagents
Now, we will prepare beads, cells and RT mix, which will then be aspirated into the microfluidic tubing.
Prepare a fresh volume of Bead Lysis Buffer (BLB):
| A | B | C | D | E | F |
|---|---|---|---|---|---|
| BLB | Stock | Volume (uL) | Final | Final in drop | Unit |
| Tris-HCl (pH 7) | 1000 | 625 | 125 | 25 | mM |
| NaCl | 5000 | 150 | 150 | 30 | mM |
| MgCl2 | 1000 | 62.5 | 12.5 | 2.5 | mM |
| Tween-20 | 100 | 200 | 4 | 0.80 | % |
| TX-100 | 10 | 375 | 0.75 | 0.15 | % |
| Glycerol | 100 | 1250 | 25 | 5.00 | % |
| BSA | 10 | 500 | 1 | 0.20 | % |
| dH2O | - | 1837.5 | |||
| Total | 5000 |
Take a fresh aliquot of frozen HyDrop-RNA beads from the -80 C stock, thaw at room temperature for ~1 minute. Transfer the beads to a 1 mL tube. Rinse the bead stock aliquot tube using bead lysis buffer.
Wash the beads by resuspending them in BLB, centrifuging at 1000 xg for 1 minute, taking the supernatant and resuspending them again in BLB. Perform this step a total of three times. After the last wash, take as much supernatant as possible without aspirating any beads. The best way to do this is to remove most of the BLB using a 1 mL pipette, re-centrifuging, and then using a 200 and 10 uL pipette to remove the rest.
Keep the beads on ice until you need them.
If you do not remove all of the supernatant BLB, the beads will be sparse during the first stage of your HyDrop run, resulting in a loss of cells.
Load the beads into the correct mineral-oil filled pipette tip in the single-cell room as described below.
- Take the mineral oil-filled pipette tip destined for beads and make sure no large air bubbles are present.
- Prime the mineral oil all the way to the very end of the tip using a flow of 10 000 uL/hour
- Put the micropipette tip into the eppendorf with the centrifuged beads
- At a rate of 5000 to 10 000 ul/hour, ASPIRATE the beads into the tube. If you blow in air bubbles by accident, centrifuge and resuspend again.
- Stop aspirating beads into the tube once air bubbles are formed. If you do it right, only a small amount of beads should be left at the bottom of the tube.
- Remove any air and prime the pumps by dispensing at 5000 uL/h until no air is left in the micropipette tip.
- Plug the pipette tip into the designated bead inlet.
Any large air bubbles in the bead stock should rise to the interface between water and mineral oil. This is not a problem if the bubbles are small.
It is best to do this before preparing the cells in order to save time later on.
Prepare a single-cell suspension according to the appropriate protocol for your sample. Resuspend the cells in 0.04% to 1% BSA in PBS. Be sure to filter the cells to remove cell clumps. Generally it is best to use the lowest concentration of BSA that will prevent clumping of your cells. Concentrations higher than 1% may lead to aggregation nof BSA with other reagents within the RT mix, leading to blockage of the microfluidic channels.
Aim for a cell concentration of at least 1 M/mL
The following step is crucial for cell recovery. Here, we want to resuspend a number of cells equal to ~1.5x the number of cells you ultimately want to recover in the data into the RT mix. However, the volumetric space that we have reserved for cells suspension is limited. In this example case, for a total volume of 170 uL of RT mix, we reserve 31 uL for cell suspension/water.
For example, if you want to recover 14 000 cells, you would want to take a volume of single-cell suspension containing 21000 cells. If your single cell suspension has a concentration of 1 M/mL, you would need 21 uL of your cell suspension. You would add 139 ul of RT pre-Mix (RT mix without any water or cell suspension) to your 21 uL of cell pellet and top off to 170 uL using 10 uL of water.
| A | B | C | D | E | F |
|---|---|---|---|---|---|
| RT Mix | Stock | volume (uL) | Final | Final in droplet | Unit |
| Maxima RT buffer | 5 | 44.2 | 1.3 | 1 | X |
| dNTP | 10 | 15.3 | 0.9 | 0.75 | mM |
| DTT | 1000 | 4.3 | 25 | 20 | mM |
| GTP | 100 | 2.2 | 1.3 | 1 | mM |
| Optiprep | 100 | 25.5 | 15 | 15 | % |
| Rnase Inhibitor (RRI) | 40 | 5.5 | 1.3 | 1 | U/ul |
| Max H- RT | 200 | 12.8 | 15 | 12 | U/ul |
| TSO-Dropseq (add prior to run) | 250 | 8.5 | 12.5 | 10 | uM |
| PEG-8K | 40 | 18.7 | 4.4 | 3.50 | % |
| Cells in 1% BSA-PBS | 21 | ||||
| dH2O | 10 | ||||
| Total: | 170 |
Proceed to HyDrop run immediately with the cells kept on ice.
HyDrop Run Stage
HyDrop Run
Now, we will proceed to the actual HyDrop run. Before proceeding, make sure that the following steps are ready:
- Outlet connected to waste
- Beads loaded into micropipette tip, and connected to chip
- Microscope and pumps ready to go
- PCR machine available for RT
Load the cells as follows (identical to bead loading):
- Take the mineral oil-filled pipette tip destined for RT mix and make sure no large air bubbles are present.
- Prime the mineral oil all the way to the very end of the tip using a flow of 10 000 uL/hour
- Put the micropipette tip into the eppendorf with the centrifuged beads
- At a rate of 5000 to 10 000 ul/hour, ASPIRATE the RT mix into the tube. If you blow in air bubbles by accident, centrifuge and resuspend again.
- Stop aspirating beads into the tube once air bubbles are formed. If you do it right, only a small amount of RT mix should be left at the bottom of the tube.
- Remove any air and prime the pumps by dispensing at 5000 uL/h until no air is left in the micropipette tip.
- Plug the pipette tip into the designated inlet.
Start the HyDrop run by priming all flows as follows:
Cells: 200 ul/h
Beads: 200 ul/h
Oil: 100 ul/h
Oil will show up first, as it is least viscous. When it does, reduce the oil flow to 50.
Next, RT mix will show up. Put RT mix to 50 uL in order to not lose any sample while the beads are priming into the microfluidic chip.
Once all three flows have reached the flow focusing point, increase the flow rates:
Cells: 600 ul/h
Beads; 150 ul/h
Oil: 950 ul/h
It is always up to the user to adjust the flow rates as necessary. When droplets are too large, either decrease cell and bead flow, or increase oil flow. When the total flow of the system is too high, delamination of the PDMS chip from the glass may occur.
Now, when the droplet formation is stable, be ready to change the waste collection Eppendorf tube to the actual sample collection Eppendorf tubes. Put 50 uL total of emulsion into each 200 uL PCR tube. This can be calculated as follows, assuming you use flows as we describe above:
Cell/RT flow + bead flow = 600 uL/h + 150 uL/h = 750 uL/h
The cell/RT flow fraction = 600 uL/h / 750 uL/h = 0.8
We can read the volume that a specific channel has pumped through on the DG Onyx control screen. We desire a total volume of 50 uL, thus:
The volume of cell/RT in 50 uL of emulsion = 0.8 * 50 uL = 40 uL
Thus, we monitor the cell/RT flow volume, and every time 40 uL has been dispensed, we switch the outlet to a new 200 uL PCR tube.
Alternatively, you can collect everything into a 1.5 mL eppendorf tube, and aliquot your desired volumes to your PCR tubes. We try to avoid it as it may lead to merging droplets if you are not careful. Additionally, you will lose some of the emulsion to your pipetting as well as to the original 1.5 mL eppendorf tube.
The run ends when the RT mix runs out. When this happens, you will see a change from aqeous RT mix to viscous mineral oil in the flow focus. Unplug the sample outlet tube and let the remains flow into the sample collection tubes.
Reverse Transcription
Transfer the emulsions to a PCR block for the following program:
| A | B | C |
|---|---|---|
| RT Program | ||
| 42 C | 90 min | |
| Cycle: | ||
| 50 C | 2 min | x11 |
| 42 C | 2 min | |
| 85 C | 5 min | |
| 4 C | inf |
While RT is on, you can prepare GITC buffer and other components necessary in the later steps.
cDNA Clean-up Stage
Droplet Breaking and Purification
Now, we will break all the droplets and purify the cDNA, which is the result of our in-droplet reverse transcription reaction.
Remove the bottom oil phase without disturbing the emulsion. It is not harmful to leave ~10 uL of oil.
Add 55 uL of the GITC Buffer and mix well.
Add 5 uL of 1M DTT
| A | B | C | D | E |
|---|---|---|---|---|
| GITC Buffer | Stock | Volume (uL) | Final | Unit |
| GITC | 6 | 834 | 5 | M |
| Tris HCL - 7.4 | 1 | 50 | 50 | mM |
| EDTA | 0.5 | 50 | 25 | mM |
| dH2O | - | 66 |
Add 125 ul of droplet breaking solution (20% PFO in HFE) to each sample. The emulsion will now break up into a single separated water/oil phase system. You can also use leftover 10x droplet breaking solution if you have it.
Incubate on ice for 5 mins.
Remove and discard the the oil phase without losing any of the aqeous phase. It's ok if some oil remains.
Produce EB-DTT-Tween and EB-DTT. Keep in mind that you need at least 30 uL per sample.
| A | B | C | D | E |
|---|---|---|---|---|
| EB-DTT-Tw | Stock | Volume (uL) | Final | Unit |
| DTT | 1000 | 2 | 10 | mM |
| Tw | 10 | 2 | 0.1 | % |
| EB | - | 196 |
| A | B | C | D | E |
|---|---|---|---|---|
| EB-DTT | Stock | Volume (uL) | Final | Unit |
| DTT | 1000 | 2 | 10 | mM |
| EB | - | 198 |
Proceed with 0.9X Ampure XP purification as follows:
- Add 0.9 volumes of Ampure XP beads to the aqueous phase (99 uL).
- Mix well and incubate for 5 minutes at room temperature, mix again, and incubate for 5 minutes more.
- Put the samples on a Nd magnet, wait a few minutes until the magnets separate well and the solution turns clear
- Discard the supernatant
- Gently add 300 uL of 80% EtOH, wait for 30 seconds, and remove. Perform this wash a total of 2 times. Make sure to not resuspend the Ampure beads during this step and to remove as much 80% EtOH after the last wash as possible.
- Air-dry the samples for 2 minutes.
- Resuspend the Ampure bead pellet in 30 uL of EB-DTT-Tween and transfer the supernatant to a fresh PCR tube
Perform ExoI clean-up to remove unused barcode primers. Prepare the following ExoI mix per sample:
| A | B | C | D |
|---|---|---|---|
| Library | Stock | V (ul) | Final |
| NEBuffer 3.1 | 10X | 4 | 1X |
| Thermolabile Exo-I | 4 | ||
| Library | 30 | ||
| dH2O | - | 2 | - |
Incubate at 37 C for 5 minutes followed by a denaturing heat shock at 80 C for 1 minute.
Add 2 ul of 1M DTT to each sample and perform a second ampure purification on the samples, but now with 0.8 x volume (33.6 uL) of Ampure beads:
- Add 0.8 volumes of Ampure XP beads to the aqueous phase (33.6 uL).
- Mix well and incubate for 5 minutes at room temperature
- Put the samples on a Nd magnet, wait a few minutes until the magnets separate well and the solution turns clear
- Discard the supernatant
- Gently add 300 uL of 80% EtOH, wait for 30 seconds, and remove. Perform this wash a total of 2 times. Make sure to not resuspend the Ampure beads during this step and to remove as much 80% EtOH after the last wash as possible.
- Air-dry the samples for 2 minutes.
- Resuspend the SPRI bead pellet in 40 uL of EB-DTT and transfer the supernatant (after magnetisation) to a fresh PCR tube
Perform IS-PCR by preparing the following reaction mix for each sample:
| A | B | C |
|---|---|---|
| Stock | V (ul) | |
| 2X KAPA HiFi PCR mix | 200 | 50 |
| Library | - | 40 |
| SMART PCR primer (10 uM) | 10 | 10 |
| Total: | 100 |
Thermocycle the PCR mixes according to the following program:
| A | B |
|---|---|
| 95 C | 3 min. |
| 13 cycles of: | |
| 98 C | 20 s |
| 63 C | 20 s |
| 72 C | 3 min. |
| Final cycle of: | |
| 72 C | 5 min. |
| 4 C | Hold |
Add 2 ul of 1M DTT to each sample and perform a SPRI purification on the samples, but now with 0.6 x volume (60 uL) of SPRI beads:
- Add 0.6 volumes of SPRI beads to the aqueous phase (60 uL).
- Mix well and incubate for 5 minutes at room temperature
- Put the samples on a Nd magnet, wait a few minutes until the magnets separate well and the solution turns clear
- Discard the supernatant
- Gently add 200 uL of 80% EtOH, wait for 30 seconds, and remove. Perform this wash a total of 2 times. Make sure to not resuspend the SPRI beads during this step and to remove as much 80% EtOH after the last wash as possible.
- Air-dry the samples for 2 minutes.
- Resuspend the SPRI bead pellet in 28 uL of EB-DTT and transfer the supernatant (after magnetisation) to a fresh PCR tube
Perform Qubit quantification and Agilent BioAnalyzer (or equivalent) quality control on the cDNA libraries. A good cDNA yield for 10k cells is 20 ng/uL or higher.
NEB Ultra Library Preparation
NEB Ultra Library Preparation
Here, we will follow a slightly modified NEB Ultra II protocol for samples of <= 100 ng of cDNA.
Ensure that the Ultra II FS Reaction Buffer is completely thawed. If a precipitate is seen in the buffer, pipette up and down several times to break it up, and quickly vortex to mix. Place on ice until use.
Vortex the Ultra II FS Enzyme Mix 5-8 seconds prior to use and place on ice.
Prepare the fragmentation reaction buffer as detailed below. Add a volume of cDNA library that corresponds to > 100 ng of cDNA total. 80 is a good number. If ~50-80 ng cannot be attained, use as much as you can, but be aware that the resulting library may not be of good quality.
| A | B |
|---|---|
| Volume (uL) | |
| (yellow) NEBNext Ultra II FS Reaction Buffer | 7 |
| (yellow) NEBNext Ultra II FS Enzyme Mix | 2 |
| cDNA sample | x |
| EB buffer | 26-x |
| Total: | 35 |
Pipette mix the component well and incubate the tubes for fragmentation according to the following program:
| A | B |
|---|---|
| 37 C | 10 min. |
| 65 C | 30 min. |
| 4 C | Hold |
Add 15 ul of EB to each sample and perform a SPRI purification on the samples, but now with 0.8 x volume (40 uL) of SPRI beads:
- Add 0.8 volumes of SPRI beads to the aqueous phase (40 uL).
- Mix well and incubate for 5 minutes at room temperature
- Put the samples on a Nd magnet, wait a few minutes until the magnets separate well and the solution turns clear
- Discard the supernatant
- Gently add 200 uL of 80% EtOH, wait for 30 seconds, and remove. Perform this wash a total of 2 times. Make sure to not resuspend the SPRI beads during this step and to remove as much 80% EtOH after the last wash as possible.
- Air-dry the samples for 2 minutes.
- Resuspend the SPRI bead pellet in 35 uL of EB and transfer the supernatant (after magnetisation) to a fresh PCR tube
Before use, mix the NEBNext Ultra II Ligation Master Mix and Ligation Enhancer by pipetting up and down. Prepare the adapter ligation mix as follows:
| A | B |
|---|---|
| Volume | |
| Fragmented DNA | 35 |
| (red) NEBNext Ultra II Ligation Master Mix | 30 |
| (red) NEBNext Ligation Enhancer | 1 |
| (red) NEBNext Adaptor for Illumina | 2.5 |
| Total | 68.5 |
Centrifuge briefly and mix the contents well by pipetting up and down.
Incubate at 20°C for 15 minutes in a thermocycler with the heated lid off.
Add 3 μl of (red) USER® Enzyme to the ligation mixture.
Mix well and incubate at 37°C for 15 minutes with the heated lid set to 45°C
Add 28.5 ul of EB buffer to top the samples off to 100 uL. Perform a SPRI purification on the samples, now with 0.8 x volume (80 uL) of SPRI beads:
- Add 0.8 volumes of SPRI beads to the aqueous phase (80 uL).
- Mix well and incubate for 5 minutes at room temperature
- Put the samples on a Nd magnet, wait a few minutes until the magnets separate well and the solution turns clear
- Discard the supernatant
- Gently add 200 uL of 80% EtOH, wait for 30 seconds, and remove. Perform this wash a total of 2 times. Make sure to not resuspend the SPRI beads during this step and to remove as much 80% EtOH after the last wash as possible.
- Air-dry the samples for 2 minutes.
- Resuspend the SPRI bead pellet in 30 uL of EB and transfer the supernatant (after magnetisation) to a fresh PCR tube
Perform the final PCR with the following PCR mix:
| A | B | C | D | E |
|---|---|---|---|---|
| Stock | Volume | Final | Unit | |
| KAPA HiFi | 200 | 50 | 100 | % |
| Hyi7-X | 10 | 10 | 1 | uM |
| Hyi5-TS-X | 10 | 10 | 1 | uM |
| Library | 30 | |||
| Total: | 100 |
Be sure to use a different i5 index for every sample!
Perform the following thermocycling program:
| A | B |
|---|---|
| 95 C | 3 min. |
| 13 cycles of: | |
| 98 C | 20 s |
| 64 C | 30 s |
| 72 C | 30 s |
| Final cycle: | |
| 72 C | 5 min. |
| 4 C | Hold |
Perform a SPRI purification on the samples, now with 0.8 x volume (80 uL) of SPRI beads:
- Add 0.8 volumes of SPRI beads to the aqueous phase (80 uL).
- Mix well and incubate for 5 minutes at room temperature
- Put the samples on a Nd magnet, wait a few minutes until the magnets separate well and the solution turns clear
- Discard the supernatant
- Gently add 200 uL of 80% EtOH, wait for 30 seconds, and remove. Perform this wash a total of 2 times. Make sure to not resuspend the SPRI beads during this step and to remove as much 80% EtOH after the last wash as possible.
- Air-dry the samples for 2 minutes.
- Resuspend the SPRI bead pellet in 30 uL of EB and transfer the supernatant (after magnetisation) to a fresh PCR tube
Perform QuBit and BioAnalyzer quality control.
The library is ready for sequencing.
