HyDrop-ATAC v1.0
Florian De Rop, Suresh Poovathingal, Stein Aerts
atac-seq
atac
tn5
hydrogel
hydrop
hydrop-atac
droplet microfluidics
microfluidic
microfluidics
transposase
assay for transposase accessible chromatin
single-cell
single cell
single
ASAPCRN
Abstract
Step-by-step protocol for execution of HyDrop-ATAC.
Steps
Preparation Stage
User manual sheet
The sheet below should streamline your execution of the protocol. It contains adaptive tables for all buffers and mixes. The tables will change depending on the parameters you enter at the start of the sheet, such as number of cells and total volume of emulsion you want to make. Importantly, if you find that your flow rates of optimal bead/cell loading differ for your microfluidic setup, the sheet will take that into account when calculating buffer concentrations (since flow rates determine concentration of enzymes within droplets).
20210825p_USER_HyDrop_ATAC_v1_7_1.xlsx
Below is also a price calculation for HyDrop-ATAC:
20210827_supp_methods_table_hydrop_pricecalc.xlsx
A reagent list:
And a list of oligonucleotides:
20210712_supp_methods_table_hydrop_oligonucleotide_list.xlsx
Please don't hesitate to contact us at hydrop.aertslab@gmail.com for any questions or remarks.
Setting up the Microfluidic Framework
You can perform these steps during the tagmentation incubation.
Boot up Droplet Genomics onyx.
Check syringe diameters in Onyx program. Any deviations from the true syringe diameter will result in biased flow rates, as the pump converts imposed flow rates to linear motion of the syringe plunger.
Connect laptop or tablet to Onyx
Fill two 3 mL syringes with ~1 mL fresh mineral oil each using a 1 mL pipette. Connect a needle after the syringes are filled. Do not fill the syringes by aspirating mineral oil through a pipette as this technique can introduce unwanted air bubbles. Moreover, mineral oil on the syringe needle will complicate connecting the tubing. Tap the syringe so that bubbles rise to the top, then push all air out. The syringe should be free of air bubbles.
Connect a ~15 cm piece of 1 mm inner diameter tubing to each syringe. The tubing should be long enough to comfortably reach from the syringe when it is in position to the inlet of the microfluidic chip. If the tubing is too long, it may get in the way during operation. If the tubing is too short, it may tear or come undone when you move the microfluidic chip around.
Using a 6 mm and 1 mm biopsy needle, punch out a small donut-shaped plug out of a ~1 cm thick PDMS slab. The outer diameter should snugly fit into the filterless pipette tip, and the inner diameter should firmly accomodate the microfluidic tubing.
Connect the syringe's tubing to the pipette tip through the PDMS plug. Now, mineral oil out of the syringe into the tubing until the micropipette tip is completely filled. Then, fix the syringes in the DG Onyx pump system, including the aspiration clamps. These syringes are now ready to aspirate the beads and cell sample respectively.
Later on, we will aspirate the cell and bead mix into the micropipette tip (NOT into the syringe, if we were to aspirate into the syringe, we would have too much dead volume in the tubing). When fixing the syringes to the DG Onyx pumps, some liquid may be pushed out or sucked in. This is normal and can be corrected later
Fill a 3 mL syringe with ~1.5 mL of RAN Biotech emulsion oil using a pipette tip, connect a needle and a piece of 1 mm tubing. Push the carrier oil all the way to the end of the tubing, and insert the syringe into the DG Onyx pump.
When fixing the syringes to the DG Onyx pumps, some liquid may be pushed out or sucked in. This is normal and can be corrected later
Take a HyDrop High Aspect 65/80 microfluidic chip and inspect it under a microscope for defects or dust. Fix the chip to the moving platform under the microscope using a piece of tape. Make sure that at least 3 sets of channels are available for the run in case an error occurs.
Put the chip horizontally under the camera so that droplets will flow north/south, not east/west.
Connect a piece of 1 mm tubing (~7 cm) to the outlet.
Make sure 250 uL PCR tubes are at haropnd for sample collection.
Don't take a piece of tubing that is too long. This leads to a big time delay between end of chip and end of tube. Every now and then, during the run, you want to sample the droplets by touching a microscopy slide with the end of the outlet and inspecting the droplets under the microscope. If you change flow parameters during the run, you want to be able to inspect the new droplet sizes and bead loading ASAP.
A finished set-up look should like so:
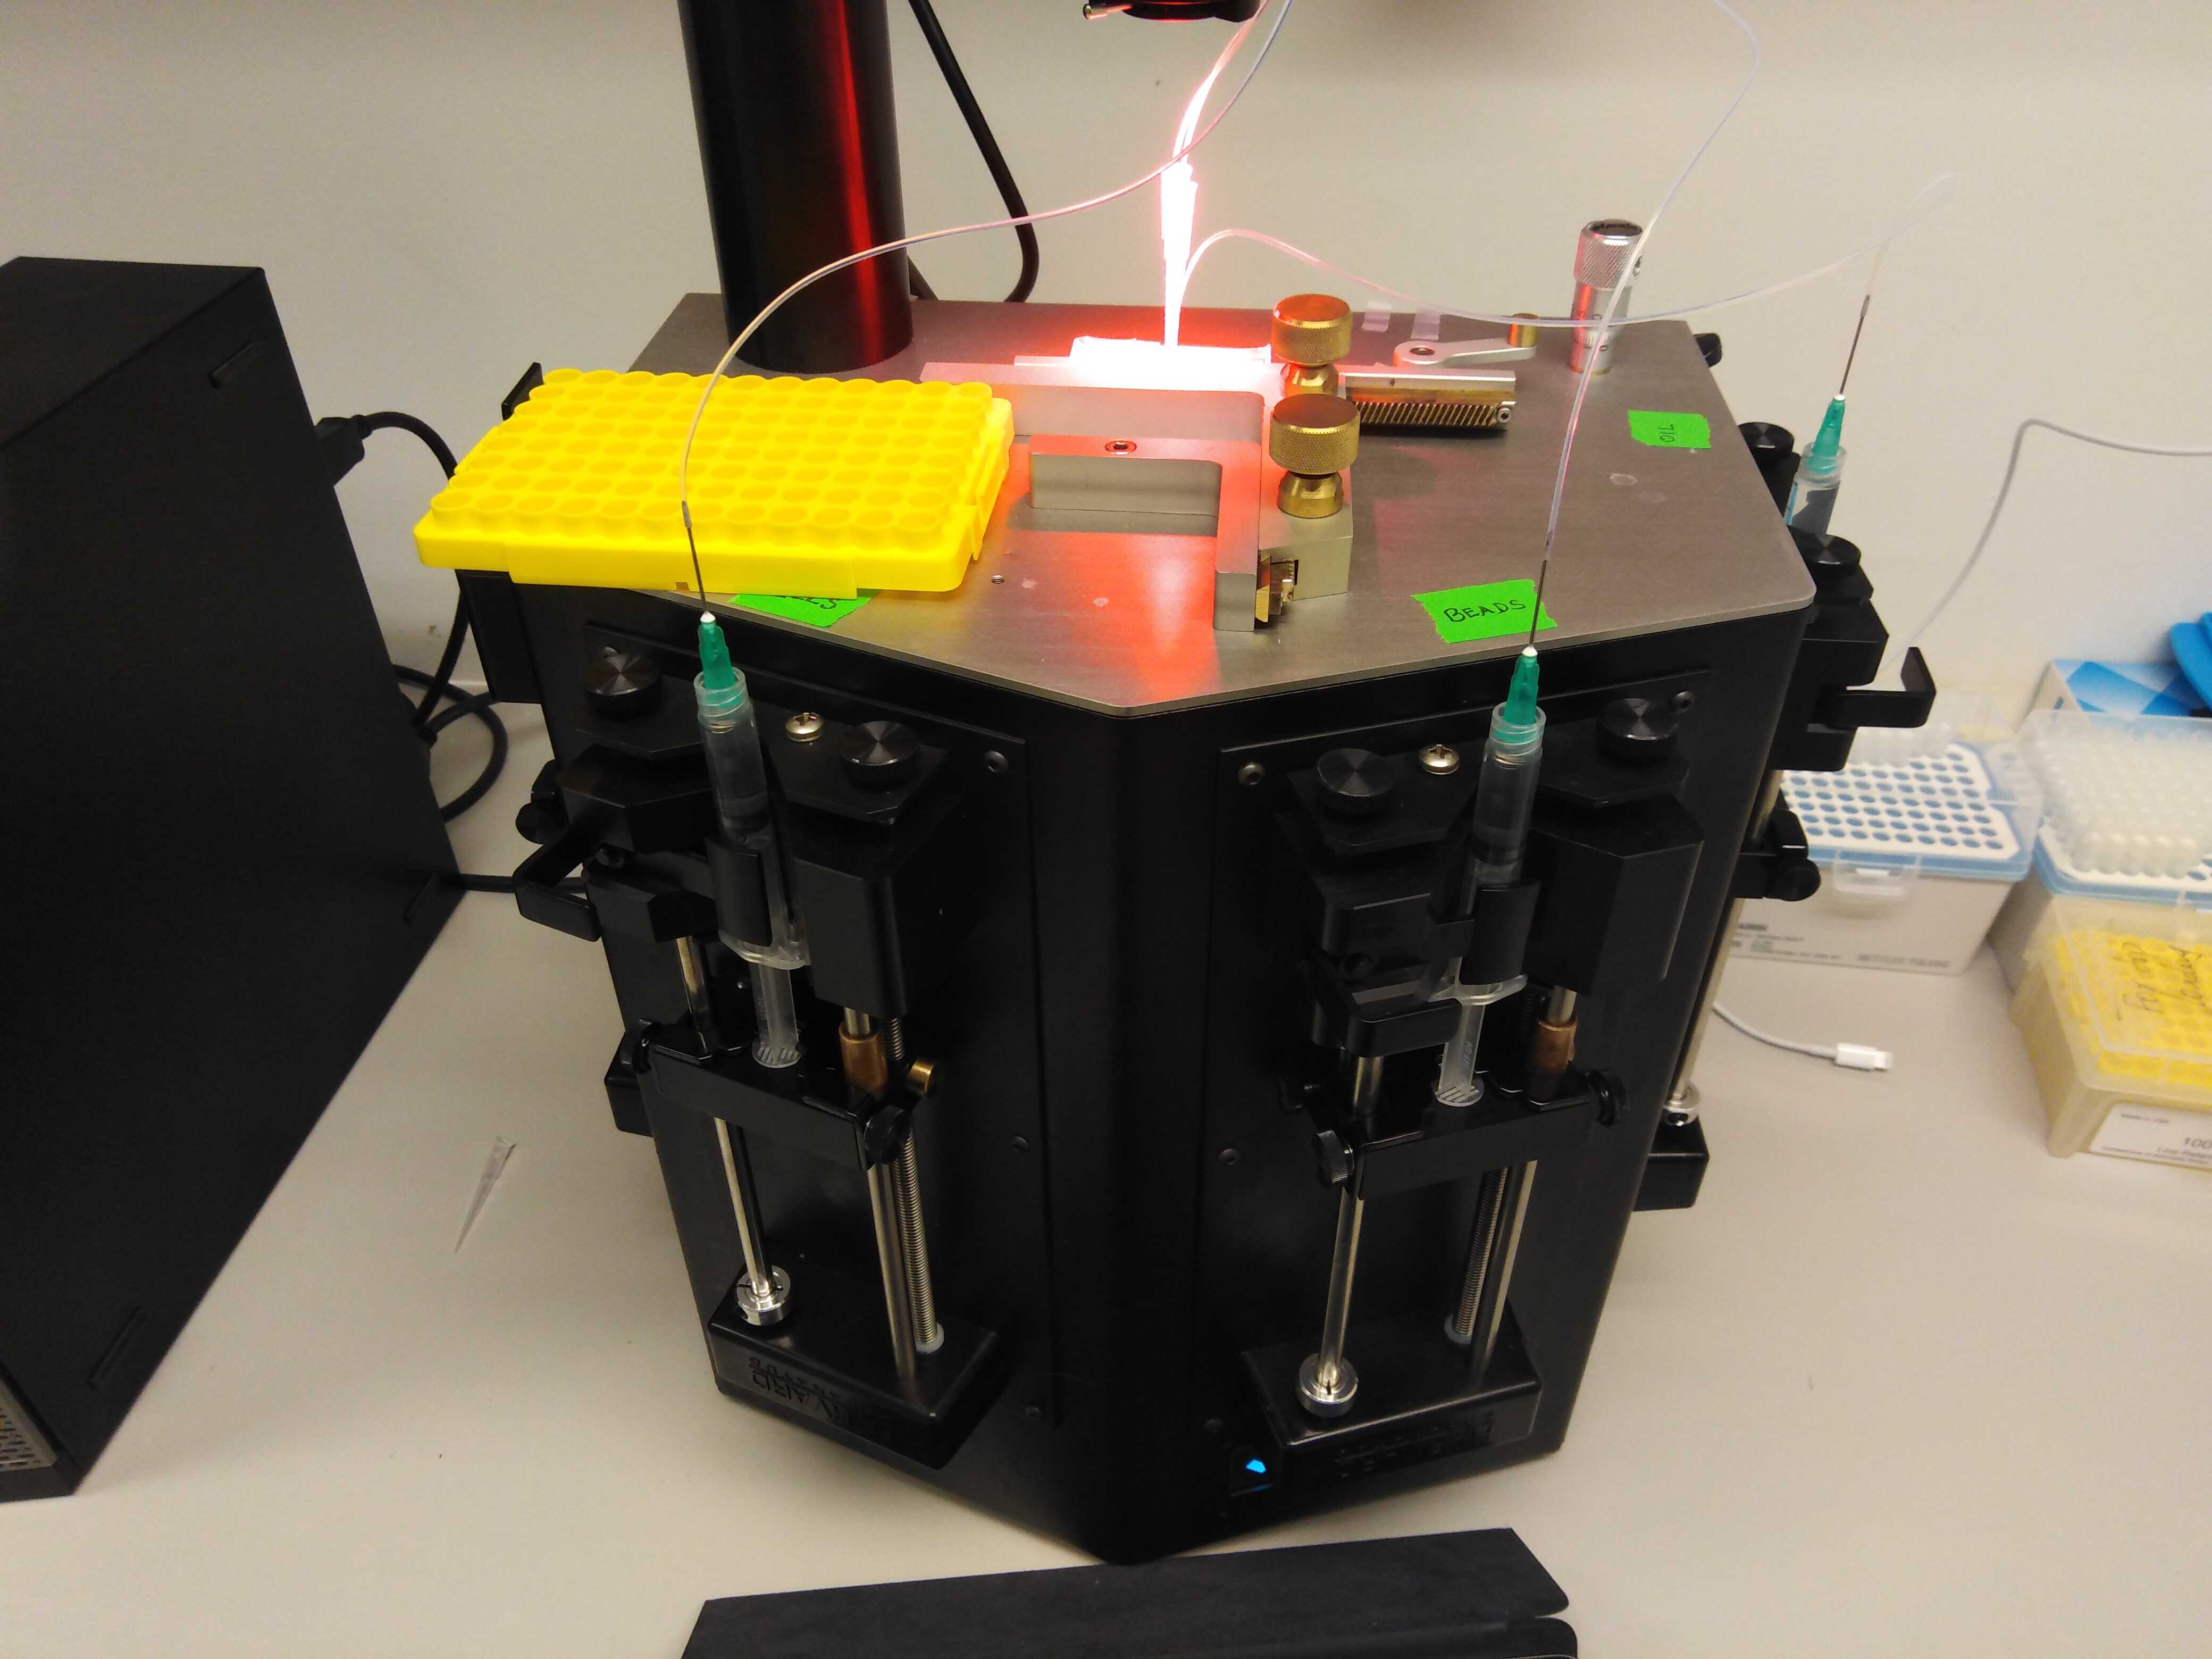
Note that we use a cover from a pipette tip box as a seating for the samples. For longer runs (10 minutes or more), we recommend that you use a small ice box or cold block to seat the samples as they are produced.
The plugged-in chip should look like so:
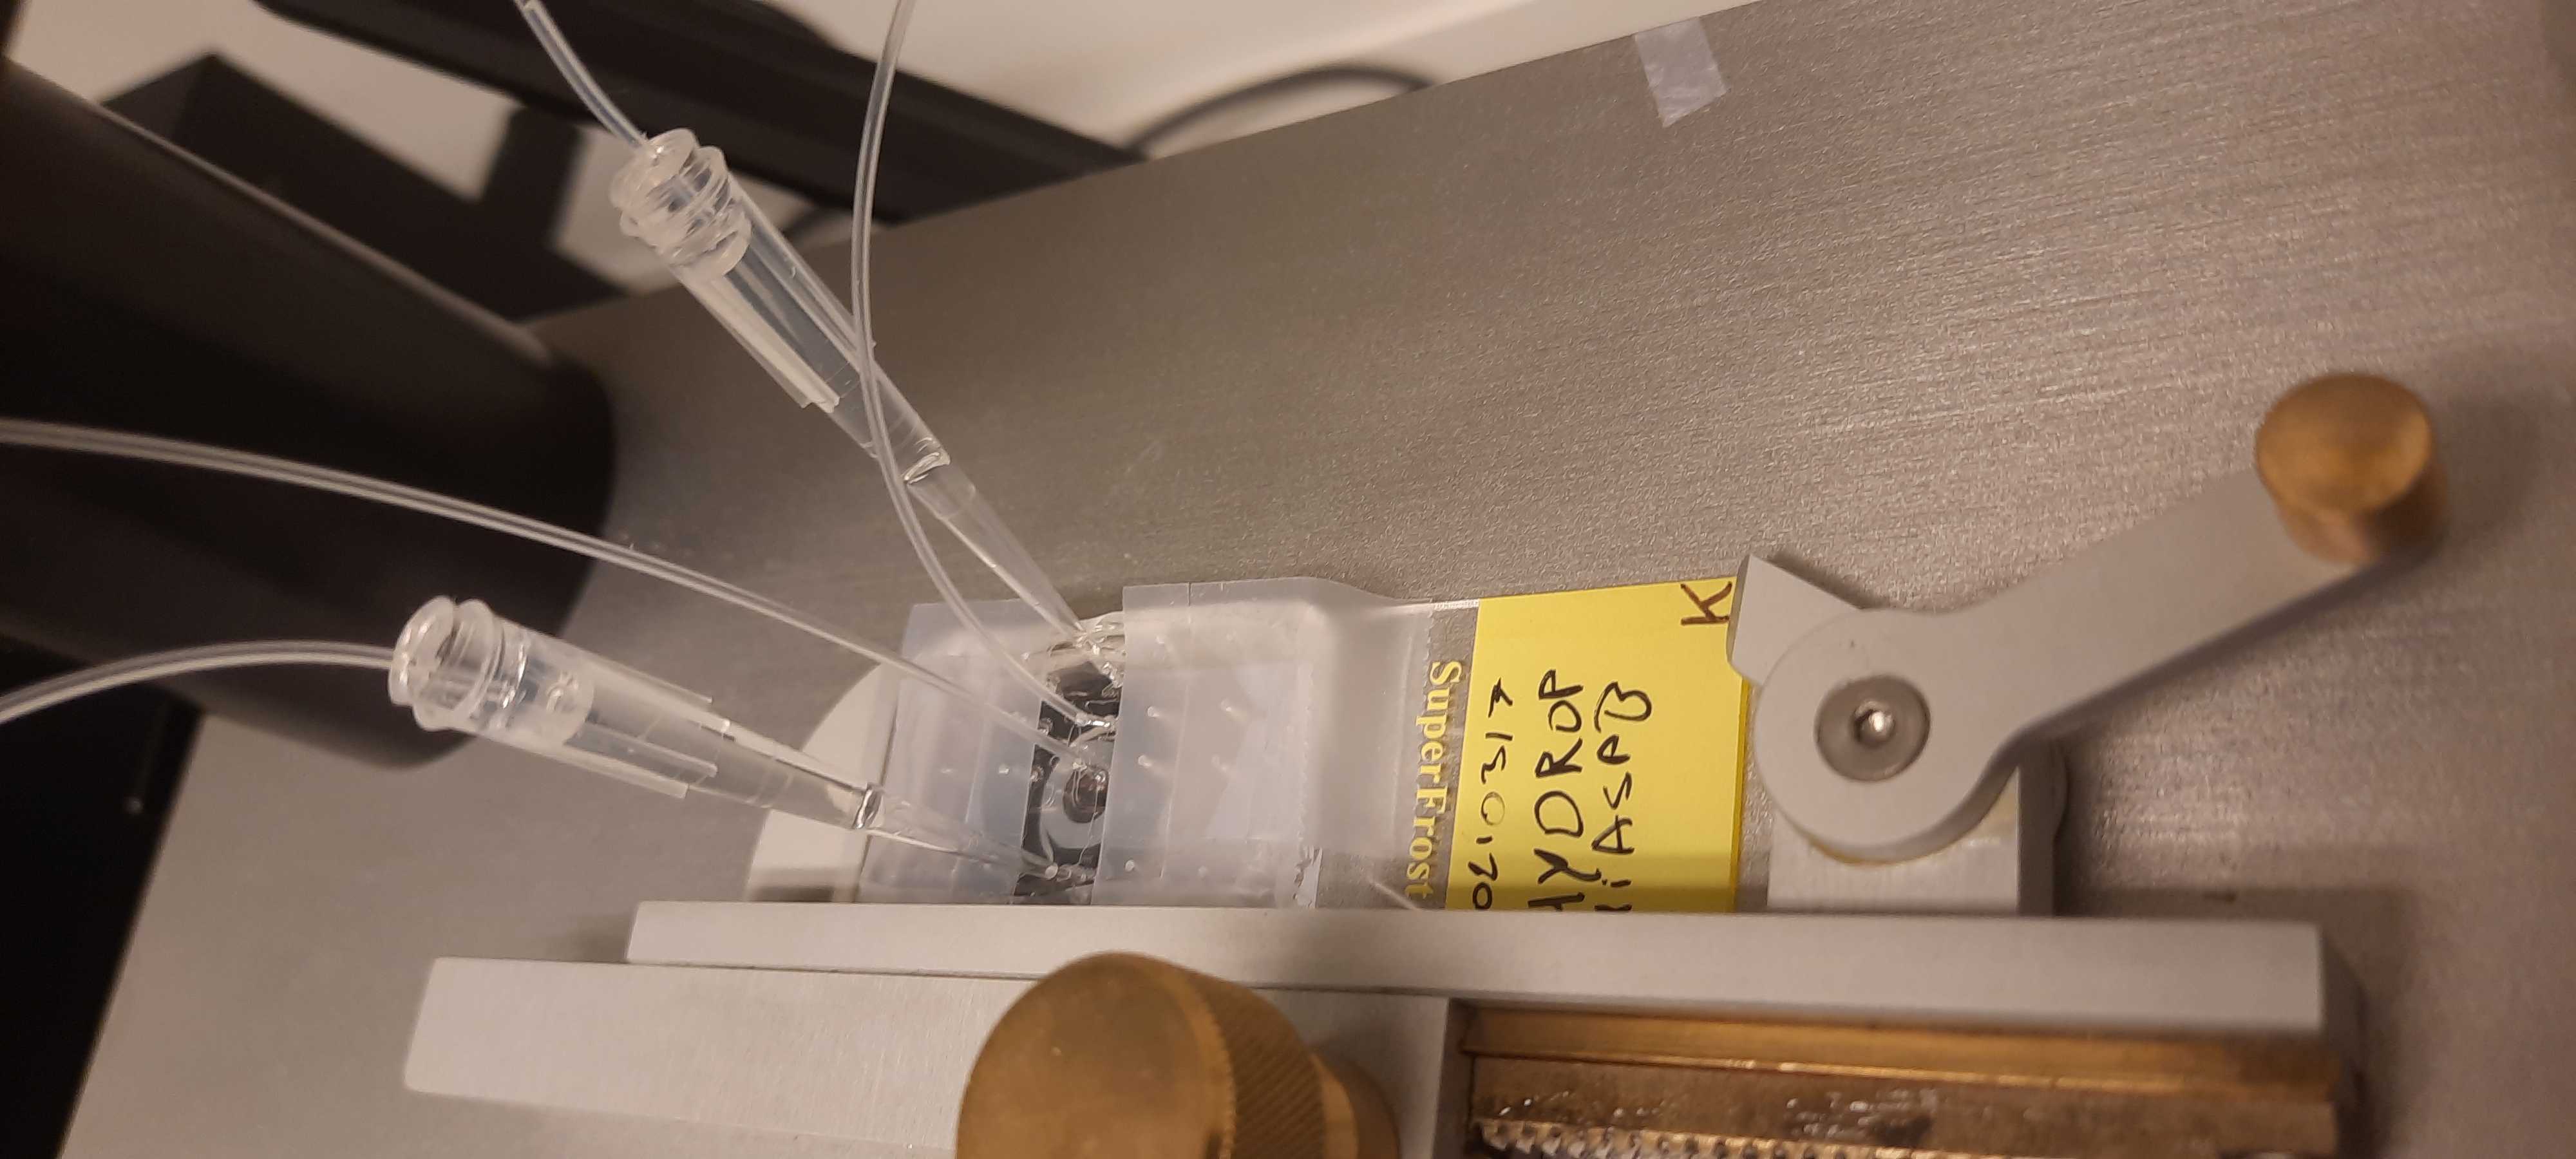
In this orientation, from north to south, you have the cell mixture, the oil, the outlet tube and finally the beads at the bottom.
Tagmentation
Preparing tagmented nuclei
Thaw following reagents:
- BSA 10%
- Digitonin 5% (need to make 1% solution!)
- Phusion HF Buffer
- dNTPs 25 m
- DTT 1M
- Pitstop 50 mM (small aliquot of 3 uL)
- Pitstop 1 mM (small aliquot of 3 uL)
We will now take a single cell suspension, isolate nuclei, and tagment them. Alternatively, your own nuclei preparation protocol can be used. In that case, wash nuclei in ANWB before tagmenting. Centrifugation conditions can be adapted to your sample.
Prepare a single-cell suspension according to the appropriate protocol for your sample.
Pellet your cells (300x g``0h 5m 0s``4°C) and resuspend in 1 mL of ice-cold PBS. Perform this PBS wash a total of two times. If you are using a very small sample (e.g. 50k cells), be extra careful with washing steps as to not lose any cells. All washing steps will incur losses.
During these centrifugation times, prepare ATAC Lysis Buffer (ALB, not to be confused with Bead Lysis Buffer) and ATAC Nuclei Wash Buffer (ANWB).
| A | B | C | D | E |
|---|---|---|---|---|
| ATAC Lysis Buffer | Vol (uL) | Stock | Final | |
| dH2O | 388.5 | |||
| PBS-BSA | 50 | 10% | 1% | |
| Pitstop | 35 | 1000 | 70 | uM |
| Tris-HCl | 5 | 1000 | 10 | mM |
| NaCl | 5 | 1000 | 10 | mM |
| Tween 20 | 5 | 10% | 0.10% | |
| NP-40 | 5 | 10% | 0.10% | |
| MgCl2 | 1.5 | 1000 | 3 | mM |
| Digitonin | 5 | 1% | 0.01% | |
| Total: | 500 |
| A | B | C | D | E |
|---|---|---|---|---|
| ATAC Nuclei Wash Buffer | Vol (uL) | Stock | Final | |
| dH2O | 2167.5 | |||
| PBS-BSA | 250 | 10% | 1% | |
| Tris-HCl pH 7.4 | 25 | 1000 | 10 | mM |
| Tween 20 | 25 | 10% | 0.10% | |
| NaCl | 25 | 1000 | 10 | mM |
| MgCl2 | 7.5 | 1000 | 3 | mM |
| Total: | 2500 |
Once cells have been washed twice in PBS, perform a cell count. If you see visually that the cells are sticking together, filter the cells. Viability should be >95%. Then lyse cells as follows:
- Take a volume equivalent to 500 000 cells to a fresh 1.5 mL tube and pellet (300g, 5 min. 4C). More cells are not necessary and may slow down lysis.
- Discard supernatant and resuspend pellet in of ATAC Lysis Buffer (ALB). Incubate on ice for 5 min. During this and subsequent incubation steps, prepare 2X TD mix and tagmentation mix (see below).
- After the 5 minutes of lysis incubation has ended, you can do a viability check. The viability of the nuclei should be <5% If viability is > 30%, you can consider prolonging lysis. If not, you can proceed further. Be sure to act fast when doing the viability check, as prolonged exposure to the ALB can damage your nuclei.
- Add 1 mL of ice-cold temperature ATAC Nuclei Wash Buffer (ANWB) to quench the lysis.
- Pellet nuclei (300 xg, 5 min. 4C) and resuspend in 50 uL of PBS.
- Filter the 100 uL of nuclei suspension through a pipette tip filter. To do this, turn the pipette to 1 mL. Aspirate the 100 ul of nuclei suspension without aspirating any air. Then, put your tip into the filter, and dispense the 50 uL. Then, push all the way through (pushing through about 950 uL of air) to get every last bit out of the filter.
- Perform a nuclei count in 1/5 dilution (don't forget to multiply obtained cell count by 5.
Perform tagmentation as follows:
- Prepare 4X ATAC TD.
- Take a volume x corresponding to 50 000 nuclei and add them to the ATAC Reaction Mix. Then, add 26-x uL of PBS. Then add 4 uL of Tn5.
- Incubate the tagmentation mix 1 hour at 37 C. Tagmentation times and temperatures can vary from sample to sample. For smaller cells such as fly and PBMC, 30 min., 55 C can be used, for example.
| A | B | C | D | E |
|---|---|---|---|---|
| 4X ATAC TD | Vol (uL) | Stock | Final | |
| dH2O | 135 | |||
| DMF | 100 | 100% | 40% | |
| Tris-HCl (pH 7.4) | 10 | 1000 | 40 | mM |
| MgCl2 | 5 | 1000 | 20 | mM |
| Total | 250 |
Wait until last moment to add PBS, nuclei and Tn5 to the ATAC Reaction Mix.
| A | B | C | D | E |
|---|---|---|---|---|
| ATAC Reaction Mix | Vol (uL) | Stock | Final | |
| 4X ATAC TD | 12.5 | 400% | 100% | |
| PBS | 26-x | |||
| Nuclei | x | |||
| Tn5 | 4 | 62.5 | 5 | ng/uL |
| Pitstop | 3.5 | 1000 | 70 | uM |
| Tween 20 | 2 | 2.50% | 0.10% | |
| Digitonin | 2 | 0.25% | 0.01% | |
| 50 |
While the tagmentation is running, prepare the beads and microfluidics. Ideally, you can proceed with the run immediately after the tagmentation ends.
Reagent preparation
Preparing beads
Here, we will wash the beads with PBS and resuspend them in Bead Lysis Buffer (BLB). The BLB will lyse the nucleus in the droplet later on.
Prepare concentrated bead lysis buffer:
| A | B | C | D | E | F |
|---|---|---|---|---|---|
| Concentrated BLB | Vol (uL) | Stock | Final in mix | Final in Droplet | |
| dH2O | 3493.205128 | ||||
| KCl | 467.9487179 | 3000 | 280.7692308 | 50 | mM |
| Tris-HCl (pH 7.4) | 701.9230769 | 1000 | 140.3846154 | 25 | mM |
| Tween 20 | 280.7692308 | 10% | 0.005615384615 | 0.10% | % |
| MgCl2 | 56.15384615 | 1000 | 11.23076923 | 2 | mM |
| 5000 |
Take a fresh aliquot of frozen HyDrop-ATAC beads from the -80 C stock, thaw at room temperature for ~1 minute. Transfer the beads to a 1 mL tube. Rinse the bead stock aliquot tube using bead lysis buffer.
Wash the beads by resuspending them in BLB, centrifuging at 1000 xg for 1 minute, taking the supernatant and resuspending them again in BLB. Perform this step a total of three times.
After the last wash, take as much supernatant as possible without aspirating any beads. The best way to do this is to remove most of the BLB using a 1 mL pipette, re-centrifuging, and then using a 200 and 10 uL pipette to remove the rest.
Keep the beads on ice until you need them.
If you do not remove all of t he s u pernatant BLB, the b eads will be sparse dur ing the first stage of your HyDrop run, resulting in a loss of cells .
Load the beads into the correct mineral-oil filled pipette tip in the single-cell room as described below.
- Take the mineral oil-filled pipette tip destined for beads and make sure no large air bubbles are present.
- Prime the mineral oil all the way to the very end of the tip using a flow of 10 000 uL/hour
- Put the micropipette tip into the eppendorf with the centrifuged beads
- At a rate of 5000 to 10 000 ul/hour, ASPIRATE the beads into the tube. If you blow in air bubbles by accident, centrifuge and resuspend again.
- Stop aspirating beads into the tube once air bubbles are formed. If you do it right, only a small amount of beads should be left at the bottom of the tube.
- Remove any air and prime the pumps by dispensing at 5000 uL/h until no air is left in the micropipette tip.
- Plug the pipette tip into the designated bead inlet.
Any large air bubbles in the bead stock should rise to the interface between water and mineral oil. This is not a problem if the bubbles are small.
It is best to do this before preparing the cells in order to save time later on.
Preparing nuclei/PCR mix
Continue with this immediately after the tagmentation reaction ends. Ideally, you already have the PCR mix without nuclei and enzymes.
- Prepare the PCR mix without enzymes. The reaction mix described below will result in 200 uL of PCR mix. This should easily result in 4 samples of 50 uL emulsion each (the emulsion volume also contains a fraction of liquid coming from the bead flow, so 200 uL of PCR mix will for sure contain enough for 4 x 50 uL total emulsion volume). This 200 uL can readily accomodate 15 000 nuclei with a very low doublet rate (<3%), but up to 60 000 can be loaded. If you only want to recover 2000-10 000 nuclei, you can scale down the PCR mix volume to 50 uL.
- Pellet tagmented nuclei at 300 xg, 4C for 5 min., discard the supernatant and add 200 uL of 1% BSA in PBS. Do not resuspend the nuclei.
- Pellet tagmented nuclei at 300 xg, 4C for 5 min. again, and remove 180 uL of supernatant, leaving 20 uL.
- Resuspend the nuclei gently in 20 uL.
- Perform a nuclei count with 2 uL of the nuclei suspension. Be sure to factor in this dilution! You can also check if the nuclei are nicely singular at this stage.
- Add a volume x of Nuclei mix that corresponds to the amount of nuclei you want to load. As a rule of thumb, you should add 50% more nuclei than what you would like to ultimately recapitulate in the data as a safeguard.
- Add enzymes and mix well.
- Immediately proceed to loading of the nuclei/PCR mix.
| A | B | C | D | E | F |
|---|---|---|---|---|---|
| Nuclei/PCR mix | Vol (uL) | Stock | In PCR mix | In droplet | |
| Phusion HF Buffer | 48.66666667 | 500% | 122% | 100% | |
| dH2O | 86.05-x | ||||
| Optiprep | 30 | 100% | 15% | ||
| dNTPs | 9.733333333 | 25 | 1.216666667 | 1 | mM |
| Nuclei | x | ? | 121.6666667 | 100 | c/uL |
| DTT | 7.3 | 1000 | 36.5 | 30 | mM |
| Phusion HF Polymerase | 6.083333333 | 2 | 0.06083333333 | 0.05 | U/uL |
| Deep Vent Polymerase | 6.083333333 | 2 | 0.06083333333 | 0.05 | U/uL |
| ET SSB | 6.083333333 | 0.5 | 0.01216666667 | 0.01 | ug/uL |
| 200 |
Load the Nuclei/PCR mix as follows (identical to bead loading):
- Take the mineral oil-filled pipette tip destined for PCR mix and make sure no large air bubbles are present.
- Prime the mineral oil all the way to the very end of the tip using a flow of 10 000 uL/hour
- Put the micropipette tip into the eppendorf with the centrifuged beads
- At a rate of 5000 to 10 000 ul/hour, ASPIRATE the PCR mix into the tube. If you blow in air bubbles by accident, centrifuge and resuspend again.
- Stop aspirating beads into the tube once air bubbles are formed. If you do it right, only a small amount of PCR mix should be left at the bottom of the tube.
- Remove any air and prime the pumps by dispensing at 5000 uL/h until no air is left in the micropipette tip.
- Plug the pipette tip into the designated inlet.
Take a small ice box and put the 250 uL PCR collection tubes on ice, connect collection tubes to outlet port via 1 mm tubing. The first collection tube is a waste tube for exhaust of priming in following steps.
Proceed with HyDrop run ASAP.
HyDrop Run Stage
HyDrop Run
Now, we will proceed to the actual HyDrop-ATAC run. Before proceeding, make sure that the following steps are ready:
- Outlet connected to waste
- Beads loaded into tubing, and connected to chip
- DG Onyx
- PCR machine available for PCR
Start the HyDrop run by priming all flows as follows:
Cells: 200 ul/h
Beads: 200 ul/h
Oil: 100 ul/h
Oil will show up first, as it is least viscous. When it does, reduce the oil flow to 50.
Next, Nuclei/PCR mix will show up. Put Nuclei/PCR mix to 50 uL in order to not lose any sample while the beads are priming into the microfluidic chip.
Once all three flows have reached the flow focusing point, increase the flow rates:
Cells: 600 ul/h
Beads; 150 ul/h
Oil: 950 ul/h
It is always up to the user to adjust the flow rates as necessary. When droplets are too large, either decrease cell and bead flow, or increase oil flow. When the total flow of the system is too high, delamination of the PDMS chip from the glass may occur.
Now, when the droplet formation is stable, be ready to change the waste collection Eppendorf tube to the actual sample collection Eppendorf tubes. Put 50 uL total of emulsion into each 200 uL PCR tube. This can be calculated as follows, assuming you use flows as we describe above:
Nuclei/PCR flow + bead flow = 600 uL/h + 150 uL/h = 750 uL/h
The Nuclei/PCR flow fraction = 600 uL/h / 750 uL/h = 0.8
We can read the volume that a specific channel has pumped through on the DG Onyx control screen. We desire a total volume of 50 uL, thus:
The volume of Nuclei/PCR in 50 uL of emulsion = 0.8 * 50 uL = 40 uL
Thus, we monitor the Nuclei/PCR flow volume, and every time 40 uL has been dispensed, we switch the outlet to a new 200 uL PCR tube.
Alternatively, you can collect everything into a 1.5 mL eppendorf tube, and aliquot your desired volumes to your PCR tubes. We try to avoid it as it may lead to merging droplets if you are not careful. Additionally, you will lose some of the emulsion to your pipetting as well as to the original 1.5 mL eppendorf tube.
The run ends when the Nuclei/PCR mix runs out. When this happens, you will see a change from aqeous Nuclei/PCR mix to viscous mineral oil in the flow focus. Unplug the sample outlet tube and let the remains flow into the sample collection tubes.
Library Prep Stage
Linear PCR and clean-up
Here, we will pre-amplify the libraries.
Put the PCR tubes in a PCR block that supports 100 uL reactions and run the following program:
| A | B | C |
|---|---|---|
| Temp | Time | |
| 72C | 5 mins | |
| 98C | 3 mins | |
| 98C | 10 s | |
| 63C | 30 s | x 15 |
| 72C | 1 min | |
| 4C | Hold |
Remove the bottom oil phase without disturbing the emulsion. It is not harmful to leave ~10 uL of oil.
Add 55 ul of the GITC Buffer and mix well.
| A | B | C | D | E |
|---|---|---|---|---|
| GITC Buffer | Stock | Volume (uL) | Final | Unit |
| GITC | 6 | 834 | 5 | M |
| Tris HCL - 7.4 | 1 | 50 | 50 | mM |
| EDTA | 0.5 | 50 | 25 | mM |
| dH2O | - | 66 |
Add 125 ul of droplet breaking solution (20% PFO in HFE) to each sample. The emulsion will now break up into a single separated water/oil phase system. You can also use leftover 10x droplet breaking solution if you have it.
Incubate at room temperature for 5 mins.
Remove and discard the the oil phase without losing any of the aqeous phase. It's ok if some oil remains.
Produce EB-DTT-Tween and EB-DTT. Keep in mind that you need at least 30 uL per sample.
| A | B | C | D | E |
|---|---|---|---|---|
| EB-DTT-Tw | Stock | Volume (uL) | Final | Unit |
| DTT | 1000 | 2 | 10 | mM |
| Tw | 10 | 2 | 0.1 | % |
| EB | - | 196 |
| A | B | C | D | E |
|---|---|---|---|---|
| EB-DTT-Tw | Stock | Volume (uL) | Final | Unit |
| DTT | 1000 | 2 | 10 | mM |
| EB | - | 198 |
Proceed with a Dynabeads purification as follows.
- Add 5 uL of Dynabeads to the aqueous phase.
- Mix well and incubate for 5 minutes at room temperature, mix again, and incubate for 5 minutes more.
- Put the samples on a Nd magnet, wait a few minutes until the magnets separate well and the solution turns clear
- Discard the supernatant
- Gently add 300 uL of 80% EtOH, wait for 30 seconds, and remove. Perform this wash a total of 2 times. Make sure to not resuspend the beads during this step and to remove as much 80% EtOH after the last wash as possible.
- Air-dry the samples for 2 minutes.
- Resuspend the bead pellet in 50 uL of EB-DTT-Tween and transfer the supernatant to a fresh PCR tube
Prepare the following PCR2 mix:
| A | B | C | D | E |
|---|---|---|---|---|
| PCR 2 mix | Vol (uL) | Stock | Final | |
| KAPA | 50 | 200% | 100% | |
| Library | 30 | |||
| Hyi7 | 10 | 10 | 1 | uM |
| Hyi5 | 10 | 10 | 1 | uM |
| Total: | 100 |
Be absolutely sure that the i5 index is different between all the samples you would like to pool for sequencing. The i7 index is not used to sample demultiplex as we need to sacrifice the i7 index read to read the cell barcode.
Perform the following PCR program:
| A | B | C |
|---|---|---|
| Temp | Time | |
| 95 C | 3:00 | |
| 98 C | 0:10 | |
| 63 C | 0:30 | x 12 |
| 72 C | 0:30 | |
| 72 C | 1:00 | |
| 4 C | Hold |
Proceed with a double-sided Ampure purification as follows.
- Add 0.4 volumes of Ampure beads (40 uL) to the PCR mix.
- Mix well and incubate for 5 minutes at room temperature.
- Put the samples on a Nd magnet, wait a few minutes until the magnets separate well and the solution turns clear
- Transfer the supernatant to a new PCR tube!
- Add 0.8 volumes (80 uL) of Ampure beads to the supernatant in the new tube. You now have 0.4 + 0.8 = 1.2 volumes total of the PEG mix. You are therefore performing a 1.2X ampure now.
- Put the samples on a Nd magnet, wait a few minutes until the magnets separate well and the solution turns clear
- Gently add 200uL of 80% EtOH, wait for 30 seconds, and remove. Perform this wash a total of 2 times. Make sure to not resuspend the beads during this step and to remove as much 80% EtOH after the last wash as possible.
- Air-dry the samples for 2 minutes.
- Resuspend the bead pellet in 25 uL of EB-DTT and transfer the supernatant to a fresh PCR tube
Perform Qbit and Bioanalyzer. The library is ready for sequencing.
A good library looks like so:
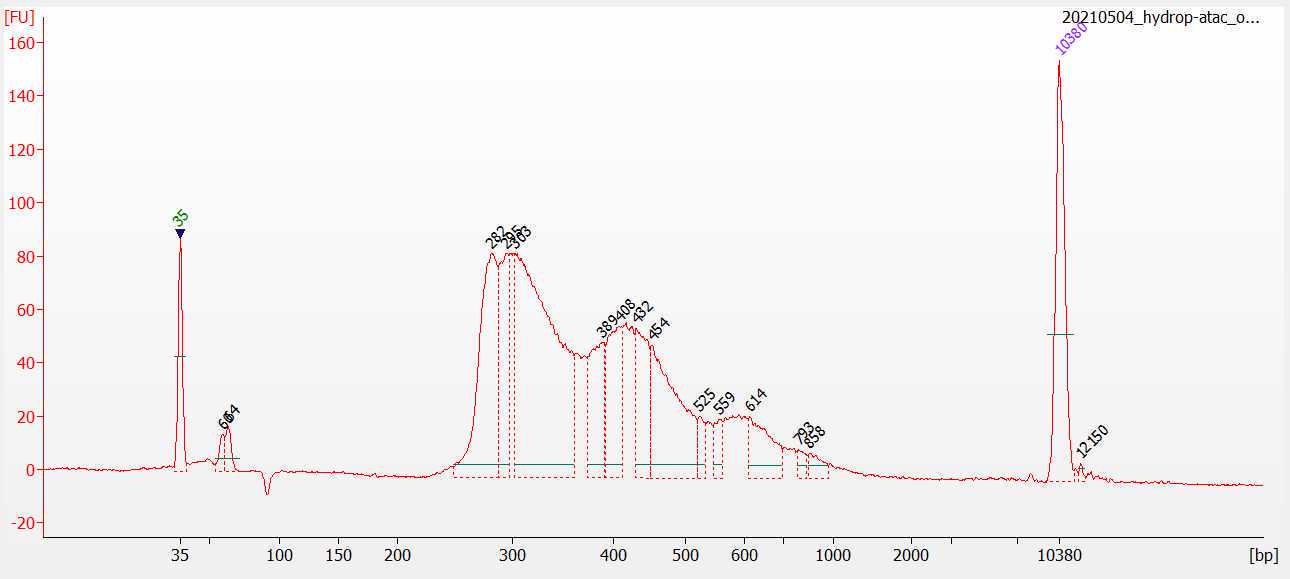
We have no primer dimers at the start, and the first fragment peak starts around 280. This corresponds to the length of the barcodes and all other adapters introduced during library preparation + the smallest possible ATAC fragment (around 30-50 bp). We also have a clean tail that diminishes by around 1000 bp. This sample originates from ~1000 drosophila nuclei.
We have noticed that the profile of these bioanalyzer traces is quite dependent on the biological sample used. The best QC is to sequence the samples at a low saturation and check the aggregate profiles and single-cell metrics.
