Human Placenta Tissue Collection and Preservation Methods - UCSD Female Reproductive TMC
Scott Lindsay-Hewett, Valentina Stanley, Louise Laurent, Mana Parast, Donald P. Pizzo
Abstract
Human Placenta Tissue collection and storage protocol for HuBMAP's UCSD Female Reproductive TMC.
Steps
Preparation
Collect placenta from delivery room within 1 hour of delivery.
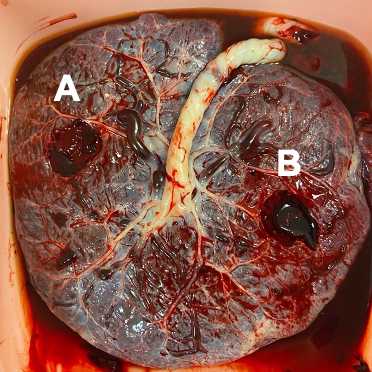
Place placenta into bucket and photograph prior to sampling.
Select 2 sites (A and B) from which samples will be collected. Aim for sites to be equidistant from the cord, avoid the edges, avoid areas with fibrin deposits/infarcts/necrosis and/or large blood vessels.
From site A , cut a circle all the way down from the fetal to the maternal surface, about one inch in diameter.
Wash the full-thickness core in cold PBS in a petri dish. Keep the fetal surface pointing up.
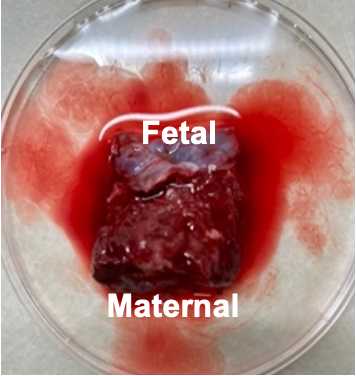
Divide the full core in half vertically, from fetal to maternal surface.

Flash freezing and storing in RNAlater
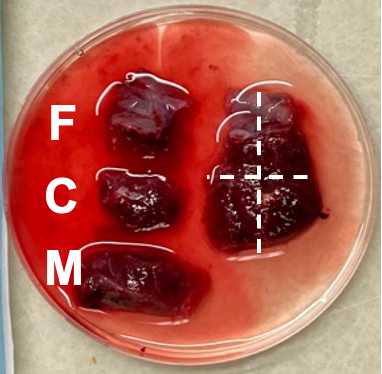
With the left half of site A , divide the core horizontally into fetal (F), central (C) and maternal (M) regions.
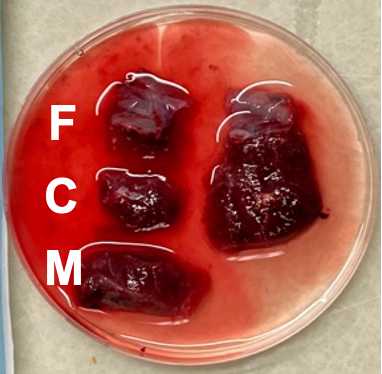
Cut each of the three regions from the previous step into 6 small chunks for a total of 18 chunks. Chunks should be small enough to just cover the bottom of a microfuge tube (~5mm x 5mm x 5mm). Collect tissue directly adjacent to the fetal and maternal membranes but do not cut from the membranes themselves.

Dab the small chunks on a sterile gauze pad and place each one into a labeled microfuge tube.
Place 9 small chunks (3 fetal, 3 central, 3 maternal) into the empty tubes to be snap frozen. Drop tubes into liquid Nitrogen. Leave for ~2-10 minutes. Remove and store in -80C freezer.
Place the other 9 chunks (3 fetal, 3 central, 3 maternal) into the RNAlater filled tubes. Place RNAlater tubes into a 4C fridge. Allow to sit for 24-48 hours, then remove the RNAlater with a sterile transfer pipette and store in -80C freezer.
Storing in formalin and MACS
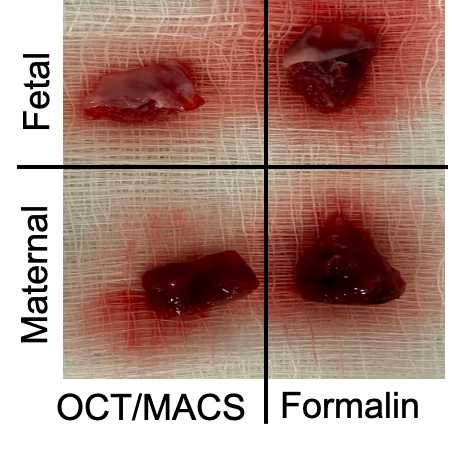
With the right half of site A , divide the tissue into 4 quadrants so that you have 2 fetal chunks and 2 maternal chunks, keeping all the membranes intact. Some of the central region tissue may need to be trimmed off if the core is very thick.
Place one fetal piece and one maternal piece into the 10% formalin tubes (to be processed into FFPE blocks). Place the other fetal and maternal piece into cold MACS tissue buffer. Store in 4C fridge.
Embedding in OCT
Alternatively, if not collecting into MACS tissue buffer, freeze the other fetal and maternal piece in OCT.
Fill plastic cryomold halfway with OCT compound being careful not to create bubbles.
Place fetal tissue (membrane side pointing up) in one mold and maternal tissue (membrane side pointing down) in another mold.
Cover tissue with a thin layer of OCT compound being careful not to create bubbles.
Slowly lower the mold into liquid nitrogen until the whole block freezes, then store in -80C freezer.
Repeat Steps 4-10 with placenta Site B.
Take photos of the placenta after both sites (A and B) are removed. Measure the distance from the cord insertion to each sampling site.
FFPE processing
Tissue samples are removed from the formalin and rinsed in DI water. Water is changed multiple times until it is relatively clear and free of extraneous blood.
Place basket in Station 2 of the Leica Processor
Set Processor to program #1 (stations and timing listed below) and start time.
The following steps for dehydration and clearing are used:
NOTE: All steps are under vacuum
STATION TIME TEMPERATURE SOLUTION
2 1hr Room temperature PRO-SOFT DEHYDRANT
3 1hr Room temperature PRO-SOFT DEHYDRANT
4 1hr Room temperature PRO-SOFT DEHYDRANT
5 1hr Room temperature PRO-SOFT DEHYDRANT
6 1hr Room temperature PRO-SOFT DEHYDRANT
7 1hr Room temperature PRO-SOFT DEHYDRANT
8 1hr Room temperature PRO-PAR CLEARANT
9 1hr Room temperature PRO-PAR CLEARANT
10 1hr Room temperature PRO-PAR CLEARANT
11 1hr 57C TYPE 3 WAX
12 1hr 57C TYPE 3 WAX
Transfer the cassettes from the basket to the Leica embedding station
Choose an appropriately sized embedding mold from the embedding mold tray
Using forceps, place the sample with the face of interest at the bottom of the mold
Fill the mold with wax from the dispenser
Place the cassette on top of the embedding mold and fill the cassette with wax (Type 9)
Place the embedding mold containing the tissue and cassette onto the cold plate to solidify
Once the wax has solidified (~ 20 minutes), use a utility knife to remove the cassette from the mold
Scrape off excess wax on the side of the blocks; Blocks are now ready to be sectioned or stored
