General Setup and Takedown Procedures for Rodent Neurosurgery
Avalon Amaya, Jackie Swapp, Ali Williford, Robert E Howard
Abstract
This protocol describes the pre-operative setup and post-operative take-down procedures utilized for rodent stereotaxic neurosurgical procedures.
Before start
Notice:
Refer to sections via table of contents to view surgery specific setup. Skip any section titled with "Setup specific..." if not applicable.
Steps
Prepare Surgical Station for Surgery (all procedures)
Disinfect the surgical area.
Spray area for the surgical drape with PREempt and let sit for at least 0h 5m 0s.
Spray all other surfaces - surgical rig, induction chamber, station tools, knobs buttons, and switches you touch during the procedure with 70% Ethanol reapplying after 5 min, so you have a minimum contact time of 0h 10m 0s.
Using a non-sterile Kimwipe wipe up any residual PREempt and 70% Ethanol.
Cover heating pad on surgical rig with a layer of press ‘n’ seal.
Prepare the surgical drape with supplies.
Open a fresh sterile drape, touching only the blue side to ensure sterility, place it white side up and blue side down, on the area disinfected with PREempt.
Open sterile packages surgical supplies (Cotton swabs, kimwipes, gauze, and sugi absorbent spears), pouring the items onto the surgical drape to preserve sterility.
Fill a 10mL or 20mL syringe with ACSF (Artificial Cerebrospinal Fluid), then attach 0.2um syringe filter and 25G 5/8” needle.
Prepare peri-operative drugs.
Remove autoclaved surgery tools from the sterilization tray and place on the sterile drape, taking care to not touch the instrument tips.
Obtain titanium headpost with associated well, spray with 70% ethanol and place on drape with the side that will interface with the skull up.
Prepare additional 0.3ml insulin syringe for vetbond application.
Obtain #10 Scalpel blade for skin incision.
Proceed to desired procedure "Specific Setup" section.
Setup Specific to Headpost Only Procedures (no craniotomy)
Prepare the 24-well plate with supplies.
Fill one well with Betadine and one well with Nair.
Fill three wells with ACSF.
Fill two wells with 70% ethanol.
Soak three cotton swabs in the Betadine well for betadine application to incision site.
Use sterile forceps to tear off pieces of sterile surgifoam and place in well with ACSF to soak.
Place stylus in one of 70% ethanol wells.
Setup Specific to Headpost and Craniotomy Procedures
Prepare the 24-well plate:
Fill one well with Betadine and one well with Nair.
Fill three to four wells with ACSF.
Fill three wells with 70% ethanol.
Soak three cotton swabs in the Betadine well for betadine application to incision site.
Use sterile forceps to tear off pieces of sterile surgifoam and place in well with ACSF to soak.
For 5mm or 3mm craniotomy procedures: use forceps to place a stacked coverslip in one of the three 70% ethanol wells in the well plate.
Place the craniotomy tracer in 70% Ethanol well.
For 5mm or 3mm craniotomies: place glass coverslip in well.
For whole hemisphere craniotomies: place the WHC tracer in the well, ensuring the portion that will come in contact with the skull is submerged.
Place stylus in one of 70% ethanol wells.
Setup Specific to Iontophoretic Injections (with or without headpost)
Prepare 24-well plate:
Fill one well with Betadine and one well with Nair.
Fill three wells with ACSF.
Fill 1-2 wells with 70% Ethanol.
Soak three cotton swabs in the Betadine well for application to incision site.
Prepare procedure-specific additional supplies:
- 5-0 Monofilament suture
- Parafilm square
- Bulldog clamp
- Silver wire
Remove one aliquot of virus from -80ºC freezer, thaw at Room temperature , and spin down in the mini centrifuge.
Obtain Iontophoretic-specific pipette.
Setup Specific to Nanoject III Injection (with or without headpost)
Prepare 24-well plate:
Fill one well with Betadine and one well with Nair.
Fill three wells with ACSF.
Fill two wells with 70% ethanol.
Soak three cotton swabs in the Betadine well for application to incision site.
Prepare procedure-specific additional supplies:
- 5-0 Monofilament suture
- Parafilm square
Remove one aliquot of virus from -80ºC freezer, thaw at Room temperature, and spin down in the mini centrifuge.
Obtain Nanoject-specific pipette.
Prepare nanoject-specific pipette.
Using a 30g, 2” backfilling Hamilton syringe filled with mineral oil, backfill the pipette.
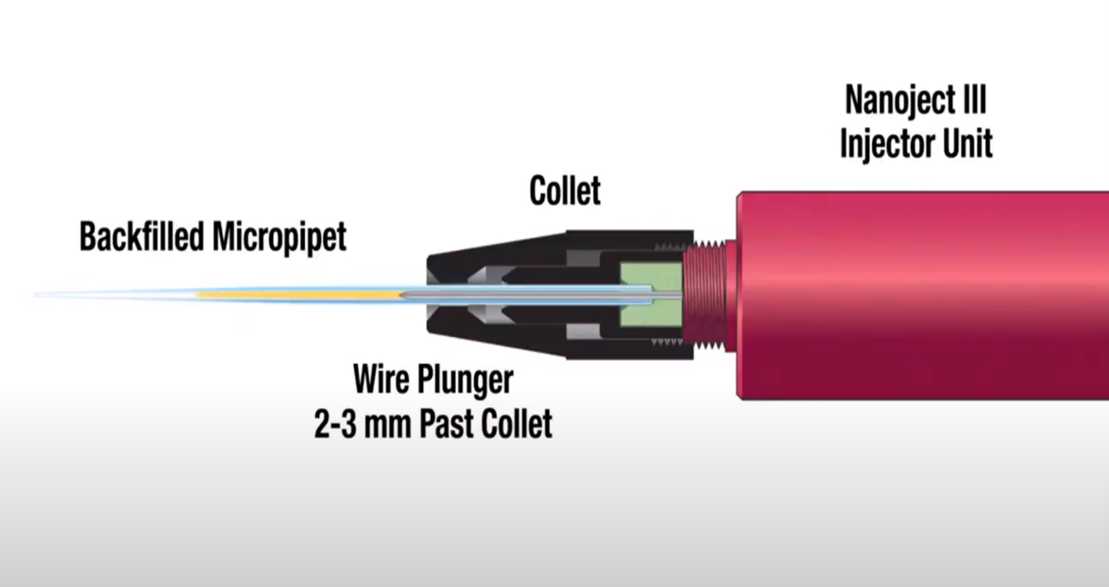
Insert the tip of the Hamilton syringe into the pulled pipette, all the way to the shoulder, and slowly depress the plunger on the Hamilton syringe, filling the pipette with oil. Be sure not to introduce bubbles into the system or the injection may not be successful.
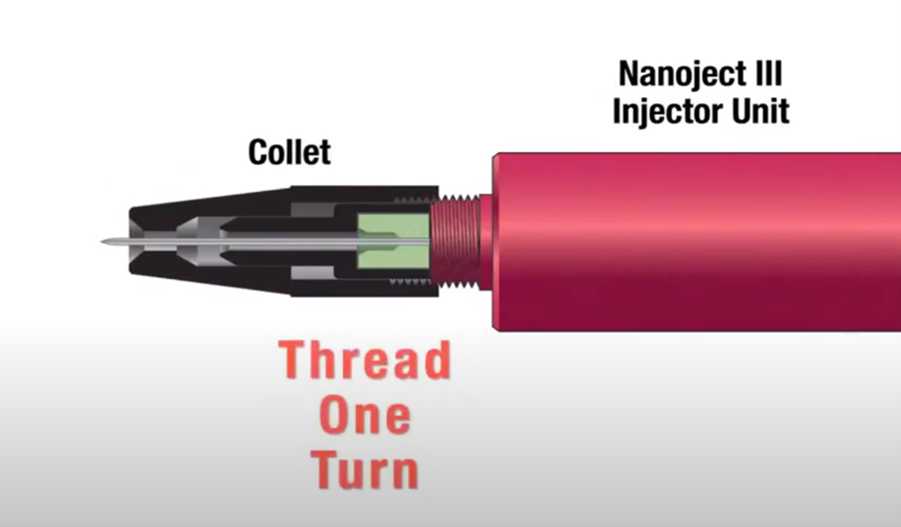
Tighten the collet.
Load the virus into the pipette
Once the pipette is secured to the collet, press, and hold the ‘EMPTY’ button on the control box until an audible beep is heard. This will drive the wire plunger out forcing oil to the tip of the pipette. Any excess oil will be expelled. Expel about 4-5 drops and work out any air bubbles.
Take virus aliquot and spin down for 10-15 seconds.
Use the P20 micropipette with a microfil tip to draw up ~2 µl of virus.
Using the surgical bed as a platform, aspirate the virus sample onto a clean piece of Parafilm.
Using the stereotaxic apparatus, lower the tip of the pipette (secured in the Nanoject) into the sample. Be careful to not “bottom out”.
Press the ‘FILL’ button and draw up the desired amount of virus (button will change to red). Press the button again to stop the filling of the pipette when finished.
Carefully set injector aside where pipette will not be disturbed.
Setup Specific to Optic Fiber Implants
Prepare 24-well plate:
Fill one well with Betadine and one well with Nair.
Fill 3-5 wells with ACSF.
Fill three wells with 70% ethanol.
Soak three cotton swabs in the Betadine well for application to incision site.
Use sterile forceps to tear off pieces of sterile surgifoam and place in well with ACSF to soak.
Gather fiber optic implants and soak them in the 70% ethanol wells.
If using a headframe that is not already sterilized, soak headframe in 70% ethanol.
Prepare the Anesthesia System and Anesthetize the Mouse (all procedures)
Prepare the anesthesia system.
Follow anesthesia system's manufacturer guidelines and your facilities environmental health and safety committee regarding the use of an anesthesia system for rodent neurosurgery.
Turn on the oxygenator and ensure your facilities vacuum lines are functioning properly (i.e vacuum lines are on and gauge displays psi).
Ensure that all tubes are connected securely and that you can feel the vacuum suction in the scoop underneath the nose cone.
Ensure the Isoflurane line to the induction chamber is open and the line to the nose cone is closed via their designated stopcocks.
Anesthetize the mouse.
Remove the animal from its experimental cage, obtain a preoperative weight.
Place the mouse into the induction chamber, open the vacuum valve (stopcock) and isoflurane line (stopcock) for the chamber, and then turn on the isoflurane vaporizer to 5%.
Once the mouse is fully unconscious, turn off the isoflurane and wait at least 10 seconds with the vacuum on to allow the chamber to clear before removing the animal.
Position mouse on surgical rig by placing maxillary incisors in the hole on the bite bar and securing head with ear bars.
Secure the nose cone over the mouse’s snout. Make sure the body of the mouse is on top of the heading pad, resting comfortably. Redirect the gas flow from the induction chamber to the surgical rig via line stopcocks.
Set the isoflurane to ~1.5-2%, turn off the vacuum line to the induction chamber and close the lid.
Monitor the mouse’s breathing throughout the process and adjust gas levels as necessary.
Prepare the Mouse for Surgery (all procedures)
Apply Systane to the end of a cotton swab and use to push the whiskers away from the surgical field.
Cover the mouse’s eyes with a generous amount of Systane. Additional Systane should be added as needed to prevent eye dryness and protection from the scope light.
Administer any drugs that have a timing after induction or prior to incision.
Use black handled scissors to shorten hair from top of the head. Use caution when trimming hair around the eyes. Avoid cutting off whiskers.
Apply Nair with the pointed end of a non-sterile cotton swab, gently swirling it down to the interface of the skin and hair.
Remove all Nair with several alcohol swabs.
Disinfect the surgical site with 3 rounds of alternating Betadine-soaked sterile swabs and alcohol wipes. The last application of Betadine should not be wiped off.
Place Saran Wrap over the trunk of the animal and change into new gloves.
Take Down Steps When the Procedure is Complete
Dispose of used syringes, blades, drill bits, swabs and needles or anything that could puncture a plastic bag in the biohazard sharps container.
Dispose of all disposable materials that came into contact with blood in the biohazard waste container.
Spray down surgical tools with pH neutral surgical tool cleaner and wipe with a kimwipe or alcohol swab. Be sure to wipe any blood, skin, or cement residue off the tools. Use caution when wiping down Dumont’s.
Place tools into tool kit. Place tool kit into sterilization pouch and write your name, department initials and the date on the pack. Bring tool kit to the designated location to be autoclaved.
If the tools are to be used again the same day, sterilize using the hot bead dry sterilizer.
Disinfect ear bars with alcohol swab, then place back on the surgical rig.
Turn off the vacuum and oxygen sources by switching the stopcocks to the off position.
Release the air from the drill lines by pressing down on the pedals until the pressure reads 0 psi. If the air source is connected to a wall valve, then turn the valve to the off position.
Turn off heating pad, bead sterilizer, stereotax, and scope light.
Turn off compressed air, vacuum, and oxygen concentrator.
Ensure Isoflurane is turned off.
Spray down station with 70% cleaning up any debris and detritus from the surgery paying close attention to the nose cone, ear bars, vacuum scoop, and Induction chamber.


