GT-seq protocol EFGL
EagleFish GeneticsLab
Abstract
The purpose of this protocol is to prepare extracted samples of DNA to be read on a NextSeq 2000. This will be achieved through SNP-PCR, barcoding, SequalPrep Normalization, Ampure bead size selection, and Qubit quantification. This will result in a single pooled vial of DNA ready for the NextSeq 2000 EFGL Loading Protocol.
Steps
SNP-PCR
Prepare SNP-PCR master mix using species specific primer panel.
Vortex and spin down aliquots of Qiagen Multiplex Master Mix and panel specific GT-seq primers, keep them in benchtop coolers. The table has been formulated to account for pipette errors.

Combine the ingredients in a non- Lo-bind tube. Vortex and spin down tube and keep in benchtop cooler till ready to dispense.
Label unskirted PCR plate(s): SNP-PCR, date, tray#, project initials, and your initials.
Remove the DNA tray(s) from fridge. Briefly vortex and spin down ,0h 0m 0s DNA trays.
Using a 0.1mL combi-tip, dispense 5µL of PCR master mix into each well.
Using a p10 multichannel pipette, add 2µL of DNA into corresponding well. Discard tips after each use.
Heat seal the SNP-PCR plate(s). Vortex and briefly spin down ,0h 0m 0s SNP-PCR plate(s).
Run the SNP-PCR plate(s) on a thermalcycler using the following program. (In our lab, the program can be found using the menu options GTseq --> gs-fxtd+10c-65 )
-
95°Cfor0h 15m 0s -
95°Cfor0h 0m 30s -
57°Cfor0h 0m 30s -
72°Cfor0h 2m 0s
Repeat 2-4 for 5 cycles, with a 5% ramp
-
95°Cfor0h 0m 30s -
65°Cfor0h 0m 30s -
72°Cfor0h 0m 30s
Repeat 5-7 for 10 cycles
4°Cindefinitely
Heat seal the DNA tray(s), and stored them back in the fridge.
Barcoding
Barcoding amplicons with i5s and i7s.
After SNP-PCR thermalcycler program has completed, remove SNP-PCR plate(s). Briefly vortex and spin down ,0h 0m 0s .
Pour lab-grade water into a 50mL reservoir. Using a p200 multichannel pipette, dispense 133ul of lab grade water into each well.
Heat seal diluted SNP-PCR tray(s). Vortex well, and centrifuge 3000rpm
Make barcoding master mix.
IMPORTANT! Each DNA tray needs to have an unique i7, if they will be loaded on the same library.
Check that i7s have been diluted to working stock of 11uM, and proceed with preparing barcoding mix. If not, add 961µL of lab-grade water to 119µL of 100uM i7 to make working stock.
Vortex Hotstart MM and i7(s), spin down and store in benchtop cooler.
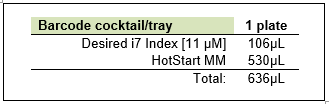
Combine ingredients in a 1.5mL non- Lo-bind tube(s). Vortex, spin down and store in benchtop cooler.
Label unskirted PCR plate: BARCODE, Date, Tray#, project initials and your initials.
Remove the pre-aliquot i5 trays. Briefly vortex, and spin down ,0h 0m 0s .
Using a 0.1mL combi-tip, dispense 6µL of barcoding mix into each well of the Barcode plate(s).
Using a p10 multi-channel pipette, add 2µL of i5 barcode into each corresponding well of the Barcode plate(s). Discard tips after each use.
Once the i5s have been added, add 3µL of the diluted SNP-PCR into each corresponding well of the Barcode plate(s). Discard tips after each use.
Heat seal the Barcode plate(s). Gently vortex, and spin down ,0h 0m 0s .
Run the Barcode plate(s) on a thermalcycler using the following program. (In our lab, the program can be found using the menu options GTseq --> RAD-amp )
-
95°Cfor0h 15m 0s -
95°Cfor0h 0m 10s -
65°Cfor0h 0m 30s -
72°Cfor0h 0m 30s
Repeat 2-4 for 10 cycles
-
97°Cfor0h 5m 0s -
4°Cindefinitely
Heat seal the i5 tray, and diluted SNP-PCR plate(s). Store them in fridge.
Sequalprep Normalization
Normalize the barcoded samples with SequalPrep kit.
After Barcode thermalcycler program has completed, remove Barcode plate(s). Briefly vortex and spin down ,0h 0m 0s .
Label a new SequalPrep Normalization plate: Date, Tray#, project initials and your initials.
Using a 1mL combi-tip, dispense 10µL of Binding Buffer into each well of the SequalPrep plate(s). If you have a partial tray, only dispense binding buffer that contains barcoded samples.
Using a p10 multi-channel pipette, transfer all 11µL of barcoded samples into corresponding well of the SequalPrep plate(s). Discard tips after each use.
Heat seal SequalPrep plate(s). Vortex, and briefly spin down ,0h 0m 0s .
Incubate SequalPrep plate(s) at room temperature for 1h 0m 0s. (OK to leave plate(s) at room temperature overnight if necessary)
After incubation, empty out all contents from the SequalPrep plate(s) into sink.
Tap plate(s) on paper towels to remove any residual binding buffer/barcoded samples.
Using a 5mL combi-tip, dispense 50ul of Wash Buffer into each well of the SequalPrep plate(s). Avoid touching the side of the wells, change tip if you think there might be contamination.
Empty out all wash buffer from SequalPrep plate(s) into sink.
Tap plate(s) on paper towels to remove any residual wash buffer in wells.
Using a 1mL combi-tip, dispense 20µL of Elution Buffer into each well of the SequalPrep plate(s). Avoid touching the side of the wells, change tip if you think there might be contamination.
Heat seal SequalPrep plate(s). Vortex, and spin down ,0h 0m 0s .
Incubate SequalPrep plate(s) at room temperature for 0h 5m 0s. (OK to store plate(s) in fridge overnight before pooling if necessary)
Using a p10 multi-channel pipette, pool 10µL of each sample into a 25mL reservoir. OK to reuse tips.
Transfer all pooled samples from reservoir into a 1.5mL Lo-bind tube. Label tube(s): NP# (tray#), project initials. Store in fridge.
Heat seal SequalPrep plate(s), and store in fridge.
Beads Size Selection
Invitrogen‱ DynaMag‱- Spin Magnet TM DynaMagTM- Spin Magnet
Vortex Ampure XP beads well, and briefly spin down to avoid beads getting stuck on lid. Keep in benchtop cooler.
Gently vortex, and quick spin down. Incubate tube(s) at room temperature for 0h 5m 0s.
In the meantime, prep the 80% ethanol wash solution. Each tube will need a total of 400µL 80% ethanol wash solution.
Add 400µL of 100% ethanol with 100µL of lab-grade water, multiply volume according to the total number of tubes you'll be doing. Vortex, spin down and set aside on benchtop.
Place tube(s) on magnetic stand for 0h 5m 0s.
If time allows, store Ampure XP beads back in fridge.
Transfer and discard all supernatant (~110µL) without disturbing the bead pellet.
While on magnetic stand, gently add 200µL of 80% ethanol wash solution to each tube(s).
Incubate for 0h 0m 30s, and discard supernatant. Repeat wash step one more time.
While on magnetic stand, air dry beads for 0h 5m 0s. Avoid overdrying beads.
Remove tube(s) from magnetic stand, and add 17µLlow TE. Resuspend beads by pipetting or gently vortex.
Incubate tube(s) at room temperature for 0h 2m 0s.
Place tube(s) on magnetic stand for 0h 5m 0s.
Carefully transfer all 17µL supernatant into a new 1.5mL Lo-bind tube(s), labeled BSS#.
This is now your final, undiluted GT-seq library(s).
Vortex NP tube(s), and spin down. Keep in benchtop cooler.
Label 1.5mL Lo-bind tube(s) with the corresponding NP tube number, if performing multiple bead size selection simultaneously.
Add 25µL of Ampure XP beads into each labeled 1.5mL Lo-Bind tube.
Add 50µL of NP tube into the corresponding labeled 1.5mL Lo-bind tube containing Ampure XP beads.
Gently vortex, and quick spin down. Incubate tube(s) at room temperature for 0h 5m 0s.
Meanwhile, store the NP tube(s) back into fridge.
Place tube(s) on magnetic stand for 0h 5m 0s.
Carefully transfer supernatant (~75µL) into a new 1.5mL Lo-bind tube. Try to avoid disturbing the bead pellet, and be sure to label the new tube(s).
To the supernatant, add 35µL of Ampure XP beads. Repeat step if having multiple tube(s).
Quantify library
Qubit GT-seq library
If BSS tube(s) were stored in fridge, allow tube(s) to come to room temperature prior to qubit.
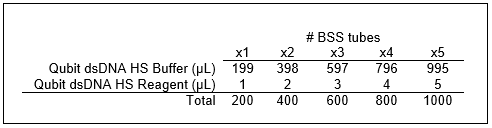
Make 1:200 diluted dye mix in a 2.0mL microcentrifuge tube.
Label each qubit assay tube(s). Only label on the lid, never the side of the tube(s).
Pipette 198µL of diluted dye mix into each qubit assay tube(s). Add 2µL of corresponding BSS to labeled qubit assay tube(s).
Vortex thoroughly, quick spin.
Incubate tube(s) at room temperature for 0h 3m 0s.
Put qubit assay tube in Qubit Fluorometer and take 2 readings per sample and enter them into Library Prep sheet in PROJECT CHECKLIST_v2.4 spreadsheet. The spreadsheet has a column that will take the average, and make the calculations in the Tray-Quant tab to dilute each library down to 1nM.
In a new 1.5mL Lo-bind tube, transfer 10µL of BSS and dilute it with the calculated amount with 1X TE. Label tube as D#, include your initials and project initials.
Store diluted BSS tube(s) in GT-seq run box in fridge. Discard the undiluted BSS tube(s). Print out the Library Prep sheet when all tube(s) are ready for the run.
