DoTA-seq V3.1
freeman.lan
Abstract
This protocol describes the process of DoTA-seq generating a single cell sequencing library from a cell suspension. This workflow can be performed in two days, with the PCR step happening overnight. Before beginning this workflow make sure to have:
-
The necessary microfluidics devices prepared and ready to go
-
The multiplex DoTA-seq target primers validated to work together without generating large molecular weight primer dimers.
Please read the publication for further details.
Steps
Preparing Cells
Prepare a cell suspension by washing twice in 1mL of 5000x g
Resuspend cells in 100µL
Add 1µL
Count cells using a hemacytometer using the SYBR signal, calculate concentration of the cell suspension.
(Optional) Stain with
Preparing Gel
Make 200µL Hydrogel Precursor Solution - Mix together in a tube:
100µL 25Mass / % volume
15µL 5Mass / % volume
10µL 10Mass / % volume
75µL Cell suspension diluted in PBS ( a total of 7e6 cells to achieve a final concentration of 3.5e7 cells/mL in the total solution)
Vortex Vigorously to Mix
Generate Gel Droplets
Prepare and Load the Syringes with the gel sample and 600µL
Connect the syringes to the inlets of the DoTA-seq Step 1 Microfluidics Device and Run the syringe pumps at 500uL/hr for the gel syringe, and 900uL/hr for the oil syringe.
Collect gel droplets for 0h 20m 0s in a 1mL tube.
Make 200µL Gel Polymerization Oil - mix together in a tube:
195µL
5µL
Add the Gel polymerization oil to the collected droplets, invert slowly 3 times to mix, and Incubate the tube containing droplets at 37°C for 0h 10m 0s to complete polymerization of the gel matrix.
Breaking out gels from emulsion
Pulse spin the emulsion in a centrifuge to close pack the emulsion and drain the oil to the bottom of the tube.
Use a pipette to remove the oil from the bottom of the tube, leaving just the emulsion
Add 200µL
Vortex, then Wait 0h 1m 0s for the emulsion to break.
Pulse spin again and remove the oil in the bottom of the tube with a pipette.
Add 1000µL of
Mix by inverting 5 times, Wait 0h 0m 10s then remove with a pipette.
Add 1000µL of
Mix by inverting 5 times, Wait 0h 0m 10s then remove with a pipette.
The gels should begin to flocculate and dehydrate.
Add 1000µL of
Mix by inverting 5 times, Wait 0h 0m 10s then remove with a pipette.
The gels should dehydrate and become hard.
Note: Do not wait too long as it could cause the gels to irreversibly aggregate into clumps.
Resuspend in 1000µL
The gels can be stored at 4°C for several days without changing DoTA-seq results.
Lysing Bacteria
Wash gels 3 times in 1000µL 500x g each time
Make a Enzymatic Lysis Solution by adding:
20mg
100µL 1mg/mL
900µL
Resuspend the gels in this lysis solution. Incubate at 37°C for 2h 0m 0s
Wash the gels 3 times in 1000µL
Make a SDS Lysis solution by adding:
20µL 20mg/mL
100µL
880µL
Resuspend the gels in this SDS Lysis solution, incubate at 55°C for 1h 0m 0s
Wash the gels three times in 1000µL
Note: Use 2% Tween 20, not 0.1% Tween
These gels can be stored at 4°C in
Barcoding the Cells
Wash the gels three times in 1000µL
Resuspend gels in 100µL
Load the gels into a syringe following the protocol described in this excellent visual protocol.
Generate a PCR Master Mix (This mix gives about ~10,000 cells per library - Scale up as required)
25µL
0.4µL 50micromolar (µM) P7 Primer mixed with Barrev primer at 5micromolar (µM)
0.4µL 50micromolar (µM) P5 Primer with appropriate I5 index
0.2µL 10micromolar (µM) DoTA-seq multiplex primer mix ( 10-20nM final concentration per prime r)
0.2µL 10micromolar (µM) 16S DoTA-seq primers ( 10-20nM final concentration )
0.5µL 1picomolar (pM) Barcode Oligo
0.25µL 500millimolar (mM)
Load the PCR mastermix into the syringe following this protocol
Load 500µL of
Connect the syringes to the DoTA-seq Step 2 microfluidics device.
Run the syringe pumps at 200uL/hr for the gel and PCR mastermix, and 800uL/hr for the oil syringe.
Collect droplets in an 0h 7m 0s for every 25µL of PCR mastermix or until the PCR mastermix runs out.
Use a pipette to remove the oil in the PCR tube, leaving just the emulsion layer (it's okay to have a little bit of oil remaining).
Thermocycle the PCR emulsion as follows:
95°C 5 min
40 cycles of:
95°C 30s
72°C 10s
60°C 5 min
72°C 30s
Final incubation of:
72°C 10min
12°C Hold
All ramp times are at 1°C per second
PCR Cleanup
Keep the emulsion on ice to prevent polymerase activity
Add 25µL
Vortex the emulsion to mix
Add 25µL
Add 25µL
Vortex the emulsion to mix
Wait 0h 1m 0s , then pulse centrifuge to separate the PCR mix from the oil.
Note: If you do not see a clear separation of two clear phases and no emulsion remaining, repeat step 35.
Transfer the top aqueous phase to a new 1mL tube.
Add 20µL 1Molarity (M)
Clean up the PCR reaction using the
Elute in 50µL Elution Buffer.
Remove primer dimers and free barcodes using the
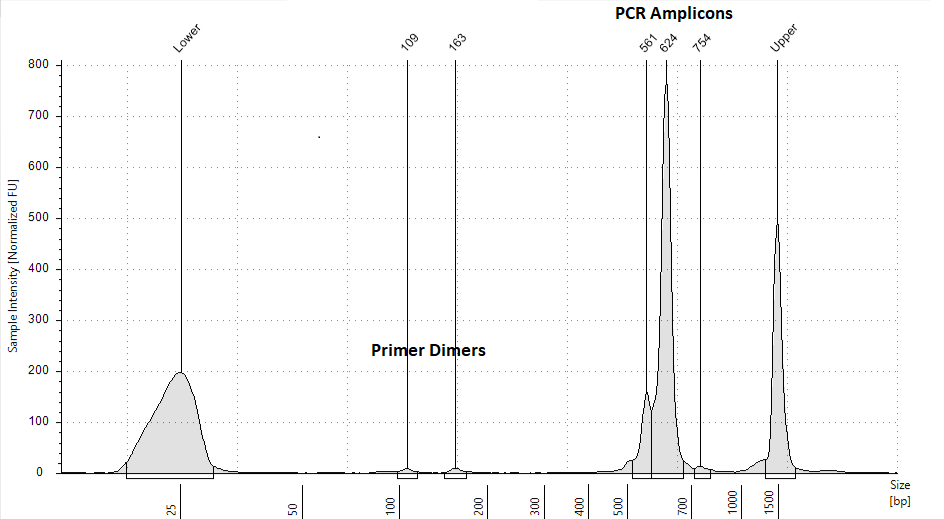
Check the resulting library for primer dimers using
Equipment
| Value | Label |
|---|---|
| TapeStation | NAME |
| Agilent | BRAND |
| G2991AA | SKU |
with a
Other high sensitivity capillary electrophoresis methods will also work.
There should be minimal primer dimers on the trace. Below is an example of an acceptable trace.

Quantify the library using a qPCR library quantification kit such as
Sequence the library on an Illumina sequencer using Custom Sequencing Primers listed here.DoTA-seq-Oligo-Sequences.xlsx

