C-SOP-1001: High Molecular Weight DNA (HMW DNA) Extraction from Bacteria using NEB Monarch HMW DNA extraction kit
Ben Pascoe
High molecular weight DNA extraction
long read sequencing
Oxford Nanopore
Bacterial DNA extraction
Gram positive
Gram negative
Disclaimer
This protocol has been adapted from nucleic acid extraction methods developed by Monarch (NEB Monarch HMW DNA extraction kit; NEB #T3060)
Abstract
The Monarch HMW DNA Extraction Kit for Tissue provides a rapid and reliable process for extracting high molecular weight (HMW), intact genomic DNA from various tissues and bacteria, as well as other sample types including yeast, insect, and amphibian. The optimized extraction protocol for tissue utilizes pestle homogenization and proteinase K digestion with agitation for sample lysis, followed by a protein removal step and precipitation of the extracted DNA onto the surface of large glass beads. A slightly modified extraction protocol for bacteria utilizes lysozyme for the efficient lysis of the bacterial cell wall, prior to proteinase K digestion. DNA size ranges from 50- ≥500 kb for the standard protocols and into the Mb range when the lowest agitation speeds are used for processing soft organ tissues and bacteria. Purified DNA is recovered in high yield with excellent purity, including nearly complete removal of RNA. For tissue and bacteria, the processing time is 90 min. Purity ratios are typically 1.8-1.9 (260/280) for tissue and bacteria, 2.1-2.5 (260/230) for tissue, and 2.1-2.2 (260/230) for bacteria. Purified HMW DNA is suitable for a variety of downstream applications including long-read sequencing (Oxford Nanopore Technologies and Pacific Biosciences), optical mapping (Bionano Genomics), and linked-read genome assembly.
Steps
Safety precautions
Prior to initiating the protocol, ensure that all active workbenches are cleaned with 80% ethanol, all relevant personal protective clothing is worn and the work area is prepared for DNA extraction according to local GLP guidelines.
Create an organised bench space by clearing away all clutter in order to maximise work efficiency. Avoid movements that will expose sterile materials to airborne contaminants.
Treat all isolates and cultures as infectious. Local laboratory safety practices should be followed at all times.
Materials Required but Not Supplied
· Microcentrifuge
· Thermal mixer containing a 1.5 ml tube block (optional: 2 ml tube block for elution)
· Recommended: vertical rotating mixer (e.g., Thermo Scientific® HulaMixer® Sample Mixer).
· Ethanol (≥ 95%).
· Cold PBS, 300 µl per sample (Low Input: 150 µl per sample). Alternatively, TE or Tris buffer can be used.
· Isopropanol, 550 µl per sample (Low Input: 275 µl/sample).
· 1.5 ml DNase-free, low DNA binding microfuge tubes (e.g., Eppendorf® DNA LoBind®, #0030108051) are recommended for elution and storage (1 per sample); it is especially important to use low DNA binding tubes if working with UHMW DNA, which tends to bind to plastic surfaces.
· For Gram-negative bacteria: Lysozyme (25 mg/ml, 10 µl per sample)
· For Gram-positive bacteria: STET Buffer (Current Protocols in Molecular Biology) containing Lysozyme (10 mg/ml) can be an effective lysis agent (150 µl or 300 µl per sample).
· Additional lysis agents may be required (e.g., lysostaphin).
Before you begin
Notes before beginning:
Review the complete protocol before beginning.
Preheat thermal mixer with 1.5 ml block to 37°C, (if available, preheat another to 56°C).
Add ethanol (≥ 95%) to the gDNA Wash Buffer as indicated on the bottle label.
Rotor-stator homogenization may be used to obtain shorter gDNA fragments (50–250 kb), which often results in better ligation-based nanopore sequencing results.
Proteinase K and RNase A should be stored at -20°C.
Starting Material Notes:
The volumes indicated in the protocol vary depending on input amounts. Refer to the following designations throughout the protocol to determine the appropriate volumes.
Standard Input: E. coli : 1 x 10⁹ – 5 x 10⁹
Low Input: E. coli : 5 x 10⁸ – < 1 x 10⁹ | B. cereus : 2 x 10⁸ – 4 x 10⁸
- Optimal input amounts for other bacteria may vary depending on the strain, genome size, and growth conditions.
– E. coli typically produces HMW gDNA in the range of 50 kb – ≥ 500 kb
– B. cereus typically produces HMW gDNA in the range of 50 kb – ≥ 350 kb
Bacterial lysis
Pellet bacterial cells in a Monarch Pestle Tube by centrifugation at maximum speed (12000x g ). If using a rotor-stator homogenizer, use a compatible 2 ml tube, not included.
Gram-negative and Gram-positive bacteria are processed differently for the initial lysissteps. The use of bead beating is not recommended as it will result in a significant reduction of gDNA size.
Gram-negative Bacteria
Resuspend pellet in 300 µl (Low Input: 150 µl) cold PBS. Cold TE or Tris buffer may be used in place of PBS if preferred.
Add 10µLLysozyme (25mg/mL not provided) and mix by vortexing briefly.
Add 300 µl (Low Input: 150 µl) HMW gDNA Tissue Lysis Buffer to the sample and mix by inverting 5-10 times.
Incubate at 37°Cin a thermal mixer with agitation at the desired speed. The speed of the thermal mixer influences fragment length and lysis time. For most applications, maximum agitation speed (2000rpm,0h 0m 0s) is recommended. For maximum gDNA size, agitate at 500rpm,0h 0m 0s. Incubation is complete when lysate turns clear, which is approximately 0h 5m 0s for E. coli. At 500rpm,0h 0m 0s, lysis may take longer.
Gram-positive Bacteria
Resuspend pellet in 300 µl (Low Input: 150 µl) of an appropriate lysis buffer containing a lytic enzyme and mix by vortexing briefly. STET buffer with freshly added lysozyme (10 mg/ml) works well for some Bacillus species.
Incubate at 37°Cfor 0h 30m 0s(no agitation).
Add 300µL(Low Input: 150 µl) HMW gDNA Tissue Lysis Buffer to the sample and mix by inverting 5–10 times.
If working with a single thermal mixer, increase the temperature to 56°C. Following lysozyme treatment at 37°C, increase the temperature of the block in the thermal mixer to 56°C.
Add 20µL(Low Input: 10 µl) of Proteinase K and mix by inverting 10–20 times.
Homogenization can be carried out using one of two methods, depending on the desired gDNA size: in a thermal mixer or with a rotor-stator homogenizer. If using a rotor-stator homogenizer, the sample must be in a 2 ml tube (not provided).
Thermal Mixer (for gDNA 50 kb up to ≥ 500 kb): Incubate at 56°C for 0h 30m 0s in a thermal mixer at the desired speed. The speed of the thermal mixer influences fragment length and lysis; higher agitation speeds reduce DNA size and sample lysis time. For most applications, including the standard ligation-based Oxford Nanopore Technologies (ONT) sequencing protocols, maximum agitation speed (2000rpm,0h 0m 0s) is recommended to produce DNA fragments predominantly 50–250 kb.
Rotor-stator Homogenizer (for gDNA 50–250 kb): Within a 2 ml tube, insert the tip of the homogenizer probe and turn on to the lowest setting. Homogenize 5–15 seconds; stop when foam begins to form in the lysate. Additional homogenization may be required to reach optimal gDNA size. gDNA size can be verified by pulsed field gel electrophoresis or FEMTO Pulse. Rotor-stator homogenizers may run at higher speeds after extended use; reduce homogenization time if necessary.
Transfer to a 1.5 ml Pestle Tube. Incubate at 56°Cfor a minimum of 0h 30m 0sin a thermal mixer at maximum speed (2000rpm,0h 0m 0s).
Add 10µL(Low Input: 5 µl) of RNase A and mix by inverting 5–10 times. Incubate for 0h 10m 0sat 56°Cwith agitation in a thermal mixer at the speed used in previous Step.
Change the heat block in the thermal mixer to accommodate a 2 ml tube, and preheat the
block to56°C . If a 2 ml tube block is not available, continue working with the 1.5 ml block.
Add 300µL(Low Input: 150 µl) of Protein Separation Solution. Mix by inverting for 0h 1m 0sAlternatively, a vertical rotating mixer at 20 rpm can be used.
Centrifuge for 0h 10m 0s at 16.000x g,0h 0m 0s. If working with multiple samples, during centrifugation, prepare the plastics for binding and elution , as indicated in the following step. The sample will separate into a large, clear upper phase (DNA) and a lower, clear phase (protein, usually on the bottom of the tube, but occasionally floating). There may also be a white precipitate at the bottom of the tube. Additional centrifugation time (0h 20m 0s) may be required for complete phase separation, particularly when low agitation speeds were used.
If working with multiple samples, prepare and label the plastics for the upcoming steps. Each sample will require:
-
Monarch Collection Tube II (no need to label)
-
1x Monarch Bead Retainer inserted into the collection tube; this will be used to remove the wash buffer from the gDNA bound to the beads.
-
2x Monarch 2 ml Tubes; one for phase separation and one for elution.
-
1x 1.5 ml microfuge tube (DNA low bind recommended, not provided); this will be used to collect the eluate.
Using a 1000µL(Low Input: 200 µl) wide-bore pipette tip, transfer the upper phase containing the DNA (large, clear phase) to a labeled Monarch 2 ml Tube. A substantial fraction of HMW DNA will be located at the interface between the clear upper phase and the protein phase; highest yields will be achieved by transferring as much of the upper phase as possible. Using a 200 µl wide-bore pipette tip to transfer the final volume of the upper phase is recommended for maximum yield. Avoid transferring material from the protein layer, though a small amount (1–2 µl) will not be detrimental. If protein enters the pipette tip, gently push it back into the tube. If a lower protein phase is not visible, leave ~30 µl behind to ensure protein is not carried over. Typically, the transferred volume will be ~ 800µL(Low Input: ~400 µl). If the volume of the sample is < 700 µl (Low Input: < 350 µl), adjust the volume of isopropanol used in Step 2 of Part 2: HMW gDNA Binding and Elution to 0.7 volumes.
HMW gDNA Binding and Elution
Using clean forceps, add 2 DNA Capture Beads to each sample, which should be contained in a Monarch 2 ml Tube.
Add 550µL(Low Input: 275 µl) isopropanol, close the cap, and mix on a vertical rotating mixer at 10 rpm for 0h 5m 0s to attach DNA to the beads. If a vertical rotating mixer is not available, invert slowly and gently by hand 25–30 times. A manual inversion is complete when the tube returns to the upright position. Slow inversion is critical for the DNA to bind to the beads; each full inversion should take ~5–6 seconds. If necessary, flick the tube to release any beads that stick to the bottom of the tube.
After a 2–3 inversions, the solution becomes more viscous and the DNA will wrap loosely around the beads. During the following inversions, precipitation of gDNA may be visible, especially with larger input samples. The DNA complex will often contain small air bubbles. With increasing number of inversions, the DNA will completely wrap around the beads, often causing the beads to stick together. DNA binding to the beads should be complete after 25–30 inversions, and the solution should no longer be viscous. Additional inversions may be necessary for larger input samples.
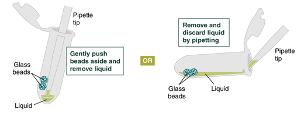
Remove and discard liquid by pipetting. Avoid removing any of the gDNA wrapped around the glass beads. For optimal DNA solubility, avoid letting the bound DNA dry out on the beads during this and the following steps; add the next buffer quickly. There are two suggested options for carrying out this step :
Keeping tube upright, insert pipette tip and gently push beads aside to remove liquid.
-OR-
Angle the tube so that beads remain at the bottom, and liquid reaches toward tube opening. Pipette from the liquid surface and continue to angle as liquid is removed (tube will be almost horizontal at the end).
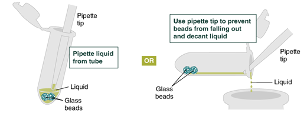
Add 500µLgDNA Wash Buffer, close the cap, and mix by inverting the tube 2–3 times. Remove the gDNA Wash Buffer as described in step 20. The loose gDNA complex will condense around the beads more tightly.
Repeat the wash in Step 21 and remove the gDNA Wash Buffer by pipetting. Alternatively, the buffer can be removed by decanting: position a pipette tip at the top of the angled tube to prevent the beads from falling out. It is not necessary to remove all the gDNA Wash Buffer at this point.
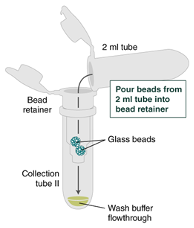
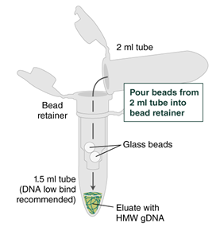
Place a labeled bead retainer into a Monarch Collection Tube II. Pour the beads into the bead retainer and close the cap. Discard the used Monarch 2 ml Tube. When working with multiple samples, be sure to close the cap of the bead retainer after each transfer of beads.
Pulse spin (≤ 0h 0m 1s) the sample in a benchtop minicentrifuge to remove any residual wash buffer from the beads.
Separate the bead retainer from the collection tube, pour the beads into a new, labeled Monarch 2 ml Tube, and insert the used bead retainer into the labeled 1.5 ml microfuge tube (DNA low bind recommended, not provided) for later use during elution. Discard the used collection tube.
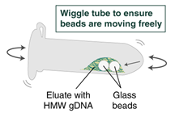
Immediately add 100µLElution Buffer II onto the glass beads and incubate for a minimum of 5 minutes at 56°C in a thermal mixer with agitation at the lowest speed (300rpm,0h 0m 0s. Halfway through the incubation, ensure the beads are not stuck to the bottom of the tube by tilting the tube almost horizontally and gently shaking. This ensures that the beads can move freely, allowing for optimal release of the DNA from the beads. It also ensures that the lower bead does not stick to the bottom of the tube during the following transfer step. Elution volume can be reduced to as low as 50µL without affecting recovery. However, if using < 100µL, the gentle shaking of the sample should be done several times during the incubation to ensure complete wetting of the beads.
Ensure the bead retainer is inserted into the 1.5 ml microfuge tube. Pour the eluate and the glass beads into the bead retainer and close the cap. When working with more than 1 sample, it is important to close the cap after each transfer of beads. Typically, all the eluate flows into the bead retainer upon pouring. If any volume remains in the 2 ml tube, spin briefly and transfer.
°C Centrifuge for 0h 0m 30sat 12,000 x g to separate the eluate from the glass beads. Discard the beads and retainer.
Pipette eluate up and down 5–10 times with a wide bore pipette tip and ensure any visible DNA aggregates are dispersed. Before analysis or downstream use, HMW DNA must be homogeneously dissolved. After pipetting, incubate at 37°C for 1h 0m 0s,, 24h 0m 0sat Room temperature,, or for > 24h 0m 0sat 4°C. Pipette up and down 5-10 times again before analyzing or using the HMW DNA. Samples processed using low agitation speeds during lysis will require additional time to fully dissolve. See additional guidance in “Homogenization of HMW DNA Samples”. Samples can be stored at 4°Cfor short term use (weeks), or at -20°Cfor long term storage. The elution buffer (10 mM Tris, pH 9.0, 0.5 mM EDTA) is formulated for long term storage of gDNA.
Additional resources
Protocol Guidance for Extraction of Ultra-High Molecular Weight (UHMW) Genomic DNA for Ultra-Long (UL) Read NGS Sequencing applications in Oxford Nanopore Technologies® workflows
Protocol for UHMW DNA Cleanup in the Oxford Nanopore Technologies® UL Library Prep Workflow
