Antibody Purification and Labeling
Jeff Spraggins, Maya Brewer, Yuantee Zhu, Mark De Caestecker
Abstract
This protocol describes the process for antibody purification, subsequent labeling for direct immunofluorescence, and validating antibody labeling.
Steps
Antibody Purification
This is to remove any BSA, azide, glycine that is often added by the
manufacturer for stabilization. If the antibody has nothing added, skip this section.
Prepare buffers from AB buffer kit:
10X binding buffer must be diluted to 1X (9 parts ddH 2 O and 1 part 10X binding buffer).
10X elution buffer must be diluted to 1X (9 parts ddH 2 O and 1 part 10X elution buffer).
Neutralizing buffer does not have to be diluted in any way. Prepare two collection tubes containing 30 µl of neutralizing buffer for the eluted fractions.
Resuspend medium of spintrap column
Remove the bottom cap from the column and save for later use.
Place the column in a 2 mL collection tube and centrifuge at 100 x g for 30 seconds to remove storage solution.
Add 600 ul of binding buffer to the tube
Centrifuge at 100 x g for 30 seconds
Add no more than 600 uL of the anitbody to the tube
Several sample applications can be made subsequently as long as the capacity of the column is not exceeded.
Secure the top and bottom cap on top the tube and incubate for 4 minutes while gently mixing
Remove the bottom cap and centrifuge the column at 100 x g for 30 seconds
Add 600 ul of binding buffer to the column to wash
centrifuge at 100 x g for 30 seconds
Add 600 ul of the binding buffer to the column for a second wash
Centrifuge at 100 x g for 30 seconds
Add 400 ul of elution buffer and mix by inverting tube several times
Place the column in one of the 2 ml collection tubes containing 30 ul of neutralizing buffer
Centrifuge at 100 x g for 30 seconds
Add 400 ul of elution buffer and mix by inverting tube several times
Place the column in the other 2 ml collection tube containing 30 ul of neutralizing buffer
Centrifuge at 100 x g for 30 seconds
Buffer Exchange
Assemble Amicon Pro Affinity Concentrator by carefully attaching the Amicon Ultra device to the exchange device
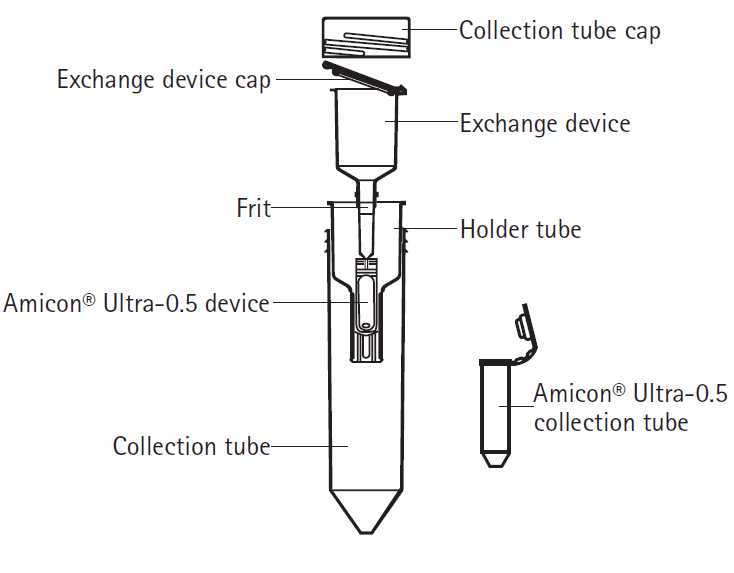
Once the concentrator is assembled, remove the collection tube cap, life the exchange device cap, and add 1 ml of binding buffer or PBS to moisten the cellulose membrane of the Amicon Ultra device. This wash ensures that the antibody does not stick to the membrane upon its addition.
Centrifuge at 4000 x g for 3 minutes
Add 1 ml binding buffer or PBS and antibody collected in neutralizing buffer to the exchange device
Centrifuge for 15 minutes at 4000 x g in a swinging-bucket rotor
Add 2 mL of binding buffer or PBS to the device and centrifuge again at 4000 x g for 10 minutes twice
Collect purified antibody from the device by reverse spin
Place a collection tube on top of the Amicon Ultra-0.5 device
Invert the assembly and centrifuge in a fixed-angle rotor at 1000 x g for 2 minutes
Use a nanodrop to measure the purified antibody at an absorbance of 280 nm
Make sure that the sampling arm on the nanodrop is up
Using a P10 pipette, add 2 µL of the sample onto the lower measurement pedestal
Lower the sampling arm and measure the absorbance of the antibody at A280. The
concentration should be given in mg/mL
Labeling Protocol
Antibodies should be in a buffer free of any amine-containing compounds (glycine, Tris, or ammonium ions) and stabilizing proteins (bovine serum albumin). These compounds will interfere with the labeling reaction. Labeling of antibody occurs by the DyLight dye linking to the primary amine (R-NH 2 ) in peptides and proteins.
Collect labeled antibody from the collection tube. Aliquot then store at 4˚C short term, and -20˚C long term.
*The conjugates can survive freeze thawing but you will need to evaluate each new antibody you use to make sure. We always evaluate one freeze/thaw cycle by repeating staining
Validating Antibody Labeling
After labeling antibodies, we initially validate antibody labeling by staining human kidney sections with the fluorophore conjugated antibody at different dilutions, as described in the antibody validation protocol (dx.doi.org/10.17504/protocols.io.5jyl8pwwdg2w/v1). We also compare staining by indirect immunofluorescence on the same section by indirect immunofluorescence using both the conjugated and original unconjugated antibody.
If we show that the conjugated and unconjugated antibody is staining the tissue using indirect immunofluorescence but the directly conjugated fluorophore is undetectable, this suggests that the signal from the fluorophore is too low (i.e.: there may be too little dye conjugation). Conversely, if antibody staining is detectable with unconjugated antibodies, but the conjugated antibody is undetectable using both methods, it is possible too much dye is conjugated to the antibody and is inhibiting the epitope binding sites. To address this, we evaluate the dye: antibody ratio and repeat the conjugation reaction with different ratios of dye to antibody in the conjugation reaction depending on the results, as described below
The dye to antibody ratio measures the average number of dye molecules conjugated to each antibody molecule using serial dilutions of the conjugated antibody in PBS, and measuring the absorbance of the conjugate at A280 and the maximum excitation wavelength for the dye.
Ideally, the optimal dye to antibody ratio is around 2, meaning there are about 2 molecules of dye per molecule of antibody. Some dyes such as the Alexa Fluors allow higher ratios upwards to 5-8 without overlabeling the antibody. On this basis, if the dye to antibody ratio is >2 and staining does not work, we repeat antibody conjugation reaction with reduced dye: antibody ratios. If the ratio of dye to antibody is > 2, then labeling is repeated after addressing the successful purification of the antibody, followed by using different ratio of dye to antibody, or decreasing the incubation time of the labeling reaction
Section D of this document outlines instructions for calculating the dye to antibody ratio
If the antibody was conjugated in house, and we show that the conjugated and unconjugated antibody is staining the tissue using indirect immunofluorescence but the directly conjugated fluorophore is undetectable, this suggests that the signal from the fluorophore is too low (i.e.: there may be too little dye conjugation). Conversely, if antibody staining is detectable with unconjugated antibodies, but the conjugated antibody is undetectable using both methods, it is possible too much dye is conjugated to the antibody and is inhibiting the epitope binding sites.
If the antibody was conjugated commercially, and we show that the unconjugated stains the tissue while the conjugated antibody does not it is possible there is either too little or too much dye conjugated to the antibody. If this occurs consider ordering a different antibody, a different lot of the same fluorophore conjugated antibody, or a different fluorophore conjugate, and retest
