AAV capsid library production
Miguel Chuapoco
Abstract
We recently developed adeno-associated virus (AAV) capsids to facilitate efficient and noninvasive gene transfer to the central and peripheral nervous systems. However, a detailed protocol for generating and systemically delivering novel AAV variants was not previously available. In this protocol, we describe how to produce and intravenously administer AAVs to adult mice to specifically label and/or genetically manipulate cells in the nervous system and organs, including the heart. The procedure comprises three separate stages: AAV production, intravenous delivery, and evaluation of transgene expression. The protocol spans 8 d, excluding the time required to assess gene expression, and can be readily adopted by researchers with basic molecular biology, cell culture, and animal work experience. We provide guidelines for experimental design and choice of the capsid, cargo, and viral dose appropriate for the experimental aims. The procedures outlined here are adaptable to diverse biomedical applications, from anatomical and functional mapping to gene expression, silencing, and editing.
Before start
Attachments
Steps
Reagent setup: Plasmid DNA
to the Addgene catalog for suggested growth conditions. Use a large-scale endotoxin-free plasmid purification kit to isolate plasmids; elute plasmid DNA with the supplied Tris-EDTA (TE) buffer. Measure the DNA purity and concentration using a spectrophotometer and freeze at -20°C or
-80°C for up to several years.

Reagent setup: Cell culture media
Add
| A | B |
|---|---|
| FBS | 25 ml |
| NEAA | 5 ml |
| pen–strep | 5 ml |
| DMEM | 500-ml bottle |
Invert to mix and store at 4°C for up to several months; warm to 37°C before use. The resulting cell culture media should have a final concentration of 5% (vol/vol) FBS, 1× NEAA, and 50 pen–strep.
Reagent setup: Cell culture
Thaw HEK293T cells according to the manufacturer’s recommendations. Passage cells using either
TrypLE Express enzyme or a standard trypsinization protocol for adherent cultures69. Seed cells in 150-mm tissue culture dishes with a final volume of 20mL of media per dish. Maintain in a cell culture incubator at 37°C with 5% CO2.
Reagent setup: PEI stock solution
Pipette 50mL of WFI water into a 50-ml conical centrifuge tube for later use. Add 323mg of PEI to the remaining 950mL bottle of WFI water and adjust the pH to 2–3 by adding 1 HCl suitable for cell culture, keeping track of the volume of HCl added. Heat in a 37°C water bath for several hours (or 24h 0m 0s) and occasionally shake to mix. Once dissolved, add reserved WFI water to a total volume of 1L. Filter-sterilize, make aliquots in 50-ml conical centrifuge tubes, and store at -20°C for up to 1 year. We routinely freeze–thaw our PEI aliquots.
Reagent setup: PEI + DPBS master mix
Thaw PEI in a 37°C water bath. Bring the PEI to Room temperature (23°C) and vortex to mix. Add PEI and DPBS to a 50-ml conical centrifuge tube and vortex again to mix. Use Supplementary Table 2 (‘Transfection calculator’ sheet) to calculate the volumes of PEI (cell I9) and DPBS (cell J9) needed.
Reagent setup: DNA + DPBS
Bring plasmid DNA to Room temperature and briefly vortex to mix. For each viral prep, add DNA and DPBS to a 50-ml conical centrifuge tube; the solution is vortexed in Step 24. Use Supplementary Table 2 (‘Transfection calculator’ sheet) to calculate the quantities of DNA (e.g., cells E9, E11, and E13) and DPBS (e.g., cell F9) needed.
Reagent setup: SAN digestion buffer
Add
| A | B |
|---|---|
| NaCl | 29.22 g |
| Tris base | 4.85 g |
| MgCl2·6H2O | 2.03 g |
| WFI water | 1-liter bottle |
and shake to mix. Filter-sterilize and store at Room temperature for up to several months. The resulting SAN digestion buffer should have a final pH of ~10.0 and a final concentration of 500millimolar (mM) NaCl, 40millimolar (mM) Tris base, and 10millimolar (mM) MgCl2.
Reagent setup: SAN + SAN digestion buffer
Add 100 of SAN (4µL of 25 SAN) per milliliter of SAN digestion buffer; pipette to mix.
Reagent setup: 40% (wt/vol) PEG stock solution
Decant ~500mL of WFI water into a 500-ml sterile bottle for later use. Add 146.1g of NaCl to the remaining 500mL (in the 1-liter bottle of WFI water) and shake/heat until dissolved.
Once completely dissolved, add 400g of PEG and heat at 37°C 24h 0m 0s for up to 2 nights. Add reserved WFI water to a total volume of 1L. Filter-sterilize and store at Room temperature for up to several months. The resulting stock solution should have a final concentration of 2.5Molarity (M) NaCl and 40% (wt/vol) PEG.
Reagent setup: DPBS + high salt
Add
| A | B |
|---|---|
| NaCl | 29.22 g |
| KCl | 93.2 mg |
| MgCl2·6H2O | 101.7 mg |
| DPBS | 500-ml bottle |
and shake to mix. Filter-sterilize and store at Room temperature for up to several months. The resulting buffer should have a final concentration of 1Molarity (M) NaCl, 2.5millimolar (mM) KCl, and 1millimolar (mM) MgCl2 (in addition to the salts in the DPBS).
Reagent setup: DPBS + low salt
Add
| A | B |
|---|---|
| NaCl | 2.92 g |
| KCl | 93.2 mg |
| MgCl2·6H2O | 101.7 mg |
| DPBS | 500-ml bottle |
and shake to mix. Filter-sterilize and store at Room temperature for up to several months. The resulting buffer should have a final concentration of 100millimolar (mM) NaCl, 2.5millimolar (mM) KCl, and 1millimolar (mM) MgCl2 (in addition to the salts in the DPBS).
Reagent setup: Iodixanol density gradient solutions (15%, 25%, 40%, and 60% (wt/vol) iodixanol)
For each layer, add iodixanol (OptiPrep), DPBS + high salt or DPBS + low salt, and phenol red (if
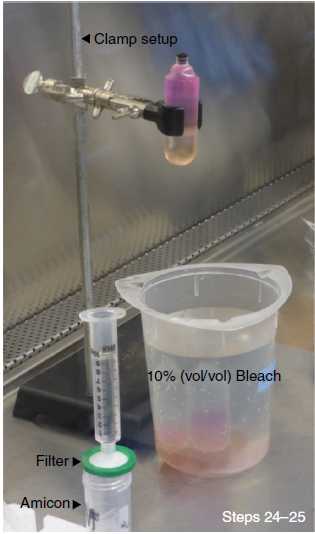
applicable) to a 50-ml conical centrifuge tube. Invert or briefly vortex to mix. Use Supplementary Table 3 to determine the volumes of each reagent needed. The 25% and 60% layers contain phenol red, which turns the solutions red and yellow, respectively, and facilitates clear demarcation of the gradient boundaries (Fig. 8).
. a, Layer the 25% (wt/vol) iodixanol underneath the 15% layer. b, Add layers of increasing density under the previous layer; the gradients should have a sharp delineation between layers. c, In Step 40 the supernatant (Sup.) from Step 39 (Fig. 7b) above the 15% layer (Supplementary Video 1, 1:46–2:22; the same step is also shown in Supplementary Video 2, 1:14–1:55). d,e, In Step 41, fill each tube up to the neck with SAN digestion buffer and insert a black cap (d); place a spacer on top before weighing the tubes (e). f, After ultracentrifugation (Step 44), secure the tube into the clamp setup above a container of fresh 10% (vol/vol) bleach (Step 46). Allow 10 ml of DPBS to begin dripping through the syringe filter unit into an Amicon filter device (Step 47). g, In Step 48, collect the virus (Supplementary Video 3, 0:00–1:30). Insert the needle ~4 mm below the 40/60% interface (i.e., where the tube just starts to curve). Do not collect virus (asterisk) until the black cap is removed; do not collect from the white protein layer at the 25/40% interface. h, In Step 49, filter the virus/iodixanol (Supplementary Video 3, 1:31–2:32). Inject the virus below the DPBS in the filter-attached syringe barrel before pushing the virus/DPBS through the syringe filter unit and into the Amicon filter device.")
Reagent setup: DNase digestion buffer
Use a 50-ml serological pipette to measure 247.5mL of UltraPure water into a 250-ml sterile bottle. Add
| A | B |
|---|---|
| CaCl2 | 55.5 mg |
| 1 M Tris-HCl | 2.5 ml |
| MgCl2·6H2O | 508 mg |
and shake to mix. Filter sterilize and store at Room temperature for up to several months. The resulting buffer should have a final concentration of 2Molarity (M) CaCl2, 10Molarity (M) Tris-HCl, and 10Molarity (M) MgCl2.
Reagent setup: DNase I + DNase digestion buffer
Add 50 of DNase I per milliliter of digestion buffer (a 1:200 dilution of 10 DNase); pipette to mix.
Reagent setup: Proteinase K solution
Use a 50-ml serological pipette to measure 250mL of UltraPure water into a 250-ml sterile bottle. Add 14.61g of NaCl and shake to mix. Add 2.5g of N-lauroylsarcosine sodium salt to the mixture and gently swirl to mix; N-lauroylsarcosine sodium salt is a surfactant and will generate bubbles during vigorous mixing. Filter-sterilize and store at Room temperature for up to several months. The resulting solution should have a final concentration of 1Molarity (M) NaCl and 1% (wt/vol) N -lauroylsarcosine sodium salt.
Reagent setup: Proteinase K + proteinase K solution
Add 100µg of proteinase K per milliliter of solution (a 1:200 dilution of 50 (2.5 U/mg) proteinase K); pipette to mix.
Reagent setup: DNA standard stock
Set up a single 50-μl restriction digest reaction; use 60-80 (3–4 μl) of ScaI (or another suitable enzyme) to linearize 20µg of the plasmid DNA containing the target sequence. Run a small amount of the reaction on an agarose gel to ensure complete digestion. Purify the reaction using two DNA clean-up columns. Measure the DNA concentration (ng/μl) using a spectrophotometer. Dilute to ~5–10 × 109 single-stranded (ss) DNA molecules/μl and use the Qubit assay to verify the concentration (ng/μl). Divide into 20µL aliquots in DNA/RNA LoBind microcentrifuge tubes and freeze at -20°C for up to 1 year.
Reagent setup: DNA standard dilutions
Prepare three sets of eight (1:10) serial dilutions of the DNA standard stock. For each set, begin by pipetting 5µL of the standard into 45µL of UltraPure water (standard no. 8). Mix by vortexing for 0h 0m 3s and proceed with the seven remaining dilutions (standard no. 7 to standard no. 1). The final concentrations of the standard dilutions should range from 5–10 × 108 (standard no. 8) to 5–10 × 101 (standard no. 1) ssDNA molecules/μl.
Reagent setup: qPCR master mix
Prepare a qPCR master mix for the total number of reactions (i.e., wells) needed. One reaction requires
| A | B |
|---|---|
| SYBR Green master mix | 12.5 μl |
| UltraPure water | 9.5 μl |
| each primer (from a 2.5-μM stock concentration) | 0.5 μl |
| Total | 23 μl/well |
Pipette or vortex for 1–2 s to mix.
Equipment setup: Clamp setup for AAV purification
Attach the rod to the support stand. Secure the clamp 25–30 cm above the stand (Fig. 8f).
Procedure
Procedure: Triple transient transfection of HEK293T cells ● Timing 1–2 h
24 h before transfection, seed HEK293T cells in 150-mm dishes to attain 80–90% confluency the next day69. Incubate the cells in a cell culture incubator at 37°C with 5% CO2.
At the time of transfection, make the PEI + DPBS master mix and the DNA + DPBS solution for each viral prep (Reagent setup and Supplementary Table 2, ‘Transfection calculator’ sheet). Using a 5- or 10-ml serological pipette, add the required volume of the PEI + DPBS master mix (e.g., ‘Transfection calculator’ cell G9) dropwise to the DNA + DPBS solution (e.g., ‘Transfection calculator’ cells E9 + E11 + E13 + F9) while gently vortexing to mix. Cap the tube and thoroughly vortex for 0h 0m 10s to mix. Allow the mixture to sit at Room temperature for 2–10 min. Add 2mL of the transfection solution dropwise to each dish and swirl to mix before returning the dishes to the cell culture incubator.
Change the media 12–24 h post transfection by aspirating the old media in 10% (vol/vol) bleach and replacing it with 20mL of fresh, warmed media (Reagent setup).
Procedure: AAV harvest ● Timing 3 d
Harvest the media and cells 60 h (2.5 d) post-transfection. Use a cell scraper to gently scrape the cells in the media. After scraping the first dish, prop it at a 30° angle, using an empty 1.5-ml microcentrifuge tube rack for support. Scrape down the residual cells and media such that they are pooled together. Return the dish lid and scrape the next plate; prop dishes up against one another along the length of the biosafety cabinet until scraping is complete. Use a 25-ml serological pipette to collect the media and cells from each dish; transfer to a 250-ml conical centrifuge tube. Pool the media and cells from up to 10 dishes in a single tube.
Centrifuge the media and cells at 2000x g. Ensure that the tube caps are tightly secured. Centrifugation will result in the formation of a cell pellet (Fig. 7b).
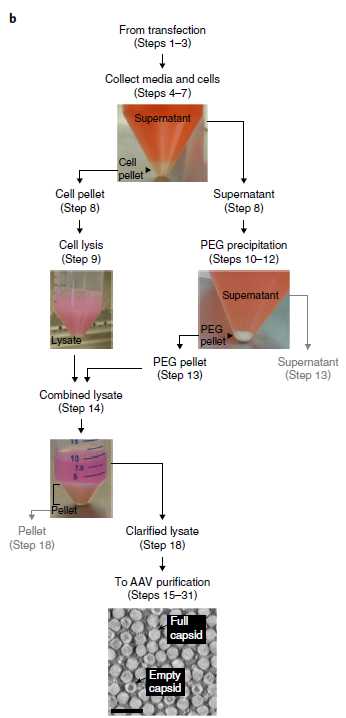
Pour off the supernatant (i.e., the clarified media) into the corresponding bottle from Step 26. Allow excess media to drip back down onto the beveled edge of the 250-ml tube; remove using a P1000 pipette and add to the supernatant. Store the supernatant at 4°C until Step 32.
Cell pellet resuspension. Prepare 5mL of SAN + SAN digestion buffer (Reagent setup) per viral prep. For smaller viral preps (1–5 dishes), use option 31.1. For larger preps (6–10 dishes), use option 31.2.
Harvest from 1–5 dishes
- Use a 5-ml serological pipette to gently resuspend the cell pellet in
5mLof SAN + SAN digestion buffer; pipette into a 50-ml tube to finish resuspending the pellet (Fig. 7b). - Incubate in a
37°Cwater bath for1h 0m 0sand store at4°Cuntil Step 36 (up to 1 d).NoteCRITICAL STEP Be sure to collect the entire pellet, which will stick to the walls and beveled edges of 250-ml tubes. Save the 250-ml tubes for Step 32.The high salt content of SAN digestion buffer lyses the cells, which release the viral particles and nucleic acids into the solution. Initially, the cell lysate may be viscous and difficult to pipette; SAN will degrade nucleic acids and reduce the viscosity after incubation at 37°C. The pH of the lysate will decrease to 8–9 or lower during cell lysis, but the lysate should appear pink rather than yellow/orange because of residual phenol red (Fig. 7b). Note that the expression of fluorescent proteins from strong promoters (e.g., CAG) can alter the color of the lysate.(Optional ) Collect a 30µL sample from the cell lysate for troubleshooting; store at 4°C for up to 1 week. If the viral yield is lower than expected, the sample can be titered (Steps 54–64) to determine at which stage the virus may have been lost.? TROUBLESHOOTING
Harvest from 6–10 dishes
- Use a 10-ml serological pipette to partially resuspend the smaller cell pellet in
5mLof SAN + SAN digestion buffer. Pipette into the second 250-ml tube containing the larger pellet and resuspend together; pipette into a 50-ml tube to finish resuspending the pellet (Fig. 7b). - Incubate in a
37°Cwater bath for1h 0m 0sand store at4°Cuntil Step 36 (up to 1 d).NoteCRITICAL STEP Be sure to collect the entire pellet, which will stick to the walls and beveled edges of 250-ml tubes. Save the 250-ml tubes for Step 32.The high salt content of SAN digestion buffer lyses the cells, which release viral particles and nucleic acids into solution. Initially, the cell lysate may be viscous and difficult to pipette; SAN will degrade nucleic acids and reduce the viscosity after incubation at 37°C. The pH of the lysate will decrease to 8–9 or lower during cell lysis, but the lysate should appear pink rather than yellow/orange because of residual phenol red (Fig. 7b). Note that expression of fluorescent proteins from strong promoters (e.g., CAG) can alter the color of the lysate.(Optional ) Collect a 30µL sample from the cell lysate for troubleshooting; store at 4°C for up to 1 week. If the viral yield is lower than expected, the sample can be titered (Steps 54–64) to determine at which stage the virus may have been lost.? TROUBLESHOOTING
Retrieve the supernatant collected in Step 30. For smaller viral preps (1–5 dishes), use option 32.1. For larger preps (6–10 dishes), use option 32.2.
Harvest from 1–5 dishes
Pour the supernatant from Step 30 into the corresponding 250-ml tube from Step 31.
Harvest from 6–10 dishes
Equally divide the supernatant from Step 30 between the two corresponding 250-ml tubes from Step 31.
Use a 25-ml or 50-ml serological pipette to add a 1/5 final volume of 40% (wt/vol) PEG stock solution to the supernatant (i.e., the supernatant should contain a final concentration of 8% (wt/vol) PEG solution). Tighten the cap and thoroughly invert ten times to mix. Incubate On ice for 2h 0m 0s.
Centrifuge the PEG–media mixture at 4000x g,4°C. Centrifugation will result in the formation of a PEG pellet (Fig. 7b).
Pour off the supernatant (i.e., the PEG-clarified media) into a used media collection bottle for bleaching. Allow excess media to drip back down onto the beveled edge of the 250-ml tube; aspirate or pipette to remove.
PEG pellet resuspension. Prepare 1mL of SAN + SAN digestion buffer (Reagent setup) per viral prep. For smaller viral preps (1–5 dishes), use option 36.1. For larger preps (6–10 dishes), use option 36.2.
Harvest from 1–5 dishes
- Use a P1000 pipette to carefully resuspend the PEG pellet in
1mLof SAN + SAN digestion buffer; pipette into the corresponding lysate from Step 31 (Fig. 7b). - Incubate in a
37°Cwater bath for an additional0h 30m 0s.NoteCRITICAL STEP Resuspending the PEG pellet is difficult and will take ~0h 5m 0s per pellet. Be sure to collect the entire pellet, some of which will stick to the walls and beveled edges of 250-ml tubes. During resuspension, avoid air bubbles, which can be difficult to collect with a pipette and may disrupt capsid structure. Do not use a serological pipette to resuspend the pellet, which can become lodged within the barrel of the pipette.(Optional ) Collect a 30µL sample from the PEG pellet resuspension, before adding it to the corresponding lysate, for troubleshooting; store at 4°C for up to 1 week. If the viral yield is lower than expected, the sample can be titered (Steps 54–64) to determine at which stage the virus may have been lost.PAUSE POINT Store the lysate at 4°C 0h 5m 0s. Alternatively, use a dry ice–ethanol bath to freeze the lysate; store at -20°C for up to 1 week.
Harvest from 6–10 dishes
- Use a P1000 pipette to partially resuspend one of the PEG pellets in
1mLof SAN + SAN digestion buffer. Pipette into the second 250-ml tube containing the second pellet and carefully resuspend together; pipette into the corresponding lysate from Step 31 (Fig. 7b). - Incubate in a
37°Cwater bath for an additional0h 30m 0s.NoteCRITICAL STEP Resuspending the PEG pellet is difficult and will take ~0h 5m 0s per pellet. Be sure to collect the entire pellet, some of which will stick to the walls and beveled edges of 250-ml tubes. During resuspension, avoid air bubbles, which can be difficult to collect with a pipette and may disrupt capsid structure. Do not use a serological pipette to resuspend the pellet, which can become lodged within the barrel of the pipette.(Optional ) Collect a 30µL sample from the PEG pellet resuspension, before adding it to the corresponding lysate, for troubleshooting; store at 4°C for up to 1 week. If the viral yield is lower than expected, the sample can be titered (Steps 54–64) to determine at which stage the virus may have been lost.PAUSE POINT Store the lysate at 4°C 0h 0m 0s. Alternatively, use a dry ice–ethanol bath to freeze the lysate; store at -20°C for up to 1 week.
Procedure: AAV purification ● Timing 1 d
Pour the density gradients (Fig. 8a,b and Supplementary Video 1, 0:00–1:45, or Supplementary Video 2, 0:00–1:13). Each gradient is composed of the following layers: 6mL of 15% (wt/vol) iodixanol, 6mL of 25% (wt/vol) iodixanol, 5mL of 40% (wt/vol) iodixanol, and 5mL of 60% (wt/vol) iodixanol (Supplementary Table 3). Pour the layers with a 2- or 5-ml serological pipette. We typically use a 2-ml pipette; using a 5-ml pipette is faster but requires the use of PTFE and Tygon tubing and extra reagents. To load the layers with a 2-ml pipette, choose option 38.1. To load the layers with a 5-ml pipette, choose option 38.2.
Loading with a 2-ml pipette
Begin by pipetting 6mL (measure to the 3 ml mark twice) of 15% (wt/vol) iodixanol to each tube. Next, add 6mL of 25% (wt/vol) iodixanol under the 15% layer by lightly touching the pipette tip to the bottom of the tube and slowly releasing the solution (Fig. 8a and Supplementary Video 1, 0:13–1:29). Continue adding layers of increasing density under the previous layer. The gradients should have a sharp delineation between layers (Fig. 8b).
Loading with a 5-ml pipette
Attach a piece of tubing (see Equipment) to a 5-ml pipette. Begin by pipetting 6mL of 15% (wt/vol) iodixanol into each tube. Next, add 6mL of 25% (wt/vol) iodixanol under the 15% layer by lightly touching the tubing to the bottom of the tube and slowly releasing the solution (Supplementary Video 2, 0:17–1:13). Continue adding layers of increasing density under the previous layer. The gradients should have a sharp delineation between layers (Fig. 8b).
Centrifuge the lysate from Step 36 at 2000x g. Centrifugation will result in the formation of a pellet (Fig. 7b).
Use a 2-ml serological pipette to load the supernatant (i.e., the clarified lysate) (~6–7 ml total) from Step 39 above the 15% (wt/vol) iodixanol layer (Fig. 8c and Supplementary Video 1, 1:46–2:22 or Supplementary Video 2, 1:14–1:55). Touch the pipette tip to the surface of the 15% layer and slowly release the lysate such that a layer forms on top.
Using a 2-ml serological pipette, fill each tube up to the neck with SAN digestion buffer. Firmly insert a black cap (Fig. 8d) and place a spacer on top (Fig. 8e). Caps and spacers are provided with the OptiSeal tubes and in the OptiSeal tube kit, respectively.
Weigh the tubes with the caps and spacers on. Balance the tubes to within 5-10mg of each other using SAN digestion buffer. Be sure to adjust the tube weight in the biosafety cabinet; use the tube removal tool provided with the OptiSeal tube kit to remove the black cap and add the appropriate volume of SAN digestion buffer with a P20 or P200 pipette.
Place the ultracentrifuge rotor in the biosafety cabinet. Load the tubes and fasten the lid.
Carefully transfer the rotor to the ultracentrifuge. Spin the Type 70 Ti rotor at 350000x g,18°C (58,400 r.p.m.) with slow acceleration (no. 3; the instrument will take 3 min to accelerate to 500 r.p.m., followed by maximum acceleration) and deceleration (no. 9; the instrument will deccelerate at maximum speed until it reaches 500 r.p.m., then take 6 min to stop) profiles. Alternatively, a Type 60 Ti rotor can be used at 358000x g,0h 0m 0s (59,000 r.p.m.).
During ultracentrifugation, gather the supplies and equipment for Steps 46–49. Assemble the clamp setup (Equipment setup) and collect one of each of the following per gradient: Amicon Ultra-15 centrifugal filter device, 5-ml syringe, 10-ml syringe, 0.22-μm syringe filter unit, and a 16-gauge needle.
After ultracentrifugation, bring the rotor inside the biosafety cabinet and remove the lid. Use the spacer removal tool provided with the OptiSeal tube kit to remove the spacer from the first tube. Next, use the tube removal tool to grip the tube neck. Slowly remove the tube from the rotor and secure it into the clamp setup above a 500-ml or 1-liter beaker containing fresh 10% (vol/vol) bleach (Fig. 8f). Clean the side of the tube with a paper towel or a Kimwipe sprayed with 70% (vol/vol) ethanol.
Prepare the supplies for Steps 48 and 49. First, remove and save the plunger from a 10-ml syringe. Attach a 0.22-μm syringe filter unit to the syringe barrel and place it on top of an Amicon filter device. Next, add 10mL of DPBS to the barrel and allow the solution to begin dripping through the syringe filter unit and into the filter device (Fig. 8f). Last, attach a 16-gauge needle to a 5-ml syringe.
From the tube clamped in Step 46, collect the virus from the 40/60% interface and 40% layer9,10 (Fig. 8g and Supplementary Video 3, 0:00–1:30). Hold the top of the OptiSeal tube with your nondominant hand; use your dominant hand to hold the needle/syringe. Use a forward-twisting motion to insert the needle ~4 mm below the 40/60% interface (i.e., where the tube just starts to curve). Use the tube removal tool in your non-dominant hand to remove the black cap from the tube to provide a hole for air entry. With the needle bevel up, use the needle/syringe to collect 4.0–4.5 ml of virus/ iodixanol from the 40/60% interface and 40% layer. Do not collect from the white protein layer at the 25/40% interface; as this interface is approached, rotate the needle bevel down and continue collecting from the 40% layer. Firmly replace the black cap before removing the needle from the tube.
Add the 4.0-4.5mL of virus/iodixanol to the syringe barrel containing 10mL of DPBS (prepared in Step 47) (Fig. 8h and Supplementary Video 3, 1:31–2:06). Layer the virus below the DPBS by placing the needle near the bottom of the barrel and pressing on the plunger. Insert the 10-ml syringe plunger into the barrel and push the virus/DPBS mixture through the syringe filter unit and into the Amicon filter device (Supplementary Video 3, 2:07–2:32). Mix well using a P1000 pipette.
Centrifuge the virus/DPBS mixture at 3000x g,0h 0m 0s for 5–8 min, or until the volume of the solution remaining in the top chamber of the Amicon filter device is 500-1500µL (>10× concentrated).
Discard the flow-through for bleaching. Add 13mL of DPBS to the virus in the top chamber and use a P1000 pipette to mix.
Centrifuge the virus/DPBS mixture as in Step 50. Wash the virus two more times for a total of four buffer exchanges. During the last spin, retain 300-500µL of solution in the top chamber.
Use a P200 pipette to transfer the virus from the top chamber of the Amicon filter device directly to a 1.6-ml screw-cap vial; store at 4°C.
Procedure: AAV titration ● Timing 1 d
Use DNase I to digest DNA that was not packaged into the viral capsid. Prepare DNase I + DNase digestion buffer (Reagent setup) and add 100µL to each 1.5-ml tube. Vortex each virus for 1–2 s to mix; alternatively, use a P200 pipette to mix. Add 2µL of the virus to each of three tubes. Vortex for 1–2 s to mix and spin down (2000x g); incubate in a 37°C water bath for 1h 0m 0s.
Inactivate the DNase. Add 5µL of EDTA to each tube; vortex for 1–2 s to mix, spin down (2000x g), and incubate in a 70°C dry bath for 0h 10m 0s.
Use proteinase K to digest the viral capsid and release the viral genome. Prepare proteinase K + proteinase K solution (Reagent setup) and add 120µL to each tube. Vortex for 1–2 s to mix and spin down (2000x g); incubate in a 50°C dry bath for 2h 0m 0s.
During the last 20 min of the proteinase K digestion, prepare the DNA standard dilutions (Reagent setup) and use the Qubit assay to measure the concentration (ng/μl) of the DNA standard stock.
Inactivate the proteinase K. Incubate the tubes in a 95°C dry bath for 0h 10m 0s.
Allow the tubes to cool for 0h 5m 0s. Vortex each sample for 1–2 s to mix and add 3µL to a new tube containing 897µL of UltraPure water (a 1:300 dilution). Vortex the diluted samples for 0h 0m 3s to mix.
Prepare the qPCR master mix (Reagent setup).
Load the PCR plate based on the experimental plan from Step 32. First, pipette 23µL of qPCR master mix into each designated well. Next, pipette 2µL of each standard into wells A1–B12. Last, pipette 2µL of each diluted sample from Step 38 into wells C1 and onward. Seal the plate with sealing film and briefly spin down (500x g) in a plate spinner.
Place the PCR plate into the qPCR machine. Use the following cycling parameters:
Step 63.1: `95°C`, `0h 10m 0s`


Step 63.2: `95°C`, `0h 0m 15s`


Step 63.3: `60°C`, `0h 0m 20s`


Step 63.4: `60°C`, `0h 0m 40s`


Repeat steps 63.2–63.4 40×.
When the qPCR run is complete, export the cycle threshold (Ct) values to an Excel file. Copy and paste the Ct values into Supplementary Table 4 (‘AAV titration calculator’ sheet) to generate a standard curve and calculate the titer (vg/ml) (cell G27) of each virus; calculate per-plate production (vg/dish) (cell K27) to assess production efficiency. Be sure to enter the appropriate values in cells B7–10 and B18; see ‘Example’ sheet.
