Working in AnVIL: A Clinical Sequencing Evidence-Generating Research (CSER) consortium perspective.
Richard Green, Kathleen Ferar, Jeffrey Ou, Michael Schatz, Stephen Mosher, David R Crosslin, Gail P Jarvik
Disclaimer
Abstract
Analysis, Visualization, and Informatics Lab-space (AnVIL) is a powerful new Genomics Data science cloud-based platform. AnVIL features a variety of tools for data processing and analysis. This protocol will cover steps toward setting up an account, creating workspaces, customizing docker images, and accessing data and tools through R studio and the command line. We provide troubleshooting tips and best practices on resources, data storage, and monitoring costs. We also provide suggestions on requesting data access from dbGap through AnVIL.
Steps
Introduction
AnVIL is a powerful data-sharing genomics platform that allows for data processing and analysis to be shared in the cloud. The goal of this protocol is to get new users that are relatively new to AnVIL up and running. The AnVIL is a cloud-centric platform that provides tools to interface with local hardware and file systems. The user specifies the amount of hardware they would like to use when they start. It's important to have a rough idea up front how much hard drive space, memory, and computer processing units (CPUs) are needed to complete the analysis. AnVIL uses Terra and Google Cloud Platform (GCP). Terra is an open-source biomedical research platform that is scalable in google cloud. GCP is in infrastructure. To put it in non-technical terms, Terra is the house and GCP is the land.
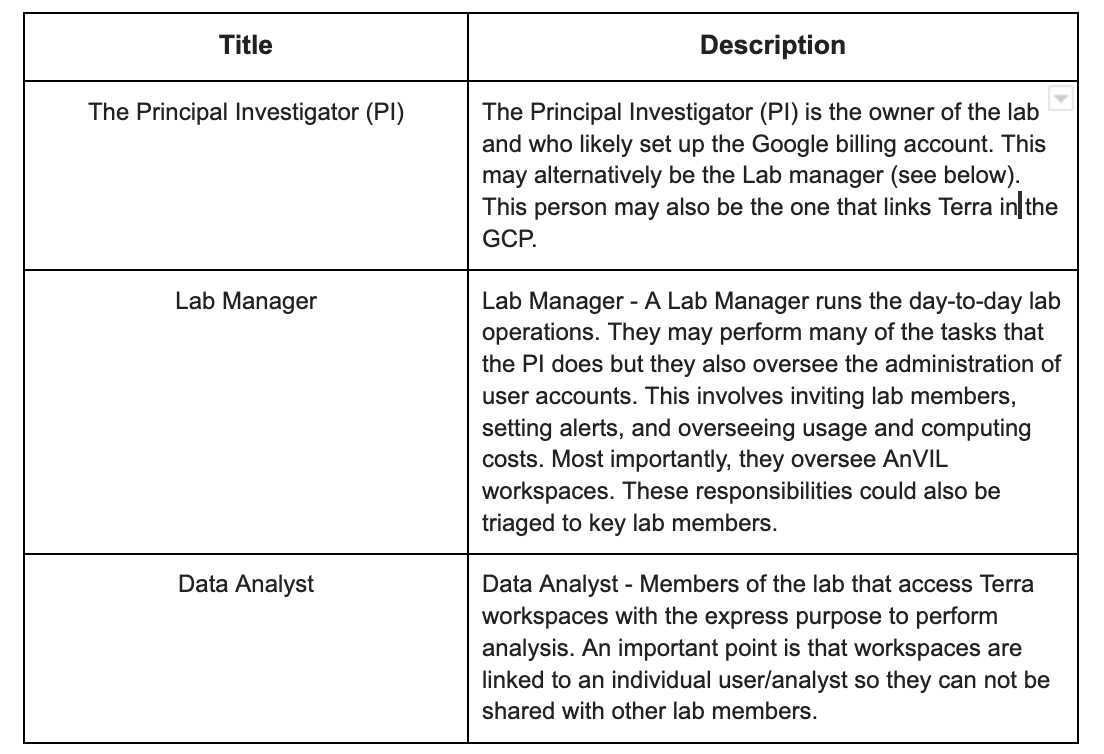
Users
AnVIL considers the following personas: data manager, principal investigator/lab manager, data analyst/researcher, and data submitters. This list may not fit all of your users but it’s important to understand how AnVIL classifies users and their associated privileges.
Expertise required and limitations
Ideally having some previous command-line experience using Linux and R is beneficial for this protocol. Any experience using cloud computing is also beneficial but not required. If the user is planning to build their own custom docker images then they will need a computer to build the image which has considerable hardware depending on their specifications. We will discuss Dockerization but not in great detail because it is outside the scope of this protocol. Users are encouraged to review the documents on the docker website. You can build your own custom docker images using the link below (not part of AnVIL),
Building a custom docker image is useful to lab members and ensures that everyone is using the same tools and versions. An alternative to a custom docker is to load a startup script when you load up your image. A startup script can be a Linux shell script that installs specific applications to that user only. This is beneficial in cases where a user wants to test out new tools but doesn’t want to commit to them into docker yet. This allows for optimization prior to docker deployment. We will go over step-by-step instructions on how to load images and startup scripts.
Recommended hardware and software guidelines
Recommended hardware and software
There are no specific hardware requirements for use with AnVIL since much of the work is performed in the cloud. If the user intends to transfer files between their computer and AnVIL it is advised that they should have adequate disk space (500mb- 1 terabyte.). The user’s computer should also contain adequate memory 256-512Mb of memory or more are adequate.
Step 1: Registration and user accounts
Login info and accessing features. First, go to anvilproject.org
You need a google account to access AnVIL. You will launch Terra with your Gmail account to access AnVIL. As previously mentioned, Terra is a secure, biomedical research platform. It can be used to access data, run analysis and provide data sharing.

If your institution uses G suite then your account is already a Google/Gmail account. Once you’ve logged in we recommend registering for free cloud credits (Google offers a 90 day, $300 in free cloud credits). This is the best way to test drive tools and access resources. If you want to access and import through other resources like dbGap you can do that by linking your account in the AnVIL setup under the profile setting.

Now that you can access your AnVIL account you will see a left hamburger icon and if you click on your profile name you will see profile, groups, billing, and cloud environments. You will also see other icons including workspaces, libraries, and support.
Step 2: Billing and permissions
Billing
Billing is setup directly through Google cloud not through Terra or AnVIL. Make sure that the Google account you use is the same across platforms. Log into the Google account platform through the link below to create an individual account. You will need to provide a credit card even if you are setup for free cloud credits. Once the credits run out you will be charged from the credit card you provide.
https://console.cloud.google.com/
Next, you’ll need to link your billing account to Terra. Go to my billing accounts in Google cloud Billing and add a new billing account by clicking “add member”. Type Terra-billing@terra.bio in the text box and then select “billing account user”. If you want to obtain a billing report on recent activity go to your user profile and under billing select “send report”. It will also allow to select dates of usage to provide customized billing reports. Please note only admins and viewers can generate billing reports, not users.
Create a Project
A project is initially created by a single user but can be shared between users. One can create a group access account and add individual users to a workspace. Which will be shown below. Also, one can share access to a project or a workspace, or sometimes both. Ideally, the user should determine how they want to share their study with others before creation.
Setting Permissions
When creating a project that will be shared between users, you can create a group access account and add individual users to a workspace. To do this select the hamburger icon on the upper left side of the screen.

Below the user profile there is a menu item named "groups". Select this to create, edit, or delete a user group.

Step 3: Docker images in AnVIL
When you are accessing your VM within AnVIL you may want to interface with your data directly through the command line. There are a couple of ways to get to the terminal. The first way is through the terminal feature in R Studio or Jupyter Notebooks. The second way it’s through the google cloud shell. This will look similar to a Linux terminal. The virtual images that AnVIL/ Terra provides are a limited amount of preloaded software tools. In order to load specific software you will need to create and upload a Docker image into AnVIL. Attempting to install software directly from the command line will not work (note: the command line option provided with Rstudio will provide limited access).
Docker is a platform service using virtualization to maintain operating systems on user-defined software builds. This system is ideal when the user has a specific set of custom software options that are version specific that they want to maintain in a virtual environment. To add software you need to include the install commands in the build script (see the example below). AnVIL will only accept docker images that are based on Terra build images. A custom docker image built from scratch will not upload properly in AnVIL. It is recommended to have docker installed locally and after building your custom image successfully you upload it directly into Google Cloud. You should not attempt to load your docker image into AnVIL from your docker account. The reason for this is the time required to pull the image off the Docker server into AnVIL could result in the server timing out. Uploading an image directly from Google is advised. An example of a modified docker image for AnVIL can be found here:
https://github.com/anvilproject/anvil-docker
Images need to run on dedicated computers called virtual machines (VMs). In the next section, we will start a virtual machine and load up a custom image.
Before loading a custom image you’ll need to specify CPU and persistent disk size. Before you select these evaluate the goals of your project and determine roughly how much computational power and space you will need. The more CPUs and persistent storage requested the more expensive it will be. Keep in mind that applications like R statistical programming language are mostly single threaded which means they will only use one CPU. R and Python do use significant amounts of memory, especially in genomics applications. Unfortunately, there’s no way in Google Cloud or AnVIL to request high memory and low CPU or vice versa. Persistent disk (PD) space is perhaps the most expensive component in the cloud environment because its usage requires a physical disk in the cloud. Before assigning a PD size determine how much data you’ll be using and factor in the size of the intermediate and output data. Buffer in 20% extra just in case. If you need to you can adjust its size later but it’s better to plan ahead. Try to use Google Buckets where you can reduce data storage costs. To create custom images you will need to build your new image of a pre-built AnVIL template image. To do this download the image and add additional install commands to the build script. Please note that persistent disks can be shared but only accessed by one user at a time. Sharing requires the data to be pushed back to a shared workspace bucket.
Log in to AnVIL/Terra at https://anvil.terra.bio https://anvil.terra.bio
You will need to use a Google-linked account to log in to Terra.
If you have trouble logging in, try out these troubleshooting options:
- Navigate to the support page at https://support.terra.bio/hc/en-us, and log in using the link in the top menu
- Try out different browsers (Firefox, Google Chrome, etc.). Safari is not currently supported.
Accessing terra without the non-anvil user interface can be found at app.terra.bio
To access a bucket, start in a workspace
After login, click on the “workspaces” and press the “+”.

If you do not want to create a workspace but clone one, press the three dot button to the right of the workspace and select "clone".

Step 4: Customizing your Virtual Machine
Customize your VM with a Docker image
After login and looking at workspaces, you will navigate to an analysis tab and then on the right side of the screen select “environment configuration”. There are premade virtual computer images to select from for Python (Jupyter Notebook), Rstudio, Galaxy, spark cluster, and more. The three main cloud environment platforms are shown below. There is also the option to select a “custom environment”.

After selecting a platform and image give yourself plenty of space. Increase persistent disk size. It would be wise to estimate your data use needs first. Here we select a persistent disk (hard drive) for 100 GB (1 Terabyte).

Press update and wait for the VM to be built. Times may vary. Could take 5-10 minutes.
Make sure the VM is on and then press the terminal icon to enter. 
Step 5: Getting Information about your Virtual Machine
Obtaining basic (but useful) information about your virtual machine
Sometimes it's beneficial to obtain some basic information about the virtual machine you just created. Remembering the long google bucket names is challenging. A quick way to get information like the google bucket location, list of users who java access, the location your VM was created, access level, etc. you can go to the dashboard and on the right side of the screen from where it says “ about this workspace” there is a list of useful information. An example is shown below.

Step 6: Accessing Terminal
Accessing Terminal
The Terminal prompt will appear if you load up a custom image into AnVIL or if you spin up a Jupyter Notebook (python). 
The terminal prompt will not appear if you pull up a Rstudio image. Instead, you can access the terminal through Rstudio on the lower right side of the screen labeled “ terminal”.

For custom images and Jupyter notebooks, after you press the terminal icon a terminal window will appear.

A few important points:
-
If you have trouble opening the Terminal, try using a different browser. Some users have had more luck with Firefox than with other browsers.
-
You can not access root within your terminal due to terra permission issues. Custom programs need to be installed in your docker image.
-
You can not mount a drive with gcsfuse due to terra permission issues.
-
You can not load an outside docker image (needs to be stored within google cloud) due to terra performance issues (it will time out).
-
VMs only appear to be in the central time zone. This may mean you have a shortage in comp resources.
Step 7: Uploading data into AnVIL
There are two ways we will show how to upload files into Anvil. The first is through the website GUI (graphical user interface) and the second is through a Linux command line tool called gsutil.
To access data uploads through the GUI select Workspaces and then Data from the upper left side of the menu.

Next, select files and then upload (see image below). This allows the user to upload files directly into the AnVIL user’s workspace. If the files you want to upload are large then you may to consider the gsutil tool.

Using gsutil
Gsutil is a command line tool created by Google that allows you to interface with the files in AnVIL. This needs to be installed and configured locally but is preloaded in AnVIL.
Detailed instructions on how to install gsutil can be found here:
https://cloud.google.com/storage/docs/gsutil_install
One example would be to download
The package using this command:
curl -O https://dl.google.com/dl/cloudsdk/channels/rapid/downloads/google-cloud-cli-418.0.0-linux-arm.tar.gz
Double-check the tutorial to determine the best version of gsutil based on what operating system you are using (Windows/Mac/Linux). If you are using windows you will run these commands using power shell.
And then unpack the folder:
tar -xf google-cloud-cli-418.0.0-linux-arm.tar.gz
This command uses a preloaded Linux tool called tar. This should already be installed if you are using a on Linux or Mac. Instructions may vary for windows. Review the link above for more info.
To run the installation program use the following command:
./google-cloud-sdk/install.sh
Next you will want to initialize the gsutil
CLI by using this command:
./google-cloud-sdk/bin/gcloud init
Typing gcloud init will take you through an interactive setup
Once gsutil is setup you can use many standard linux commands to access your files.
Important commands include
cd move directories
list files
cp copy files
cp -r copy files recursively
Note Linux’s commands are case sensitive and always lower case.
Check the contents of a google bucket
Type in the following to look in a bucket for vcf files.
gsutil -u cser-dcc ls gs://<google_bucket>/*.vcf
This will list all the files by name, date, and size
Please note that the -u is defining a user group. In our example we are using the group called user-dcc but your user group will be named something different. This may be necessary when linking a user account to group to access resources. AnVIL (and Google cloud) need to have a billing account to be affiliated with in order to pull data down, upload data, or access resources.
Copying files out of a Google bucket to a local directory.
Go to the local directory on your computer through the command line
cd
Then copy files out if the bucket
gsutil -u cser-dcc cp gs://<google_bucket>/*.vcf .
The cp is just the standard file copy command in Linux. The is usually applied this way
cp
The gs:// is the location of the Google bucket containing my files. <google_bucket> is the location of the google bucket you are using.
The wild card * indicates that I want everything in this subdirectory. The reason why I did this is some CSER data on individually stored in subdirectories. Instead of requesting each subdirectory as a separate command the wild card requests all of them. This saves time and less commands but be careful not to request additional data you don’t need. These files can quickly fill up a hard drive.
*.vcf means I’m only requesting compressed VCF files. This command is useful if there are intermediate files that one doesn’t need in the directories. Thus will only capture the file types you are interested in.
The last “.” with a space before it refers to the destination. In the case a period refers to the current directory you are in.
Copy files recursively
gstuil offers a way to copy files using multiple processors (CPUs, multi-threaded). This makes copying faster and reduces the compute time costs. To enable multi-threading “-m” needs to ne added to the copy command like what is shown below.
gsutil -u cser-dcc cp -m gs://<google_bucket>/*.vcf .
Example: Accessing 1000 genomes project data project in AnVIL
We will show how to analyze some public data in AnVIL. To get to other public data sets go to the three solid lines in the upper left corner of the screen.

Select data and select a data set on the screen. Once selected click on the “import data” button.
We will be using some public data from the thousand genomes project since CSER and eMERGE require authorized access through dbGap. The data we will be using can be found here:
Link to 1k genomes data in AnVIL
We will access this through the terminal through R studio. On the lower right die of the screen, there is a button labeled terminal. This is similar to the power shell and will allow you limited access to installing applications.
Before we download our data we will need a place to put it. We need to create a directory and allocate enough space for it.
Make a directory
AnVIL’s default directory is rstudio for an R install and Juptyer for python images. We will make a directory to place our data called 1kseq_vcfs. The command is:
mkdir /home/rstudio/notebooks/1kseq_vcfs

Next before we move files we need to check how much space they require
Type in the following to look in a bucket for vcf files.
gsutil -u cser-dcc ls gs://terra-featured-workspaces/GWAS/1kg-genotypes/vcf_maf001/

Check space
I want to copy all my vcf files in a bucket how much space will that require?
rstudio@cdce2713c8b9:~$ gsutil -u cser-dcc du -ch gs://terra-featured-workspaces/GWAS/1kg-genotypes/vcf_maf001/*.vcf.bgz
403.71 MiB gs://terra-featured-workspaces/GWAS/1kg-genotypes/vcf_maf001/ALL.chr1.phase3_shapeit2_mvncall_integrated_v5a.20130502.genotypes.bi_maf001.vcf.bgz
121.6 MiB gs://terra-featured-workspaces/GWAS/1kg-genotypes/vcf_maf001/ALL.chr10.phase3_shapeit2_mvncall_integrated_v5a.20130502.genotypes.bi_maf001.vcf.bgz….
This produced a summary of files and their sizes with a total of 4.31 gigs
Copying Files
To copy all the vcf files separately we would type the following
cd /home/rstudio/notebooks/1kseq_vcfs
rstudio@cdce2713c8b9:~$ gsutil -u cser-dcc du -ch gs://terra-featured-workspaces/GWAS/1kg-genotypes/vcf_maf001/*.vcf.bgz .
For the purposes of this paper will download only one file by typing in the following command
cd /home/rstudio/notebooks/1kseq_vcfs
gsutil cp 'gs://terra-featured-workspaces/GWAS/1kg-genotypes/vcf_maf001/ALL.chr1.phase3_shapeit2_mvncall_integrated_v5a.20130502.genotypes.bi_maf001.vcf.bgz' .
Load Tools
More information about VCFTools can be found here:
https://vcftools.github.io/downloads.html
Install VCFtools
rstudio@cdce2713c8b9:~$ git clone https://github.com/vcftools/vcftools.git
Cloning into 'vcftools'...
remote: Enumerating objects: 655, done.
remote: Counting objects: 100% (4/4), done.
remote: Compressing objects: 100% (4/4), done.
remote: Total 655 (delta 0), reused 1 (delta 0), pack-reused 651
Receiving objects: 100% (655/655), 785.98 KiB | 6.72 MiB/s, done.
Resolving deltas: 100% (316/316), done.
rstudio@cdce2713c8b9:~$
Now that we downloaded the code we still need to compile it using the following commands:
./autogen.sh
./configure
make
make install
This will create the vcftools binary file here:
/home/rstudio/vcftools/src/cpp/vcftools
So will copy that to our vcftools folder
cp /home/rstudio/vcftools/src/cpp/vcftools /home/rstudio/vcftools/
And produce a site depth summary report
rstudio@cdce2713c8b9:~$ vcftools/vcftools --gzvcf ALL.chr1.phase3_shapeit2_mvncall_integrated_v5a.20130502.genotypes.bi_maf001.vcf.gz --site-depth --max-missing 1.0 --out site_depth_summary
Run a depth summary analysis
vcftools --vcf ALL.chr1.phase3_shapeit2_mvncall_integrated_v5a.20130502.genotypes.bi_maf001.vcf.bgz --site-depth --max-missing 1.0 --out site_depth_summary
Alternatives to manual installation. Startup scripts
You may not be able to build a custom docker image or you may just want to install an application quickly. As referenced before the terminal within Rstudio has limited permissions. For instance, it will not provide to the /usr/local/bin directory making the loading of compiled binaries problematic. An alternative is to load a shell script that contains your install commands. This is similar to what might appear in a docker image but the startup script can be provided as a stand-alone file when a VM is first spun up.
Under the cloud environment and settings, there is a place to load a startup script.

However, there is a catch to providing startup scripts. They need to be in a URI format (Uniform Resource Identifier). This means the file should already be in a google bucket. This means you will need to create your virtual machine first upload your startup script, sync it, and then update the VM. I will show how to do this below.
First, create a simple start up script like the one below. This is a shell script that installs some basic genomics tools: plink, bcftools, samtools, and htslib.
#!/usr/bin/env bash
apt-get install autoconf autogen
#Install plink
sudo apt-get install -y plink
#update packages
sudo apt-get update
sudo apt-get install gcc
sudo apt-get install make
sudo apt-get install libbz2-dev
sudo apt-get install zlib1g-dev
sudo apt-get install libncurses5-dev
sudo apt-get install libncursesw5-dev
sudo apt-get install liblzma-dev
apt-get install -y libcurl4
#htslib
cd /usr/bin
wget https://github.com/samtools/htslib/releases/download/1.9/htslib-1.9.tar.bz2
tar -vxjf htslib-1.9.tar.bz2
cd htslib-1.9
make
#samtools
cd ..
wget https://github.com/samtools/samtools/releases/download/1.9/samtools-1.9.tar.bz2
tar -vxjf samtools-1.9.tar.bz2
cd samtools-1.9
make
#bcftools
cd ..
wget https://github.com/samtools/bcftools/releases/download/1.9/bcftools-1.9.tar.bz2
tar -vxjf bcftools-1.9.tar.bz2
cd bcftools-1.9
make
#update user paths
export PATH="$PATH:/usr/bin/bcftools-1.9"
export PATH="$PATH:/usr/bin/samtools-1.9"
export PATH="$PATH:/usr/bin/htslib-1.9"
source ~/.profile
Once this file is saved as a text file called “startup_script_anvil.sh”. It can be uploaded to a google bucket on your VM. If you go to dash board and click on “open bucket in google browser” the following screen will appear.

By selecting “upload files”, you can upload your startup script from your local computer into your bucket. From this screen, you can also can the complete path to the google bucket. Copy the path to the startup script by pressing the icon at the end of the file. This is located on the top of the screen.

Once the file is finished uploading go back to the environment configuration and paste in the location of the startup file.

Press “next” and then press “update” on the next screen. The image will reload and run your startup script. If the startup script fails it will alert the user with an error message on the upper right side of the screen. If it runs successfully and you want to verify the startup script installation, go to the terminal.
Combining data from different locations
Combining data within AnVIL depends on the roles you are assigned to. AnVIL considers the following roles: data manager, principal investigator/lab manager, data analyst/researcher, and data submitters.
If your data is in different storage buckets and you want it to be accessible together you can create a persistent disk and move content from the buckets into it. This persistent disk can be shared but only accessed by one user at a time. Alternatively, a bucket can be created and multiple buckets could be copied into it. sub bucket directories could be created so the original hierarchy is retained. Once this is build the original buckets could be deleted.
So for example if I created a directory “merge_all_datasets” to copy my bucket contents into:
mkdir /home/rstudio/notebooks/merge_all_datasets
Then I copy the bucket contents into the directory
cd /home/rstudio/notebooks/merge_all_datasets
gsutil cp 'gs://terra-featured-workspaces/bucket1/*' .
gsutil cp 'gs://terra-featured-workspaces/bucket2/*' .
gsutil cp 'gs://terra-featured-workspaces/bucket3/*' .
cd ..
There are tools like gcs fuse that are part of Google Cloud that allow the user to mount a Google bucket and treat it like a typical Linux-mounted hard drive with read and write privileges. Due to some security issues, this functionality is not currently offered through AnVIL.
Step 8: Securing buckets and data recovery
Securing buckets and data recovery
When a user creates buckets and moves data into them it is important that versioning is enabled (called Object Versioning). This provides the functionality to trace changes to the data within the bucket and in the event that data is accidentally deleted then the user can retrieve this data within several days after reporting the deletion. Please note objects cannot be recovered from a deleted bucket, even if the bucket used Object Versioning. To enable object versioning use the commands below. In this case, we will use the example bucket: gs://terra-featured-workspaces/bucket1/
First, check the versioning:
gsutil versioning get gs://terra-featured-workspaces/bucket1/
If it is enabled it will look like:
gs://terra-featured-workspaces/bucket1/: Enabled
If it is not then use this command to enable versioning:
gsutil versioning set on gs://terra-featured-workspaces/bucket1/
Additional information about object versioning can be found here:
https://cloud.google.com/storage/docs/using-object-versioning
Step 9: How to obtain data access in AnVIL for CSER and beyond
How to obtain data access in AnVIL for CSER and beyond
Within Anvil there are three types of data access. Open access, Controlled access, or consortium-level access. Open access will provide all accessible data from Terra or Gen3. Controlled is just like it sounds, controlled. This is where data from CSER is located to outside users. Consortium-level access is available to users within the consortium for example CSER members have consortium access as per their data sharing agreement. More information on dbGap data sharing codes can be found here:
https://www.ncbi.nlm.nih.gov/pmc/articles/PMC4721915/
If we want to quickly access data to use without an authentication process and preview what data sets are already integrated into AnVIL you can access the dataset catalog at anvilproject.org/data. This offers a breakdown of data by useful search terms. A screenshot of these datasets can be found below:

Next, we will perform the following steps to gain access to CSER data as an outside, non-consortium user.
First, we will login into our an eRA or NIH account. If you don’t have one you can register for it here: https://auth.nih.gov/

Make use your account is synced with your AnVIL account. Once you can login to dbGAP you will need to identify the data set

Once you can successfully login to your era commons account and it is properly synced with your AnVIL account then you can login to dbGap to identify the data sets you are interested in.
Go to dbGap:
You can go to dbGap my clicking on the link below.
After logging into dbGap got the search button:

Type in keyword (i.e. CSER) into the search box.

Review the results to determine which data sets you want to request.

Once you have determined which data sets you are interested in it is time to submit a formal dbGaP data access request.
Step 10: Preparing your research use statement and Access AnVIL data
Your research use statement is your proposal for data access from dbgap. The statement can be broken up into four sections:
Your objectives (how you will use the data). This includes any analysis or biological interpretation you will plan to perform on this data.
Cloud use statement : State if you are planning to use any other cloud-based platforms aside from AnvIL, which is cloud-based.
Staff and Collaborator Contact Information: Who will be using the data you are requesting. State any outside collaborators. State which data will only be accessed by which individuals.
Non-Technical Summary : State the purpose of the research in non-technical terms.
More information on the dbGap data request process can be found here:
Once your access is granted, your data will appear as one or more workspaces on your Terra workspaces page.
Access CSER data in AnVIL
Not specific to CSER, once dbGap has approved your request your data will appear in AnVIL as a workspace on your Terra workspaces page. An example of how a CSER dataset appears within AnVIL is shown below.

AnVIL provides a GUI that allows you the user interface with components of the data.

The user may elect to download specific files out of the AnVIL workspace. To do this select file and follow the instructions below. AnVIL will list the associated cost with downloading the file along with instructions to perform this task using the gsutil command-line tool. In this case to download the variant call format file (VCF) it is 5 cents.
,

Troubleshooting
In general, when troubleshooting issues it’s advised that you use the Google chrome browser when using AnVIL because this is the browser the AnVIL utilities have (mostly) been tested on. Results with other browsers (Microsoft Edge, Firefox, etc.) may vary. It’s also advised to not have an image uploaded to your Google/Terra profile. You should also have ad blockers turned off when using AnVIL.

First error: 400 Bad request error. Unable to access workspaces.
There is a known bug in AnVIL that if your Google account contains a profile image that you may have difficult accessing workspaces within AnVIL. This usually appears as a 400 error message to the upper right side of the screen after you login. The way to resolve this is to delete any profile.
Second error:Authentication error : browser specific.
{"source":"leonardo","message":"Your account is not authenticated","statusCode":401,"exceptionClass":"class org.broadinstitute.dsde.workbench.leonardo.model.AuthenticationError","traceId":null}
