Whole Mouse Brain Delipidation, Immunolabeling, and Expansion Microscopy
Naveen Ouellette, Andrew Recknagel, Kevin Cao, Judith Baka, Molly Logsdon, Jayaram Chandrashekar
Expansion Microscopy
Whole Brain
Tissue Clearing
Delipidation
Hydrogel
Immunolabeling
Light Sheet
Clearing
Antibody
SPIM
Abstract
The mammalian brain contains approximately 1,000 brain areas and each brain area contains multiple (up to 100) cell types. Neurons in one brain region can send projections to dozens of target regions, and distinct neuron types could project to different combinations of target regions. The enumeration and description of the brain’s cell types, and their brain-wide connectivity, is foundational for understanding how neural activity is routed across brain-wide neural circuits during normal behavior and how these processes are dysregulated in mental disorders.
Obtaining brain-wide single neuron reconstructions requires high-resolution, high-contrast imaging of entire brains – neuronal axons travel many centimeters (in the mouse) while individual axon collaterals could be finer than 100nm. Here, we present an integrated protocol for labeling and isotropic expansion of whole mouse brains that results in optically clear specimens ideally suited for high-resolution selective plane illumination microscopy (SPIM) imaging. Pipeline steps are modular, and the protocol is extensible to other large volume clearing and expansion applications.
We have imaged expanded whole mouse brains generated using this protocol on our custom built ExA-SPIM microscope without need for any tissue slicing. These whole brain data sets are being used for tracing complete axonal morphology of individual neurons.
Steps
Protocol Overview
This protocol prepares a whole mouse brain for expansion microscopy (ExM). Methods of tissue processing include organic and aqueous delipidation, immunolabeling, ExM (gel embedding and expansion), and mounting the sample in the imaging chamber.
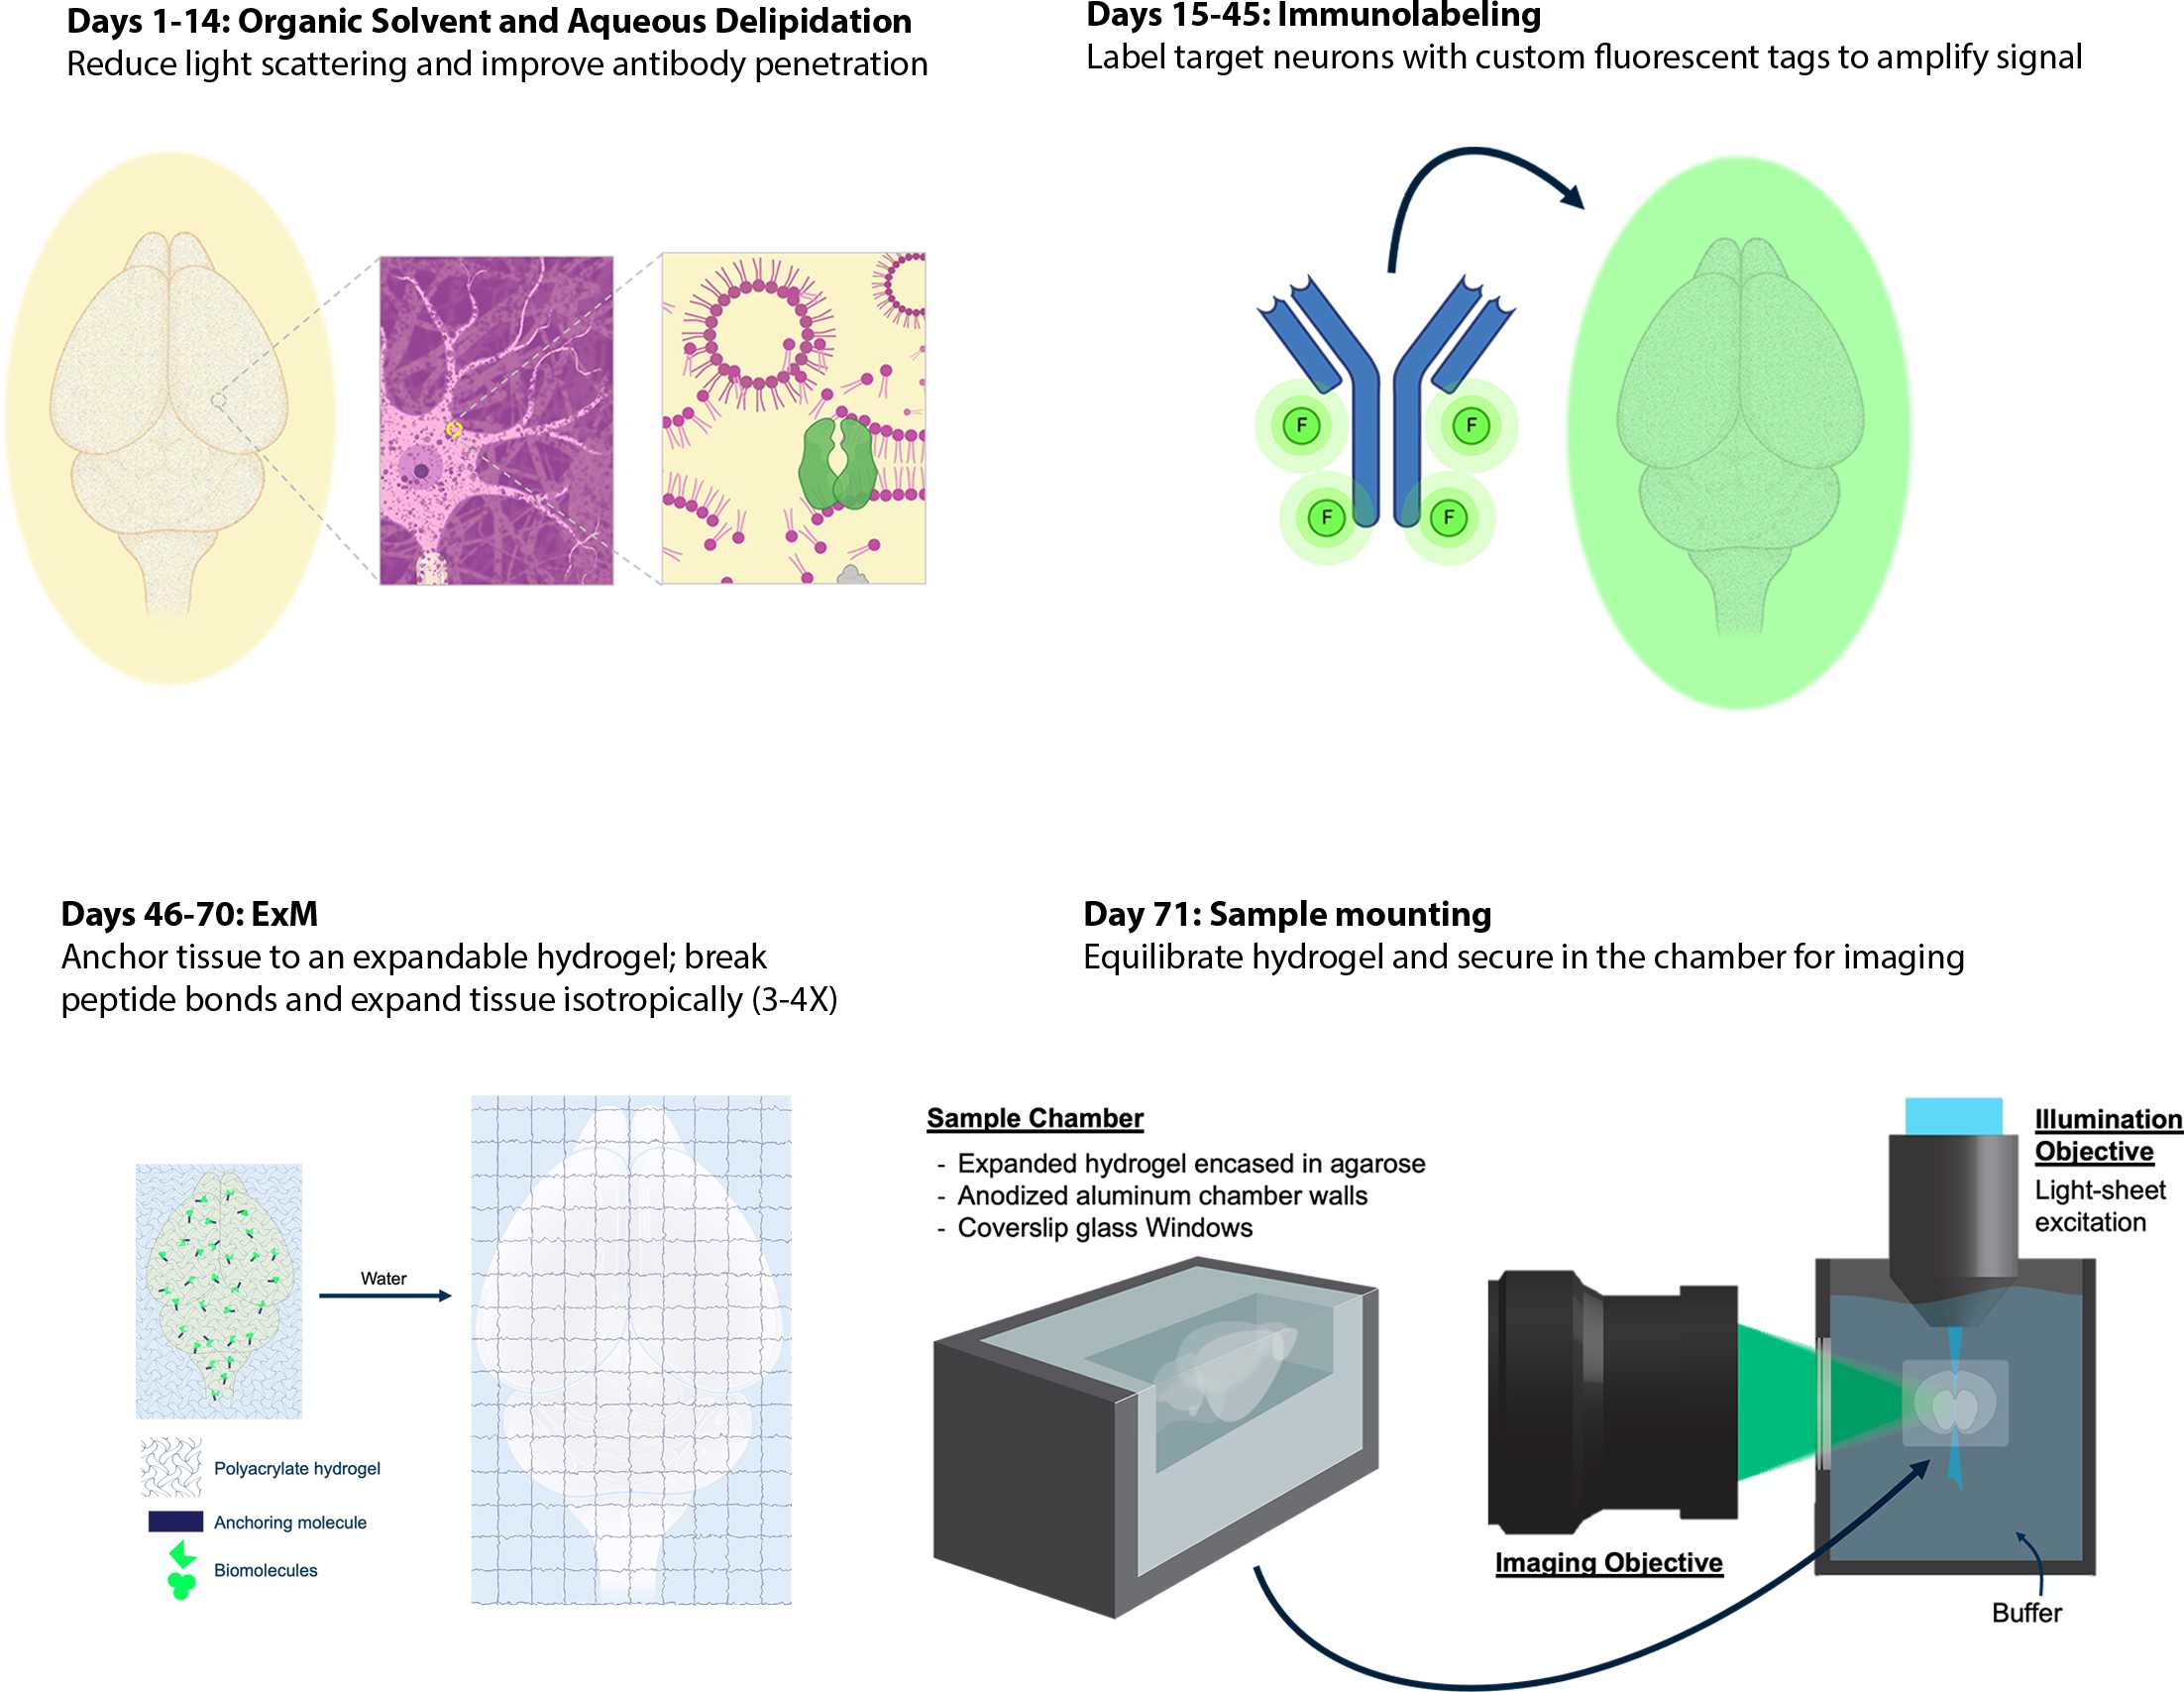
Tetrahydrofuran / Dichloromethane Delipidation
Reference Tetrahydrofuran and Dichloromethane Delipidation of a Whole Mouse Brain protocol.
Tetrahydrofuran and Dichloromethane Delipidation of a Whole Mouse Brain
SBiP Delipidation
Reference Aqueous (SBiP) Delipidation for a Whole Mouse Brain protocol.
Immunolabeling
Reference Immunolabeling of a Whole Mouse Brain protocol.
Gelation and Digestion
Day 1 – MBS equilibration
For all ExM steps, use small-volume glass tubes or vials to contain the brain. This way, we use a smaller amount of valuable reagents for gelation. We typically use a 4mL glass vial that has a wide enough opening to fit an adult mouse brain.
Wash sample in MBS at Room temperature, filling vial to the top (typically 4mL). Replace solution for each step:
- MBS for
1h 0m 0s - MBS for
1h 0m 0s
Replace MBS and store On ice at 4°C
Day 2-5 – Acryloyl X (AcX) treatment
Prepare a new tube or vial with 3mL MBS for each brain. Place On ice.
Mix AcX with MBS (2500µg per brain or 250µL of 10 mg/mL AcX with 3mL MBS) for each whole brain.
Replace MBS solution from previous step with AcX solution for each whole brain and fill remaining space in vial with MBS to minimize air.
Incubate On ice at 4°C, mix by inverting tubes once per day for 4 days.
Day 6-7 – PBS washes
Replace solution with cold 1X PBS, mix by inverting, keep on On ice at 4°C, .
Replace solution with cold 1X PBS, mix by inverting, keep on On ice at 4°C, .
Day 8-11 – Stock X equilibration
Prepare Stock X on On ice.
To activate Stock X, add VA-044. The amount of VA-044 required is equal to 1.2% of the total volume of Stock X used. (Typically we add 234µL of 10% (w/v) VA-044 in ~20mL Stock X).
Fill each whole brain tube with activated Stock X solution to minimize air.
Save any extra activated Stock X solution on On ice.
Incubate on On ice at 4°C, mix by inverting tubes once per day for 4 days.
Day 12 – Gelation and Proteinase K
Bring brain vials and activated Stock X solution to Room temperature on the bench. Swirl Stock X conical tube carefully to avoid bubbles.
Remove coverslip and gasket; gel should be firm without extra liquid dripping out.
Cut gel with a razor blade, making a rectangular cuboid shape. Leave about a 2 mm border of gel on all sides of the brain. If needed, the gel may be trimmed down further after expansion.
Wash in 50mL 1X PBS at Room temperature in a 50mL conical tube for about 0h 3m 0s with swirling.
Replace solution with 40mL Proteinase K (ProK) buffer spiked with 100U ProK (~126µL); incubate at Room temperature with gentle swirling or rocking on a nutator for 5 days.
De-gas activated Stock X solution in a vacuum chamber ~0h 20m 0s. This reduces the appearance of bubbles during polymerization.
Prepare polymerization chamber by stacking silicone isolator gaskets of various thicknesses to an appropriate height on an uncharged 1"x3" microscope slide. The gaskets should be stacked high enough so the entire mouse brain will be embedded within the hydrogel. Typically, we stack the gaskets to allow about 2 mm of gel to polymerize around the brain. Inspect chamber for dust and debris before beginning embedding process.
Add activated Stock X to partly fill polymerization chamber.
Avoid and eliminate all bubbles.
Transfer brain to chamber and fill with Stock X just to the top.
Seal chamber with a clean, long coverslip, taking care to avoid bubbles.
Place in petri dish, and seal in 2 sequential zip lock bags, each thoroughly purged with nitrogen gas.
Incubate at 37°C for 4h 0m 0s
Day 18 – Proteinase K digest (continued)
Swirl whole brain conical tube carefully and thoroughly.
Add 126µL (100U) Proteinase K to the tube.
Move to 37°C and incubate 5 days+. Cortex should look transparent and the white matter should look mostly clear. Digestion time may be extended if needed.
Day 23 – Final washes (after judging that digest is complete)
Wash brain in ~50mL 1X PBS briefly at Room temperature, then replace with enough 1X PBS to fill the 50mL conical tube; wash at Room temperature with gentle swirling or rocking for 2 days.
Replace 1X PBS solution for a few hours and/or 0h 3m 0s.
Change final wash with 1X PBS Azide 0.05% and store at 4°C until ready for expansion.
Expansion of Hydrogel Embedded Brain
Submerge the hydrogel in 0.05X SSC.
- Replace 0.05X SSC once per day for at least 3 days at
Room temperature.
The hydrogel should expand to about 3 times its original size before digestion. If the gel does not seem to be expanded fully, change the SSC buffer again.
As it expands, the hydrogel becomes more fragile. When handling the hydrogel, use a gloved hand to carefully transfer it to another container if needed. To exchange 0.05X SSC, we use a 2 L Instrument Soaking Tray which has a strainer insert. The gel and strainer are lifted out of the solution, the solution is refreshed, and the strainer and gel are gently placed back in.
Mounting of Hydrogel in ExA-SPIM Chamber
Mounting of Expanded Hydrogel Embedded Brain in ExA-SPIM Chamber
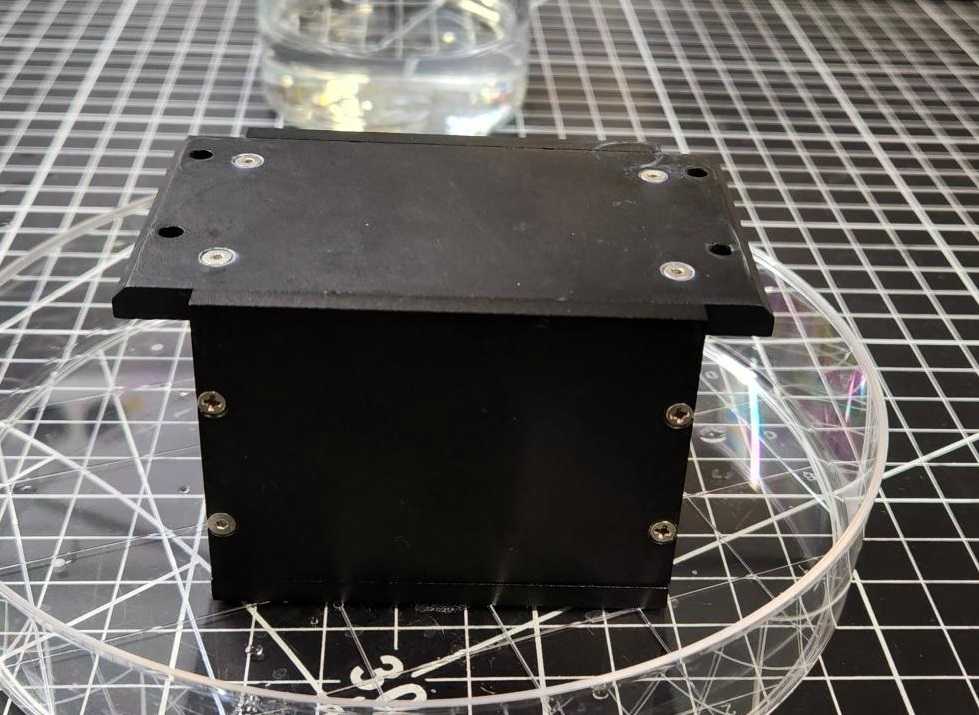
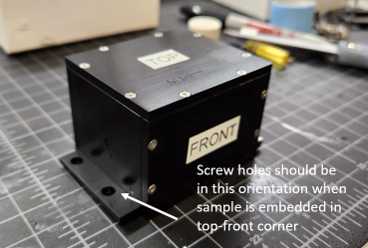
The expanded hydrogel is embedded in a chamber that will hold it in place during imaging on the ExA-SPIM. The hydrogel is placed against the upper corner of the chamber and held in place with agarose. Once the agarose is solidified, the solid top and front panels that the sample is resting against are replaced with glass. The sample will be securely held in place while allowing access on two sides for imaging .

Assemble the glass window panels
Using a glass cutting pen and ruler, cut #2 glass panels to fit the top and front window frames. Along the longest edge, trim the glass about 1 mm shorter than measured. When the panels are assembled on the chamber, this will leave a gap at the corner where the two glass edges meet along the top-front corner. This opening allows fluid to move between the chamber and surrounding imaging buffer, helping keep the sample equilibrated.
Use Krazy glue to apply the glass to the metal frame. Make sure the glass is clean and free of debris or glue.
Optional: a glass window may be cut for the back panel viewing window, but this is not crucial. The back solid panel may remain in place during imaging.

Assemble the chamber to prepare for agarose embedding
The chamber is first assembled with solid sides so that the hydrogel can be placed inside and embedded in 2% Agarose without leakage. Leave one side open (Back or Bottom side) for inserting the hydrogel. Fill chamber with water to test for any leaks. If leaks are observed, ensure that all screws are tight. If there is a very slow leak, this is usually OK, agarose will not leak as easily as water.

Trim the expanded hydrogel
The lateral side of the embedded brain hydrogel will be mounted against the front glass panel. This side of the gel should have a smooth surface. If the cut sides of the hydrogel are uneven, it will be difficult to mount without agarose leaking around the uneven side and obscuring the brain.
Use a long, thin blade to smoothly trim the sides along the lateral, anterior and posterior sides of the hydrogel. It is best to leave about 6 mm buffer of empty hydrogel surrounding the brain.
Trimming is not necessary unless the the gel is too large or front facing side is very uneven.

Position the hydrogel in the imaging chamber
Submerge the hydrogel and assembled chamber in a wide dish filled with the same 0.05X SSC that the brain was soaking in. Position the hydrogel so the dorsoventral axis of the brain intersects with the top and bottom of the chamber (Z-axis of the ExA-SPIM). The dorsal surface should be facing the top panel.
While submerged, carefully use your hand to slide the hydrogel through the open panel into the chamber. Position the chamber so the open panel faces up. The hydrogel should rest against the corner of the Front and Top sides. Carefully drain any 0.05X SSC that is left in the chamber. A transfer pipet may be used to remove any remaining 0.05X SSC.

Prepare 150mL of 2% agarose. Add 3g of agarose to 150mL 0.05X SSC. Stir with a spatula and heat about 2 minutes in the microwave until boiling and solution is clear.
Wait until the agarose has cooled to about 55°C.
To prevent the agarose from leaking underneath the hydrogel, prop the chamber at an angle (against the side of a petri dish) so gravity is gently pulling the hydrogel against the Front-Top corner of the chamber. Gently pour the agarose in so it just reaches the lowest edge of the open panel. Wait for it to solidify. Keep remaining agarose on a hot plate at ~55°C.

Once the first pour is solid, place the chamber on a level surface and fill the remaining space with agarose. Insert the last panel and wait for it to solidify. The bottom panel has 4 screw holes that are used to attach it to the imaging chamber. It must placed so the the holes are positioned farther away from the sample.
The front and top panels must be replaced with glass panels to conduct imaging. Carefully remove these panels and replace with the glass panels that were prepared earlier. Avoid trapping bubbles.
It helps to wet the surfaces of the exposed agarose and hydrogel with 0.05X SSC when the new panels are applied. There should be a small gap visible at the top-front corner where the glass panels meet. This opening helps keep the sample equilibrated with the surrounding imaging buffer.


Submerge embedded sample back in to the 0.05X SSC it was previously soaking in. Protect container from light and leave the embedded hydrogel to soak overnight.

The sample is now ready to be imaged on the ExA-SPIM.
