Wheat spike meristem micro-dissection
Isabel Faci, Anna Elisabeth Backhaus, Cristobal Uauy
Disclaimer
This is one of many ways to dissect wheat (inflorescence) meristems. Please note that genotypes might differ in appearance from the figures provided. We hope this protocol provides a starting point which can then be adapted as needed by individual labs.
Abstract
The aim of this protocol is to micro-dissect young wheat plants to access developing meristems which are found enveloped within growing leaves. This protocol can be used to dissect spikes during early stages of development, for both wheat and barley.
Steps
Abstract
Cereal plant development and growth rate are affected by environment, genetics and their interaction. A plethora of decisions are made in early stages of inflorescence/spike development, when the meristem primordium is being differentiated into spikelet and inflorescence meristems, depending on the environmental cues and genetics (Kirby, 1984). To study the factors that affect these developmental decisions, we usually micro-dissect, in-depth phenotype and/or collect spike meristems at very early developmental stages ( Note 1 ). This protocol (adapted from Kirby, 1984) can be used to dissect spikes during early stages of development (up to approximately Waddington scale stage 4.0., (Waddington et al., 1983))( Note 2 ). It will vary slightly vary between stages and we will specify these differences throughout the protocol.
Note 1: The dissected spike meristems can be collected and pooled into cool (dry-ice) 2 mL Eppendorf tubes to perform RNA extraction or nuclei isolation (briefly described in Step #7). This specific protocol does not describe the RNA extraction or nuclei isolation.
Note 2: Due to the high similarity in wheat and barley inflorescences, this protocol would also be suitable for barley.
Waddington stages: Waddington-scale.tif
Cereal developmental guide (Kirby, 1984): Cereal Development Guide KIRBY 1984.pdf
Materials needed - Setup
Gather the following materials:
-
Dissection knives : GeeEdge ophtalmic slit knife model CJY-01-2.2. Another recommended knife is the GeeEdge MVR CJY-04-20g(Z), up to personal preference. These are one-use knives, however we clean and re-use them until the blade is worn off (they last for months). They can be purchased in AliExpress.
-
Stereo microscope ( with additional lighting and camera ) : We use Leica S9 (0.6X, 1X, 2X, 3X, 4X, 5.5X) with a HXCAM HiChrome HR4 Lite camera and a Photonic Optics light source.
-
Software GX-Capture: to take pictures.
-
Small pair of scissors .
-
RNase removal spray (BLITZ) ( Optional ): Only needed if meristems will be collected for RNA extraction, nuclei isolation, or similar (explained in #7). If used, make sure to use it to clean all your surfaces and knives.

Dissection
Examine plant and identify the main tiller. Cut just below roots (Fig. 2). It is important to leave some roots to be able to hold the plant in later steps under the microscope. Clean the roots with some tissue to avoid having soil on the work area.

Remove leaves one by one, gently. The aim is to peel back and remove leaves so you can access the developing meristem which is within them. You can do this with the knife (CJY-01-2.2), and helping with your hands. Always make sure that the highest node (the node furthest away from the roots) is still there and intact, as this is where the spike meristem is ( Note 3 ). In early stages of development (approx. up to W2.5-3), the highest node is still at the very base of the tiller. In later stages, this node will start to go up (as observed in Fig. 3).
Note 3: You can often feel with your fingers where the nodes are, but this is not always the case. For example, in Fig. 3, it is easy to feel the node indicated with orange, but not the one indicated in white. Because of this, it is recommended to practise this technique and to always be careful with the whole tiller until you find the highest node.
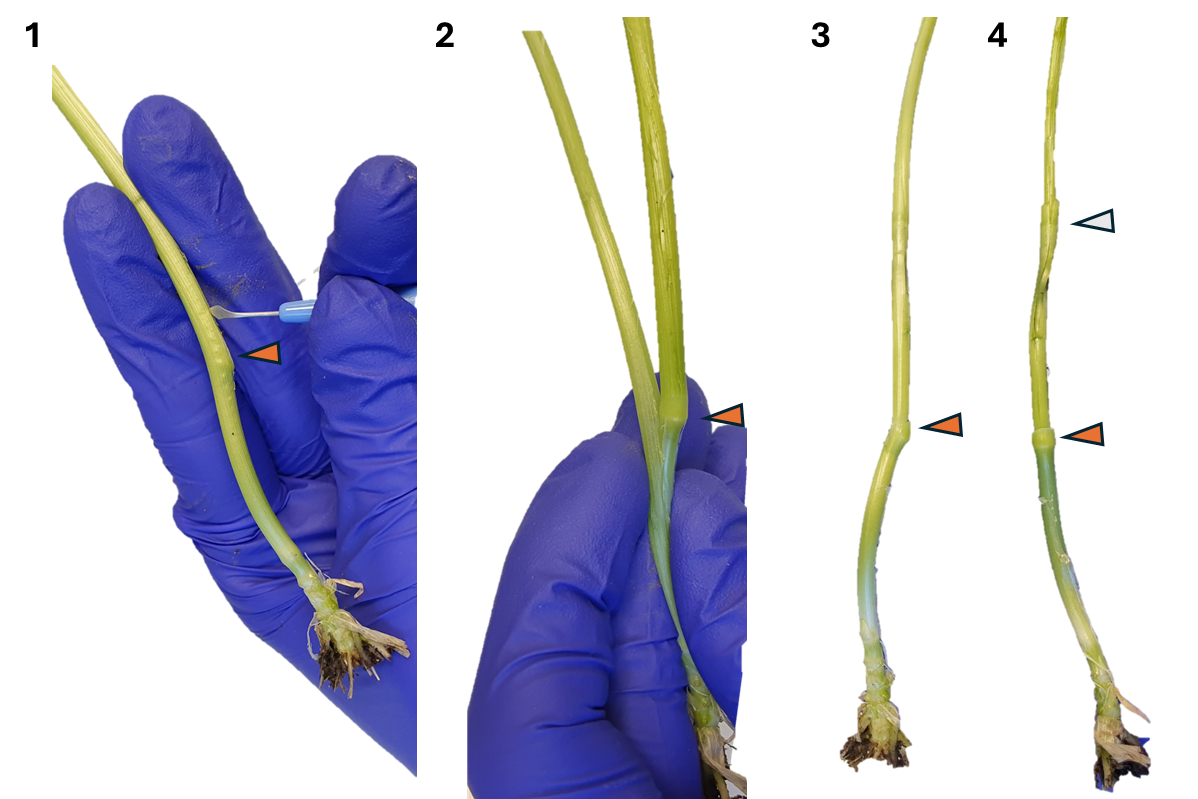

Once you remove most leaves and the next leaf is ~ 2 mm (step 7 in Fig. 3), continue dissecting under the stereo microscope.
Dissect under the microscope. Use a Petri dish to place the sample and hold the roots/stem with one hand. Hold the knife with the other hand (Fig. 4), and dissect carefully, like in the videos below.

To see an example of how to dissect under the microscope, watch these videos , taken with the microscope camera:
#尊敬的用户,由于网络监管政策的限制,部分内容暂时无法在本网站直接浏览。我们已经为您准备了相关原始数据和链接,感谢您的理解与支持。
<iframe title="YouTube video player" src="https://www.youtube.com/embed/vZ784Dj9cZY?si=7tB786BuwGlg5-_q" height="315" width="560"></iframe>
#尊敬的用户,由于网络监管政策的限制,部分内容暂时无法在本网站直接浏览。我们已经为您准备了相关原始数据和链接,感谢您的理解与支持。
<iframe title="YouTube video player" src="https://www.youtube.com/embed/XQ06DrLibro?si=b3Zj9lTCdvZQ-Cyp" height="315" width="560"></iframe>
Capture images with the camera . These are examples of pictures of the developing meristems:

Collection in clean and cold conditions (optional)
To collect for RNA extraction or similar, make sure that the knives used and all surfaces in the setup are previously cleaned with RNase removal . Clean the surfaces and knives between the collection of each meristem.
Once the meristem is visible, like in the video, cut the spike at the base with a clean knife. Then, hold a RNase-free small pipette tip and pick up the meristem to place it carefully into cool (dry-ice) labelled 2 mL RNase-free Eppendorf tubes to perform RNA extraction, nuclei isolation or equivalent molecular biology processing of the sample.
For these protocols, we often pool several meristems at the same stage into a tube. We also place two nitrogen-cooled metallic beads (previously cleaned with 0.5 M HCl and 70% ethanol) in each tube. The reason why we add two beads to each tube is because the first step of RNA extraction or nuclei isolation will be grinding the tissue (in cold conditions). The metallic beads are the method that works best for us for grinding low amounts of wheat meristems.
Once a sample is collected, we place it in liquid nitrogen. The sample can be processed or long-term stored in -80 °C, until processed.
This specific protocol does not describe the RNA extraction or nuclei isolation.
