Ultra low input library preparation of single soil invertebrate specimens for Hifi PacBio sequencing
Leonie Schardt, Miklós Bálint
PacBio
ultra low input
long read sequencing
soil invertebrate
single specimen
Pacific Biosciences
Hifi
oribatids
oribatida
collembola
collembolans
protura
Disclaimer
This protocol is not peer reviewed and so far not part of a peer reviewed publication - use at your own discretion.
Some safety precautions apply - includes steps with flammable chemicals (ethanol absolute).
Abstract
This protocol is a modification of the Pacific Biosciences Ultra Low Input workflow for HiFi SMRTbell® Libraries. The modified workflow has been successfully used for the processing of samples well below the recommended quantity (down to 0.3 ng total DNA input) and quality thresholds (fragment distributions with means of around 10 kb length), producing libraries that are useable for Hifi sequencing on PacBio Sequel II platforms. The optimization of this process was done using single specimen soil invertebrates (Oribatida, Collembola, Protura) from newly ethanol stored as well older ethanol stored collections.
Before start
Users should become familiar with the Ultra Low Input protocol from PacBio before considering this modifcation. The time needed to finish this protocol is approximately three work days, with two major breaks (PCR step and BluePippin size selection step). Experienced users might be able to condense the time needed to two work days.
Following is the wet lab protocol for immediate sample processing. It is deliberately kept short for an easier overview in the lab, for further information like equipment lists and recommendations, as well as a decision tree flowchart, see the Materials tab.
Steps
Optional: Pre-processing of DNA
For high molecular weight (HMW) DNA extracts, fragmentation of the input material might be required. Additionally, if the whole extract is to be used for library preparation, concentrating the volume down might be necessary.
Optional: shearing of gDNA with Megaruptor 2
- Run a full wash cycle on the device before starting (~5 minutes).
- Pipette the sample into a diagenode Hydrotube (up to two tubes/ samples per run).
- Dilute to 55 µl with 1 x TE buffer or water.
- Spin down the samples on table centrifuge, if impurities are to be expected, centrifuge longer to collect them at the bottom of the Hydrotube.
- Set machine to either 10 kb, 15 kb, or 20 kb (for soil invertebrates - 15 kb, but it depends on the sample type) for the respective samples, adjust input volumes in the menu if necessary.
- Attach Hydropores (long type) to the machine as shown on the display and initiate pre-load (adds 45 µl TE buffer). Do not attach Hydrotubes to the Hydropores without the pre-load, this will pull your samples into the pore via capillary forces!
- Stick Hydrotubes to the pores, making sure the end of the pore is centered in the tube as much as possible.
- Start the run, one sample takes approx. 15 minutes, two samples take approx. 30 minutes.
- Unscrew Hydropores with tubes still attached.
- Centrifuge the tubes with the Hydropore still attached if possible to get as much of the extractback out as possible. Spin carefully as to not detach the Hydropore mid spin.
Optional: concentrating down DNA or sheared gDNA
Let the samples run on a Concentrator Plus system at 45°C (system has fixed rpm) with an open lid to concentrate them down. Try to approach the optimal input volume of 45.4 µl in small steps.
1. Pre-PCR library preparation
Follow the Procedure & Checklist for Ultra Low Input libraries Ultra Low Input libraries pages 9 and 10 without changes.
At the adapter ligation step (page 11), reduce the amount of ligation mix to 20 µl per sample. Add MgCl2to a final concentration of 3 mM to each sample (for example 12 µl of a 25 mM MgCl2 stock solution, this results in a total volume of 96.5 µl per sample). Add the Diluted Amplification Adapters last.
Incubate at 20°C for 1:40 h, afterwards the samples can be kept at 4°C overnight if necessary.
Instead of the purification on page 12, perform the size selection purification detailed on page 15 and 16 of Procedure & Checklist for Low Input libraries Low Input libraries, to get rid of as many remaining small fragments and leftover adapters before the PCR step. Example calculation here:
For every 96.5 µl sample, prepare 96.5 µl x 2.2 bead mix, rounded up to 215 µl (40 % aka. 86 µl beads mixed with 60 % aka. 129 µl PacBio elution buffer). It is important to carefully remove the supernatant after the bead pellet has formed, to avoid carryover of small fragments. After the ethanol cleaning steps, elute with 97 µl PacBio elution buffer and incubate for 30 minutes at RT. Since the PCR afterwards is performed in two separate reactions, split the sample after elution and transfer 48 µl into separate PCR strips. The adapter ligated samples can be stored at 4°C for a few days if needed.
Continue on page 13 of Procedure & Checklist for Ultra Low Input libraries Ultra Low Input libraries. Add PCR mixes and primers to the samples one by one (no pooled master mix). Increase cycle numbers to 14 for both PCR protocols.
2. Post-PCR library preparation
Perform the purification as shown in the Procedure & Checklist for Ultra Low Input libraries Ultra Low Input libraries on page 14. Extend the bead binding and elution incubation times to at least 10 minutes and elute in ~32µl of elution buffer. 2 µl is kept for the QC, 30 µl is the volume needed for the subsequent size selection on the BluePippin. Purified PCR products are stable at 4°C for a few weeks or -20°C for a few months.
Measure the concentrations of the purified PCR products on a Quantus Fluorometer or comparable system and assess fragment lengths on a Femto Pulse system. For post PCR concentration and fragment length guidelines see Materials - section Post PCR Quality control.

3. BluePippin (BP) size selection of PCR products
Let cassettes and reagents warm to RT, vortex and short spin down the loading solution, flick and short spin down the S1 marker.
Follow the general guideline for preparing samples and cassettes as described in the BluePippin User Guideline, add 42 µl of run buffer to the elution wells. Samples can be vortexed shortly to mix them properly with the loading solution.
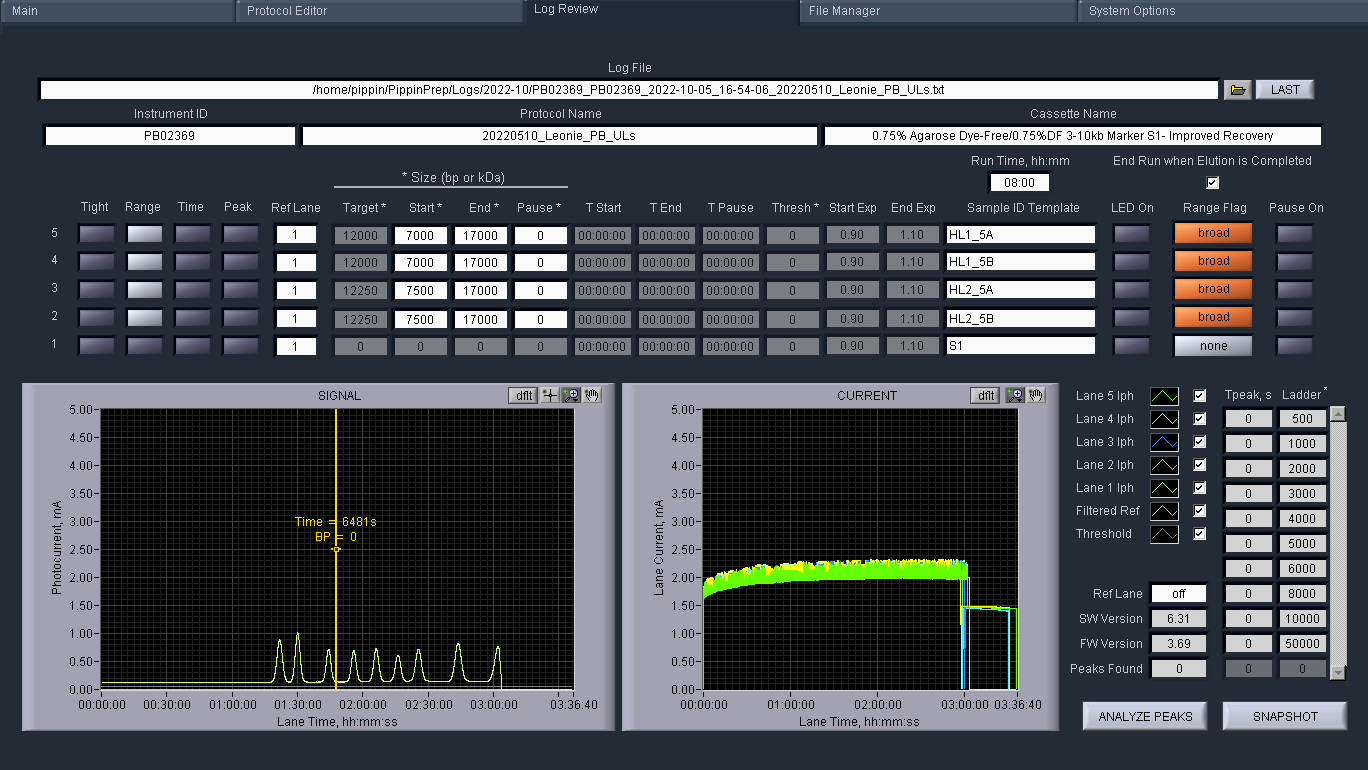
Use the cassette definition “0.75% DF 3 – 10kb Marker S1 – Improved Recovery”.
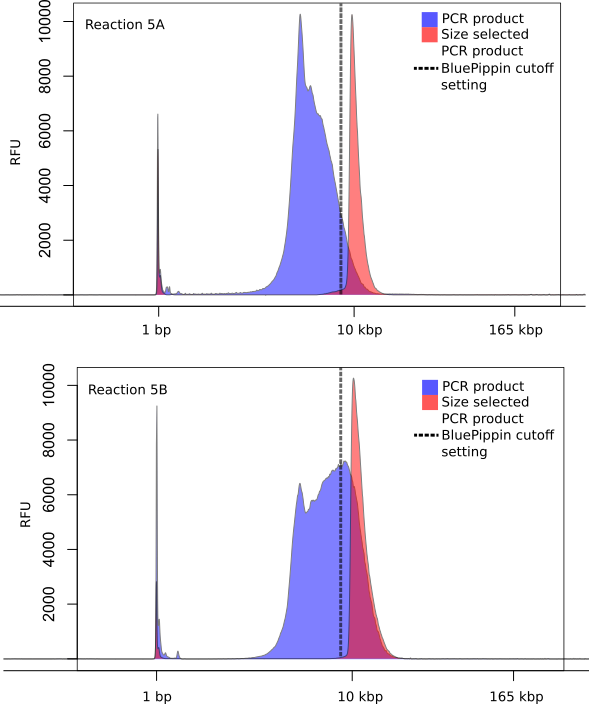
Set the cutoff to any range from 3 - 8 kbp (the higher threshhold is arbitrary and can be set to 17 kbp for example), this depends on the fragment lengths after the PCR (see Materials - section BluePippin automated gel size selection). The separation and elution will run for 2.5 h to 3 h.

After the program is finished, the cassette should be left in the device for at least 45 minutes to enhance elution efficiency; it can also be left in the device overnight. Gently pipette up and down a few times before removing the sample from the elution well. If a second BP elution should be done, immediately add another 40 µl of electrophoresis buffer to the elution wells and keep the cassette sealed at RT until needed.
Purify the samples by adding 40 µl magnetic beads (1 x purification), mix by slowly pipetting until the solution has a homogeneous color. Incubate for 10 - 15 minutes at RT. Pellet the beads on a magnetic rack until the solution is clear, discard the supernatant. Keep the tubes on the magnetic rack and wash twice with 200 µl of 80% ethanol. Quick spin the remaining ethanol to the bottom of the tube and return tubes to the magnetic rack. Pipette off any remaining ethanol from the bottom of the tubes. Immediately add 27 µl of elution buffer and incubate at RT for 10 - 15 minutes. Save 2 µl of the elution for the QC. Size selected and purified PCR products are stable at 4°C for a few weeks or -20°C for a few months.
Second BP elutions can be purified with the same protocol, but should be concentrated down as much as possible. When pooling first and second BP elutions, the total volume should stay below 74 µl, otherwise later volumes will not fit the 0.2 ml PCR tube.
If samples were checked with the Femto before the BP, it usually suffices to measure the concentration and proceed, alternatively do a quick Bioanalyzer run or gel. If sample concentrations are in an acceptable range (see Materials - section BluePippin automated gel size selection), pool both 5A and 5B PCR products (including second BP elutions if needed) and proceed with section "4. Post PCR and post BluePippin library preparation" below. When adding second BP elutions, try to stay below 74 µl, otherwise the later volumes will not fit the 0.2 ml PCR tube.
If sample amounts are lower than the recommended levels, proceed with Optional: reamplification of size selected PCR products" " below.
Optional: reamplification of size selected PCR products
Prepare the Master Mixes as detailed on page 13 of Procedure & Checklist for Ultra Low Input libraries. Adjust the volume of the sample to 48 µl with water or elution buffer (if the concentration post BP was not measurable, do not dilute the sample, just use the 25 - 27µl as is). Add PCR mixes and primers to the samples one by one (no pooled master mix), increase volumes of both PCR mixes to 52 µl. Reamplifications should run for a maximum of 5 cycles, for more information see Materials - section Reamplifications of post size selection PCR products.
Perform the purification as shown in the Procedure & Checklist for Ultra Low Input libraries on page 14. Extend incubation times to at least 10 minutes and elute in either ~15 µl (if you have original PCR product left to to pool with) or ~25µl of elution buffer (if you used all of the sample for reamplification). 2 µl is kept for the QC.
4. Post PCR and post BluePippin library preparation
Proceed with Procedure & Checklist for Ultra Low Input libraries on pages 16 and 17. Reduce the amount of ligation mix to 20 µl. Add the Overhang Adapter v3 last. Incubate the mixture at 20°C for 1:40 h or alternatively overnight before storing them at 4°C.
Instead of the purification on page 18, perform the size selection purification detailed on page 15 and 16 of Procedure & Checklist for Low Input libraries, to get rid of leftover adapters and adapter dimers. Elute in 15 µl of PacBio EB.
If the Nuclease Treatment should be used, either elute in 97 µl of elution buffer (or adjust the volumes of the Nuclease Treatment Master Mix to a lower sample input).
5. Final library QC
Use 2 µl of the final library for the concentration measurement and fragment analysis. For notes on the concentration and fragment distribution of the final library see Materials - section Post PCR and post size selection library prep.
Final libraries should not be frozen anymore but rather stay at 4°C. We have successfully sequenced libraries that were kept at 4°C for two weeks.
Optional: Nuclease Treatment of SMRTbell Libraries
Follow the protocol as detailed on pages 13 - 14 ofProcedure & Checklist for Low Input librariess. Adjust the elution volume of the bead purification to the volume needed for the subsequent sequencing preparation (usually 10-15 µl).

