Protocol (B): Zebrafish embedding and imaging (3 dpf)
Désirée A. Schmitz, Tobias Wechsler, Hongwei Bran Li, Bjoern H. Menze, Rolf Kümmerli
Danio rerio
multispecies bacterial infections
imaging
Pseudomonas aeruginosa
Klebsiella pneumoniae
Acinetobacter baumannii
Abstract
This protocol details the zebrafish embedding and imaging.
Steps
Part 0: Material preparation
Prepare 1.5% low-melting point agarose by heating e.g. 1.5 g low-melting point agarose (Sigma, serial no: A9414) in 100 mL distilled water in a flask (minimal volume 150 mL) in 0h 0m 30s bursts in the microwave.
Once the solution is clear, i.e. no flocs or powder are visible anymore, aliquot into 1.5 mL Eppendorf tubes.
The day before embedding, prepare an 0h 0m 30s culture of all bacteria used for injections. These will serve as a positive control.
Part 1: Embedding zebrafish in low-melting point agarose
Heat 1.5% low-melting point agarose in 1.5 mL Eppendorf tube aliquots to 90°C in a heating block.
Once the agarose has melted, reduce the heat to 42°C.
Check fluorescence in the otic vesicle of individual zebrafish using any microscope with sufficient fluorescence sensitivity and magnification. This step is only needed if the goal is to solely image zebrafish with an ongoing infection. These fishes can then be picked selectively based on their fluorescent signal in the otic vesicle.
Prepare a sufficiently large volume of anesthetic solution to use for all treatments: For this, add approximately 9mL of E3 zebrafish water with PTU (final PTU concentration: 0.003%) and 10 drops of the thawed anesthetic tricaine (ethyl 3aminobenzoate methanesulfonate salt analytical standard, 4000 mg/L) using a Pasteur pipette (LLG Labware, 3 mL, unsterile) into a small petri dish (Greiner, 60x15mm, sterile).
For each treatment, move a few drops of the solution from the previous step into a separate small petri dish. This allows anesthetizing each treatment group individually to avoid cross-contamination.
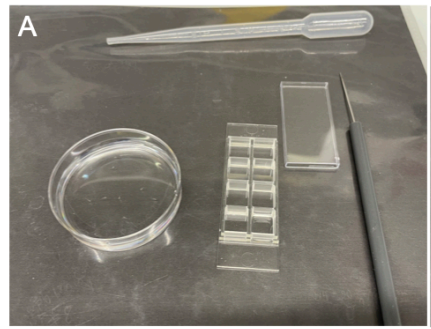
Move the zebrafish of the first treatment into the anesthetic liquid in a designated petri dish (Fig. SP3A).

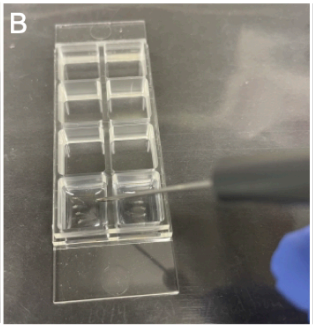
Add 4-5 zebrafish of one treatment into a well of an 8-well Ibidi µ slide (Vitaris, serial no: 80827-IBI) (Fig. SP3B).

Using a Pasteur pipette, add about 5 drops of the low-melting point agarose (from the 42°C in the heating block) to the zebrafish in a well.
Using a dissecting needle, mix the agarose and the small amount of liquid that was transferred with the zebrafish in the well so that the agarose concentration is the same throughout.
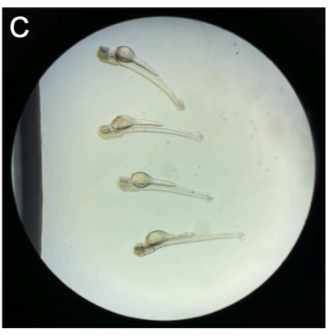
Position the zebrafish with the dissecting needle so that the injected otic vesicle (see protocol A) is on the bottom of the slide to enable the use of an inverted widefield microscope for imaging (Fig. SP3C). Do this step with the naked eye as well as checking under a stereomicroscope.

Wait approximately 0h 5m 0s until the agarose has completely hardened.
Add E3 zebrafish water very carefully on top to ensure a constant supply of moisture.
Repeat steps 9-15 for all zebrafish that need to be embedded for imaging.
Add a positive control for each tagged bacterial species/strain, i.e., ~10µL 0h 5m 0s culture mixed with agarose into one well per species.
Part 2: Imaging the inner ear structure (otic vesicle) of zebrafish with a widefield microscope
Place up to 4 Ibidi slides into the slide holder in a widefield microscope.
Set up the brightfield and all required fluorescence channels, e.g., GFP (excitation at 475 nm & emission 520 nm), and mCherry (excitation at 555 nm & emission at 605 nm).
Set the positions of all otic vesicles with a 20X objective that has a long working distance (minimum 1 mm).
Image all saved positions of zebrafish otic vesicles from the previous step within the brightfield and fluorescence channels.
Save the images as .tiff files for further processing, also keeping the original images from the imaging software.

