ONT 16S Barcoding & Flow Cell Priming
Emily Gailey
Abstract
This protocol describes how to carry out rapid barcoding of 16S amplicons using the 16S Barcoding Kit 1-24 (SQK-16S024). Due to the presence of both highly conserved (adequate for universal primers and phylogenetic signal) and highly variant regions (different across species), the 16S rRNA gene is often used for sequence-based bacterial identification.
The 16S Barcoding Kit 1-24 enables access to rapid 16S sequencing for organism identification. By narrowing down to a specific region of interest, a user can see all the organisms in the sample without sequencing unneccesary regions of the genome, making the test quicker and more economical. There are 24 unique barcodes, allowing the user to pool up to 24 different samples in one sequencing experiment.
Steps
Library Preparation with 16S Barcodes
Take one 96-well plate containing 16S barcodes. Break one set of barcodes (1-24, or as desired) away from the plate and return the rest to storage.
- Important : The 96-well plates are designed to break in one direction only. Strips, or multiple strips, of eight wells/barcodes can be removed from the plate at any one time.
Thaw the desired barcodes, make sure the liquid is at the bottom of the tubes, and place on ice.
Thaw the LongAmp Hot Start Taq 2X Master Mix, spin down briefly, mix well by pipetting and place on ice.
Prepare the DNA in nuclease-free water. Transfer 10 ng genomic DNA into a DNA LoBind tube. Adjust the volume to 10 μl with nuclease-free water. Mix thoroughly by flicking the tube, to avoid unwanted shearing. Spin down briefly in a microfuge.
For each sample to be tested, prepare the following mixture in separate 0.2 ml thin-walled PCR tubes. Ensure the components are thoroughly mixed by pipetting, and spin down.

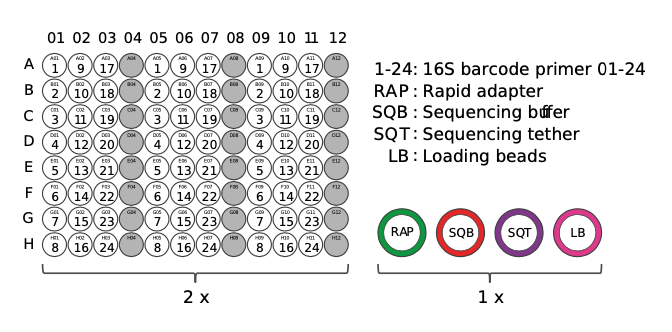
Using clean pipette tips, carefully pierce the foil surface of the required barcodes. Use a new tip for each barcode to avoid cross-contamination. Make a note of which barcode numbers will be run for each sample.
Using a multichannel pipette, mix the 16S barcodes by pipetting up and down 10 times. Transfer 10 μl of each 16S Barcode into respective sample-containing tubes.
The layout of the barcodes in the plate are as follows:
Amplify using the following cycling conditions:

Transfer each sample to a separate 1.5 ml DNA LoBind Eppendorf tube. Carry out steps 9-17 for each sample, before pooling the samples at step 18.
Resuspend the AMPure XP beads by vortexing. Add 30 μl of resuspended AMPure XP beads to the reaction and mix by pipetting.
Incubate on a Hula mixer (rotator mixer) for 5 minutes at room temperature.
Prepare 500 μl of fresh 70% ethanol in nuclease-free water.
Spin down the sample and pellet on a magnet. Keep the tube on the magnet, and pipette off the supernatant when clear and colourless.
Keep the tube on the magnet and wash the beads with 200 μl of freshly prepared 70% ethanol without disturbing the pellet. Remove the ethanol using a pipette and discard.
*Repeat this step.
Spin down and place the tube back on the magnet. Pipette off any residual ethanol. Allow to dry for ~30 seconds, but do not dry the pellet to the point of cracking.
Remove the tube from the magnetic rack and resuspend the pellet in 10 μl of 10 mM Tris-HCl pH 8.0 with 50 mM NaCl. Incubate for 2 minutes at room temperature.
Pellet the beads on a magnet until the eluate is clear and colorless.
Remove and retain 10 μl of eluate into a clean 1.5 ml Eppendorf DNA LoBind tube.
Dispose of the pelleted beads. Quantify 1 μl of eluted sample using a Qubit fluorometer.
Pool all barcoded libraries in the desired ratios to a total of 50-100 fmoles in 10 μl of 10 mM Tris-HCl pH 8.0 with 50mM NaCl. For 16S amplicons of ~1500 bp, 50-100 fmoles equates to ~50-100 ng.
Add 1 μl of RAP to the barcoded DNA. Mix gently by flicking the tube, and spin down. Incubate the reaction for 5 minutes at room temperature.
*The prepared library is used for loading into the flow cell. Store the library on ice until ready to load.
Priming and loading the SpotON flow cell
Thaw the Sequencing Buffer (SQB), Loading Beads (LB), Flush Tether (FLT) and one tube of Flush Buffer (FB) at room temperature before mixing the reagents by vortexing, and spin down at room temperature.
To prepare the flow cell priming mix, add 30 μl of thawed and mixed Flush Tether (FLT) directly to the tube of thawed and mixed Flush Buffer (FB), and mix by vortexing at room temperature.
Open the MinION device lid and slide the flow cell under the clip.
Press down firmly on the flow cell to ensure correct thermal and electrical.

Slide the priming port cover clockwise to open the priming port.
*IMPORTANT: Take care when drawing back buffer from the flow cell. Do not remove more than 20-30 μl, and make sure that the array of pores are covered by buffer at all times. Introducing air bubbles into the array can irreversibly damage pores.
After opening the priming port, check for a small air bubble under the cover. Draw back a small volume to remove any bubbles:
-
Set a P1000 pipette to 200 μl
-
Insert the tip into the priming port
-
Turn the wheel until the dial shows 220-230 ul, to draw back 20-30 ul, or until you can see a small volume of buffer entering
the pipette tip
Note: Visually check that there is continuous buffer from the priming port across the sensor array.
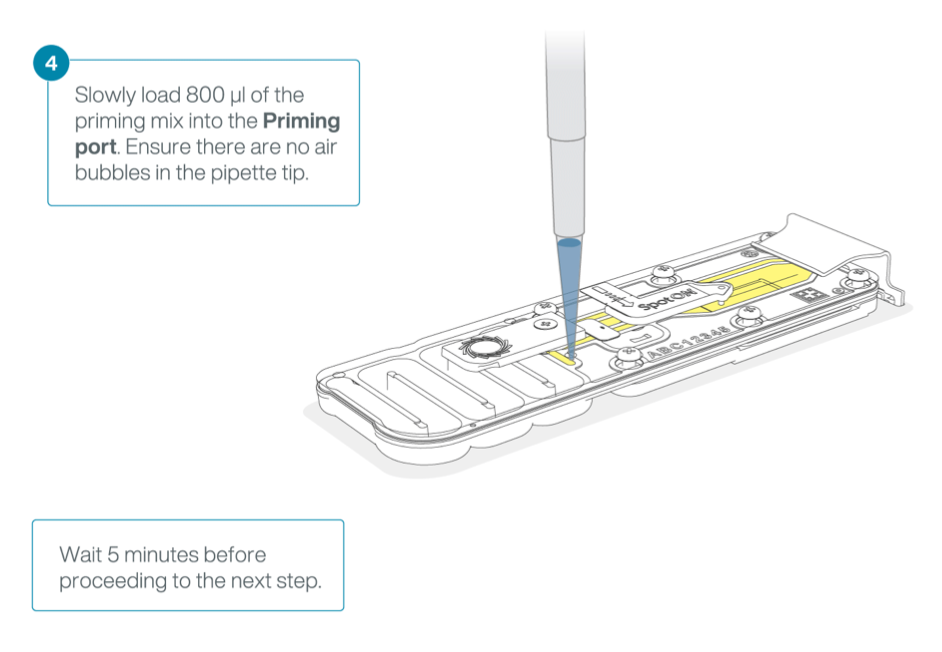
Load 800 μl of the priming mix into the flow cell via the priming port, avoiding the introduction of air bubbles. Wait for five minutes. During this time, prepare the library for loading by following the steps below.
Thoroughly mix the contents of the Loading Beads (LB) tubes by vortexing.
*IMPORTANT : The Loading Beads (LB) tube contains a suspension of beads. These beads settle very quickly. It is vital that they are mixed immediately before use.
In a new tube, prepare the library for loading as follows:
 and Loading Beads (LB) because the fuel in the buffer will start to be consumed by the adapter.")
Complete the flow cell priming:
-
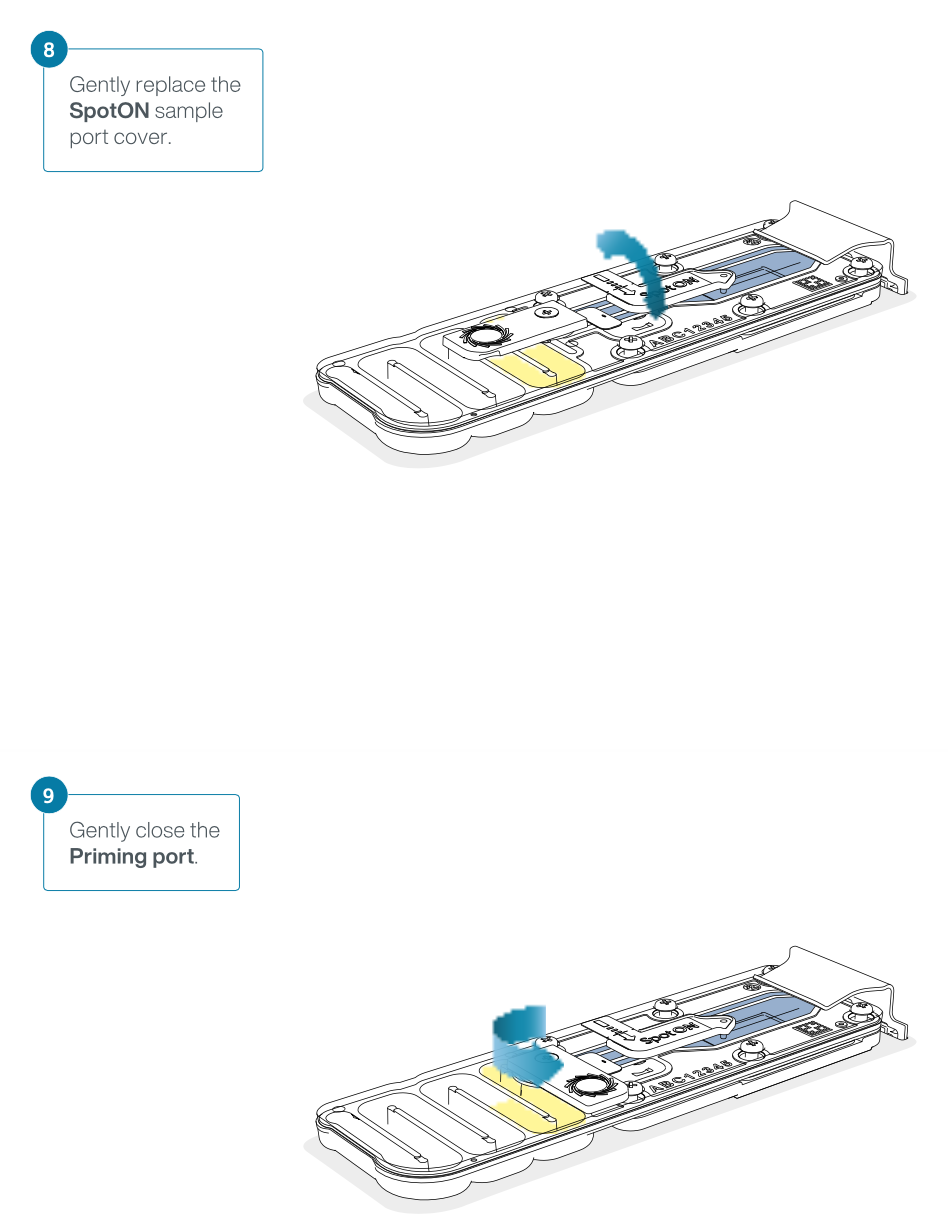
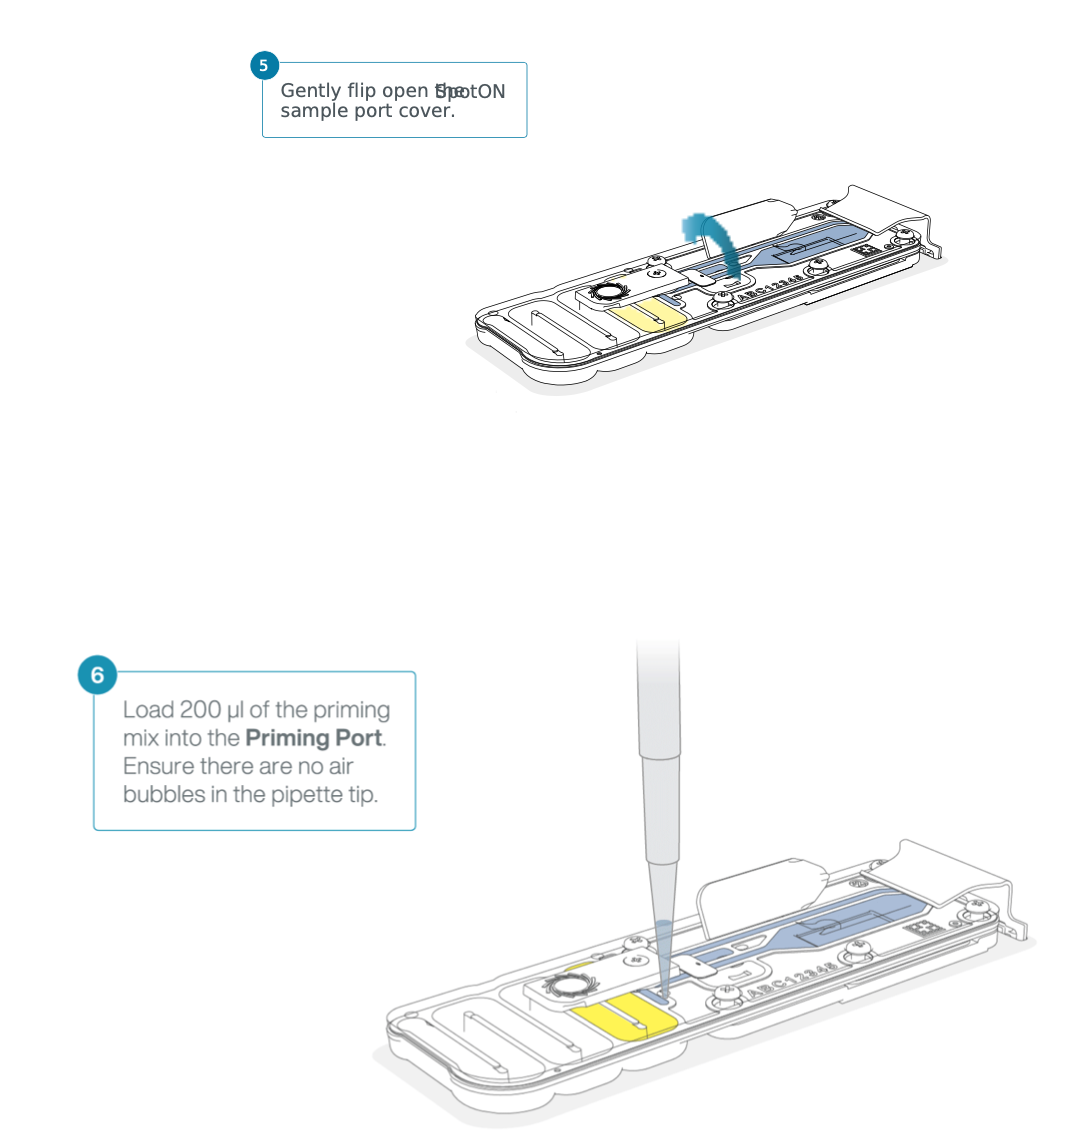
Gently lift the SpotON sample port cover to make the SpotON sample port accessible.
-
Loa 200 μl l of the priming mix into the flow cell priming port not t the SpotON sample port), avoiding the introduction of air
bubbles.
Mix the prepared library gently by pipetting up and down just prior to loading.
Add 75 μl of the prepared library to the flow cell via the SpotON sample port in a dropwise fashion. Ensure each drop flows into the port before adding the next.
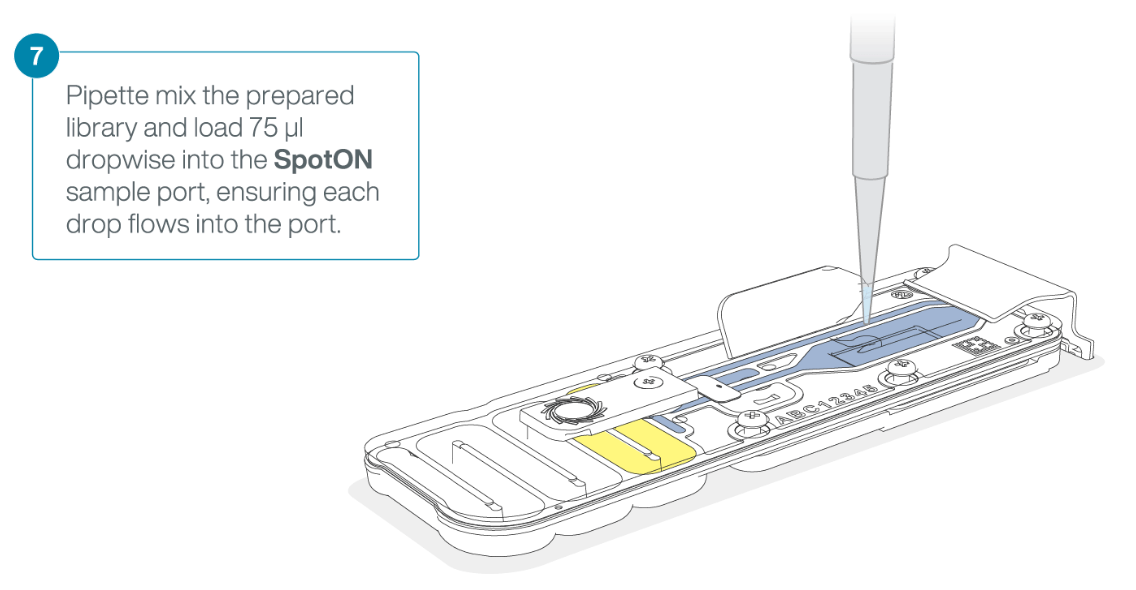
Add 75 μl of the prepared library to the flow cell via the SpotON sample port in a dropwise fashion. Ensure each drop flows into the port before adding the next.
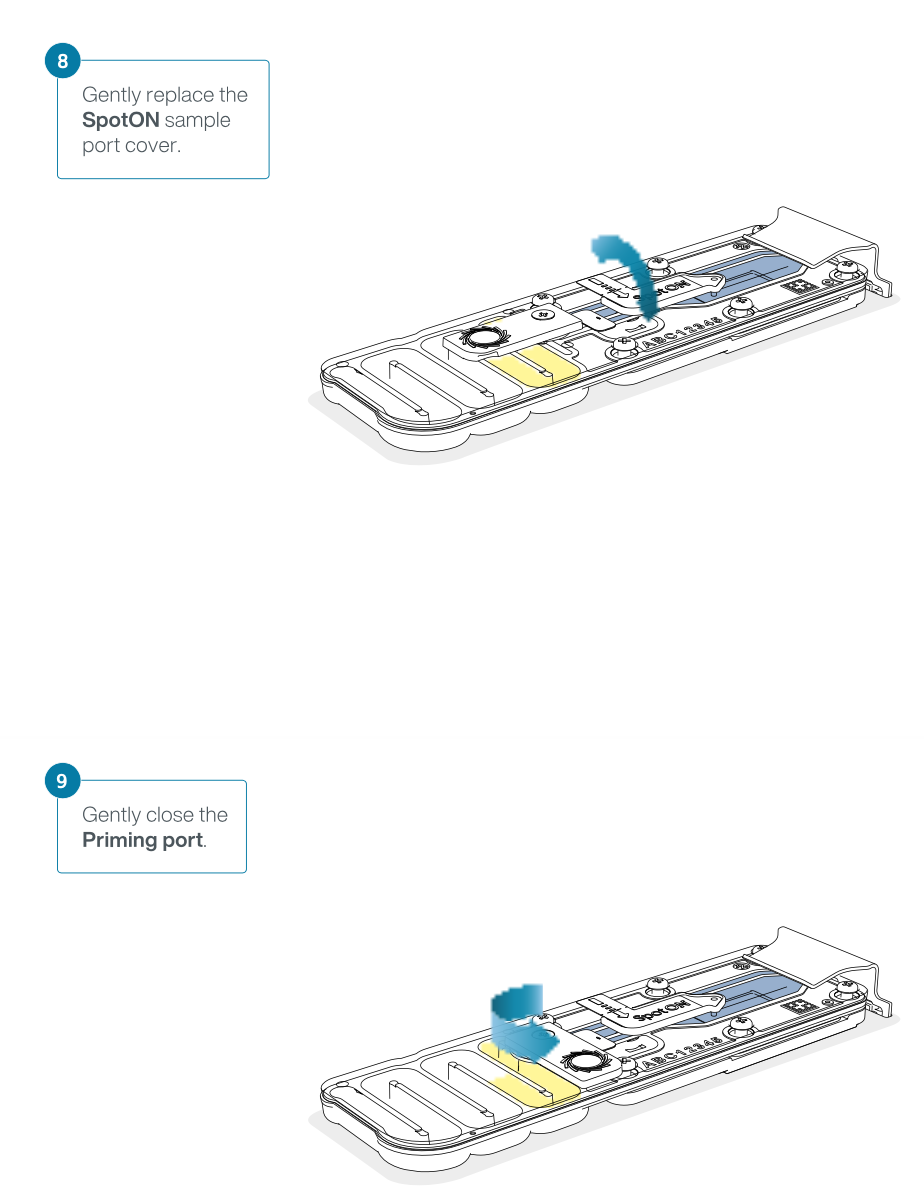
Gently replace the SpotON sample port cover, making sure the bung enters the SpotON port, close the priming port and replace the MinION device lid.