Nova-ST Chip Preparation Protocol
Suresh Poovathingal, Stein Aerts, Kristofer Davie
Abstract
Nova-ST is a an open-source, high-resolution sequencing based spatial transcriptomics workflow. This method gives comparable resolution to BGI Stereoseq, SeqScope & PIXEL seq. Nova-ST is derived from dense nano-patterned randomly barcoded Illumina NovaSeq 6000 S4 sequencing flow cells. More details in the Nova-ST pre-print (https://www.biorxiv.org/content/10.1101/2024.02.22.581576v1). Nova-ST enables customized, low cost, flexible, and high-resolution spatial profiling of broad range of tissue section sizes (upto 10mm x 8 mm). In this protocol, we provide detailed step-by-step resource for implementing the Nova-ST spatial transcriptomics workflow in you lab. Bioinformatics and data analysis workflows are detailed in: https://github.com/aertslab/Nova-ST. For any protocol related or data analysis clarifications, you can reach out to us via nova.st.aertslab@gmail.com.
Steps
HDMI Sequencing
Before Starting
The NovaSeq S4 reagents stored at -20°C is taken out and thawed at 4°C for atleast 16h 0m 0s -20h 0m 0s before sequencing. Prior to sequencing these reagents are removed and warmed to 25°C for atleast 0h 30m 0s .
The NovaSeq S4 flowcell stored at 4°C is thawed to Room temperature at least 0h 30m 0s before sequencing.
Thaw HDMI32-DraI and Read1-DraI oligonucleotides to Room temperature, and prepare 20µL of 100micromolar (µM) of Read1-DraI read primer and prepare 200µLof 1micromolar (µM) of HDMI32-DraI oligonucleotide for HDMI sequencing. The 1micromolar (µM) of HDMI32-DraI oligonucleotide is subject to qPCR quantification for library normalization
Sequencing
Prepare NaOH for denaturation (Mix the content well).
| A | B | C | D |
|---|---|---|---|
| Component | Stock Concentration | Final Concentration | Volume |
| NaOH | 4 M | 0.2 M | 5 ul |
| Nuclease Free Water (NFW) | 95 ul |
Prepare Tris 8 (Mix the content well)
| A | B | C | D |
|---|---|---|---|
| Component | Stock Concentration | Final Concentration | Volume |
| Tris 8.0 | 1 M | 10 mM | 2 ul |
| NFW | 198 ul |
Prepare Tris 8 for neutralization (Mix the content well)
| A | B | C | D |
|---|---|---|---|
| Component | Stock Concentration | Final Concentration | Volume |
| Tris 8.0 | 1 M | 0.4 M | 40 ul |
| NFW | 60 ul |
1.5nanomolar (nM)of normalized HDMI library is prepared by diluting the qPCR quantified HDMI32-DraI oligonucleotide using 10 mM Tris 8.0 buffer.
Denaturing of the HDMI sequencing library is performed by adding 0.2Molarity (M)NaOH to a final concentration of 0.04Molarity (M).
Incubate for 0h 8m 0s.
Neutralize the denatured HDMI library by adding 0.4Molarity (M) Tris 8 solution to a final concentration of 67millimolar (mM). The final concentration of the HDMI library prior to loading on sequencer is 300picomolar (pM) .
Prepare the Read1-DraI primer concentration to 0.3micromolar (µM) by adding 10.5µL of 100micromolar (µM)of Read1-DraI primer to 3489.5µL of the HT1 buffer from the NovaSeq 6000 kit. Mix well and load the primer to the custom read primer 1 position in the NovaSeq reagent cartridge.
Proceed for HDMI sequencing. The sequencing configuration used for reading the HDMI barcodes is:
| A | B |
|---|---|
| Read Configuration | Number of bases |
| Read 1 | 37 |
| Index 1 | 0 |
| Index 2 | 0 |
| Read 2 | 0 |
At the end of 34 cycles , perform manual abortion of the run by pressing the option of "End run without Wash".
The S4 flow cell is retrieved either for immediate downstream post processing steps, or it can also be stored safely at 4°C for at least 2 weeks (based on our experience). Users not having direct access to NovaSeq 6000 instrument can instruct sequencing facility to perform the HDMI sequencing and arrange for refrigerated transport of the flowcell in its original shipping case . In order the prevent the flow channels from evaporation, the inlet and outlet of the flow cell is plugged with 1.5 mm Polydimethylsiloxane (PDMS) punch.
Preparation of the 1.5 mm PDMS plugs:
The monomer (part A) and catalyst (part B) of SYLGARD 184 Silicone Elastomer Kit is prepared in a 10:1 weight ratio in a plastic container.
Using a spatula, the components were mixed thoroughly till the PDMS become milky white texture.
To remove the air bubble from the PDMS mix, it is degassed in a vaccum chamber for a total duration of 2h 0m 0s.
Depending of the length of the biopsy needle, pour the degassed PDMS to a petridish to the appropriate level and incubate in a 80°C oven for a total duration of 2h 0m 0s to polymerize PDMS.
Using a fine spatula (Sigma Aldrich, Cat. No. Z193216-2EA), pry out the polymerized PDMS block out of the petridish and place on aluminum foil.
Using a disposable biopsy punch (World Precision Instrument; Cat. No. 504647), create 1.5-2 mm PDMS punches. With help of fine tweezers, use these punches to block the inlet and the outlet of the NovaSeq HDMI flow cell.
Flow cell cleanup & Enzymatic treatment
Before Starting
Thaw the following components:
- 10x rCutSmart buffer
- Switch on the incubator to
37°C.
Prepare the 1X rCutSmart buffer . Mix the content well.
| A | B | C | D |
|---|---|---|---|
| Component | Stock Concentration | Final Concentration | Volume |
| 10x rCutSmart buffer | 10X | 1X | 60 ul |
| NFW | 540 ul |
Prepare the DraI mix (without enzyme). Mix the content well.
| A | B | C | D |
|---|---|---|---|
| Component | Stock Concentration | Final Concentration | Volume |
| 10x rCutSmart buffer | 10X | 1X | 60 ul |
| ** DraI enzyme | 20 U/ul | 2 U/ul | 60 ul |
| NFW | 480 ul |
Incubate both of the above buffer (without the enzyme, marked with **) at 37°C for at least 0h 30m 0s
Remove the sequencing reagents from the flow channels of the NovaSeq flow cell using vacuum liquid aspirator. Wash the flow channels of the sequencing flow cell with 200µL of NFW. Repeat this step for a total of 3 times.
Between each wash, the liquid in the channels are completely aspirated using vacuum liquid aspirator. The channels should be dry after the aspiration.
Remove the NFW from the flow channels of the NovaSeq flow cell using vacuum liquid aspirator. Wash the flow channels of the sequencing flow cell with 140µL of 1X rCutSmart buffer .
Add 60µLof DraI Enzyme to the DraI mix (enzyme marked in **) above to the buffer mix. Mix the content well using a P1000 pipette. Remove the fluid from from the flow channels of the NovaSeq flow cell using vacuum liquid aspirator and load the flow cell channels with140µL DraI mix cocktail.
Absorb the excess fluids from the inlet & outlet of the sequencing flow cell and using a precision forcep (VWR Cat. No. BOCH1930), block the inlets and & outlets using the 1.5-2mm PDMS biopsy cores to prevent evaporation of the reagents. Apply scotch tape to ensure no evaporation losses.
Place the flow cell into a humidification chamber made with a large square petridish with some tissue towel paper soaked in NFW. Seal the petridish with parafilm tapes to completely seal the large petridish.
Incubate the flowcell in the sealed humidification chamber at 37°C in an oven for a duration of 16h 0m 0s to 20h 0m 0s .
After 16h 0m 0s of incubation, check the flow channel and if air bubble are found in the flow channels, repeat with fresh with DraI mix cocktail and incubate for an additional 4h 0m 0s .
Before Starting
Thaw the following components:
- 10x Exonuclease I buffer
- Switch on the incubator to
37°C.
Prepare the 1X Exonuclease I buffer . Mix the content well.
| A | B | C | D |
|---|---|---|---|
| Component | Stock Concentration | Final Concentration | Volume |
| 10x Exonuclease I buffer | 10X | 1X | 60 ul |
| NFW | 540 ul |
Prepare the Exonuclease I mix (without enzyme). Mix the content well.
| A | B | C | D |
|---|---|---|---|
| Component | Stock Concentration | Final Concentration | Volume |
| 10x Exonuclease I buffer | 10X | 1X | 60 ul |
| NFW | 493.25 ul |
Incubate both of the above buffer at 37°C for at least 0h 30m 0s.
Remove the DraI mix cocktail from the flow channels of the NovaSeq flow cell using vacuum liquid aspirator. Wash the flow channels of the sequencing flow cell with 200µL of NFW. Repeat this step for a total of 3 times.
Between each wash, the liquid in the channels are completely aspirated using vacuum liquid aspirator.
Remove the NFW from the flow channels of the NovaSeq flow cell using vacuum liquid aspirator. Wash the flow channels of the sequencing flow cell with 130µL of 1X Exonuclease I buffer .
Add 30µLof to the Exonuclease I enzyme + 16.75µL Quick CIP enzyme to the Exonuclease I mix above. Mix the content well using a P200 pipette. Remove the fluid from from the flow channels of the NovaSeq flow cell using vacuum liquid aspirator and load the flow cell channels with140µL Exonuclease I mix cocktail each.
Absorb the excess fluids from the inlet & outlet of the sequencing flow cell and using a precision forcep, block the inlets and & outlets using the 1.5-2mm PDMS biopsy cores to prevent evaporation of the reagents. Apply scotch tape to ensure no evaporation losses.
Place the flow cell into a humidification chamber made with a large square petridish with some tissue towel paper soaked in NFW.
Incubate the flow cell in the humidification chamber at 37°C in an oven for a duration of 0h 45m 0s
After the incubation, check the flow channel and if air bubble are found in the flow channels, repeat with fresh Exonuclease I mix cocktail and incubate for an additional 0h 15m 0s.
Remove the Exonuclease I mix cocktail from the flow channels of the NovaSeq flow cell using vacuum liquid aspirator. Wash the flow channels of the sequencing flow cell with 200µL of NFW. Repeat this step for a total of 3 times.
Between each wash, the liquid in the channels are completely aspirated using vacuum liquid aspirator.
The enzymatically treated S4 flow cell can then be processed directly for the Nova-ST chip preparation, or it can also be stored safely at 4°C for at least 2 weeks (based on our experience).
If the flow cell is going to be stored, replace the NFW from the flow channels with 200µL of IDT TE8 buffer. Absorb the excess fluids from the inlet & outlet of the sequencing flow cell and using a precision forceps, block the inlets and & outlets using the 1.5-2mm PDMS biopsy cores to prevent evaporation of the reagents. Apply scotch tape to ensure no evaporation losses and proceed with the storage.
Please read the " Guidelines & Warnings " section, before the glass cutting step to prepare Nova-ST chips.
Manual cutting strategy for Nova-ST chip preparation
Before Starting:
Clean all the surfaces and tools being used for preparing the Nova-ST with 70% Ethanol followed by RNA zap and DNA zap.
Prepare 0.1N NaOH solution
| A | B | C | D |
|---|---|---|---|
| Component | Stock Concentration | Final Concentration | Volume |
| NaOH | 10N | 0.1N | 5 ml |
| NFW | 495 ml |
Prepare 0.1M Tris 7.5 solution
| A | B | C | D |
|---|---|---|---|
| Component | Stock Concentration | Final Concentration | Volume |
| Tris pH 7.5 | 1M | 0.1M | 50 ml |
| NFW | 450 ml |
If the NovaSeq flow cell after the enzymatic treatment has been stored at 4°C , remove the PDMS plugs and wash the flow channels of the sequencing flow cell with 200µL of NFW. Repeat this step for a total of 3 times.
Between each wash, the liquid in the channels are completely aspirated using vacuum liquid aspirator.
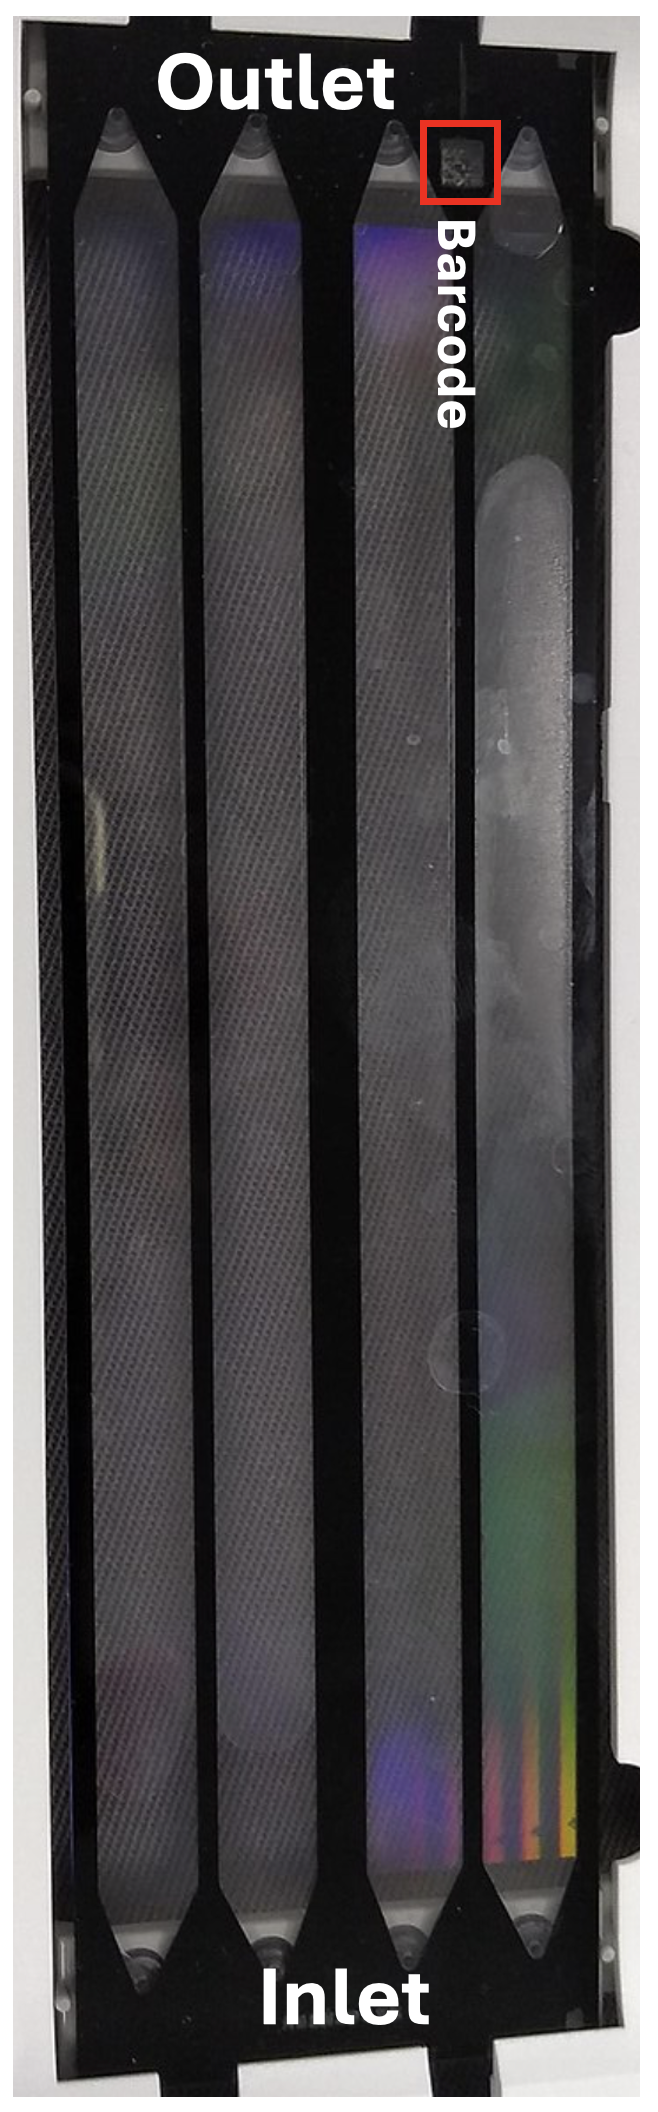
The orientation of the chip is marked with the QR code present in the corner of the NovaSeq flow cell.
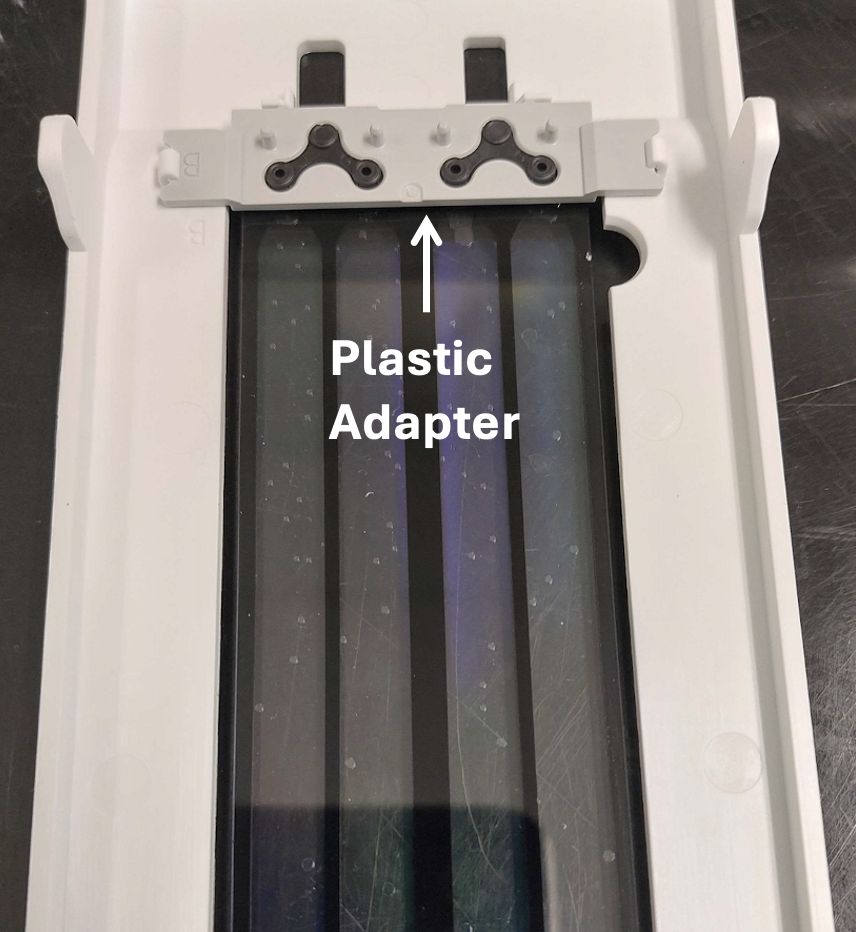
The flow cell is removed from its plastic adapter by releasing the plastic clip holding the chip. The flow cell is then incubated at 50°C for 0h 20m 0s to dry the flow channels.
Using a scalpel, gently pry between the thin & thick glass layers which is separated by a black gasket. This has to be done on all sides of the flow cell. By gentle prying, the layers would slowly separate on all the sides. Once the layers have separated significantly, hold them and gradually separate the layers by hand till the thin and thick layers have separated completely.
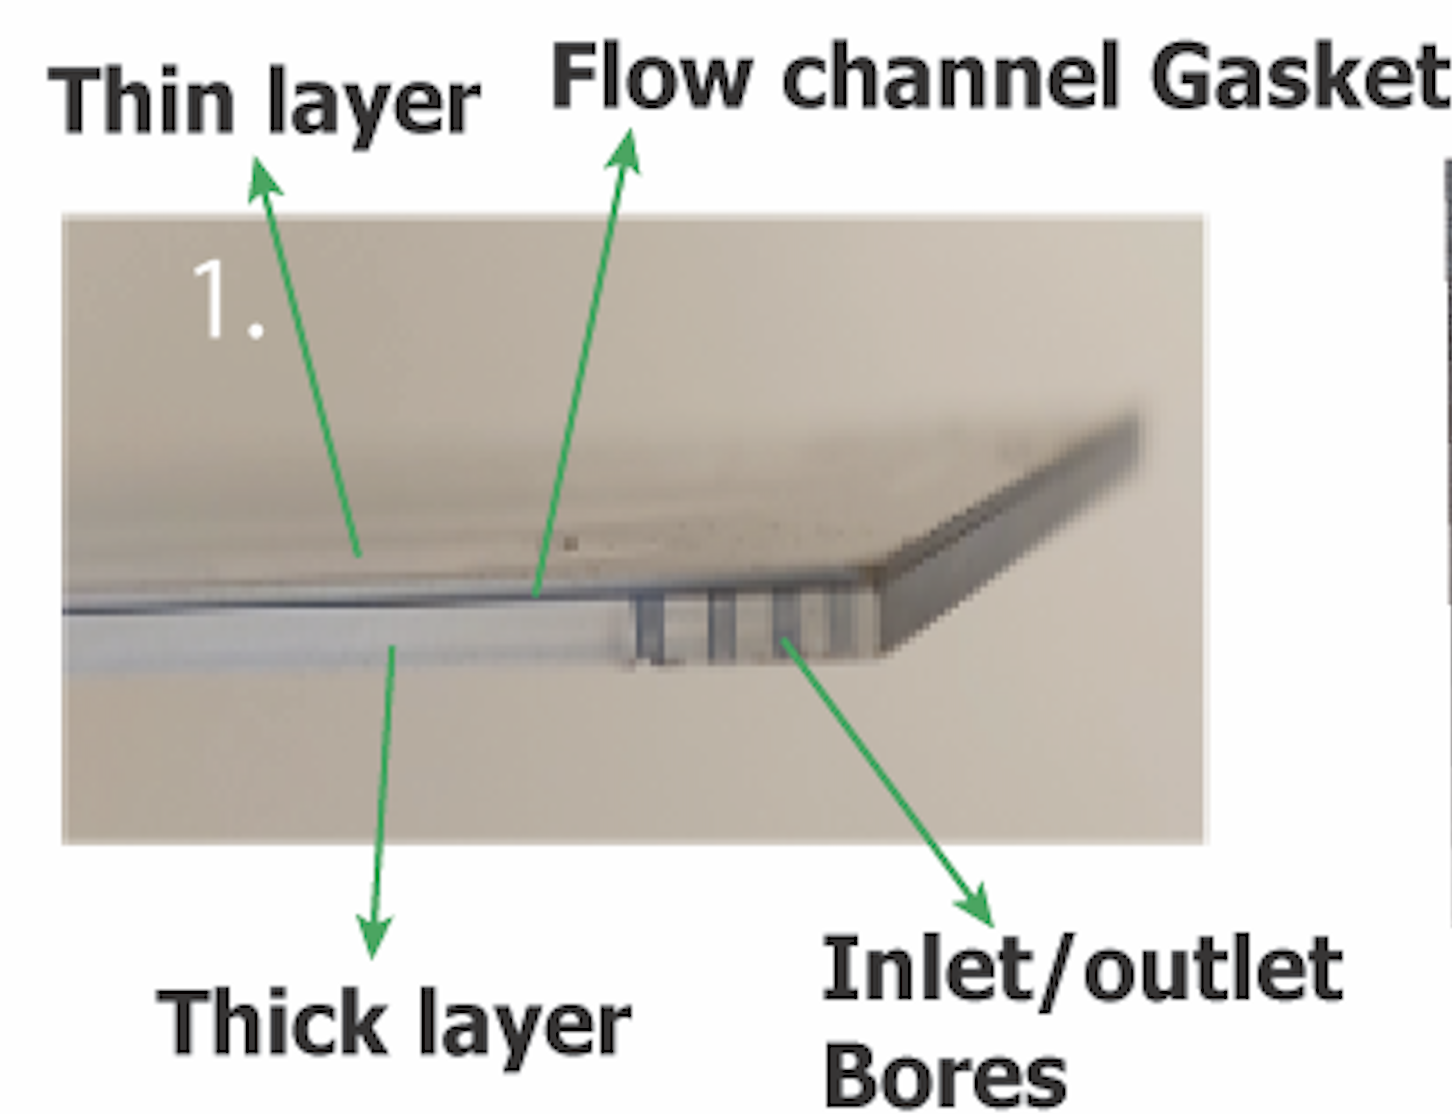
After separating the layers, the glass slides are glued to paper masking tapes. The excess paper tapes around the glass slides are trimmed away.
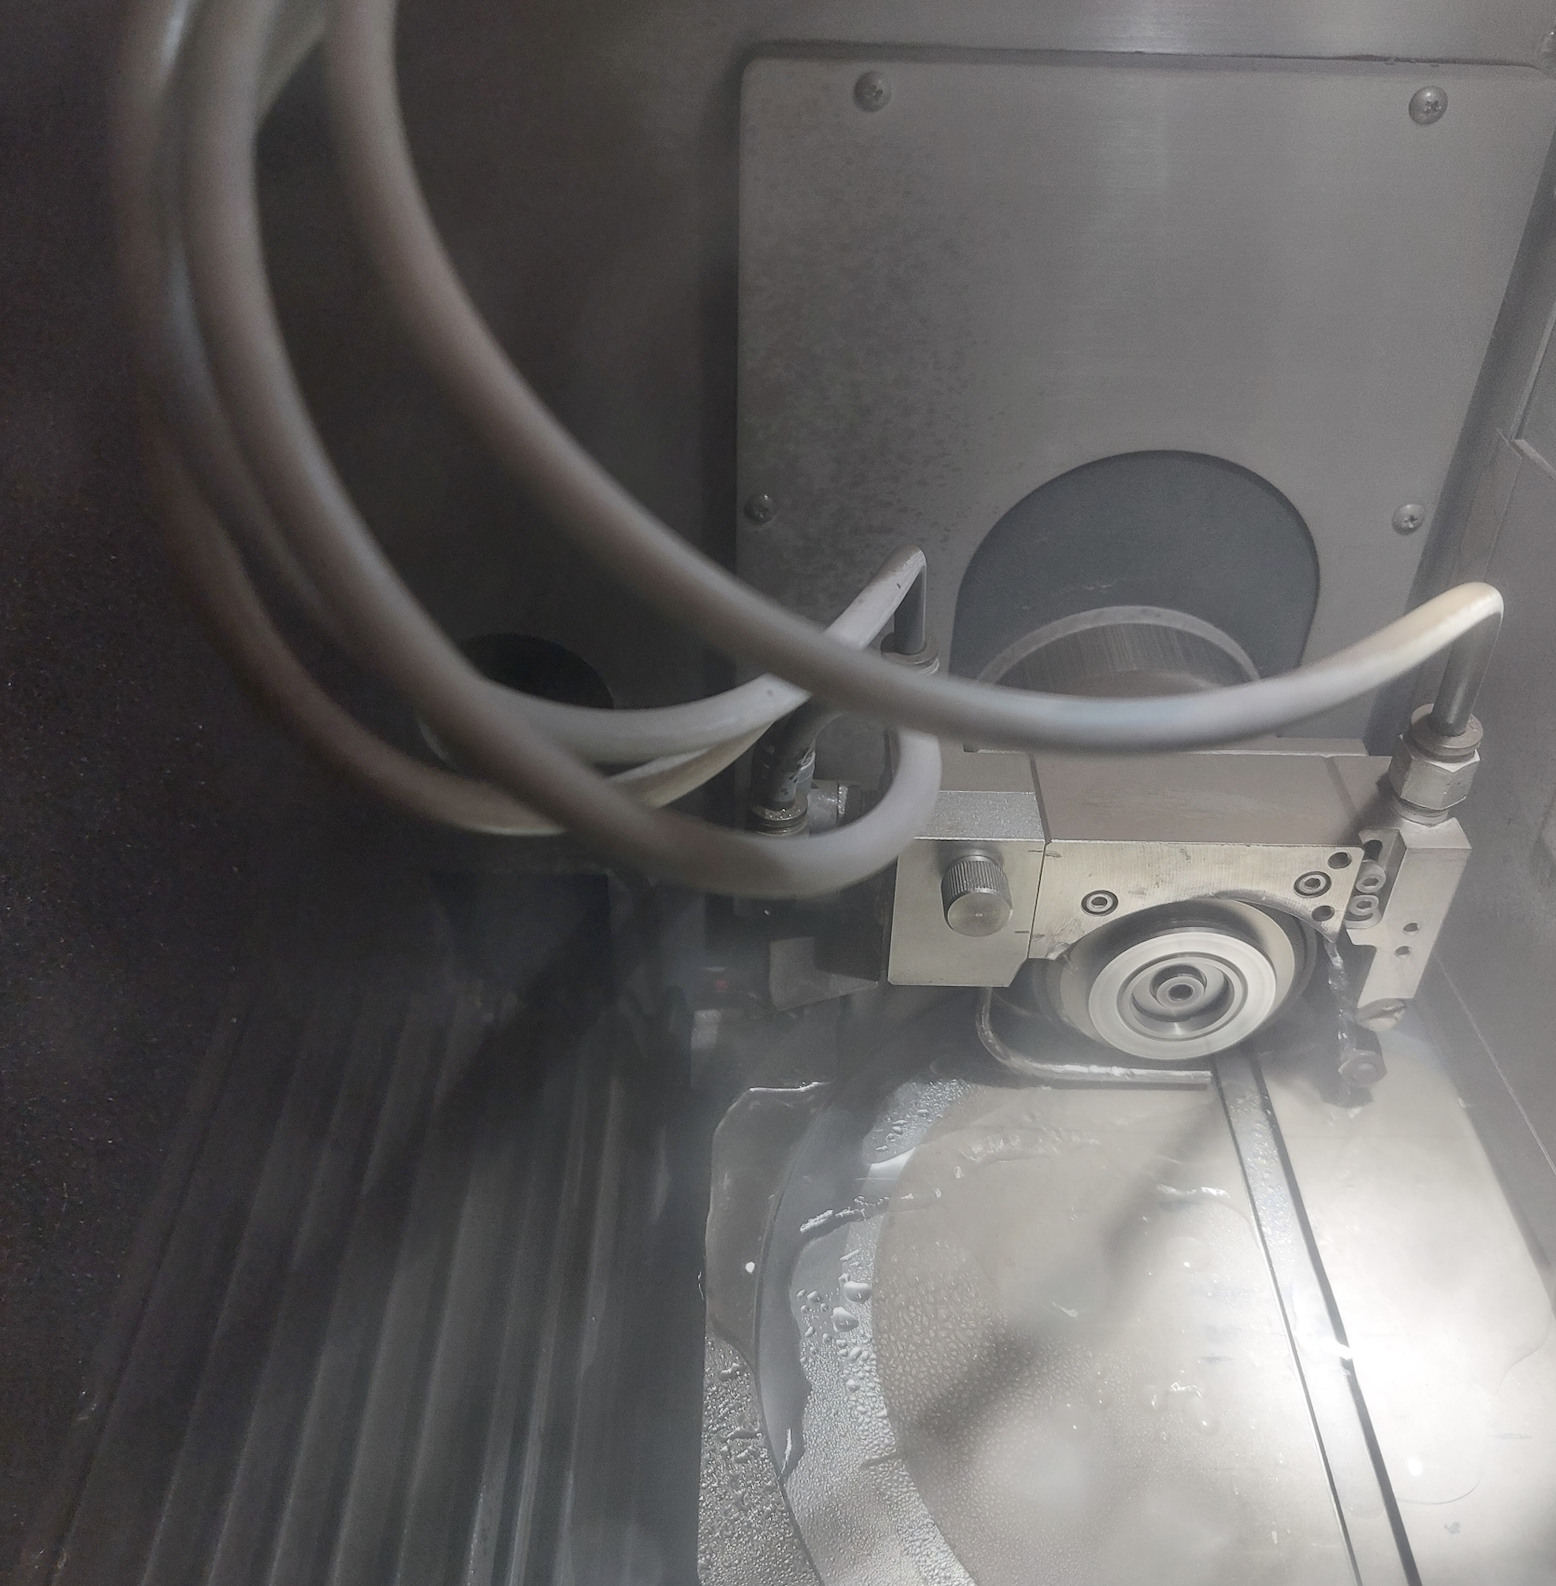
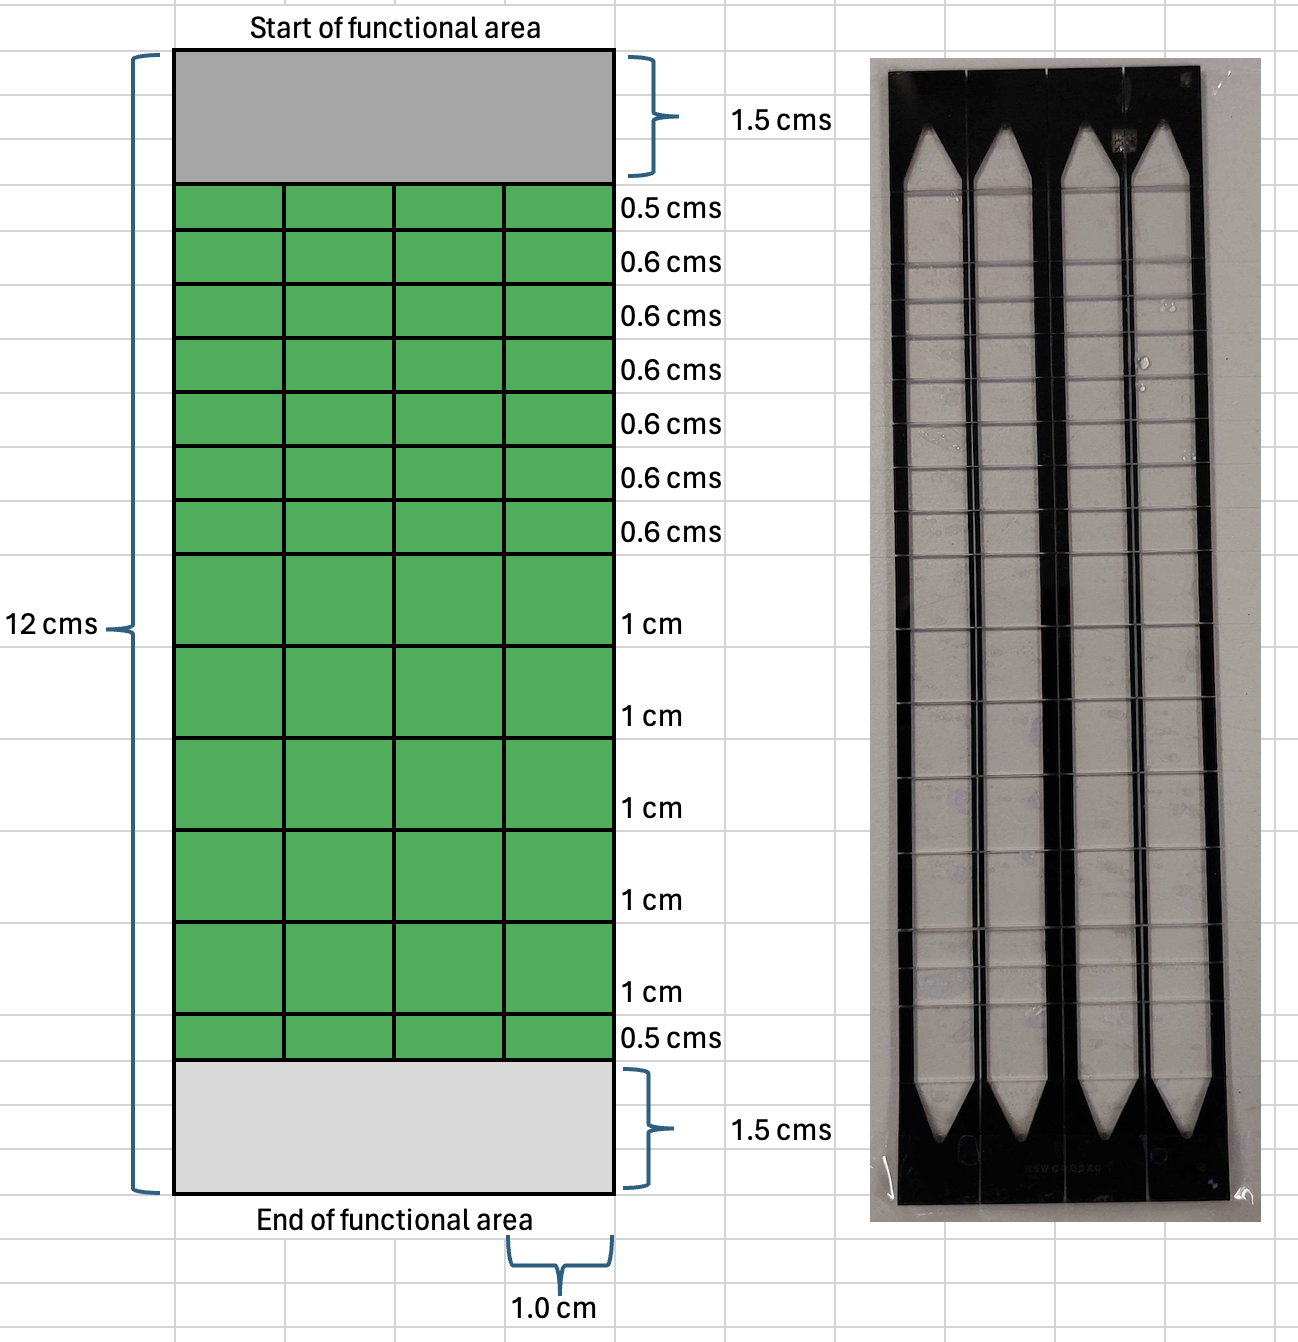
The scoring pattern was created using the machine suppliers dedicated software, Carbide Create. The glass plates dimensions were defined in the software as well as the desired scoring pattern. The pattern used for scoring both the glass slides:


The glass slides were aligned and fixed onto the bread-board stage of the instrument. As per manufacturers protocol, the x, y and z coordinates of the spindle is set. The scoring depths was then adapted according to the glass thickness and the direction. The thicker glass plate (1.2mm thick) was scored with a 0.6mm depth in the width direction (shortest side) and 0.2mm depth in the length direction. For the thin section (thickness 0.3mm), depths of 0.4mm and 0.1mm were used, respectively. Each score was performed with a single pass of the tool.
Retrieve the glass slides from the CNC machine. Using the glass running pliers (SPEEDEOX), place the glass slides such that the score lines align with the reference line on the pliers. Adjust the set screws of the pliers to control the width of the jaws such that the glass layer sits flushed against the jaws when held between it. Apply gentle pressure, to break the glass along the score lines. Firstly, break the glass slide along the width (shorter length). Then, break along the long score lines to produce 1cm2 Nova-ST chip tiles.
Prepare 4x 24-well plate for transferring the chips. After cutting the chips, with help of sharp forceps gently remove the Nova-ST chips from the adhesive tape, without damaging the functional surface of the Nova-ST chip. Transfer the Nova-ST chips to the wells of 24 well plate according to an example color scheme described below:

The wells where the Nova-ST chips are stored are labeled according to their location in the S4 flowcell. This is needed for the identification of the location of the chips in the original NovaSeq flow cell. Example, the Nova-ST chip 1A1 is derived from the thick glass slide and is closest to the outlet port.
After the chip transfer to the corresponding 24 well plates are completed, proceed with the wash steps below:
Using a multi-channel pipette, add 1 ml of NFW to the wells of the 24 well plate. After wash, discard NFW to a collection reservoir.
Using a multi-channel pipette, add 1 ml of 0.1N NaOH solution to the wells of the 24 well plate. Ensure all the chips are completely submerged in the liquid. Incubate the chips for 0h 5m 0s at Room temperature . After incubation discard the 0.1N NaOH solution from the wells to a collection reservoir. After each wash remove as much as liquid possible from the wells.
repeat the step for a total of 3X times.
Using a multi-channel pipette, add 0.1M Tris 7.5 solution to the wells of the 24 well plate. Ensure all the chips are completely submerged in the liquid. After incubation discard the 0.1M Tris 7.5 solution from the wells to a collection reservoir. After each wash remove as much as liquid possible from the wells.
repeat the step for a total of 3X times.
Using a multi-channel pipette, add 1 ml of 1x IDT TE 8 to the wells of the 24 well plate. Ensure all the chips are completely submerged in the liquid. After wash, discard the TE buffer to a collection reservoir.
Using a multi-channel pipette, add 1 ml of 1x IDT TE 8 to the wells of the 24 well plate. Ensure all the chips are completely submerged in the liquid. Seal the 24 well plate with parafilm M tapes and store the chips at 4°C .
Automatic dicing strategy for Nova-ST chip preparation
Before Starting:
Clean all the surfaces and tools being used for preparing the Nova-ST with 70% Ethanol followed by RNA zap and DNA zap.
Prepare 0.1N NaOH solution
| A | B | C | D |
|---|---|---|---|
| Component | Stock Concentration | Final Concentration | Volume |
| NaOH | 10N | 0.1N | 5 ml |
| NFW | 495 ml |
Prepare 0.1M Tris 7.5 solution
| A | B | C | D |
|---|---|---|---|
| Component | Stock Concentration | Final Concentration | Volume |
| Tris pH 7.5 | 1M | 0.1M | 50 ml |
| NFW | 450 ml |
If the NovaSeq flow cell after the enzymatic treatment has been stored at 4°C , remove the PDMS plugs and wash the flow channels of the sequencing flow cell with 200µL of NFW. Repeat this step for a total of 3 times.
Between each wash, the liquid in the channels are completely aspirated using vacuum liquid aspirator.
The orientation of the chip is marked with the QR code present in the corner of the NovaSeq flow cell.
The NovaSeq flow is mounted on dicing tape which has a sticky backing that holds the flow cell on a thin sheet metal frame, to prepare for dicing process. The thick glass side of the flow cell is glued on to the adhesive film. In order to reduce the adjustment for alignment in the dicing machine, the flow cell is glued on to the dicing tape, pre-aligned.
The metal frame with flow cell is fixed to the dicing stage. The x-,y- and
Firstly, the dicing is performed along the length of the NovaSeq flow cell and its cut into slabs of 1 cm thick. Without detaching the separated 1 cm slab from the dicing tape, the tape assembly is turned by 900 angle and the dicing is repeated along the width of the NovaSeq flow cell and it cut into desired dimensions. An example of a recent dicing pattern used by our lab:
After the dicing steps are completed, the diced NovaSeq flow cell is removed from the instrument and the dicing tape is cut out to retrieve the diced NovaSeq flow cell.
Prepare 6x24-well plate for transferring the chips. For the dicing schema described in step 46, the following plate configuration is used:
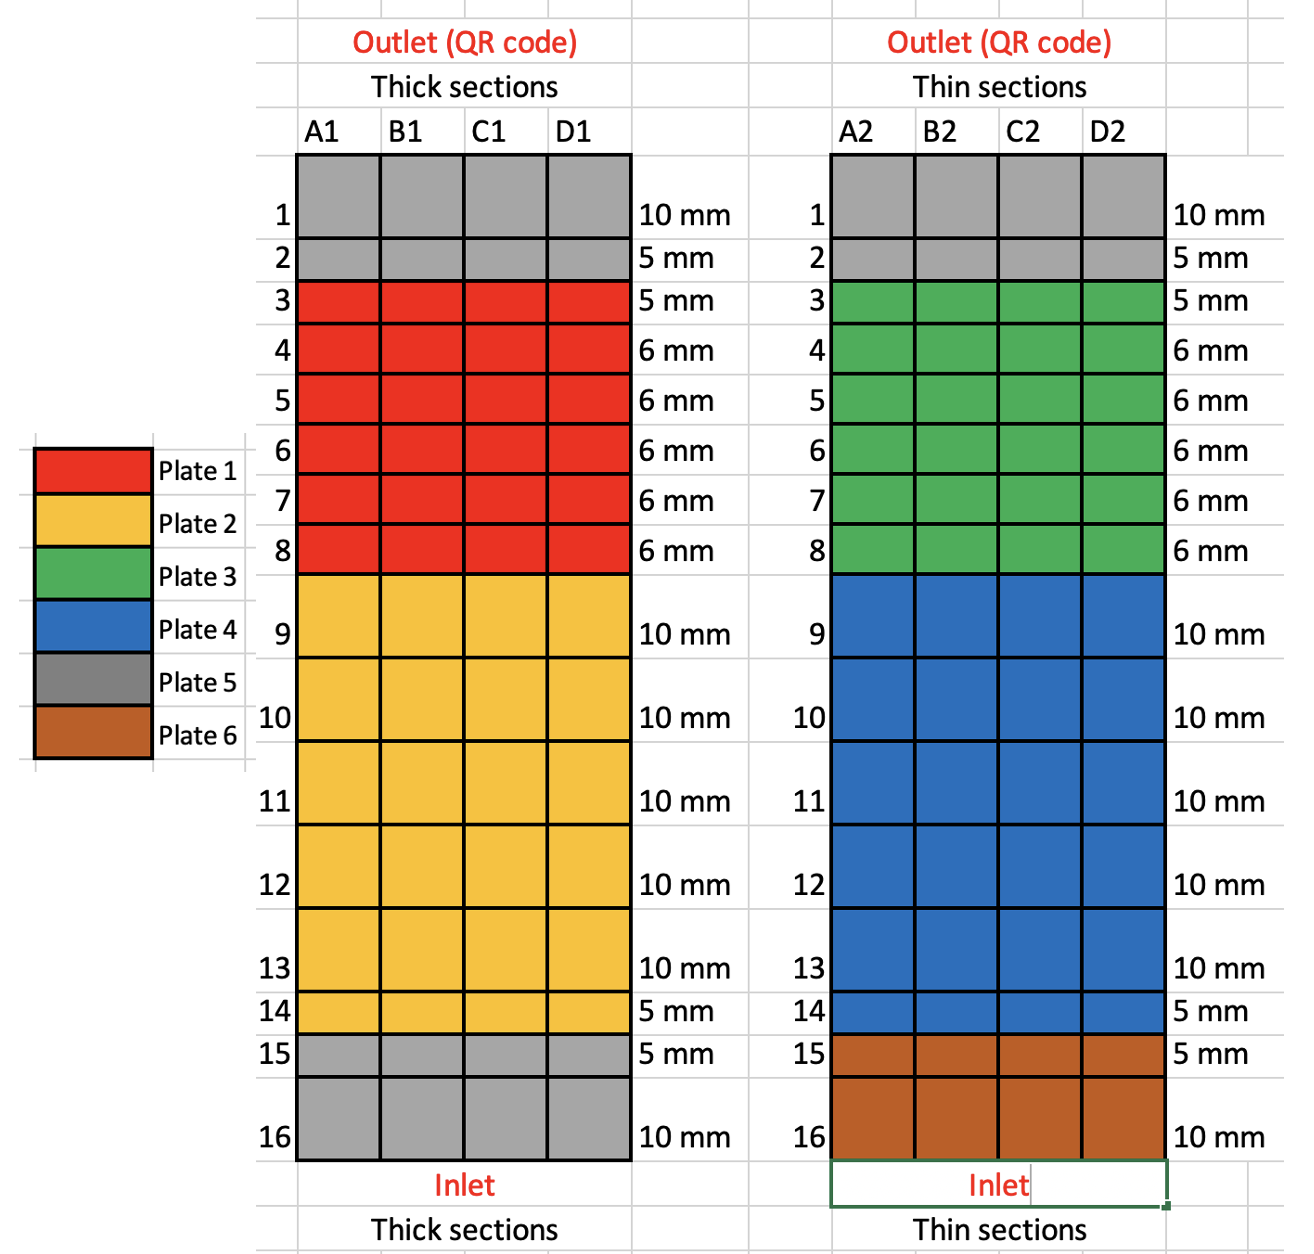
The wells where the Nova-ST chips are stored are labeled according to their location in the S4 flowcell. This is needed for the identification of the location of the chips in the original NovaSeq flow cell. Example, the Nova-ST chip 3A1 is derived from the thick glass slide and is closest to the outlet port.
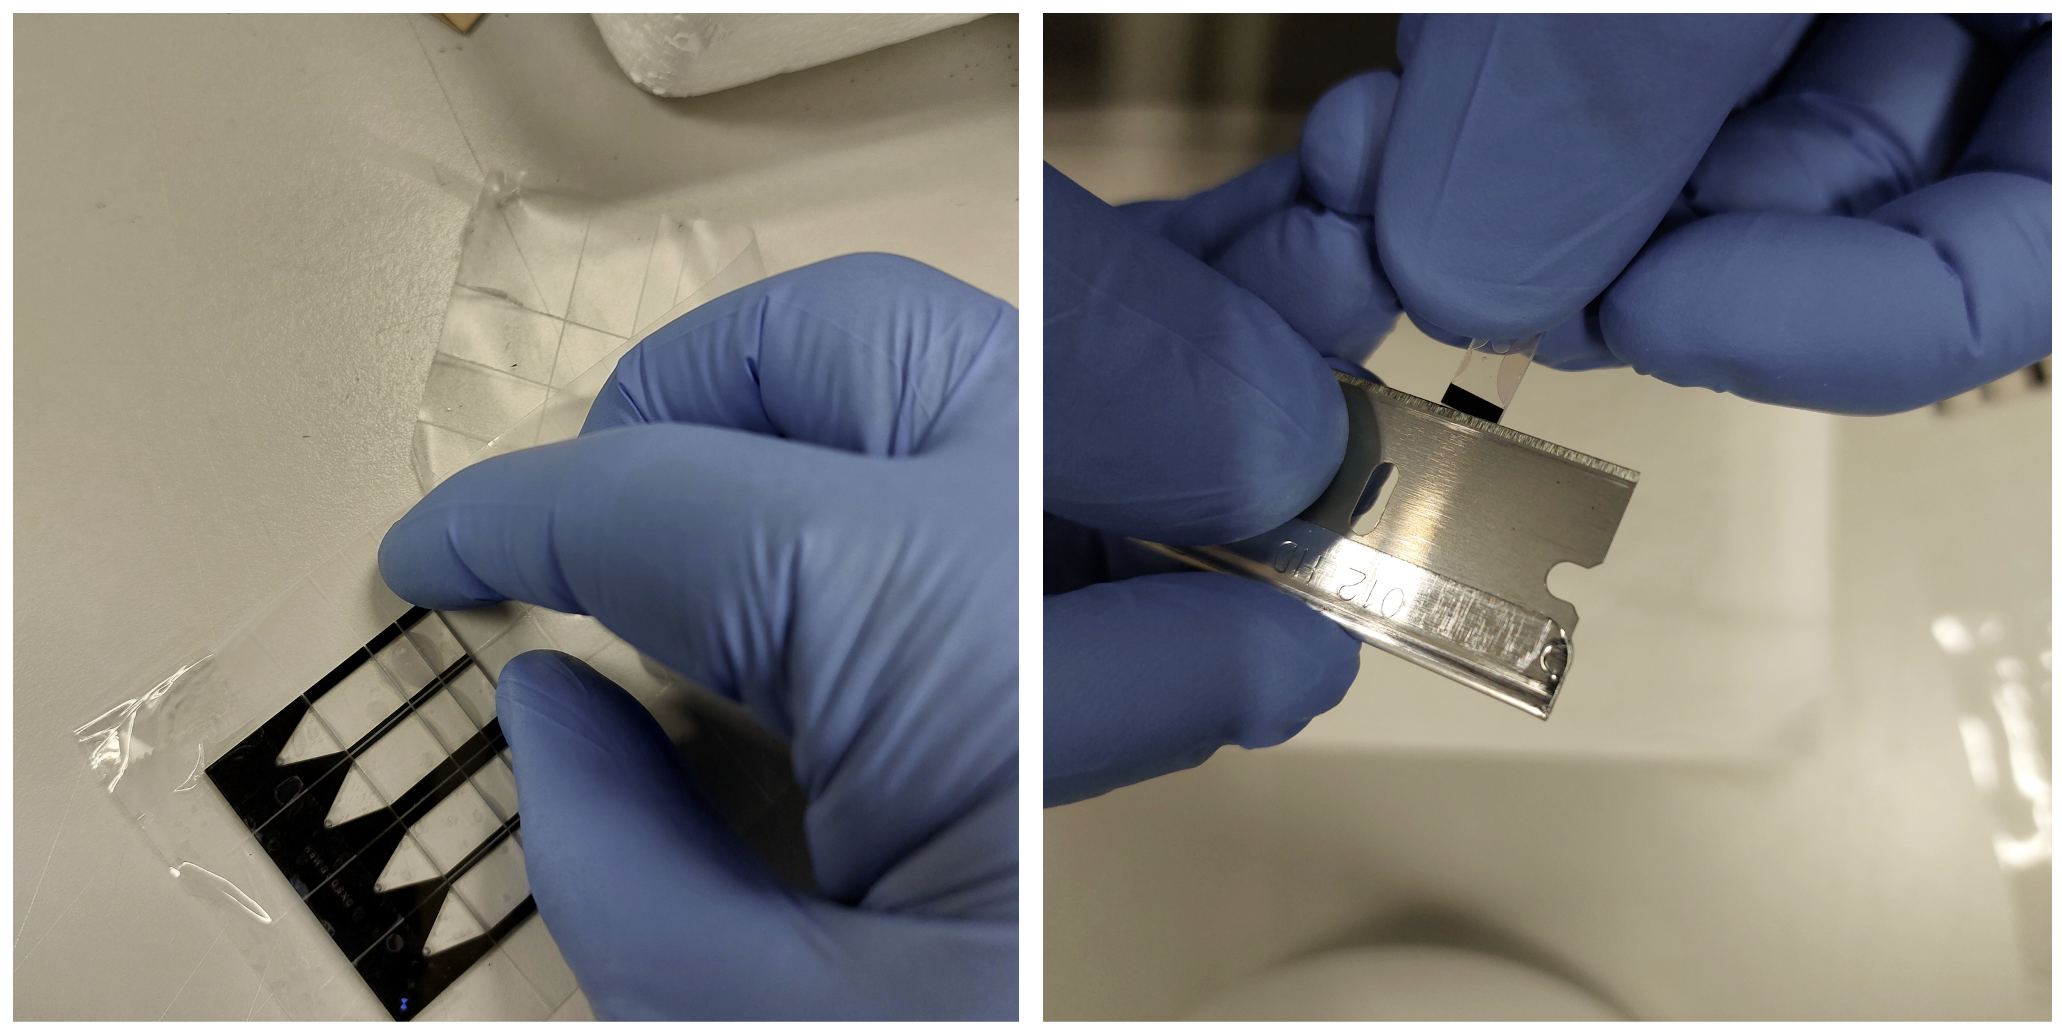
With help of sharp forceps gently remove the Nova-ST chips from the adhesive dicing tape. The Nova-ST chips at this stage is still bonded with the thin and thick sections still bonded. Using a fresh razor, pry gently at the side between the thin and thick section (as shown below). A gentle push is sufficient to separate the layers. Ensure not to disturb/damage the function surface of the Nova-ST chips.
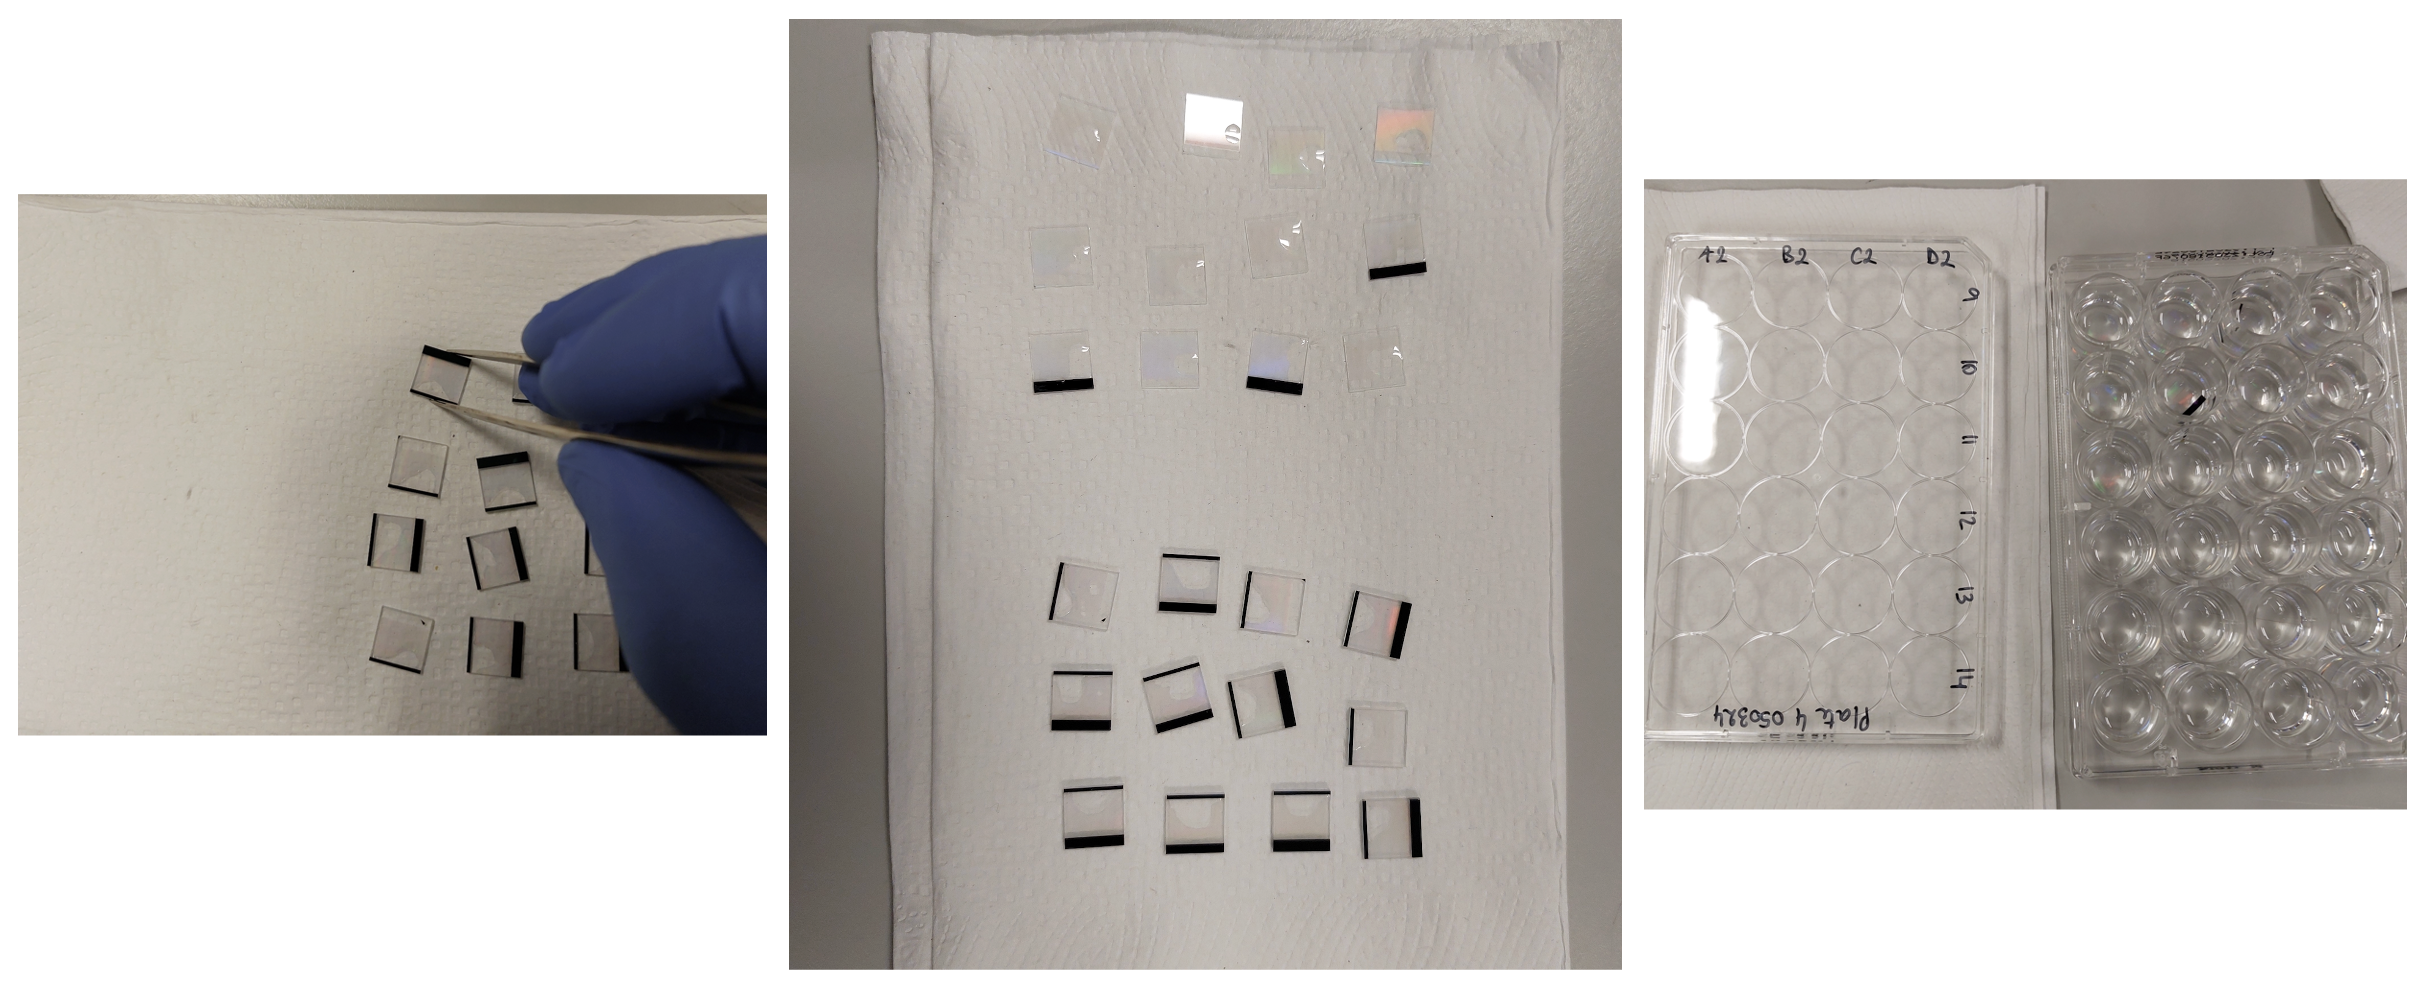
Once the layers have been separated, place the separated chip on a paper towel with the functional surface facing up. After separating a batch of chips, using a sharp forceps, transfer the chips to the respective 24 well plate, with the functional surface of the chips facing upwards.
After all the chip transfer has been performed to the corresponding 24 well plates, proceed with the wash steps below:
Using a multi-channel pipette, add 1 ml of NFW to the wells of the 24 well plate. After wash, discard NFW to a collection reservoir.
Using a multi-channel pipette, add 0.1N NaOH solution to the wells of the 24 well plate. Ensure all the chips are completely submerged in the liquid. Incubate the chips for 0h 5m 0s at Room temperature. After incubation discard the 0.1N NaOH solution from the wells to a collection reservoir. After each wash remove as much as liquid possible from the wells.
repeat the step for a total of 3X times.
Using a multi-channel pipette, add 0.1M Tris 7.5 solution to the wells of the 24 well plate. Ensure all the chips are completely submerged in the liquid. After incubation discard the 0.1M Tris 7.5 solution from the wells to a collection reservoir. After each wash remove as much as liquid possible from the wells.
repeat the step for a total of 3X times.
Using a multi-channel pipette, add 1 ml of 1x IDT TE 8 to the wells of the 24 well plate. Ensure all the chips are completely submerged in the liquid. After the wash, discard the TE buffer to a collection reservoir.
Using a multi-channel pipette, add 1 ml of 1x IDT TE 8 to the wells of the 24 well plate. Ensure all the chips are completely submerged in the liquid. Seal the 24 well plate with parafilm M tapes and store the chips at 4°C .
Data processing
Details on data processing, post HDMI sequencing can be found here https://github.com/aertslab/Nova-ST
