Native Barcoding (SQK-NBD114) gDNA for Adaptive Sampling using Oxford Nanopore Technologies
Emil Gustavsson, Claire Anderson, Hannah Macpherson, Jasmaine Lee, Zhongbo Chen
Native Barcoding
SQK-NDB114
Oxford Nanopore Technologies
ONT
Adaptive sampling
gDNA
genomic DNA
Targeted Long Read Sequencing
ASAPCRN
Disclaimer
DISCLAIMER – FOR INFORMATIONAL PURPOSES ONLY; USE AT YOUR OWN RISK
The protocol content here is for informational purposes only and does not constitute legal, medical, clinical, or safety advice, or otherwise; content added to protocols.io is not peer reviewed and may not have undergone a formal approval of any kind. Information presented in this protocol should not substitute for independent professional judgment, advice, diagnosis, or treatment. Any action you take or refrain from taking using or relying upon the information presented here is strictly at your own risk. You agree that neither the Company nor any of the authors, contributors, administrators, or anyone else associated with protocols.io, can be held responsible for your use of the information contained in or linked to this protocol or any of our Sites/Apps and Services.
Abstract
This protocol describes how to carry out native barcoding of genomic DNA (gDNA) using the Native Barcoding Kit 24 V14 (SQK-NBD114.24) for Adaptive Sampling using Oxford Nanopore Technologies (ONT). Adaptive Sampling is a method of real-time selection of DNA molecules for sequencing and rejection of DNA molecules that are not of interest by reversing the voltage across the pores.
Attachments
ligation-sequencing-gdna-native-barcoding-v14-sqk-nbd114-24-NBE_9169_v114_revF_15Sep2022-promethion.pdf ONT notes on fragmentation of gDNA.docx ONT notes input-dna-rna-qc-IDI_S1006_v1_revB_18Apr2016-any.pdf ONT notes on DNA Contaminants.docx ONT notes on adaptive sampling.docx SCA4_human_hg38.bed adaptive-sampling-ADS_S1016_v1_revJ_12Nov2020-any.pdf flow-cell-wash-kit-exp-wsh004-WFC_9120_v1_revK_08Dec2020-promethion.pdf
Steps
Prepare for your experiment
This protocol is based on ligation-sequencing-gdna-native-barcoding-v14-sqk-nbd114-24-NBE_9169_v114_revF_15Sep2022-promethion with some modifications for adaptive sampling.
Refer to the ONT notes on adaptive sampling for further information and creating a .BED file.
Ensure you have your Native Barcoding Kit 24 V14 (SQK-NBD114.24), the correct equipment and third-party reagents.
- Check your PromethION R10.4.1 flow cell/s (FLO-PRO114M) to ensure there are >5000 pores.
Prepare samples for your experiment
This protocol is for barcoding 4-5 samples per flow cell.* Only 2 flow cells may be run simultaneously with high accuracy basecalling required for adaptive sampling.
- Extract DNA, and check its length, quantity and purity. ONT notes input-dna-rna-qc-IDI_S1006_v1_revB_18Apr2016-any.pdf
High molecular weight DNA may require shearing prior to adaptive sampling. If shearing is not required, proceed with clean-up and volume reduction
Shear 6µg gDNA using Diagenode Megaruptor® 3 DNA shearing kit (and DNAFluid+ kit for viscous samples) to obtain uniform fragment lengths of 12-15 kb.
Check fragment length using Agilent Femto Pulse Genomic 165 kb kit (or similar electrophoresis method).
ONT notes on fragmentation of gDNA.docx
Perform a 1X ProNex® bead clean-up on fragmented gDNA
Allow ProNex® beads to get to Room temperature and resuspend by vortexing.
Pellet the beads on a magnet for 0h 2m 0s until the eluate is clear and colourless.
Remove and retain 25µL of eluate into a clean 1.5 ml Eppendorf DNA LoBind tube.
Quantify 1µL of each eluted sample using a Qubit fluorometer.
Add 1X the volume of resuspended ProNex® beads to gDNA and mix by flicking the tube.
Incubate on a Hula rotator mixer for 0h 10m 0s at Room temperature.
Meanwhile, prepare sufficient fresh 80% ethanol in nuclease-free water to completely cover the samples. Allow enough for two washes, with some excess.
Spin down the samples and pellet the beads on a magnet for 0h 2m 0s until the eluate is clear and colourless. Keep the tubes on the magnet, pipette off the supernatant and retain (SN1).
Keep the tube on the magnet and wash the beads with enough freshly prepared 80% ethanol to cover the pellet. Remove the ethanol using a pipette and discard.
Repeat the previous step
Briefly spin down and place the tubes back on the magnet for the beads to pellet. Pipette off and discard any residual ethanol. Do not allow the pellet to dry out.
Remove the tubes from the magnetic rack and resuspend the pellet in 25µL nuclease-free water. Spin down and incubate for 0h 10m 0s at Room temperature.
If necessary, dilute gDNA with nuclease free water to obtain 2X 12µL aliquots per sample at a concentration of 1200-1500ng in clean 0.2 ml thin-walled PCR tubes.
DNA repair and end-prep
Thaw the AMPure XP Beads (AXP) at Room temperature * Thaw NEBNext FFPE DNA Repair Buffer, Ultra II End-Prep Reaction Buffer, Ultra II End-Prep Enzyme Mix and NEBNext FFPE DNA Repair Mix On ice.
Flick and/or invert the reagent tubes to ensure they are well mixed. Spin down tubes before opening.
Optional addition of DNA Control Sample (DCS).
Prepare a mastermix of the end-prep and DNA repair reagents for the total number of samples and add 3µL to each sample tube.
| A | B |
|---|---|
| Reagent | Volume |
| DNA sample | 12 µl |
| NEBNext FFPE DNA Repair Buffer | 0.875 µl |
| Ultra II End-prep Reaction Buffer | 0.875 µl |
| Ultra II End-prep Enzyme Mix | 0.75 µl |
| NEBNext FFPE DNA Repair Mix | 0.5 µl |
| Total | 15 µl |
Pipette mix 10 - 20 times and spin down in a centrifuge.
Using a thermal cycler, incubate at 20°C for 0h 30m 0s and 65°C for 0h 5m 0s.
Transfer each sample into a clean 1.5 ml Eppendorf DNA LoBind tube.
Resuspend the AMPure XP beads (AXP) by vortexing.
Add 15µL of resuspended AMPure XP Beads (AXP) to each end-prep reaction and mix by flicking the tube.
Incubate on a Hula rotator mixer for 0h 10m 0s at Room temperature.
Prepare sufficient fresh 80% ethanol in nuclease-free water for all of your samples. Allow enough for 400 µl per sample, with some excess.
Spin down the samples and pellet the beads on a magnet for 0h 2m 0s until the eluate is clear and colourless. Keep the tubes on the magnet, pipette off the supernatant and retain (SN2)
Keep the tube on the magnet and wash the beads with 200µL of freshly prepared 80% ethanol without disturbing the pellet. Remove the ethanol using a pipette and discard.
Repeat the previous step
Briefly spin down and place the tubes back on the magnet for the beads to pellet. Pipette off any residual ethanol. Do not allow the pellet to dry out.
Remove the tubes from the magnetic rack and resuspend the pellet in 10µL nuclease-free water. Spin down and incubate for 0h 10m 0s at 37°C.
Pellet the beads on a magnet for 0h 2m 0s until the eluate is clear and colourless.
Remove and retain 10µL of eluate into a clean 1.5 ml Eppendorf DNA LoBind tube.
Quantify 1µL of each eluted sample using a Qubit fluorometer.
Take forward an equimolar mass of each sample to be barcoded into the native barcode ligation step:
Use an online weight to molar quantity calculator to identify which sample has the lowest molar concentration in 7.5µL. Dilute other samples to the same molar quantity in 7.5µL.
Native barcode ligation
Thaw the NEB Blunt/TA Ligase Master Mix at Room temperature, spin briefly and mix by performing 10 full volume pipette mixes. Store On ice.* Thaw the EDTA at Room temperature and mix by vortexing. Then spin down and place On ice.
- Thaw the required number of Native Barcodes (NB01-24) at
Room temperature. Individually mix the barcodes by pipetting, spin down and place themOn ice.
In clean 0.2 ml PCR-tubes add the reagents in the following order:
Between each addition, pipette mix 10 - 20 times
| A | B |
|---|---|
| Reagent | Volume |
| End-prepped DNA | 7.5 µl |
| Native Barcode (NB01-24) | 2.5 µl |
| Blunt/TA Ligase Master Mix | 10 µl |
| Total | 20 µl |
Thoroughly mix the reaction by gently pipetting and briefly spinning down.
Incubate for 0h 20m 0s at Room temperature.
Add 2µL EDTA to each reaction and mix thoroughly by pipetting and spin down briefly.
Pool all the barcoded samples in a 1.5 ml Eppendorf DNA LoBind tube.
| A | B | C | D |
|---|---|---|---|
| Volume per sample | For 4 samples | For 5 samples | |
| Total volume | 22 µl | 88 µl | 110 µl |
Resuspend the AMPure XP Beads (AXP) by vortexing.
Add 0.8X AMPure XP Beads (AXP) to the pooled reaction, and mix by pipetting.
| A | B | C | D |
|---|---|---|---|
| Volume per sample | For 4 samples | For 5 samples | |
| Volume of AXP | 18 µl | 72 µl | 90 µl |
Incubate on a Hula rotator mixer for 0h 10m 0s at Room temperature.
Prepare 2mL of fresh 80% ethanol in nuclease-free water.
Spin down the sample and pellet on a magnet for 0h 5m 0s. Keep the tube on the magnetic rack until the eluate is clear and colourless. Pipette off the supernatant and retain (SN3).
Keep the tube on the magnetic rack and wash the beads with 700µL of freshly prepared 80% ethanol without disturbing the pellet. Remove the ethanol using a pipette and discard.
Repeat the previous step
Spin down and place the tube back on the magnetic rack. Pipette off any residual ethanol. Do not dry the pellet to dry out.
Remove the tube from the magnetic rack and resuspend the pellet in 32µL nuclease-free water by gently flicking.
Incubate for 0h 10m 0s at 37°C.
Every 2 minutes, agitate the sample by gently flicking for 0h 0m 10s to encourage DNA elution.
Pellet the beads on a magnetic rack for 0h 2m 0s until the eluate is clear and colourless.
Remove and retain 32µL of eluate into a clean 1.5 ml Eppendorf DNA LoBind tube.
Quantify 1µL of eluted sample using a Qubit fluorometer.
Adapter ligation and clean-up
Thaw NEBNext Quick Ligation Reaction Buffer (5X) at Room temperature. Spin down and ensure the reagent is fully mixed by performing 10 full volume pipette mixes. Store On ice.
- Spin down the Native Adapter (NA) and Quick T4 DNA Ligase, pipette mix and place
On ice.
- Thaw the Long Fragment Buffer (LFB) and Elution Buffer (EB) at
Room temperatureand mix by vortexing. Then spin down and placeOn ice.NoteUse Long Fragment Buffer (LFB) in the clean-up step after adapter ligation to enrich for DNA fragments >3 kb.
In a 1.5 ml Eppendorf LoBind tube, mix in the following order:
Between each addition, pipette mix 10 - 20 times.
| A | B |
|---|---|
| Reagent | Volume |
| Pooled barcoded sample | 30 µl |
| Native Adapter (NA) | 5 µl |
| NEBNext Quick Ligation Reaction Buffer (5X) | 10 µl |
| Quick T4 DNA Ligase | 5 µl |
| Total | 50 µl |
Thoroughly pipette mix the reaction and briefly spin down.
Incubate the reaction for 0h 20m 0s at Room temperature.
Resuspend the AMPure XP Beads (AXP) by vortexing.
Add 40µL of resuspended AMPure XP Beads (AXP) to the reaction and mix by pipetting.
Incubate on a Hula rotator mixer for 0h 10m 0s at Room temperature.
Spin down the samples and pellet the beads on a magnet for 0h 2m 0s until the eluate is clear and colourless. Keep the tubes on the magnet, pipette off the supernatant and retain (SN4)
Wash the beads by adding 125µL Long Fragment Buffer (LFB).
Remove from the magnet, flick the beads to resuspend, spin down, incubate for 0h 2m 0s at Room temperature before returning the tube to the magnetic rack.
Pellet the beads on a magnetic rack for 0h 2m 0s until the eluate is clear and colourless. Remove the supernatant using a pipette and discard.
Repeat the previous step
Spin down and place the tube back on the magnet. Pipette off any residual supernatant. Do not allow the pellet to dry out.
Remove the tube from the magnetic rack and resuspend the pellet in 25µL Elution Buffer (EB). Spin down and incubate for 0h 10m 0s at 37°C. Every 2 minutes, agitate the sample by gently flicking for 0h 0m 10s to encourage DNA elution.
Pellet the beads on a magnet for 0h 2m 0s until the eluate is clear and colourless.
Remove and retain 25µL of eluate containing the DNA library into a clean 1.5 ml Eppendorf DNA LoBind tube.
Quantify 1µL of eluted sample using a Qubit fluorometer.
Prepare the final library to 50 fmol in 32µL of Elution Buffer.
Store the library on ice or at 4°C until ready to load.
Priming and loading the PromethION Flow Cell
Remove flow cell/s from the fridge. Wait 0h 20m 0s before inserting into the PromethION to allow the flow cell to come to Room temperature.
- Thaw the Sequencing Buffer (SB), Library Beads (LIB), Flow Cell Tether (FCT) and one tube of Flow Cell Flush (FCF) at
Room temperature, mix by vortexing, spin down and storeOn ice.
To prepare the flow cell priming mix, combine Flow Cell Tether (FCT) and Flow Cell Flush (FCF), as directed below:
Single-use tubes format:
Add 30µL Flow Cell Tether (FCT) directly to a tube of Flow Cell Flush (FCF).
Sequencing Auxiliary Vials V14 (EXP-AUX003) format:
In a clean suitable tube for the number of flow cells, combine and mix the following reagents:
| A | B |
|---|---|
| Reagent | Volume per flow cell |
| Flow Cell Flush (FCF) | 1,170 µl |
| Flow Cell Tether (FCT) | 30 µl |
| Total volume | 1,200 µl |
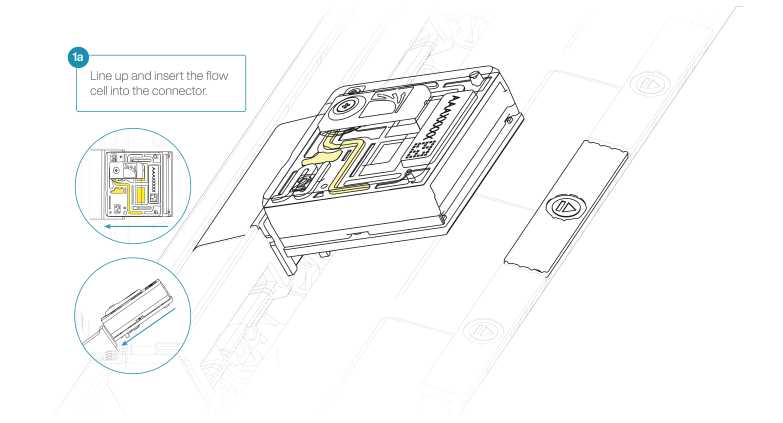
Load the flow cell(s) into the docking ports on the PromethION 24/48.
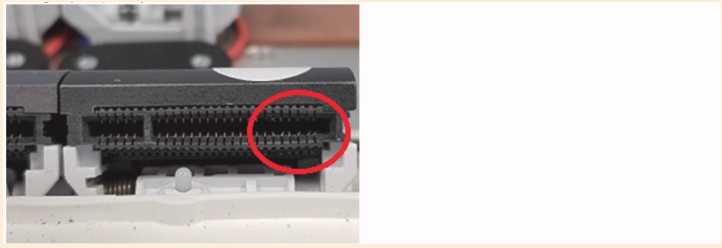
Line up the flow cell with the connector horizontally and vertically before smoothly inserting into position.
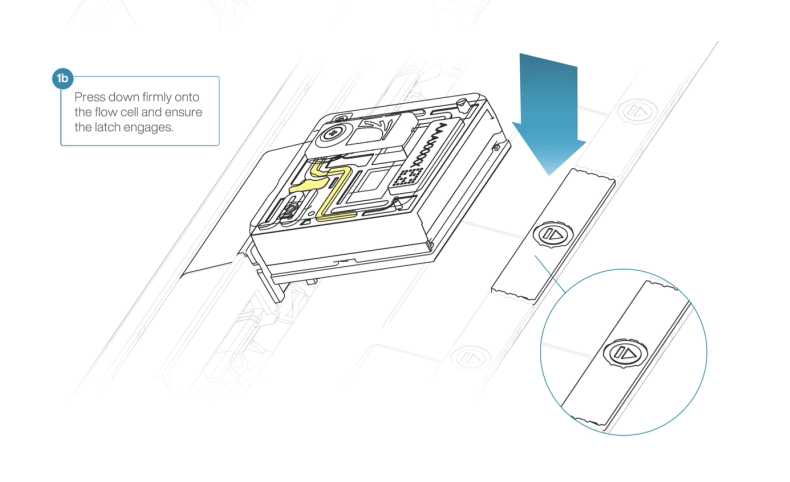
Press down firmly onto the flow cell and ensure the latch engages and clicks into place.
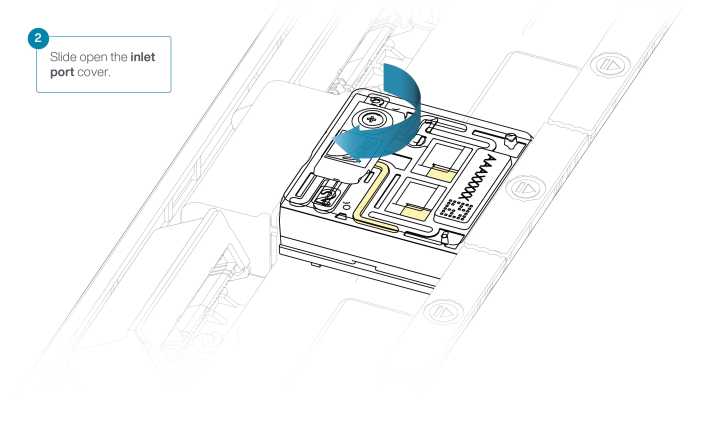
Turn the valve clockwise to expose the inlet port.
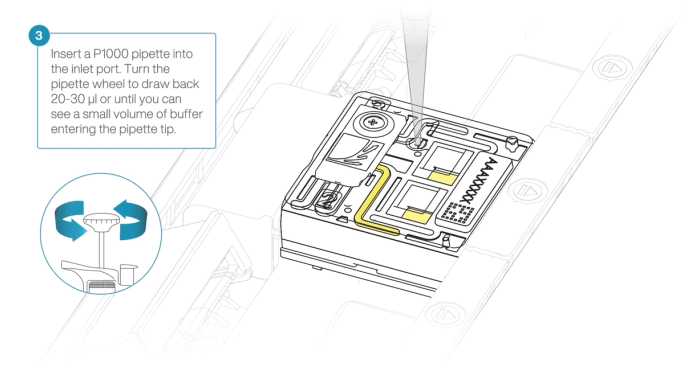
After opening the inlet port, draw back a small volume to remove any air bubbles:
Set a P1000 pipette tip to 200µL.
Insert the tip into the inlet port.
Turn the wheel until the dial shows 220-230 µl, or until you see a small volume of buffer entering the pipette tip.
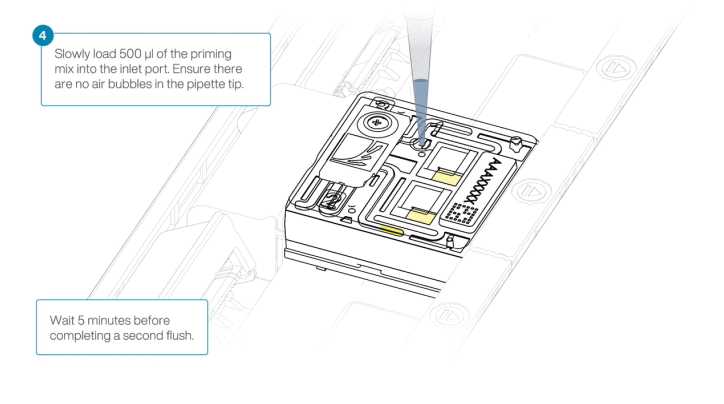
Load 500µL of the priming mix into the flow cell via the inlet port, avoiding the introduction of air bubbles. Wait 0h 5m 0s.
During this time, prepare the library for loading
In a new 1.5 ml Eppendorf DNA LoBind tube, prepare the library for loading as follows:
| A | B |
|---|---|
| Reagent | Volume per flow cell |
| Sequencing Buffer (SB) | 100 µl |
| Library Beads (LIB) thoroughly mixed before use | 68 µl |
| DNA library | 32 µl |
| Total | 200 µl |
Complete the flow cell priming by slowly loading 500µL of the priming mix into the inlet port.
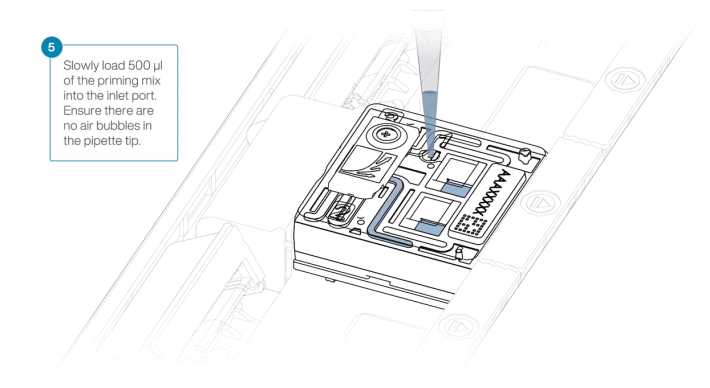
Wait 0h 5m 0s before loading library
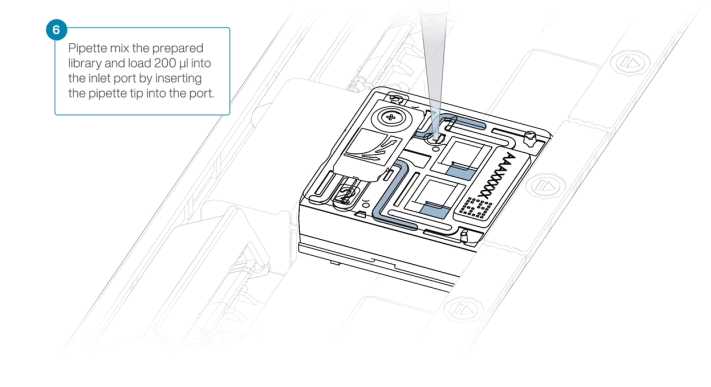
Mix the prepared library gently by pipetting up and down just prior to loading.
Using a P1000, insert the pipette tip into the inlet port and load 200µL of library.
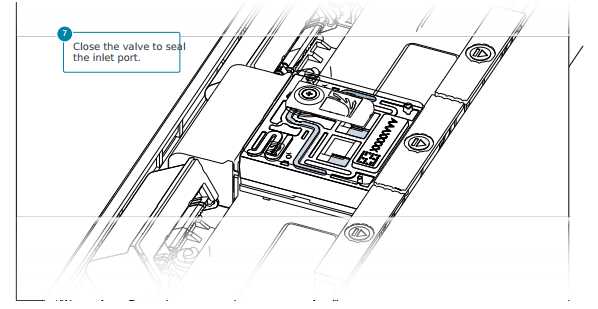
Close the valve to seal the inlet port.
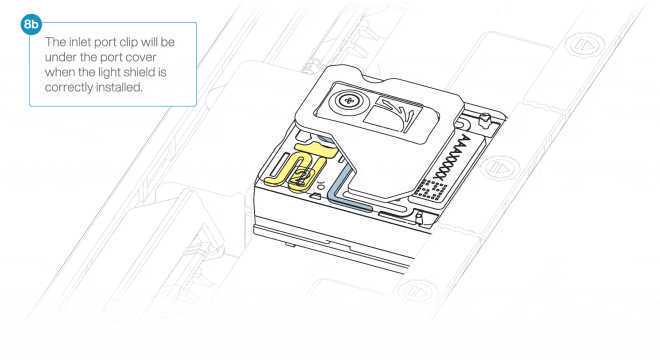
Install the light shield on your flow cell as follows:
- Align the inlet port cut out of the light shield with the inlet port cover on the flow cell. The leading edge of the light shield should sit above the flow cell ID. Firmly press the light shield around the inlet port cover. The inlet port clip will click into place underneath the inlet port cover.

- Close the PromethION lid when ready to start a sequencing run on MinKNOW.
Wait a minimum of 0h 30m 0s after loading the flow cells with library before initiating sequencing to increase the sequencing output.
Data acquisition and high accuracy basecalling for adaptive sampling
Select 'Start Sequencing' on the start page of the MinKNOW software to set up the sequencing parameters for the experiment:
Type in the experiment name appended with a run number for the chosen flow cell/s. Label sample ID's.
'Alignment' is optional.
Select 'output location'.
Select 'output format':
- Raw reads default is .POD5
- Basecalled reads default is .FASTQ
- Aligned reads (if selected) default is .BAM
Note
Raw reads can be saved as .POD5 or .FAST5. Note that for Kit 14 chemistry, .POD5 is the default file output, which is a Nanopore-developed file format that writes data faster, uses less compute and has smaller raw data file size.
'Filtering' is at Q9 by default for the high accuracy basecalling.
Click 'Start' to review all run options selected.
- Edits can be made by selecting the 'Edit' button.
- Select 'Advanced run options' to view the extra options selected.
- Click 'Start' to begin sequencing
Select the Native Barcoding Kit 24 V14 (SQK-NBD114.24) used to prepare the library.
Set up the run options:
- run limit: 96 hours
- Minimum read length: 200 bp
- Adaptive sampling: select 'Enrich or deplete sequences'. Upload an alignment reference (e.g. hg38 FASTA file) and specific sequence coordinates of interest (e.g. SCA4_human_hg38.bed).
Select 'enrich alignment matches'.
Turn 'barcode balancing' off.
'Active channel selection' is on by default.
The time between pore scans is 1.5 hours by default.
Turn 'Reserved pore' option off to front-load sequence data acquisition.
'Basecalling' is on by default. Click "Edit options" to specify the basecall model as 'High accuracy Basecalling'.
'Modified bases' is off by default.
'Barcoding' is on by default.
Click on the flow cell to check the number of active pores.
Monitor translocation speed, quality score and data output during the sequencing run.
If translocation speed ≤350 bps, quality score begins to drop toward Q9 and there is little increase in data output:
- pause sequencing
- Perform a flow cell wash
- Prime flow cell
- load 50 fmol prepared library
- restart sequencing
Performing a flow cell wash
flow-cell-wash-kit-exp-wsh004-WFC_9120_v1_revK_08Dec2020-promethion.pdf
- Place the tube of Wash Mix (WMX) on ice. Do not vortex.
- Thaw one tube of Wash Diluent (DIL) at room temperature. Mix the contents of Wash Diluent (DIL) thoroughly by vortexing, then spin down briefly and place on ice.
In a clean 1.5 ml Eppendorf DNA LoBind tube, prepare the following Flow Cell Wash Mix:
| A | B |
|---|---|
| Reagent | Volume per flow cell |
| Wash Mix (WMX) | 2 µl |
| Wash Diluent (DIL) | 398 µl |
| Total volume | 400 µl |
Mix well by pipetting and place on ice. Do not vortex.
Pause the sequencing run.
Ensure the inlet port is closed and remove any waste fluid from the waste port labelled 2 on the flow cell.
Open the inlet port and draw back a small volume to remove any air bubbles
Load 400µL of the prepared Flow Cell Wash Mix into the flow cell via the inlet port, avoiding the introduction of air bubbles. Wait 1h 0m 0s.
Prepare Priming Mix and library, load flow cell.
Restart sequencing.
Monitor translocation speed, quality score and data output during the sequencing run.
If translocation speed ≤350 bps, quality score begins to drop toward Q9 and there is little increase in data output perform a flow cell wash, re-prime the flow cell, load 50 fmol prepared library and restart sequencing
Ending the experiment
Flow cells are unlikely to be re-useable given the nature of adaptive sampling. However, if you would like to reuse the flow cell, follow the Flow Cell Wash steps . Store the washed flow cell at 2°C-8°C.
Alternatively, flush the flow cell/s with deionised water and store ready to send back to Oxford Nanopore.
Data Analysis
Data analysis pipeline is available through https://github.com/egustavsson/long-read_SV_calling.git
