NGGDPP Collection Metadata Submission Guide
darthur Arthur
Abstract
The Registry of Scientific Collections (ReSciColl) is a metadata catalog administered by the National Geological and Geophysical Data Preservation Program (NGGDPP), It includes essential metadata describing scientific collections, to promote discovery and encourage further exploration of similar items by identifying contacts, providing access instructions, and linking to online resources for additional information.
This document describes the process by which collection metadata is to be submitted to ReSciColl, including metadata for items within a collection. It introduces mdEditor, an open-source, browser-based application for creating metadata records that is highly customizable and uses a graphical user interface developed by the Alaska Data Integration Working Group (ADIwg), a collaboration between the US Geological Survey and the US Fish and Wildlife Service. Many of the mdEditor screenshots used to illustrate this document are from the ADIwg mdEditor online tutorial and reference manual, available at https://guide.mdeditor.org/. This tutorial and reference manual are extremely valuable resources for navigating the tabs, screens, and sections of mdEditor, and the NGGDPP highly recommends ReSciColl users familiarize themselves with these resources.
Before start
Considerations before Starting
To begin, determine whether you are starting a new collection, modifying an existing collection, or modifying an organization's suite of collections.
-
New collection – Follow the process directly below for first use. Request the contacts starter file (referred to under item #3 below), if applicable.
-
Modify a single existing collection – If contacts have a need to be updated, start with the contacts starter file for your organization. Then drop down to the description for import followed by the editing an existing collection.
-
Modify an organization's suite of collections – Make updates to a suite of existing collections as a funded grant activity (states only) to update ReSciColl. Contact nggdpp@usgs.gov for a starter file of the contacts and existing collections metadata file for your organization. Follow the guidance in the "Editing Existing (Published) Metadata Records" section of this protocol, Step 38, and work through the collections you wish to update.
If you have existing collections to update with thousands of items in a collection, contact nggdpp@usgs.gov for consultation and assistance with management of the items in the collection.
Steps
Contacts - Importing
In mdEditor, Contacts are created and maintained as separate records from metadata records. This enables a contact to be used many times in a single metadata record or across multiple metadata records without requiring a user to reenter the contact's information. Rather than entering a contact's information within a metadata record, mdEditor provides users with a drop-down list of contacts that can be linked to various roles within the metadata record. The available list consists of those contact records currently in the user’s browser instance of mdEditor, typically entered or imported by the user. Like metadata records themselves, contacts can also be imported and exported via JSON format. The NGGDPP is working with ReSciColl users to develop standardized contacts that can be imported and shared among other ReSciColl and mdEditor users within the same organization.
See the video below for a walk through the mdEditor Import function:
#尊敬的用户,由于网络监管政策的限制,部分内容暂时无法在本网站直接浏览。我们已经为您准备了相关原始数据和链接,感谢您的理解与支持。
<iframe src="https://d9-wret.s3.us-west-2.amazonaws.com/assets/palladium/production/s3fs-public/media/video/NGGDPP_ReSciColl_mdEditor_Import.mp4" height="405" width="720"></iframe>
To import Contacts, select the “Import” option on the top menu bar in mdEditor. The import selection screen will appear (Fig. 4).
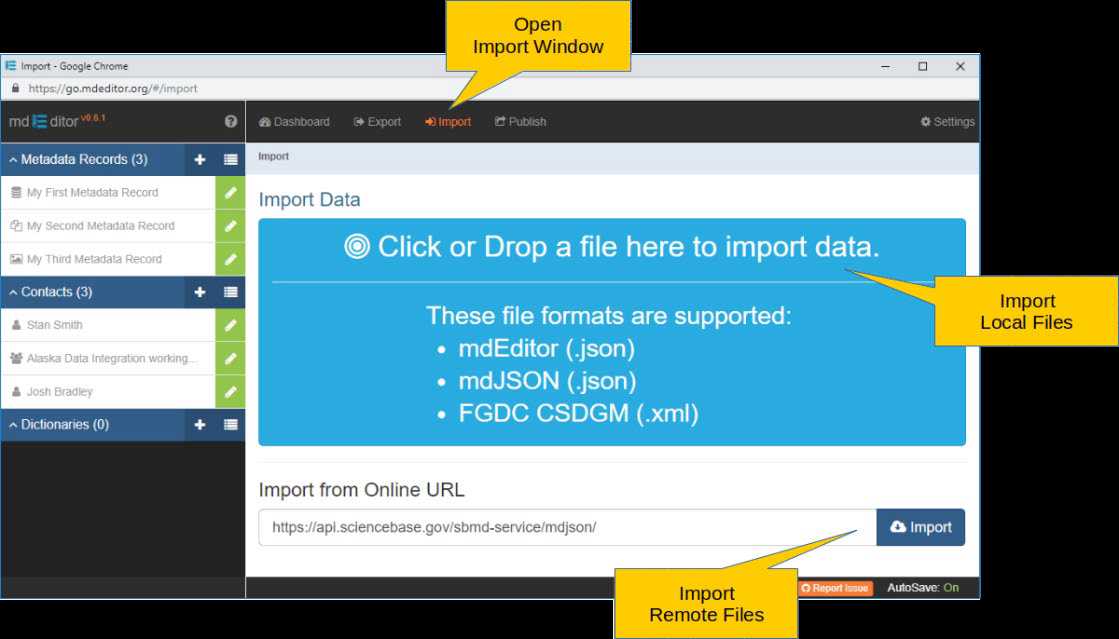
If the file you wish to import is local (on the user's PC or connected storage), click the large blue box. If it is at a remote web address, enter the address in the “Import from Online URL” box. mdEditor supports three file formats for import: mdEditor (.json), mdJSON (.json), and FGDC CSDGM (.xml). Contacts will generally be shared via the mdEditor JSON format, which can also hold metadata records in the same file. Once the file is selected, the Import Data selection list screen will appear (Fig. 5).
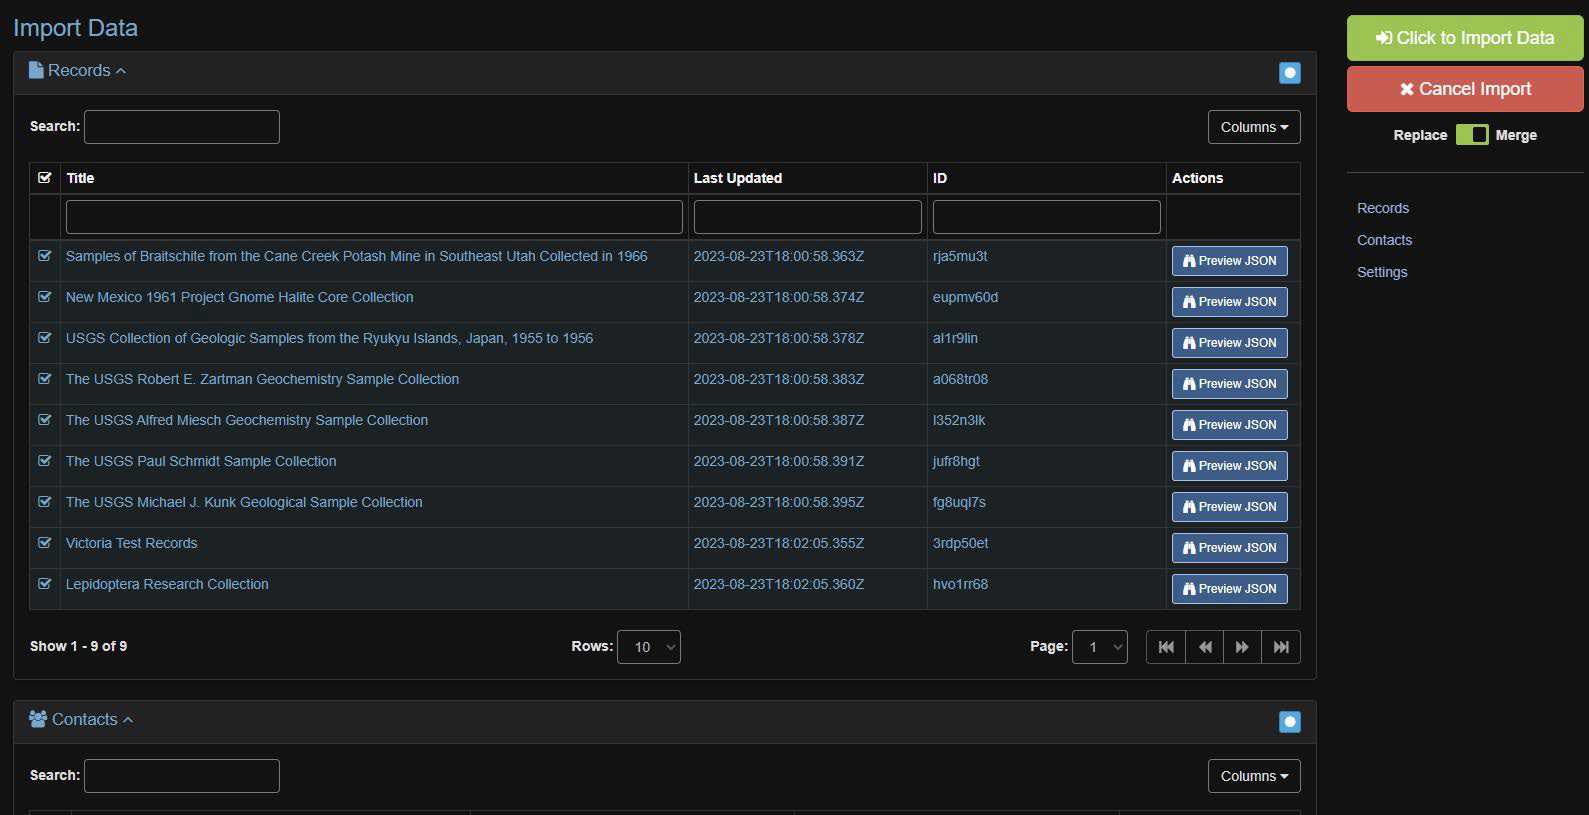
In the example in Fig. 5, Contacts are included below a set of Metadata Records. The Contacts available for import are shown in Fig. 6.
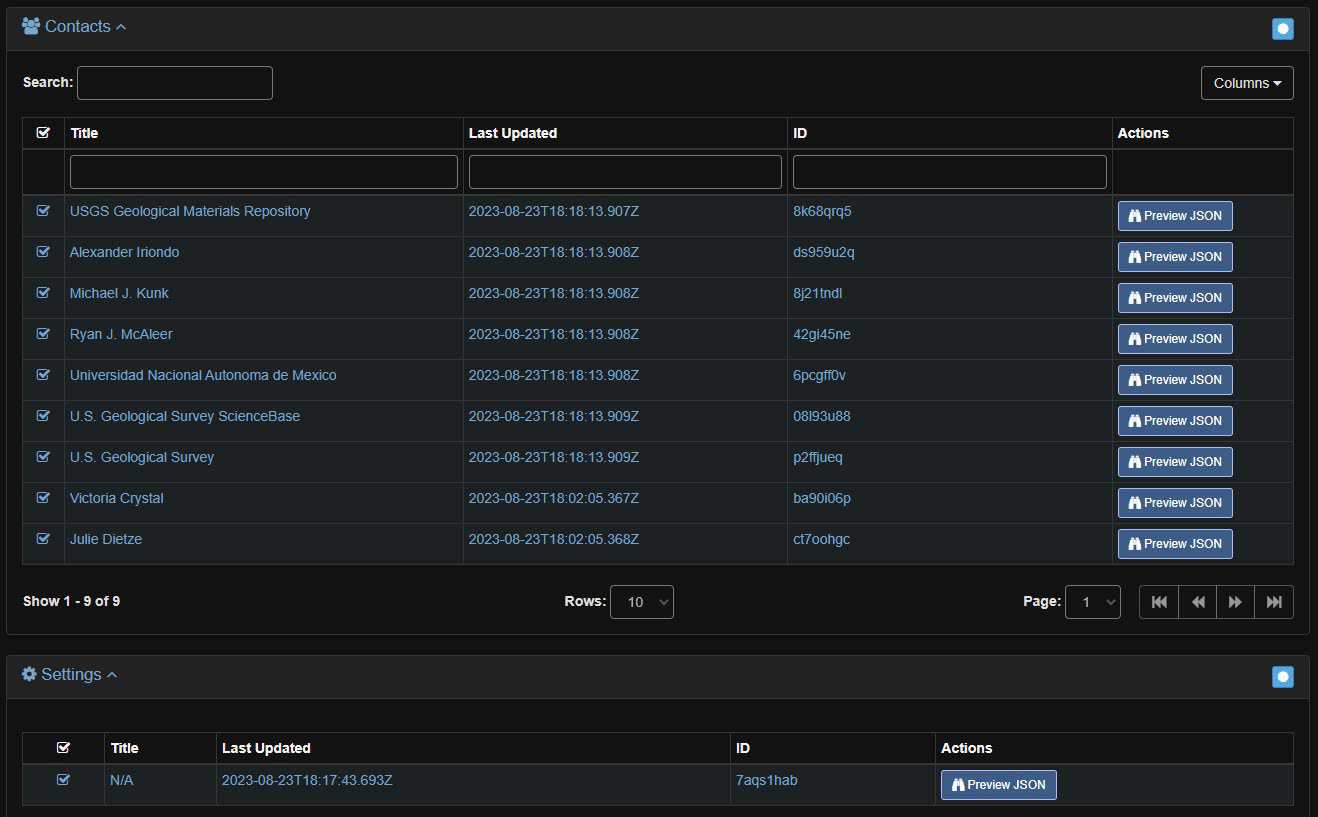
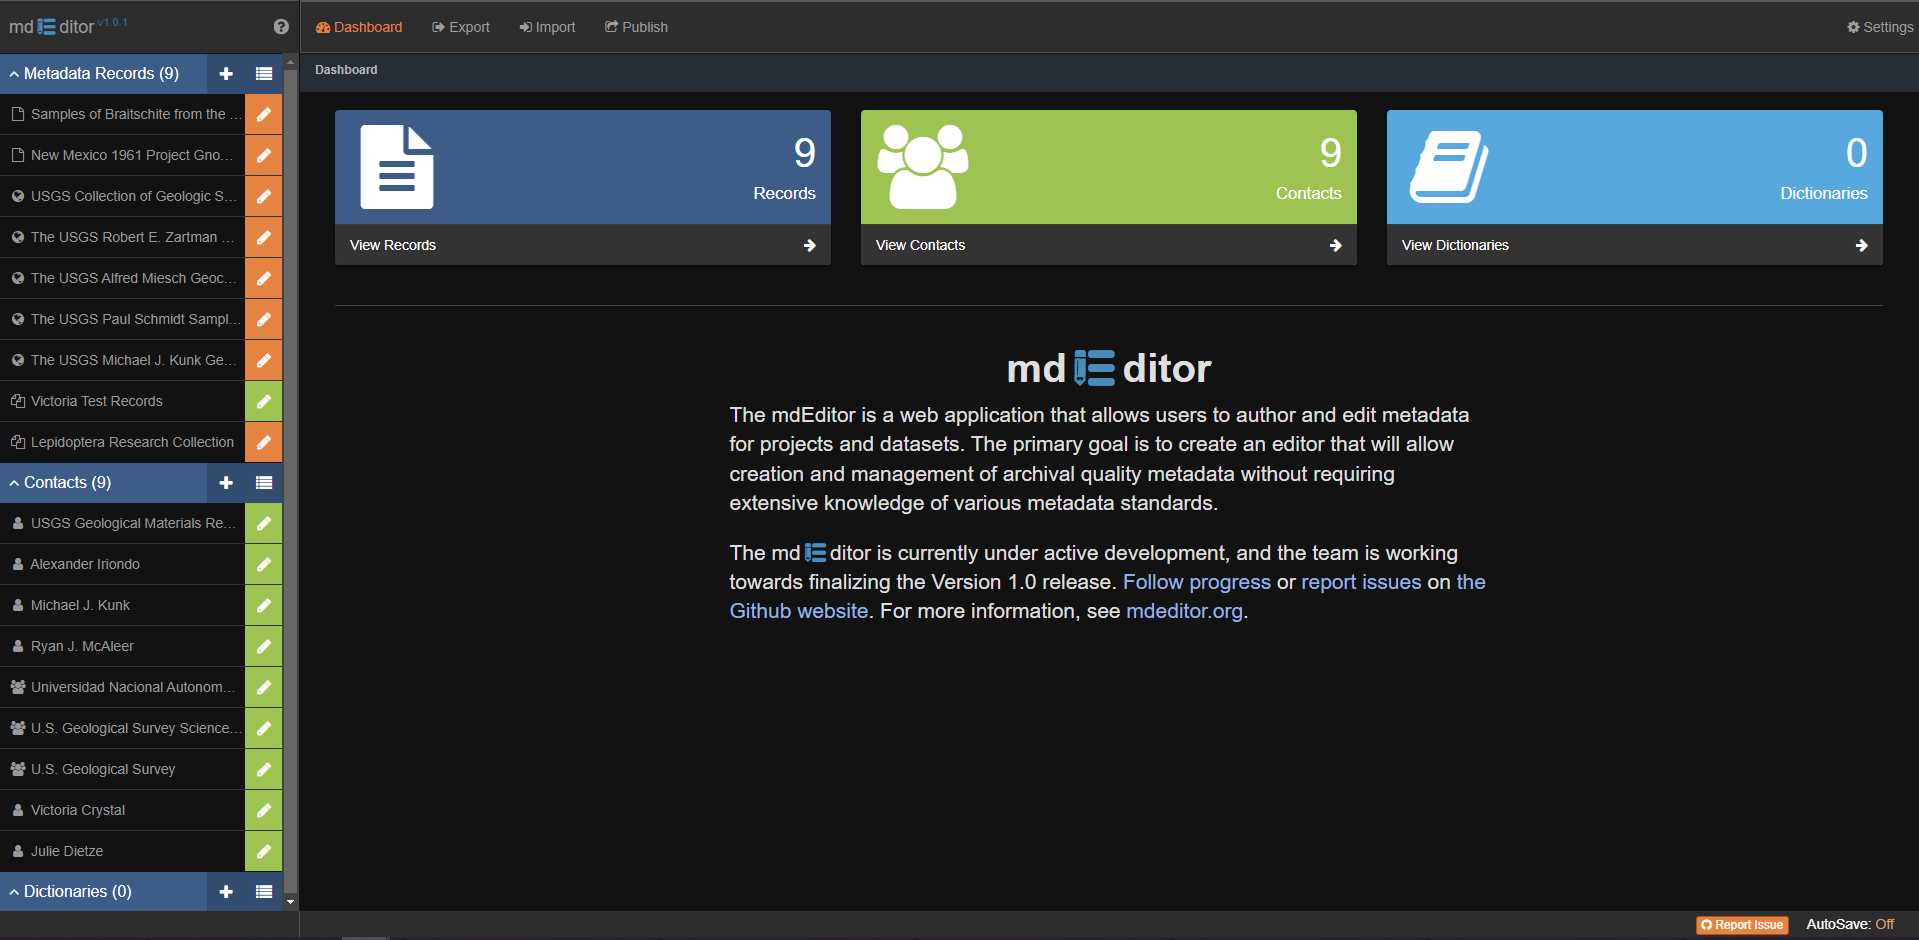
All records and contacts are selected by default. Deselect any you do not wish to import, select “Merge” on the “Import/Merge” toggle on the upper right (Fig. 5), and select the “Click to Import Data” button. Fig. 7 shows a previously clean instance of mdEditor with all the example records and contacts from Figs. 5 and 6 imported (in the lists on the left side of the screen).
Contacts - Creating and Editing
If you need to create a new contact record in mdEditor, click the plus sign (+) to the right of the “Contacts” section header on the left side (see the “Create New Contact” callout in Fig. 9). As shown in Fig. 8, you can choose whether to create a contact for an individual (e.g., Jane Doe, Richard Roe) or an organization (e.g., U.S. Geological Survey, U.S. Department of Interior). Clicking the switch icon between the labels for Individual and Organization will toggle the type of contact to be created. The field labeled “Contact ID” is a system generated Universally Unique Identifier (UUID) for the contact. It is used by mdEditor to link the contact to other contacts and/or metadata records. If your organization uses a different identification code system for identifying contacts, you will need to change the value here from the generated UUID to your organization’s ID at this point, before proceeding. Enter either the individual’s name or the organization’s name in the “Name” field as appropriate, and, if creating an individual contact, a “Position Name” is also required. Required fields in mdEditor are always indicated by a red asterisk (*) after the field name.
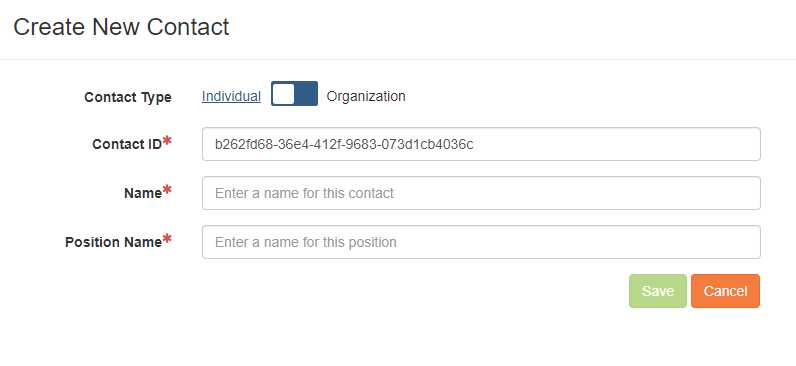
Click “Save,” and the full contact edit window will be presented (Fig. 9).
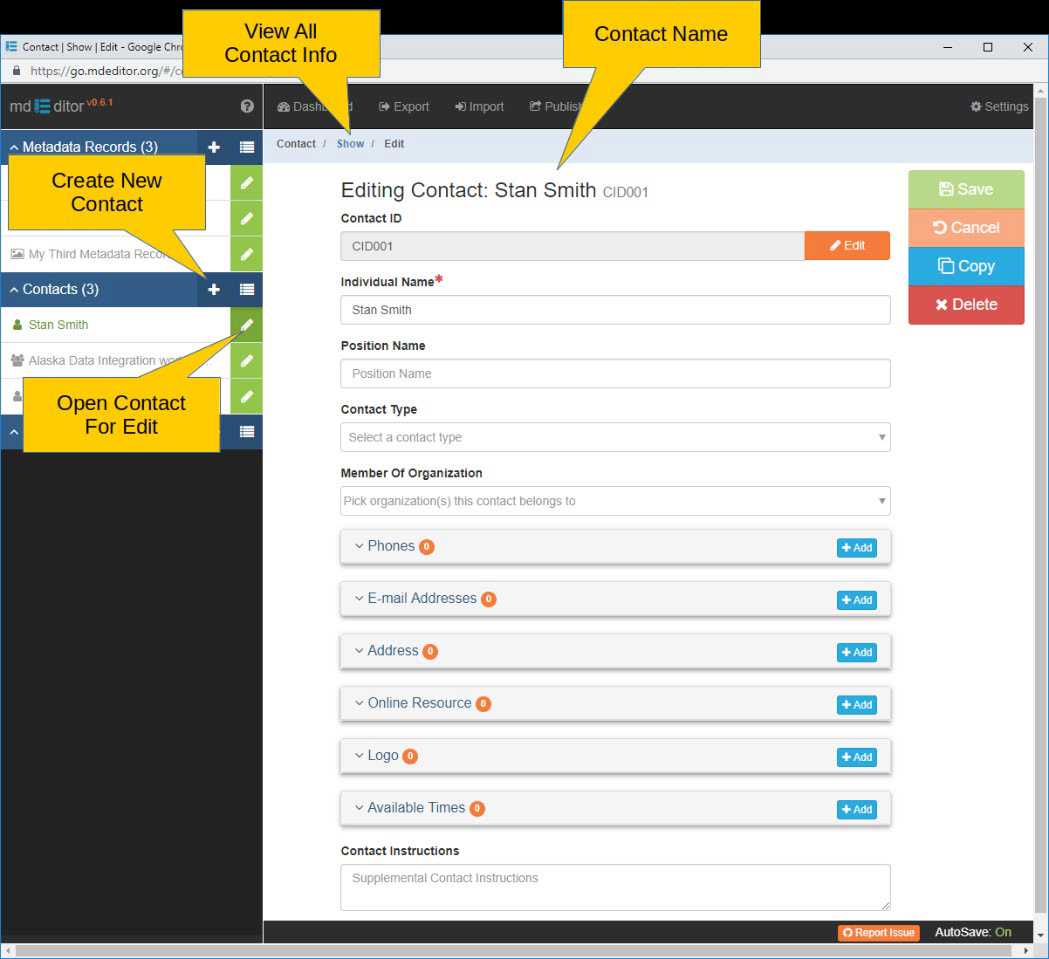
In the contact editing window, you can add all relevant metadata for the contact, including phone numbers, email addresses, etc. You can also link an individual or organization to another organization via the “Member of Organization” drop-down list, presuming the contact for the desired organization has already been created or imported.
If your organization has more than one user creating and/or maintaining metadata records for ReSciColl, you may wish to share contact records in order to maintain consistency. If one user created an individual contact for “John Smith,” and another user in the organization also created a contact for “John Smith,” and yet another created “John A. Smith,” yet all three refer to the same person, when editing and publishing records that link to those separate contacts, they would be considered as three different individuals, as each would have a unique UUID/Contact ID. Exporting contacts from mdEditor allows sharing contact records, in order to minimize the likelihood of the above scenario. Exporting contacts will be covered in a later section, along with general exporting from mdEditor. When creating or editing contacts, including persistent identifiers such as ORCiDs and/or RORs is highly encouraged as this practice increases the accuracy and quality of the metadata.
Additional information on Contacts in mdEditor can be found in the online tutorial and reference manual:
https://guide.mdeditor.org/reference/edit-window/contact/contact-record.html
Profiles
mdEditor is designed with the use of what are referred to as profiles to customize the visibility of metadata elements when creating a metadata record. They may also be considered views, as all metadata elements remain available, but a particular profile, when loaded, may not display every possible field for entry. They may also be used for custom enforcement of required content, depending on the type of resource being described by the metadata record. Profiles can only be switched while in edit mode.
For ReSciColl, we have provided an initial set of five domain profiles that are currently loaded along with the defaults:
-
NGGDPP Common: A core profile which ensures all metadata elements required by the NGGDPP are collected. All elements visible in this profile are also visible in the following four domain-specific profiles.
-
NGGDPP Geological: A profile designed for collections of geological samples.
-
NGGDPP Image: A profile designed for collections of images/photographs.
-
NGGDPP Invertebrate: A profile designed for collections of biological samples of invertebrate species.
-
NGGDPP Vertebrate: A profile designed for collections of biological samples of vertebrate species.
The NGGDPP continues to develop additional profiles for other collection types, and suggestions are always welcome.
Before continuing with creating a record, select the profile appropriate for the type of collection being described. Changing the current profile can be done in the top menu bar, in black, via the drop-down menu labeled “Profile” (Fig. 10).
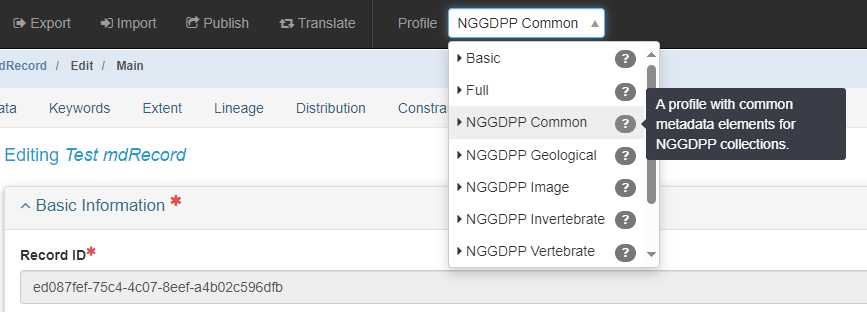
This will change what metadata elements, sections, and menus are shown, as well as, in the case of the NGGDPP domain profiles, what keyword lists are available. Profiles can always be switched during editing, as the entire metadata schema (all defined fields/elements) is always available. Each of the NGGDPP domain profiles (Geological, Image, Invertebrate, Vertebrate) displays all the fields
and keyword lists available in the NGGDPP Common profile, along with specific fields and keyword lists deemed relevant to those domains.
Once you have selected a profile, you are ready to enter the metadata for the collection into the record. The basics of navigating the mdEditor interface are covered in an online tutorial that is available here:
mdEditor Tutorial (https://guide.mdeditor.org/tutorial/welcome-to-tutorial.html)
In order to maximize the Findability, Accessibility, Interoperability, and Reusability (the FAIR Principles) of ReSciColl collections, the NGGDPP recommended best practice is to complete as much of the available metadata as possible. When creating a collection record in mdEditor, visit each of the
available tabs for the selected profile, and provide as much information as is available for each field, whether or not a field is required. Also, if you have metadata information for an element that is not visible when using a specific profile, switching to another profile is possible, even during editing.
mdEditor also comes with four default profiles:
- Full (every available metadata element in the mdJSON schema)
- Basic (minimal subset of metadata elements)
- Product (subset of metadata elements commonly used for product metadata, e.g., data releases)
- Project (subset of metadata elements commonly used for project metadata, e.g., field campaigns)
These profiles are also always available.
Creating a Collection Record in ReSciColl
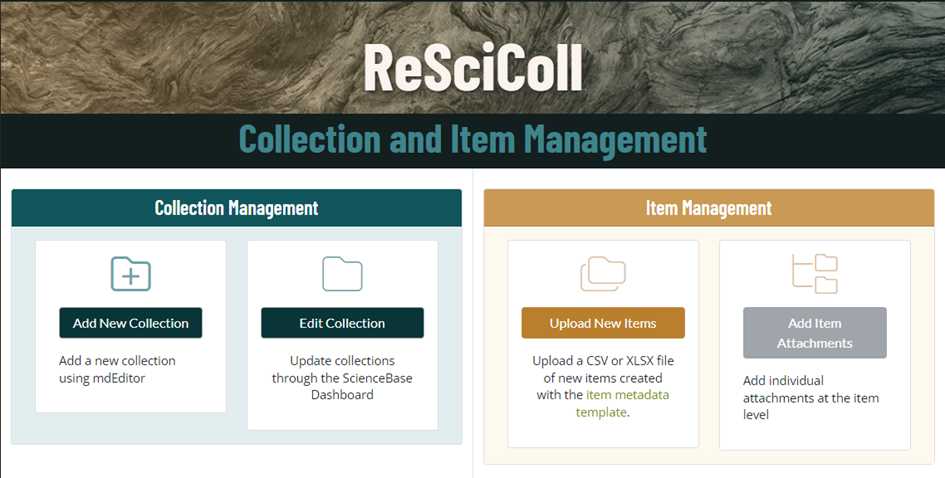
ReSciColl users who have collection metadata, as well as metadata for items within a collection, must create the collection metadata record before uploading metadata for that collection’s items. To add a collection in ReSciColl, visit the ReSciColl website:
https://webapps.usgs.gov/rescicoll/index.html
In the “Collections Management” section on the lower right side of the page, click on the “Create New Collection – mdEditor” button (highlighted by the yellow ellipse in Fig. 11):
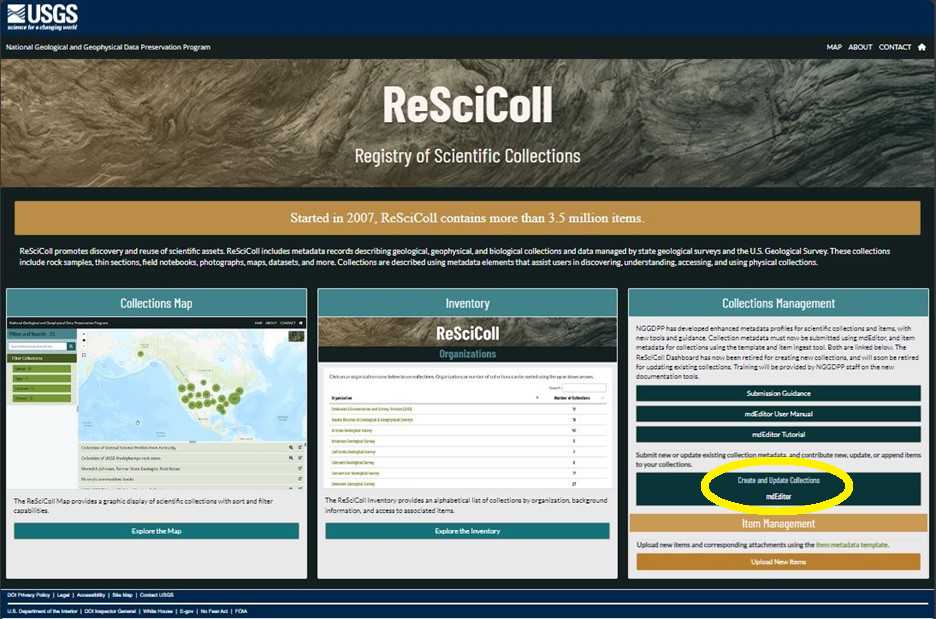
Your browser will be redirected to the website for mdEditor (https://go.mdeditor.org/),
On the mdEditor dashboard, in the primary sidebar on the left side, click the plus (+) sign to the right of the count of metadata records to create a new one (Fig. 12).
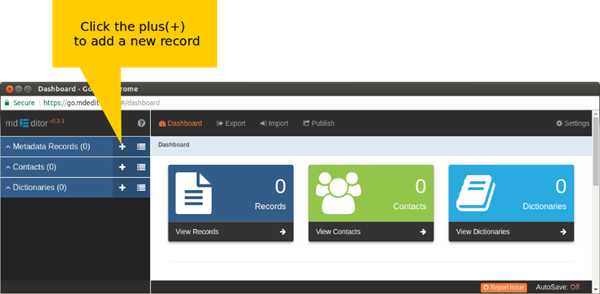
The “Create New Record” screen appears (Fig. 13).
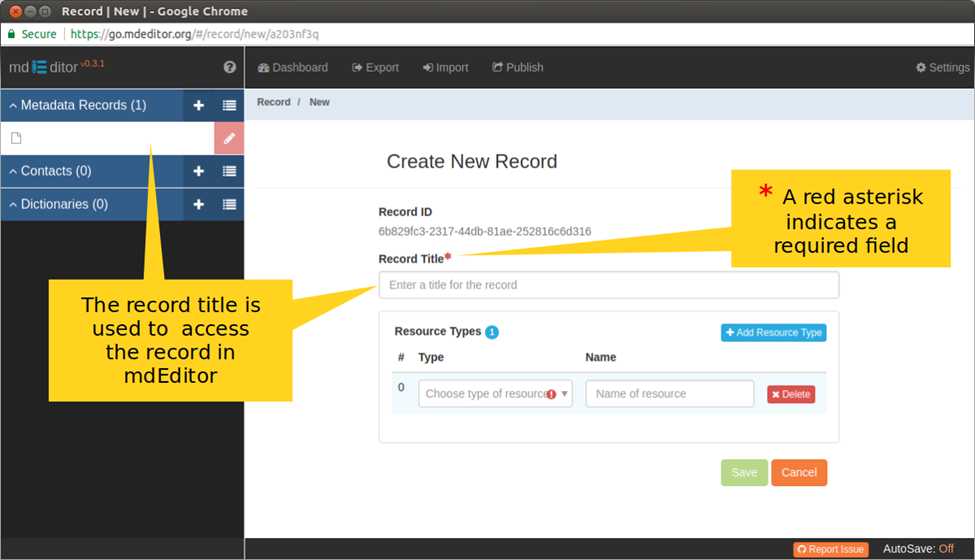
As indicated by the callout boxes in Fig. 13, you will need to provide a title for the record. This is the collection title that will be displayed by ReSciColl. In the Resource Types section, from the Type drop-down list, choose the appropriate type(s). For ReSciColl, there must always be at least one Resource Type with a value of “collection.” In the Name field to the right, you can provide a name for the type of collection to be represented by this record if it is not represented in the list of Resource Types (e.g., field notebooks, hyperspectral image data, thin sections).
Once you have entered a title and resource type, the “Save” button will become available.
After saving the initial information for the record, as shown in Fig. 14, the main Edit Window for mdEditor will appear. The screenshot in Fig. 14 shows the various sections of the mdEditor interface when in edit mode. See the online tutorial and reference manual for more information: https://guide.mdeditor.org/.
<img src="https://static.yanyin.tech/literature_test/protocol_io_true/protocols.io.6qpvr321bvmk/pjygcaja712.jpg" alt="Figure 14: mdEditor Editing Metadata Record screen, showing Main tab and callout boxes highlighting features. "Breadcrumbs" show the path taken within mdEditor to get to the current screen, and can be used for navigation within the application." loading="lazy" title="Figure 14: mdEditor Editing Metadata Record screen, showing Main tab and callout boxes highlighting features. "Breadcrumbs" show the path taken within mdEditor to get to the current screen, and can be used for navigation within the application."/>
Before creating a metadata record for a collection with mdEditor, users should ensure they have the appropriate contact records in mdEditor, as discussed in the Contacts section above.
One of the NGGDPP requirements and best practices for ReSciColl, as well as several metadata standards, is to record the people and/or organizations related both to the resource being described by the metadata record and those involved in creating and maintaining the metadata record itself. If any contacts are missing that are relevant to the record you are creating or editing, they must be added or imported to your mdEditor contacts before they can be associated with a metadata record.
Main Tab
Points of Contact
On the Main tab in mdEditor, immediately below Resource Type, is a section called “Points of Contact” (Fig. 15). The contacts added in this section on this tab should be people and organizations associated with the specific collection resource being described. At least one contact must be added as Point of Contact with a role of “owner.” Other contacts may be added here with other roles (e.g., principalInvestigator, collaborator), including associated organization contacts. The complete list of available roles, along with short definitions, can be found here: http://mdtools.adiwg.org/#codes-page?c=iso_role
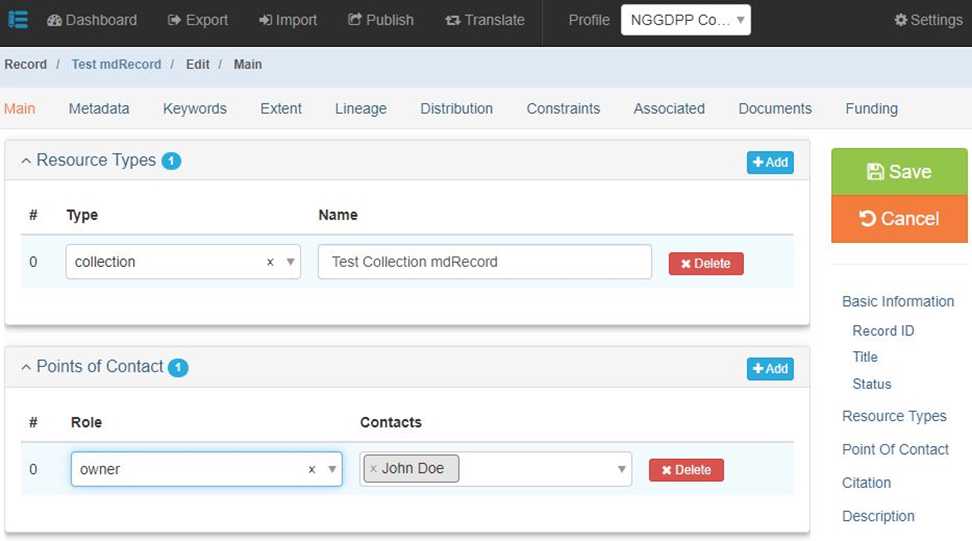
In the drop-down list for Role, select “owner,” and then select from the available contacts via the Contacts drop-down list to the right. Your collection metadata record should have at least one owner, and it can have more than one. To add additional owners, continue to select them from the Contacts drop-down list. You can only have one entry for a particular role, but that role can have multiple contacts associated with it. If you have additional contacts in other roles, you can add them via the “Add” button on the upper right of the Points of Contact section.
Citations
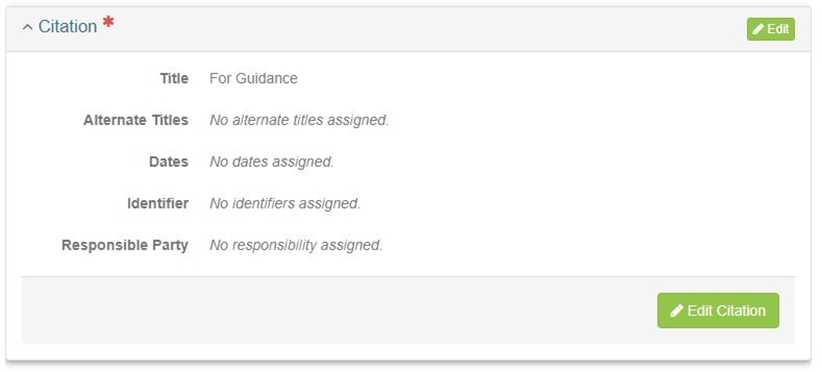
Citation sections can be found in several locations in mdEditor, because a metadata record can reference many different resources, including associated resources, documents, taxonomic systems, etc. On the Main tab, the citation is for the resource itself (the collection). A blank Citation section is shown in Fig.16. It inherits the Title from the record title, and other information can be added by clicking either the “Edit” or “Edit Citation” button. Doing so will bring up the “Editing Citation” window, which allows completion of several metadata items, including responsible parties, online resources, and identifiers. Adding a persistent identifier such as a DOI, if available, to the citation for the collection is highly encouraged, and increases the quality and findability of the metadata.
To add an identifier, click the “Add Identifier” button, which will open the section shown in Fig. 17.
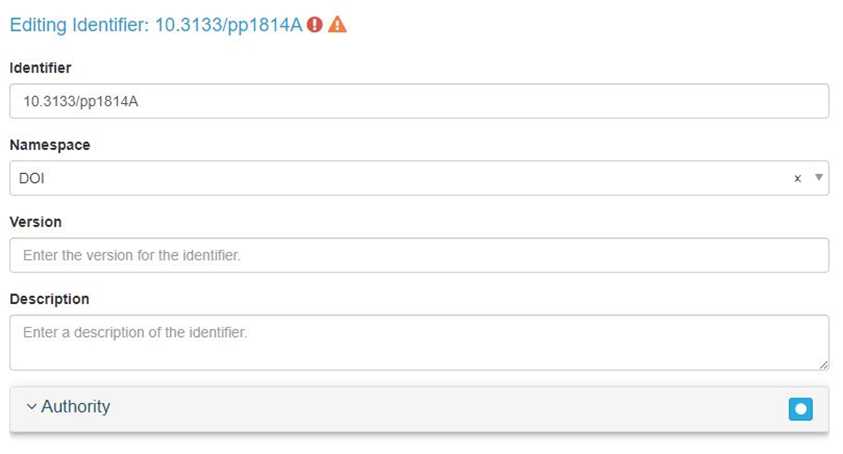
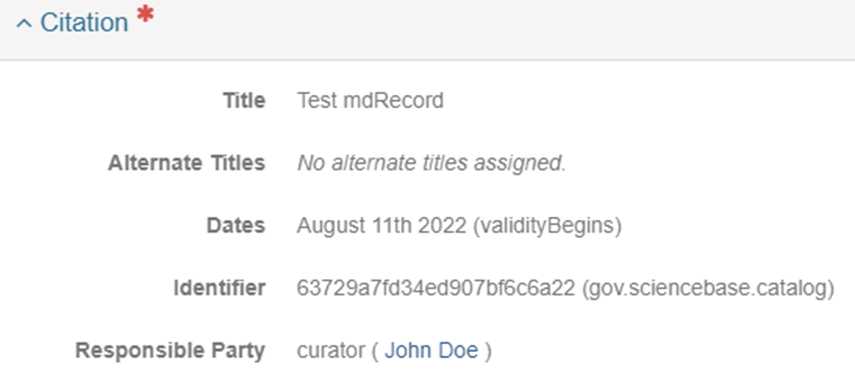
Fig. 17 shows the “Identifier” field in which a DOI has been entered (only the DOI itself is required – the full web address is not required). Selecting “DOI” in the “Namespace” field below the identifier is highly recommended, in part because, once the collection has been published, another identifier will be added to the resource citation via ScienceBase, consisting of the ScienceBase ID for the collection, with an associated namespace of “gov.sciencebase.catalog” (Fig. 18).
Description
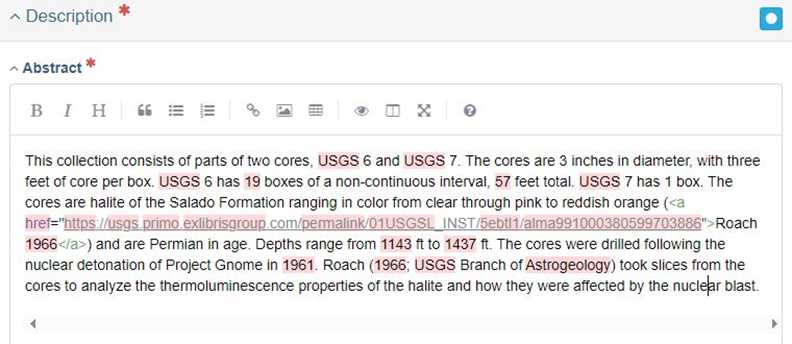
Also on the Main tab is a Description section, where a required abstract for the collection must be entered (Fig. 19). mdEditor provides a box that supports Markdown and rich text formatting. As shown in Fig. 19, during editing, it will highlight items to be checked for spelling.
Note : There is no “Save” option specifically for the edit window for Abstract (or for many other sections in mdEditor). Once you enter or change text in the window, mdEditor recognizes the record has changed, and you can save it via the main “Save” button for the record, or it will autosave periodically if you have that option turned on in Settings (described in the "Settings" section of this protocol, Step 29).
The Description section also provides text entry boxes for “Purpose” (to describe the purpose of the collection) and “Supplemental Information” (any other useful information about the collection that is neither the purpose nor part of the abstract). These are not required but their use is highly encouraged.
Time Period
Also on the Main tab is a section that can be used to describe the temporal extent of the collection (Fig. 20). While single dates can be entered in many places in mdEditor, this section allows for a range, when both a Start Date and End Date are known.

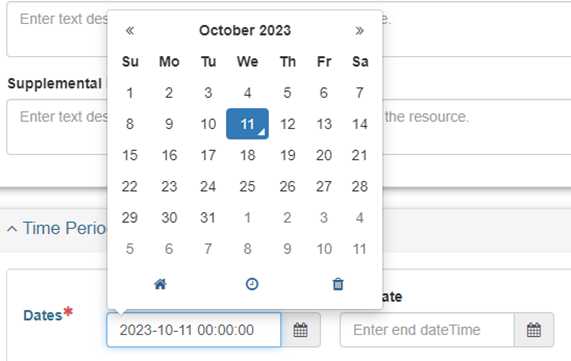
Clicking the calendar icon to the right of each date field will bring up a calendar-based date picker (Fig. 21). Times other than 00:00:00 must be entered numerically after the date is selected. Dates and times in mdEditor are local to the user’s instance, to the system clock for the computer being used.
More information on the Main tab can be found in the online reference manual:
https://guide.mdeditor.org/reference/edit-window/metadata/main-panels/main-section.html
Metadata Tab
Basic Information
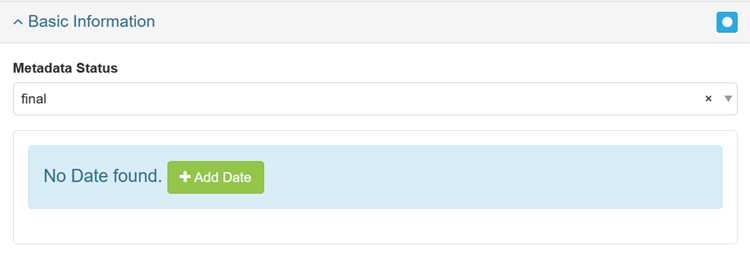
Select the status of the metadata via the drop-down list and select the “Add Date” button to associate a date with the record (Fig. 22).
You can add a date via the date picker (calendar icon). For “Date Type,” you must have at least one date with a date type of “creation” (Fig. 23). A description to provide further info about the date is optional. If you are updating an existing record, it should already have a date associated with “creation,” and you should therefore add an additional date entry, e.g., “revision,” or another appropriate type from those available in the drop-down list.

Note : These dates on the mdEditor Metadata tab are dates that are associated with the metadata record itself, not the resource being described (the collection itself). Dates related to the collection are added on the Main tab, which is described in the Main Tab section above.
Metadata Contacts
People and organizations associated with creating, updating, and maintaining the metadata associated with the resource should be added to the Metadata Contacts section on the Metadata tab. At least one contact must be added with a role of “author.” To add a metadata contact to a collection metadata record, scroll down until you see the “Add Metadata Contact” button (Fig. 24).
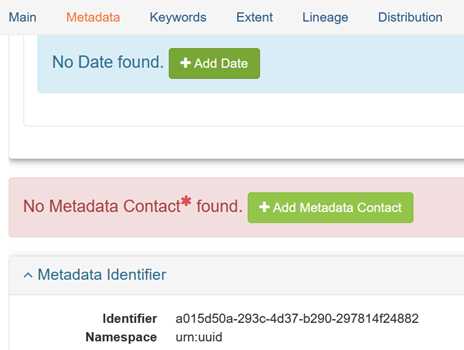
In the drop-down list for Role, select “author,” and then select from the available contacts via the Contacts drop-down list to the right. Your collection metadata record should have at least one author, and it can have more than one. To add additional authors, continue to select them from the Contacts drop-down list. You can only have one entry for a particular role, but that role can have multiple contacts associated with it. If you have additional metadata contacts in other roles, you can add them via the “Add” button on the upper right of the Metadata Contacts section (Fig. 25).

Metadata Identifier
This section of the Metadata tab is where mdEditor stores the UUID it assigns to the metadata record when you create it. It can be edited if your organization uses a different identification system (as with the UUIDs for Contacts described in that section), but only one metadata identifier object is permitted by the schema.
Online Resource
This section is available to add information about an online resource for the metadata related to the collection, including web links (Fig. 26). If you have metadata related to the collection in another location, it can be linked here. The only required field is the URI (internet address, or URL), but other information such as Title, Description, etc., are highly recommended, if available.
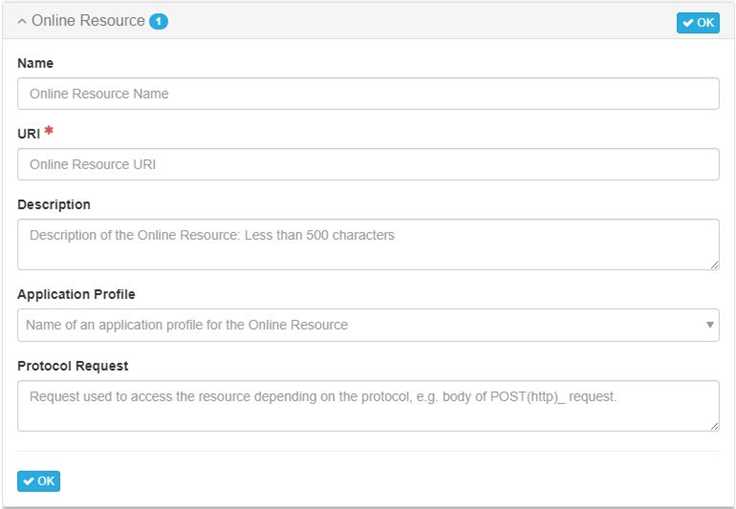
More information about the Metadata tab can be found in the reference manual:
https://guide.mdeditor.org/reference/edit-window/metadata/metadata-panels/metadata-section.html
Keywords Tab
A major goal of ReSciColl is to make collections FAIR (Findable, Accessible, Interoperable, and Reusable). To facilitate this, the NGGDPP has connected several curated, controlled vocabularies that are available online to the Keywords feature in mdEditor. We strongly encourage users to add as many relevant keywords as possible to their collection records using this feature.
To access this feature, select the Keywords tab in the mdEditor menu bar. You’ll be presented with the screen shown in Fig. 27. First, add a thesaurus by clicking either of the “+ Add Thesaurus” buttons.

What mdEditor defines as a thesaurus is actually a metadata object that may contain a selected keyword list. Several keyword lists are available by default in mdEditor, and others have been made available depending on the NGGDPP domain profile in use.
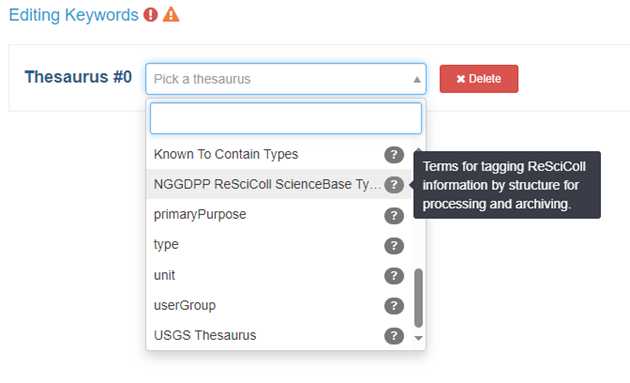
Once you’ve added a thesaurus, an available keyword list can be selected from the drop-down list (Fig. 28). In the figure, the cursor is pointing at the “?” icon to the right of the “NGGDPP ReSciColl ScienceBase Type Tags” vocabulary/keyword list. When available, these will bring up a pop-up displaying a brief definition of the terms contained in that keyword list. Click on the keyword list name to the left of the “?” to assign a particular keyword list to the thesaurus.
Note : Only one keyword list can be assigned to a thesaurus object in mdEditor. If you wish to add keywords from more than one list, you will need to add a thesaurus for each list. If you select a particular list in error, you can change it via the drop-down menu up until you have added keywords from the list to the thesaurus. Once keywords have been selected from a list, if you no longer want that list in the metadata record, you will need to delete the thesaurus object.
After selecting a keyword list, you can add individual keywords to the metadata record by clicking the “Edit Keywords” button (Fig. 29).

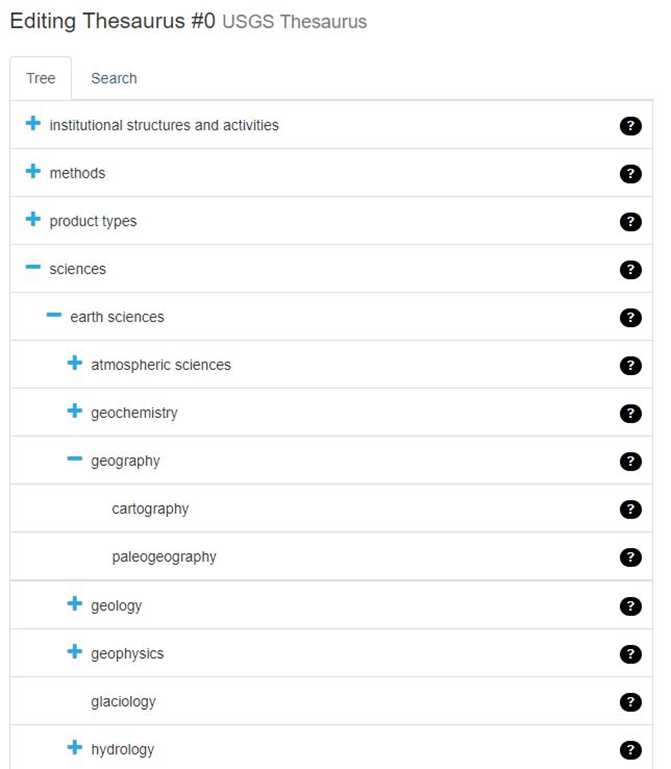
The “Editing Thesaurus” screen will be presented, with the number of the thesaurus object, along with the name of the keyword list being used (Fig. 30; in this case, the USGS Thesaurus).

As with the keyword lists, categories, subcategories, and terms may have definitions available by pointing to the “?” icon to the right of the entry.
If the keyword list is hierarchical, the categories and subcategories can be expanded using the “+” icons to the left of the category name. If the list is flat, or you have reached the lowest level, no “+” icon is shown (Fig. 31). An expanded section can be collapsed by clicking the “-” icon that appears when expanded. In Fig. 31, the “sciences” category has been expanded, along with the “earth sciences” subcategory, and the “geography” subcategory. The terms “cartography” and “paleogeography” are at the lowest level in this part of the hierarchy, representing individual keywords.
To select a keyword to add to the collection metadata record, click the keyword itself. It will highlight, and it will appear, along with its hierarchy, if any, in the “Selected Keywords” section (Fig. 32).
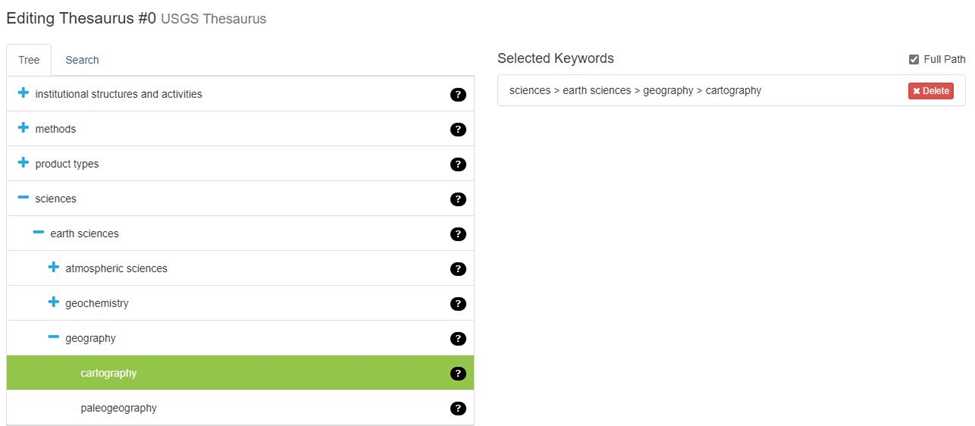
Continue adding keywords from the current list, if desired, either by navigating the list with the “+” and “-” icons and clicking on terms to add them, or by clicking on the "Search" tab above the displayed keywords or categories, typing in a search term, and then clicking on one or more of the desired results. Keywords that are categories or subcategories can also be added by clicking on the term itself rather than on the icons to expand or collapse them. When finished with a particular keyword list and its associated thesaurus, click the “Back to List” button to the right of the “Selected Keywords” section (Fig. 33).

mdEditor will return to the list of thesauri currently in the record (Fig. 34), from which you can add terms from a different keyword list by adding another thesaurus object. A second thesaurus object has been added in Fig. 34, ready to select a desired keyword list.

Note : For ReSciColl collections, a keyword from the “NGGDPP ReSciColl ScienceBase Type Tags” vocabulary is required in order for the collection to be findable and accessible in ReSciColl: You must add the “ndc_collection” keyword (Fig. 35) to any collection metadata record intended for ReSciColl.
<img src="https://static.yanyin.tech/literature_test/protocol_io_true/protocols.io.6qpvr321bvmk/pj24caja732.jpg" alt="Figure 35: mdEditor Thesaurus object example with "ndc_collection" keyword added for ReSciColl." loading="lazy" title="Figure 35: mdEditor Thesaurus object example with "ndc_collection" keyword added for ReSciColl."/>
For more information about the Keywords tab, see the reference manual:
https://guide.mdeditor.org/reference/edit-window/metadata/keyword-panels/keyword-section.html
Extent Tab
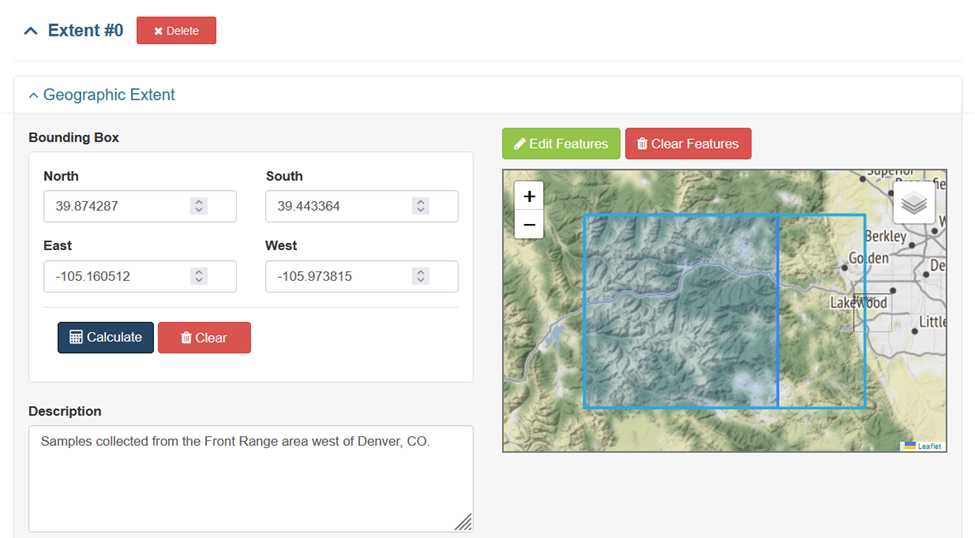
Extents are used in mdEditor to describe the geographic bounds of the resource (temporal extents can be defined via the Time Period object on the Main tab). For ReSciColl collections, at least one geographic extent is required. It can be of any type or feature (e.g., bounding box, polygon, point), and an extent can contain more than one feature. Instructions for creating extents can be found in the mdEditor tutorial linked above. An example is shown in Fig. 36.
Additional information about Extents can be found in the online reference manual:
https://guide.mdeditor.org/reference/edit-window/metadata/extent-panels/extent-section.html
Lineage Tab
Metadata in this tab are used to document the history of the resource, i.e., any steps or actions taken with the collection from acquisition through publication of the metadata.
Additional information is available in the mdEditor reference manual:
https://guide.mdeditor.org/reference/edit-window/metadata/lineage-panels/lineage-section.html
Distribution Tab
Metadata entered here should provide information about how to obtain or otherwise access the resource (e.g., website information, contacts).
See the reference manual for more information:
Constraints Tab
Here, ReSciColl users should describe any constraints on the resource, including copyright requirements, intellectual property, use limitations, security concerns, etc.
More information is in the reference manual:
https://guide.mdeditor.org/reference/edit-window/metadata/constraint-panels/constraint-section.html
Associated Tab
On this tab, users can enter information about any resources related to the main resource, including websites, ScienceBase data releases, other collections, etc. Items within the main resource collection are not entered here. That process will be described in the "Item Metadata" sections of this protocol, Steps 41 - 50.
For more information, consult the reference manual:
https://guide.mdeditor.org/reference/edit-window/metadata/associated-panels/associated-section.html
Documents Tab
Here, users should provide metadata about any supplemental documents. These may include factsheets, data catalog pages, additional publications, websites, etc.
See the reference manual for more information:
https://guide.mdeditor.org/reference/edit-window/metadata/documents-panels/document-section.html
Funding Tab
On this tab, users should describe the funding for the resource. First, add a Funding Period, and within that, create an Allocation. In the Allocation box (Fig. 37), enter the Amount, the Award ID, and the Source. For Source, select from the contacts drop-down list. ReSciColl users should create or import a contact for the NGGDPP for use here (see the Contacts section).

Further information is available in the reference manual:
https://guide.mdeditor.org/reference/edit-window/metadata/funding-panels/funding-editWindow.html
Settings
mdEditor has several settings that control its operation. They can be accessed from the “Settings” menu item in the upper right of the mdEditor window (Fig. 38).
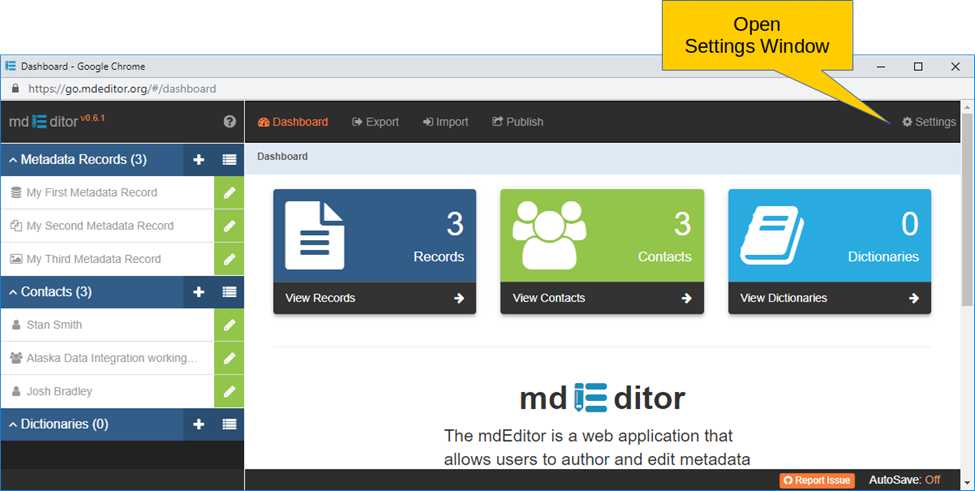
Here, users can control aspects such as date format, start of fiscal year, clearing the mdEditor cache ( Warning: Clearing the cache will delete all Metadata Records, Contacts, and Dictionaries from the mdEditor browser instance being used. Back up (Export) any desired records before clearing the cache ), etc.
See the video below for a walk through the mdEditor Publishing Settings:
#尊敬的用户,由于网络监管政策的限制,部分内容暂时无法在本网站直接浏览。我们已经为您准备了相关原始数据和链接,感谢您的理解与支持。
<iframe width="720" height="405" src="https://d9-wret.s3.us-west-2.amazonaws.com/assets/palladium/production/s3fs-public/media/video/NGGDPP_ReSciColl_mdEditor_Publishing_Settings.mp4"></iframe>
Publishing metadata records to ReSciColl requires configuring mdEditor with the correct organization. On the Main tab of the Settings page, under “Publishing Settings,” you will find an entry for “ScienceBase.” ReSciColl uses ScienceBase as a trusted digital repository as the first step for publishing and archiving. In the ScienceBase Publishing Settings entry in mdEditor, a Default Parent Identifier is required to publish (Fig. 39). This is the ScienceBase item ID for your organization page within the ReSciColl community on ScienceBase.
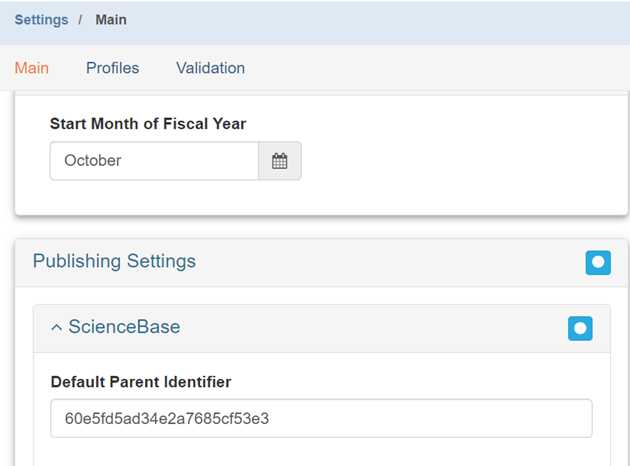
If there is no Default Parent Identifier present, it will need to be added. It can be obtained by copying the last part of the web link for your organization’s page on ScienceBase (e.g., the portion of the end of this link in bold text: https://www.sciencebase.gov/catalog/item/6390c2f2d34ed907bf7e380e 6390c2f2d34ed907bf7e380e – Also highlighted in Fig. 40 by the yellow ellipse).
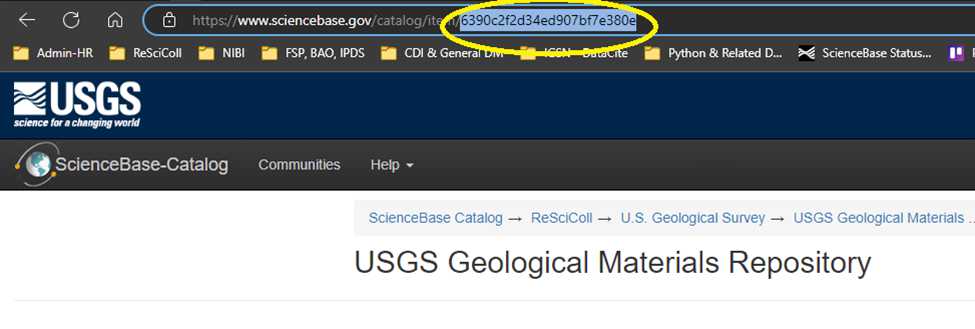
If you have difficulty locating or otherwise using the ID, please contact the NGGDPP for assistance. If it is present, you can verify it is correct by comparing it to the string of characters at the end of the web link for your organization’s ScienceBase ReSciColl community page. If you need to add or change it, you can simply paste it over what, if anything, is there. There is no “save” function on this Settings section – saving is automatic.
Additional information on mdEditor Settings is available in the reference manual:
https://guide.mdeditor.org/reference/settings-window/settings-reference.html
Export
mdEditor supports the ability to save the currently loaded Metadata Records, Contacts, and Dictionaries either as an mdEditor file or an mdJSON file. These files can then be shared with collaborators or saved to a local workstation for backup and/or archiving. By default, exported files will be saved in your computer's "downloads" folder. This default location can be changed in your browser's settings, generally under the "Downloads" section. You can export all records or select from those currently available. You can also include the current set of mdEditor Settings in the exported file(s).
See the video below for a walk through the mdEditor Export function:
#尊敬的用户,由于网络监管政策的限制,部分内容暂时无法在本网站直接浏览。我们已经为您准备了相关原始数据和链接,感谢您的理解与支持。
<iframe width="720" height="405" src="https://d9-wret.s3.us-west-2.amazonaws.com/assets/palladium/production/s3fs-public/media/video/NGGDPP_ReSciColl_mdEditor_Export.mp4"></iframe>
To export records, select “Export” on the upper menu bar of the mdEditor window.
See the online reference manual for further information:
https://guide.mdeditor.org/reference/export-window/export-reference.html
Import
Complementary to exporting, mdEditor also supports importing records into a user’s local browser instance. Imported metadata must be formatted as either an mdEditor file (.json), mdJSON file (.json), or FGDC CSDGM file (.xml). Files can be imported locally (from the user’s PC or connected storage) or remotely over the web.
ReSciColl users may wish to use the remote option to bring collection metadata from their ScienceBase archive into mdEditor. To do this, in the “Import from Online URL” box (Fig. 41, highlighted by the red oval), enter this link text: https://api.sciencebase.gov/sbmd-service/mdjson/, followed immediately by the ScienceBase ID of the desired collection to be imported, e.g., 63bda2ded34e92aad3cd84e1, obtained from the end of the web address for the collection in ScienceBase (Fig. 42, highlighted by the yellow oval). For this example, the entire URL to be imported would be: https://api.sciencebase.gov/sbmd-service/mdjson/63bda2ded34e92aad3cd84e1
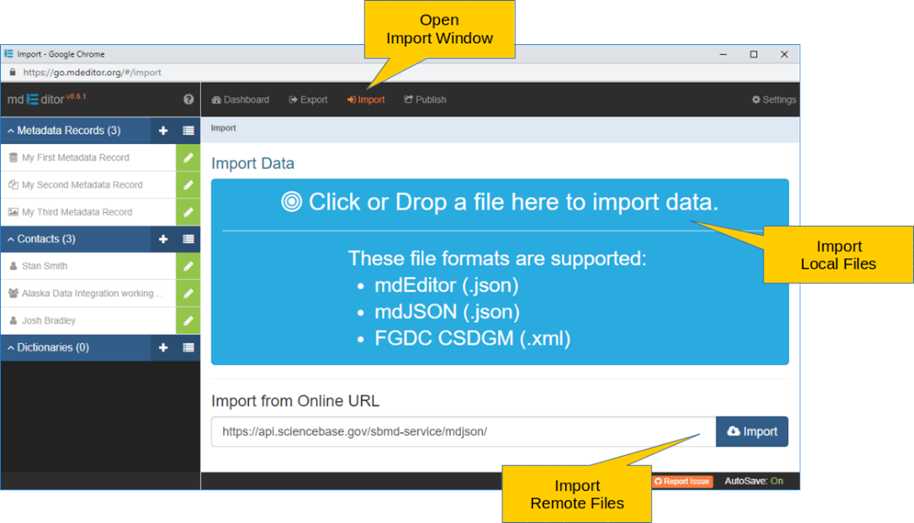
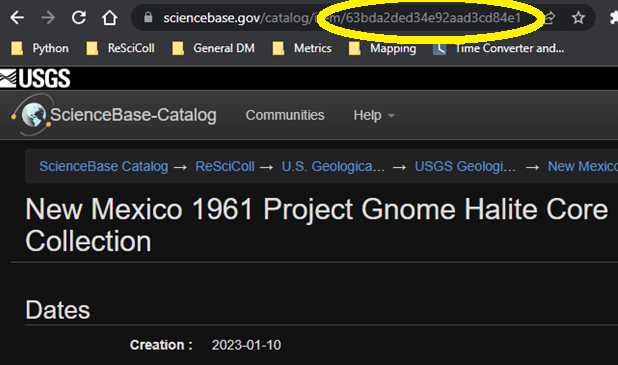
Click the “Import” button to the right of the box with the URL to import the collection metadata record into mdEditor.
With either local or remote importing, you’ll be presented with the Import Data selection screen (Fig. 43), where you can choose which records and/or contacts to include, and whether to replace local records that may have the same UUIDs, or to merge the imported records with those currently loaded.
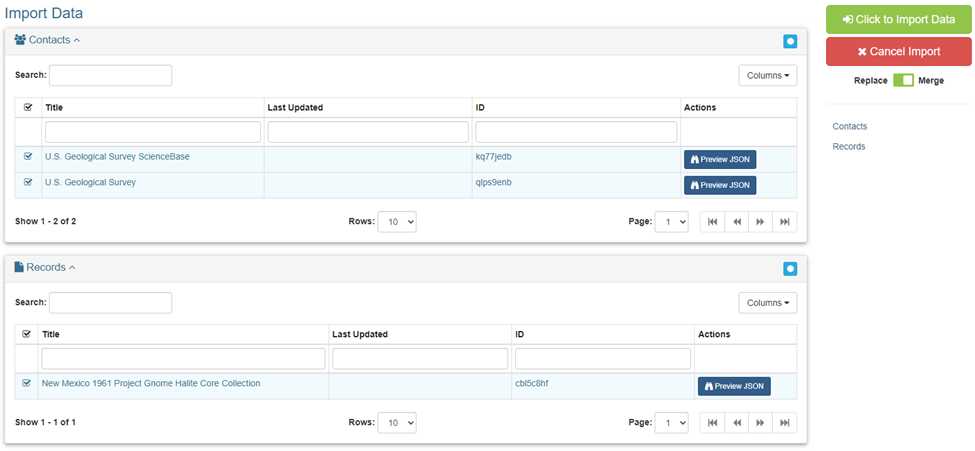
More information about importing metadata in mdEditor is available in the reference manual:
https://guide.mdeditor.org/reference/import-window/import-reference.html
Publish
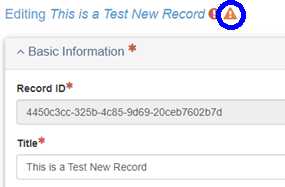
When you are ready to publish your collection metadata record to ReSciColl, you will first need to save the record. In the title bar of the example in Fig. 44 is a red circle icon with an exclamation point (highlighted by the blue circle). Pointing to this icon popups up the message, “This record has been modified! Click to save.” You can then either click that icon, or the larger “Save” button on the upper right.

If your collection metadata record contains errors (usually related to missing required elements), you will see an orange triangle icon with an exclamation point (Fig. 45).
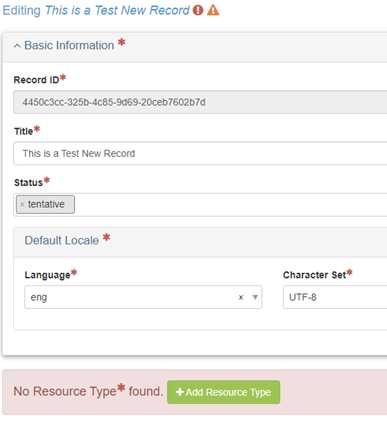
To see the error messages, click on the error triangle. A screen like the one in Fig. 46 will appear.

The error message in Fig. 46 indicates that the collection metadata record is missing the “resourceType” element. Beneath the error message is the location in the hierarchy within the metadata schema. In this example, “metadata\resourceInfo” refers to information about the resource, which can usually be found on the Main tab in mdEditor. Click “Close” on the upper right of the error screen to return to the mdEditor main window. As seen in Fig. 47, that element is obviously missing from the example record.
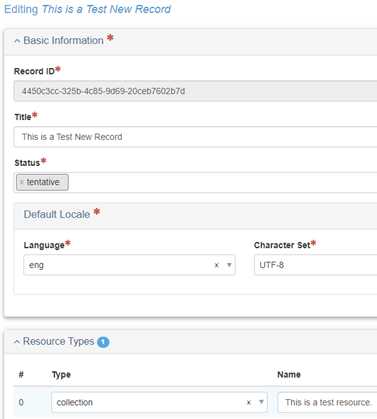
In Fig. 48, the error has been corrected, and the error triangle at the top no longer appears.
Once all errors have been corrected and the record has been saved, a best practice is to export the record so that you have an external copy, for backup purposes or in case others wish to edit or need to approve the record on a different computer. Export and import functions are covered in previous sections, and in the online tutorial:
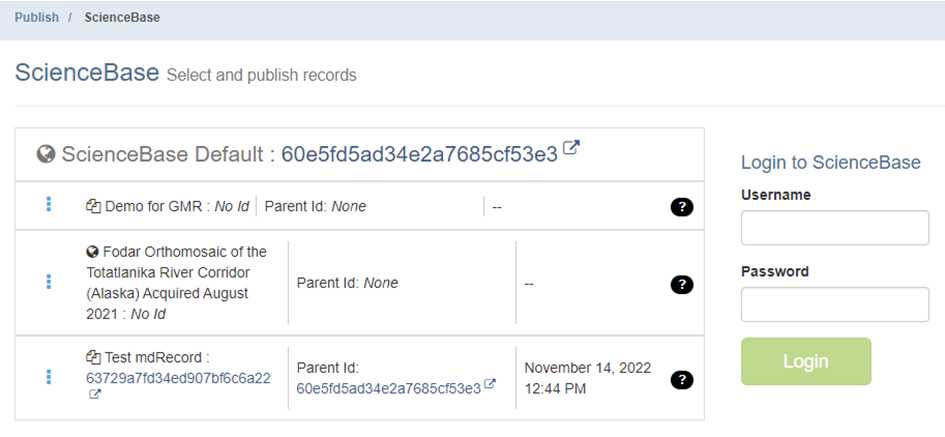
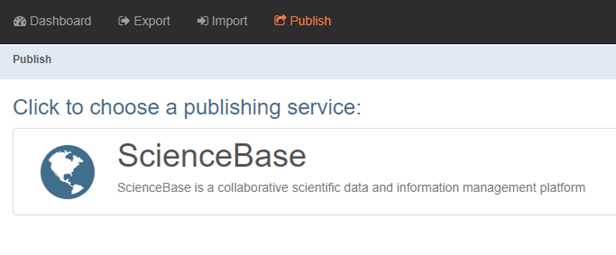
Once you have set or verified your Default Parent Identifier in mdEditor (covered in the Settings section previously), you should be ready to publish. Select the Publish menu in the upper menu bar, and then select ScienceBase as the publishing service (Fig. 49).
Note : Your ScienceBase account (which is also your ReSciColl account) must have permission to publish items associated with/below the parent identifier set in your mdEditor Publishing Settings. If you have issues, please contact the NGGDPP for support and assistance (contact information is at the end of this document).
To select the collection metadata record(s) you wish to publish to ReSciColl (via ScienceBase), click on the entries, and then click the “Publish” button (Fig. 51).
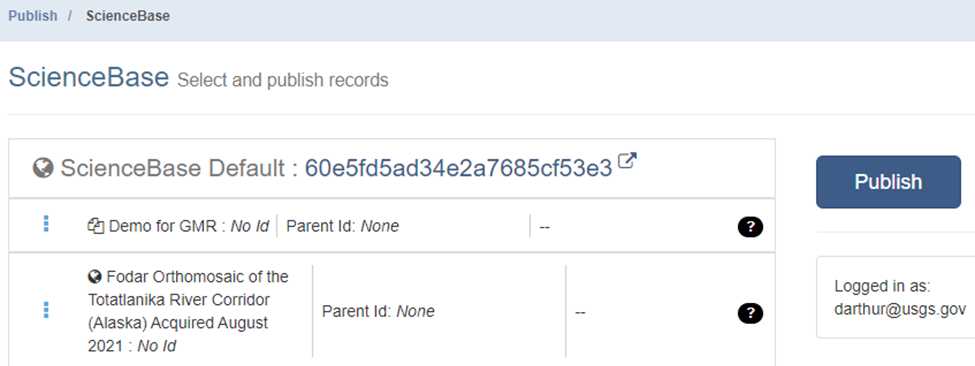
mdEditor will connect to ScienceBase and publish your selected records. If any issues are encountered, make note of any errors, and contact the NGGDPP for support.
A successful publication will refresh the list of records, and any published records will show both the parent ID along with their own, newly created, ScienceBase item IDs for each collection record. Date and time of publication to ScienceBase will also be shown to the right (Fig. 52).

Clicking either item ID will take you to the ScienceBase page for the collection (e.g., Fig. 53) or its parent organization page.
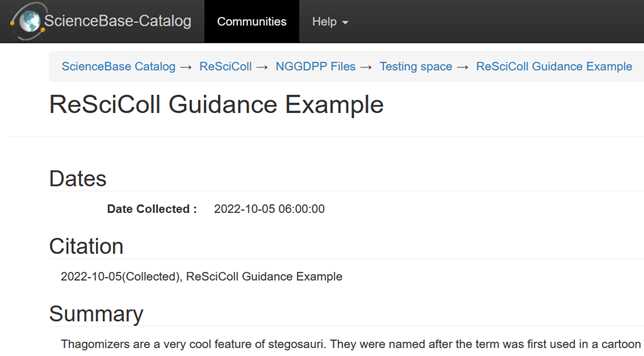
Additional information about publishing from mdEditor is available in the reference manual:
https://guide.mdeditor.org/reference/publish-window/publish-reference.html
ScienceBase, as described above, now serves as the first step in the ReSciColl collection publishing process, as well as an archive for each collection record. The next step, harvesting the collection record into the ReSciColl database for API access and display on the ReSciColl website, happens automatically. Currently, new records are harvested nightly. Newly published collection records will be visible on the ReSciColl website (https://webapps.usgs.gov/rescicoll/index.html) within 24 hours (Fig. 54).
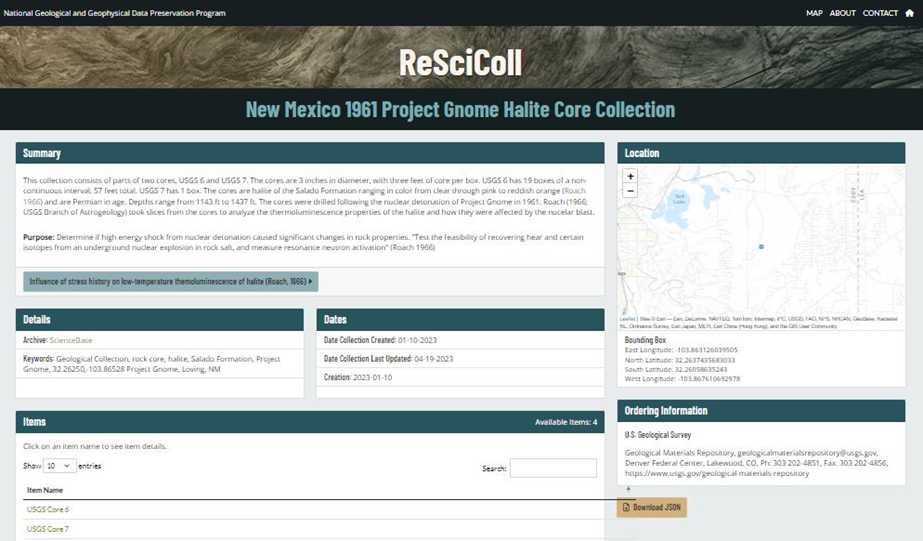
Editing Existing (Published) Metadata Records
Using the import features described in previous sections, along with the publishing feature, users can bring published collection metadata records from ScienceBase into mdEditor, make any desired changes/updates, and republish the record. ReSciColl collections updated in this manner, once republished to ScienceBase, will be updated in ReSciColl within 24 hours.
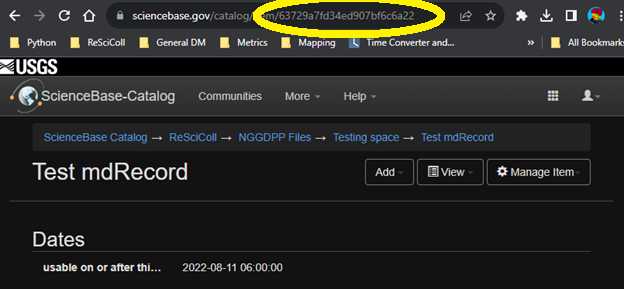
To import an existing ReSciColl collection for updating in mdEditor, go to the Import tab of mdEditor. In the “Import from Online URL” box (Fig. 55, highlighted by the yellow oval near the bottom), enter this link text: https://api.sciencebase.gov/sbmd-service/mdjson/, followed immediately by the ScienceBase ID of the desired collection to be imported, e.g., 63729a7fd34ed907bf6c6a22, obtained from the end of the web address for the collection in ScienceBase (Fig. 56, highlighted by the yellow oval near the top). For this example, the entire URL to be imported would be: https://api.sciencebase.gov/sbmd-service/mdjson/63729a7fd34ed907bf6c6a22.
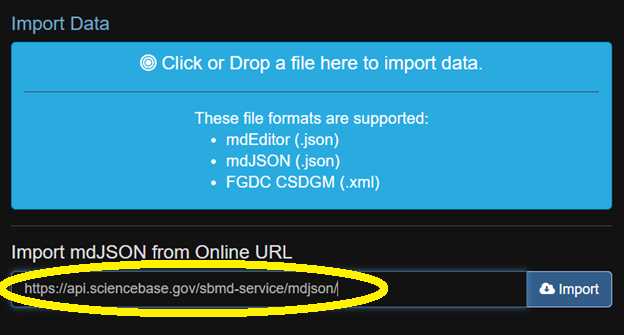
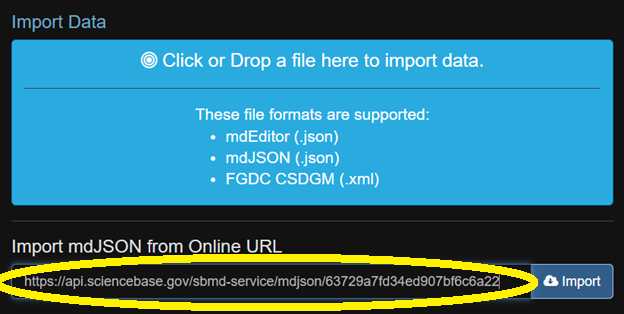
The entire URL should now be visible in the “Import mdJSON from Online URL" box (Fig. 57, highlighted by the yellow oval near the bottom). Click the “Import” button to the right of the box with the URL to import the collection metadata record into mdEditor.
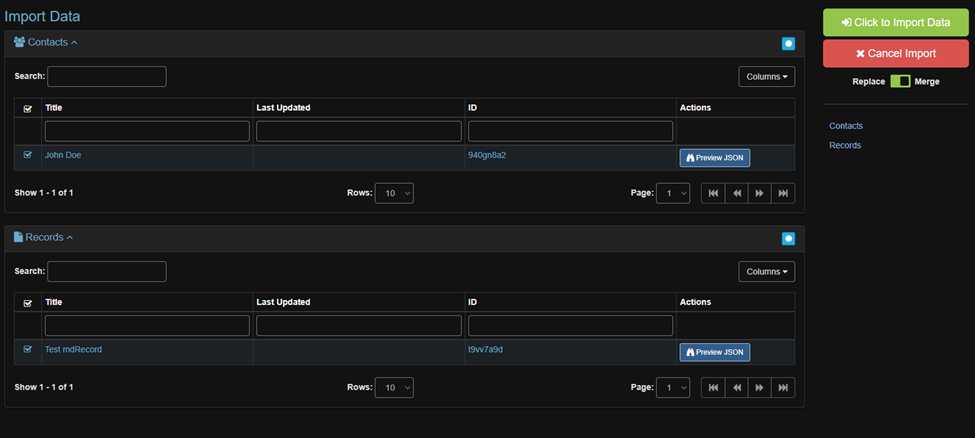
Next, mdEditor presents the Import Data selection screen (Fig. 58), which lists the metadata record, as well as any associated contacts, in the mdJSON file selected from ScienceBase. Be sure to move the Replace/Merge toggle to “Merge,” if it is not already selected, uncheck any records or contacts you don’t wish to import, and click the “Click to Import Data” button on the upper right.
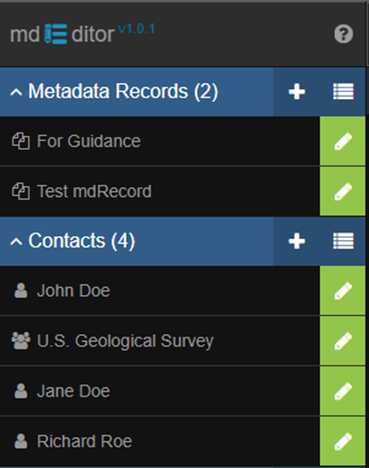
The record and contact should now be visible on the list to the left of the dashboard (Fig. 59).
Now, mdEditor can be used to edit the record as needed. When editing is complete, there are no errors in the record, and it is ready for republication, users should first verify in the mdEditor Settings that the Default Parent ID is set to the correct organization page in ScienceBase, described in the "Settings" section of this protocol, Step 29.
On the Main tab of the Settings page, under “Publishing Settings,” you will find an entry for “ScienceBase” near the bottom of the screen. A Default Parent Identifier is required to publish (Fig. 60). This is the ScienceBase item ID for your organization page within the ReSciColl community on ScienceBase.
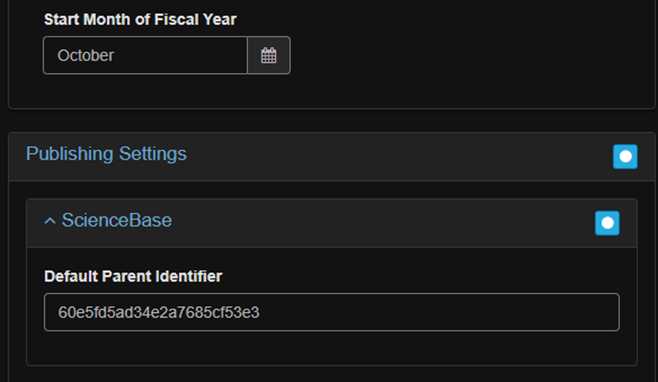
If there is no Default Parent Identifier present, it will need to be added. It can be obtained by copying the last part of the web link for your organization’s page on ScienceBase (e.g., the portion at the end of this link in bold text: https://www.sciencebase.gov/catalog/item/ 6390c2f2d34ed907bf7e380e – highlighted in Fig. 61 by the yellow ellipse).
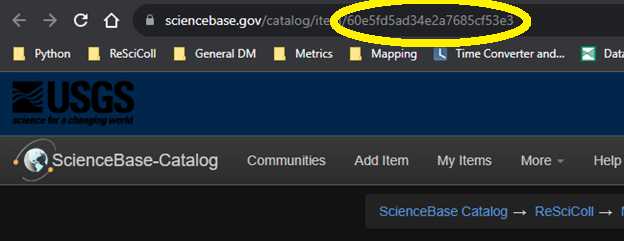
If you have difficulty locating or otherwise using the ID, please contact the NGGDPP for assistance. If it is present, you can verify it is correct by comparing it to the string of characters at the end of the web link for your organization’s ScienceBase ReSciColl community page. If you need to add or change it, you can simply paste it over what, if anything, is there. There is no “save” function on this Settings section – saving is automatic.
Additional information on mdEditor Settings is available in the reference manual:
https://guide.mdeditor.org/reference/settings-window/settings-reference.html
With the correct Default Parent ID set, you can now republish the updated record. Publishing proceeds as described in the "Publish" section of this protocol, Steps 33 - 37.
For additional information on republishing, see the mdEditor reference manual:
Item-Level Metadata Elements
Once the collection is available on ReSciColl, such as the example shown in Fig. 54, you may add metadata for items within the collection, and you may also add attachments (e.g., images, documents).
The tables in this section list the nineteen (19) metadata elements accepted by ReSciColl. Some metadata elements are mandatory and must be included to adequately describe records. Other metadata elements are optional but recommended, when available, to enhance metadata records for ReSciColl users.
| A | B | C |
|---|---|---|
| Element Name | Definition | Number of Values |
| localID | Identifier provided by organization (e.g., Oil and gas well API, Well no., Local ID, Map ID, Publication No., Sample ID). | 1 |
| title | The name/title of the item in the Collection (e.g., map name, sample identifier). | 1 |
| abstract | Main description element. May be anything from a few words to an essay, suitable for a general audience (i.e., who, what, where, when, and why of the item in the collection). | 1 |
| datatype | A controlled vocabulary of data types (keywords; e.g., Auger Samples, Fluid Samples, Geochemical Samples, Hand Samples, Ice Cores, Paleontological Samples, Rock Cores, Rock Cuttings, Sediment Cores, Sidewall Cores, Thin Sections and Polished Sections, Type Stratigraphic Sections). Use the NGGDPP Collection Category terms here: https://www.sciencebase.gov/vocab/categories?parentId=4f4e475ee4b07f02db47df22. An item may include multiple dataTypes, separated by commas (no spaces), and grouped between double quotes if using CSV format (see below for Excel format; e.g., "Auger Samples,Rock Cuttings,Sidewall Cores"). | ≥1 |
| coordinateLon_WGS84 | Geographic longitude in decimal degrees, WGS84. Example: -118.023423. | 1 |
| coordinateLat_WGS84 | Geographic latitude in decimal degrees, WGS84. Example: 45.02312. | 1 |
| publicationDate | Publication date regarding the currency of the metadata, which may be when the item metadata are added/updated to the collection record in ReSciColl. May be of any of the following formats: YYYY, YYYYMM, YYYYMMDD. Ranges are not valid for this field. | 1 |
Table 1: Required Metadata
| A | B | C |
|---|---|---|
| Element Name | Definition | Number of Values |
| alternateTitle | Additional title information and/or identifiers for individual items in a collection may be provided for further identification or use by other web service interfaces. The alternateTitle field may include either textual titles or specific sample IDs used by the collection. | 1 |
| alternateGeometry | The underlying item resource may use an alternate method of storing a geospatial footprint. If so, this text field should be used to describe the authoritative source for geographic location and how the simple coordinates were derived. Examples of authoritative sources include: Getty place names – Linked open data (LOD) resource, includes API and SPARQL queries (http://vocab.getty.edu/queries); USGS GNIS: U.S. and Territories only, search through U.S. Board on Geographic Names (https://geonames.usgs.gov/apex/f?p=138:1::::::); USGS GAZ – Connected to GNIS, U.S. names (https://edits.nationalmap.gov/apps/gaz-domestic/public); Library of Congress terms – A linked data service (https://id.loc.gov/vocabulary/identifiers/geogndb.html) | 1 |
| onlineResource | URI (Uniform Resource Identifier or web link) of an item-level data source. | ≥1 |
| browseGraphic | One or more URI pointers to images representing the specific record. | ≥1 |
| date | If a meaningful date within the geosciences domain can be attached to the record (e.g., collection date, map publication date), it can be supplied here. Date may be to any degree of precision or may be left blank to indicate uncertainty. Examples: 2001, 2001-2003, 1939-1945, 20030331, 20000331-20000401. | ≥1 |
| verticalExtent | Vertical extent is useful for describing rock core samples and borehole depths. Specification of extent must contain three elements, in the following order, with no spaces between them: unit of measure (meter, feet), maximum depth, minimum depth. Example: m,35.4,0 for a rock core measured at maximum depth of 35.4 meters from the surface. | 1 |
| IGSN | International Generic Sample Number (IGSN) of the physical item in the collection (e.g., cutting, core, specimen). Only the IGSN itself is required, not the full web link (e.g., 10273/ICDP5054ESYI201, not http://doi.org/10273/ICDP5054ESYI201). | 1 |
| parentIGSN | The IGSN of the parent material (sample) the derivative material (subsample) was obtained from. Only the IGSN itself is required, not the full web link. | 1 |
| relIGSN | The IGSN of a related sample or subsample (e.g., duplicate, or split). Only the IGSN itself is required, not the full web link. | ≥1 |
| relationType | Relationship of the IGSN to the largerWorkCitation. Use the DataCite Relation Type vocabulary terms here: https://www.sciencebase.gov/vocab/vocabulary/611d428bbfff3461918aba6e | ≥1 |
| largerWorkCitation | Physical sample connection to publication (DOI). The collection may document a larger set of samples with only a section used in a journal article. Only the DOI itself is required, not the full web link. | 1 |
| attachmentFileName | Full name of file that is to be linked to the item via the file attachment process. A full folder/directory path is not required, just the filename and extension. Must exactly match the name used during file attachment ingest. | 1 |
Table 2: Optional Metadata Map the sample level properties found in your collection to ReSciColl metadata elements by creating a Microsoft Excel or CSV file with column headings that match the metadata elements described in Tables 1 and 2 with rows containing the metadata for each item in the collection. An Excel template is available to download here. In some cases, this might be a one-to-one mapping. For instance, the “date” element might correspond to the 'DateCreated' property in your collection database. For the abstract, it may be desirable to concatenate several fields to provide a richer description of the resource and more specific search results. If the location information is stored in township/range/section, it will be necessary to convert these values to a single geographic latitude and longitude point to populate the required WGS84 coordinates metadata elements. The descriptive township/range/section may then be provided in the alternateGeometry field.
Item-Level Metadata Upload Format
ReSciColl Dashboard supports two primary formats for loading data into ReSciColl. Data providers may submit Comma Separated Value (CSV) formatted files or XLSX (Microsoft Excel) files. These formats are discussed in more detail below.
File Format
A CSV file format represents tabular data. Each row in the file corresponds to a single metadata record, and the properties associated with each record are separated by a comma. The comma is a special character that separates data fields, which is useful for recording item/sample characteristics. However, comma delimited files present issues when data fields include commas, which requires enclosing entire fields in double quotes (“) so that the embedded commas are not regarded as field delimiters but as part of the field information. For properties that contain more than one value, the ReSciColl Item Ingest Tool requires data providers to use double quotes around fields that contain values within a single element. For example, a single record with five fields might look like the following, using double quotes as special delimiter characters:
1341234,This is a Title,”m,35.4,0”,”Please note, the existence of a comma within.”,”2020-10-01,2021-04-02”
```The above line contains five fields, three with multiple values enclosed in double quotes, with the final field containing two dates.


CSV formatted files must also include a header on the first line that indicates the metadata element names and delimiters corresponding to the subsequent data (similar to a map legend). Applying this to the above example, the first two lines of the CSV file would look like the following:
localID,title,verticalExtent,abstract,date 1341234,This is a Title,”m,35.4,0”,”Please note, the existence of a comma within.”,”2020-10-01,2021-04-02”
 **Note** : If uploading a file in Excel (*.xlsx) format, make sure all the columns/fields are of either text, general, or number format. Do not use date or other specific formats, as that affects how the data are saved, and could cause validation errors in ReSciColl.


CSV file example is available here:


[https://www.sciencebase.gov/catalog/file/get/6377bb81d34ed907bf6f8eaf?name=ReSciColl_CSV_file_example.csv](https://www.sciencebase.gov/catalog/file/get/6377bb81d34ed907bf6f8eaf?name=ReSciColl_CSV_file_example.csv)
Item-Level Metadata Upload to ReSciColl
Create an Excel file (*.xlsx ONLY) or regular (not pipe-delimited) comma-separated value (CSV) file using the requirements described above. Note: When using Excel for either file format, the row number indicated by Excel is 2 rows off from the rows as numbered by ReSciColl. ReSciColl does not count the header row (with column names), so the first row of metadata (row 2 in Excel) is considered row 0 in ReSciColl.
After creating/updating your collection, navigate to the ReSciColl home page. The collection itself must be created/updated first to then hold all the items in the collection.
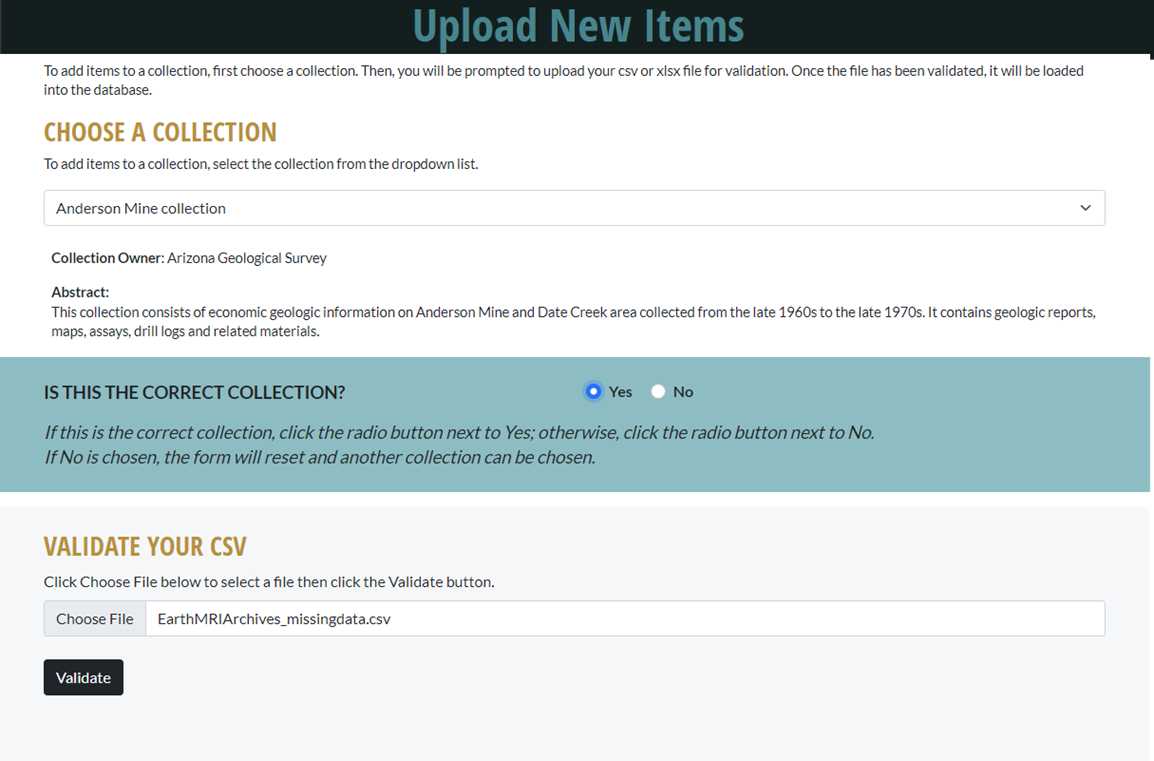
Click the “Upload New Items” button under “Item Management.”
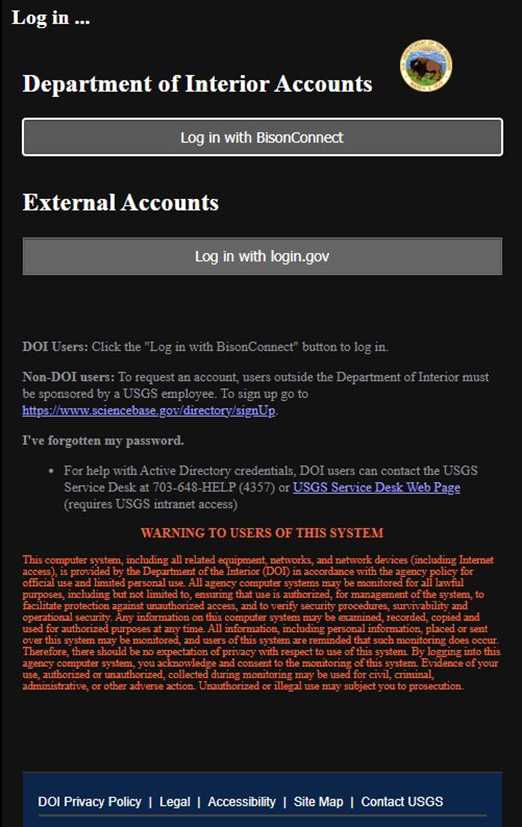
Login to ReSciColl with your username and password (Fig. I-1). USGS and other Department of Interior users should click the “Login with BisonConnect” button, while external users should select “Login with login.gov.” If you need assistance obtaining a login.gov account, contact login.gov via their website. Contact NGGDPP with your login.gov username once you have obtained an account. If you need further assistance logging into ReSciColl, contact NGGDPP.
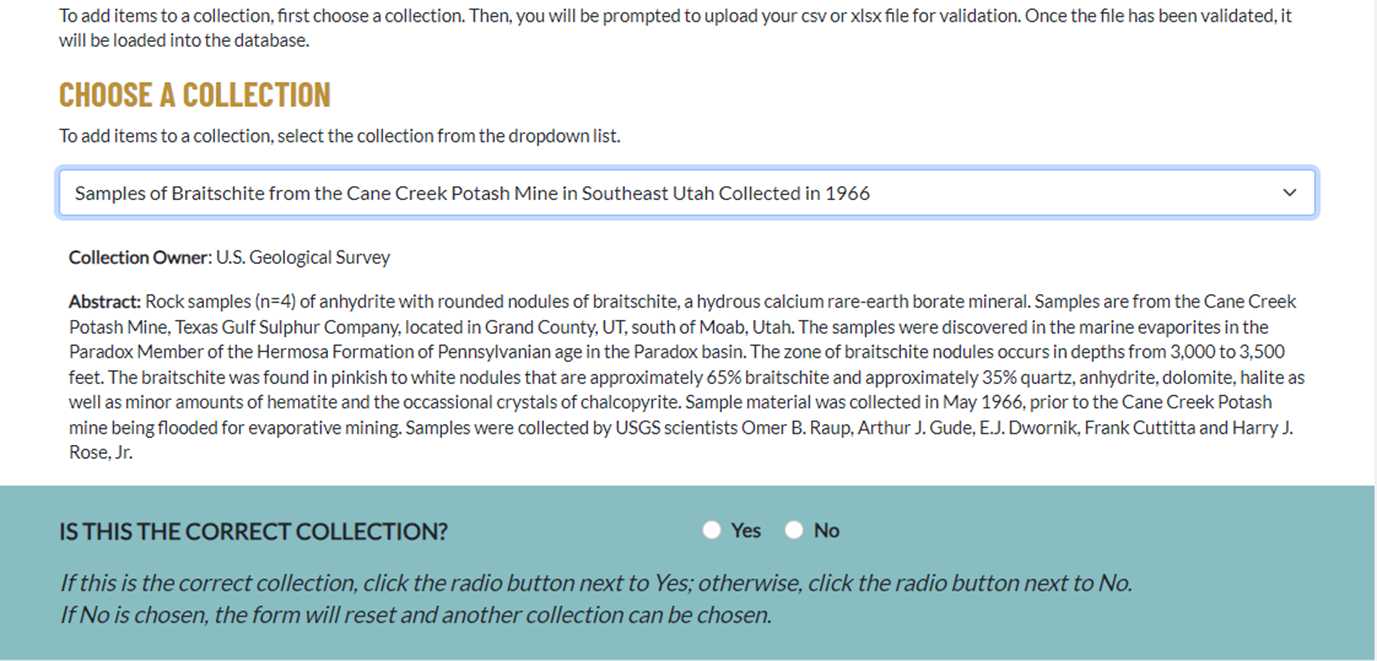
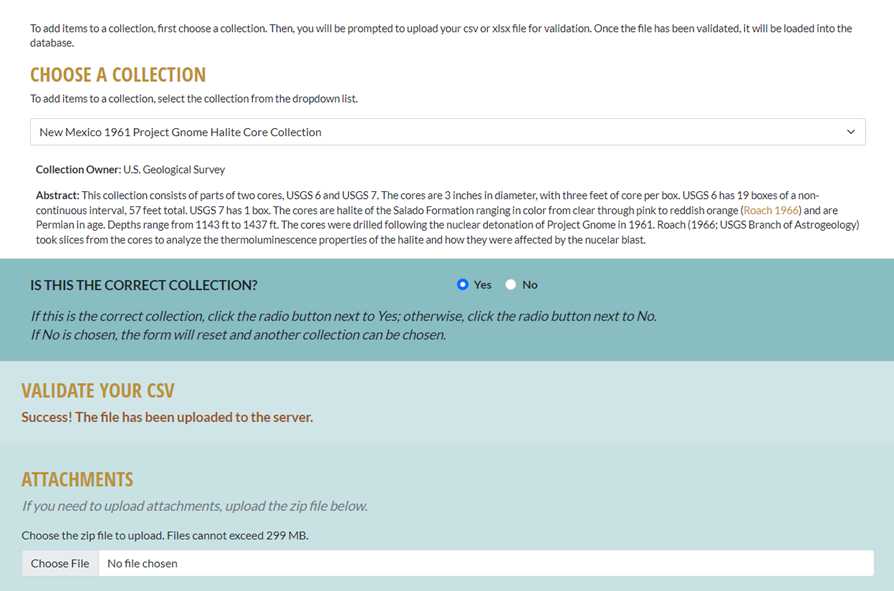
Under “Choose a Collection,” from the drop-down list (Fig. I-3), select the collection to which you want to add items, and when you have chosen the correct collection, select “Yes” in the “Is this the correct collection?” section.
ReSciColl will validate the uploaded metadata file. If there are errors, you can fix them and try again by clicking the “Errors Fixed” button that will appear. If you have issues understanding and/or correcting the errors, contact NGGDPP for assistance. Once the file is correctly validated, you should see a success message (Fig. I-5).

Notes:
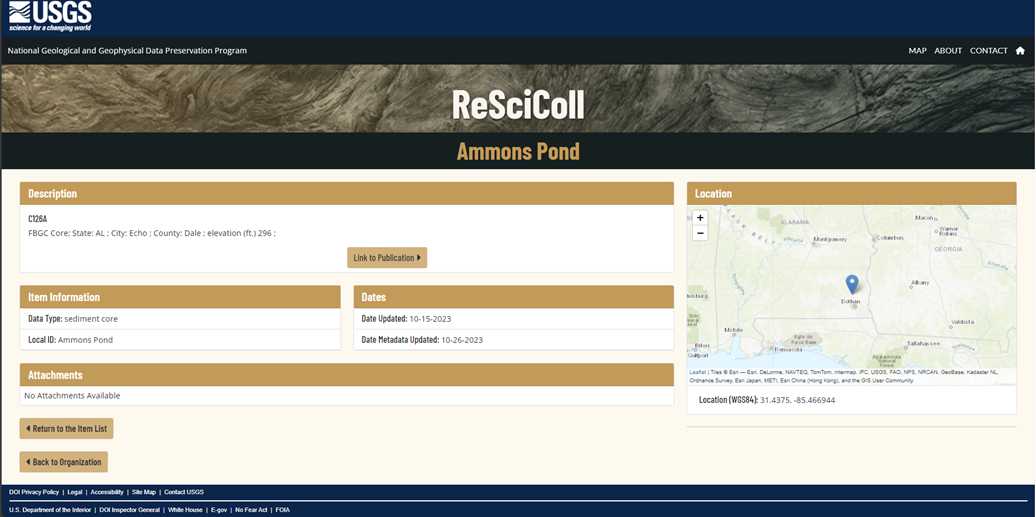
- When uploading item metadata to a ReSciColl collection, ReSciColl creates a web page for each item (Fig. I-6). The CSV or XLSX file that was uploaded is transferred to the ScienceBase archive page for the collection as an attached file, and it may be accessed there. Individual “child” item pages are no longer created in ScienceBase.
- If you have already uploaded items to the selected collection, ReSciColl uses the “localID” field in the item metadata CSV or XLSX file to determine whether or not an item already exists. If it finds a localID that matches, it updates that item. If it does not find a match, it adds the item to the collection.
- If you need to delete items from a ReSciColl collection, contact the NGGDPP for assistance.
Upload File Attachments to ReSciColl
If you listed attached files in the item metadata template, you may now upload those via the attachment dialog box (Fig. I-7). ReSciColl only accepts attachment uploads as a single file of 299 MB or smaller. For multiple attachments, a Zip file is required. If the total size of a Zip file of all your attachments is larger than 299 MB, you will need to upload the Zip files one at a time. ReSciColl will prompt you for each file. If your attachments are too large for these limits, please contact NGGDPP for assistance and possible alternatives.
Repeat the process for each separate collection.

