Isolation and Culture of Individual Myofibers and Their Adjacent Muscle Stem Cells from Aged and Adult Skeletal Muscle
Sören S. Hüttner, Hellen E. Ahrens, Manuel Schmidt, Henriette Henze, Marie Juliane Jung, Svenja C. Schüler, Julia von Maltzahn
Muscle stem cell
Myofiber
Aging
Self-Renewal
Differentiation
Collagenase
Transfection
Satellite cell
Abstract
The isolation and culture of single floating myofibers with their adjacent muscle stem cells allow the analysis and comparison of muscle stem cells from aged and young mice. This method has the advantage that muscle stem cells are cultured on the myofiber, thereby culturing them in conditions as close to their endogenous niche as possible. Here we describe the isolation, culture, transfection with siRNA, and subsequent immunostaining for muscle stem cells on their adjacent myofibers from aged and young mice.
Steps
3.1 Dissection and Digestion of the EDL Muscle
Sacrifice the mouse according to animal welfare regulations ( see Note 3 ).
Transfer the sacrificed mouse to a dissection bench (semi-sterile). Spray the whole mouse and dissection tools with 70% ethanol.
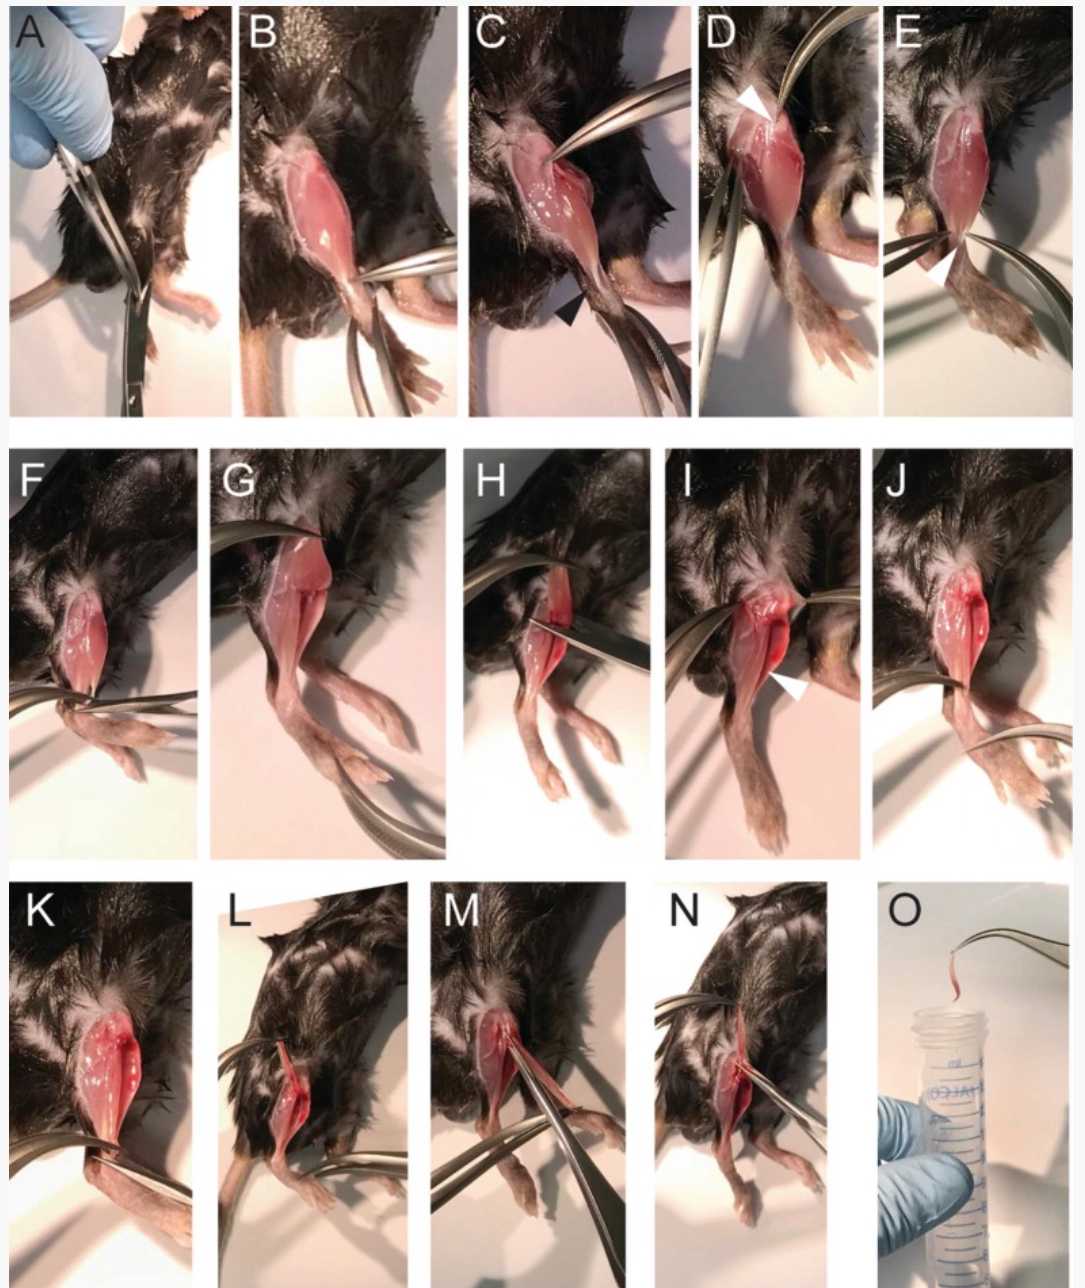
Remove the skin from the hind limb. Use forceps to lift up the skin at the ankle, and cut the skin with curved scissors up to the region over the knee, thereby exposing the underlying muscles ( see Note 4 ; Fig. 1a). Make sure that no hairs are stuck to the exposed muscles, since they are the highest risk of contamination.
Remove the fascia surrounding the muscles by ripping them with fine forceps (Dumont 7). Pinch the fascia at the ankle at the side of the tibia bone with the forceps (close the forceps! Otherwise they will bend), and move the forceps toward the knee (Fig. 1b, c). The fascia will rip, and the tendon of the EDL (extensor digitorum longus) at the knee will be visible (Fig. 1d).
Use curved fine forceps (Dumont 7) to expose the distal tendon of the TA (tibialis anterior) muscle (Fig. 1e; this is the tendon lying on top of the tendons at the ankle). Lift up the tendon with the forceps, and use another set of fine forceps to detach the TA muscle from the underlying EDL (extensor digitorum longus) muscle. Therefore, move the closed forceps up to the knee (approximately up to 0.2 cm below the knee) without injuring the EDL muscle.
Lift the tendon of the TA muscle with the fine forceps, and cut the tendon with fine spring scissors (Fig. 1f). Pull the TA muscle up to the proximal end (Fig. 1g); cut it at the knee or rip it off (Fig. 1h). The EDL will be fully exposed now (Fig. 1i).
Grab the now fully exposed tendon of the EDL at the distal end (Fig. 1j; see Note 5 ), cut the tendon with fine spring scissors (Fig. 1k), and pull the EDL muscle carefully toward the knee (Fig. 1l). Do not touch the EDL muscle and do not stretch the muscle! Only handle the muscle at the tendon ( see Note 6 ).
At the knee there are two tendons visible (Fig. 1m). The tendon of the EDL is the one closer to the knee (see also Fig. 1d). Carefully pull the EDL toward the outside of the knee, and then cut the proximal tendon (Fig. 1n). Transfer the EDL gently to the preheated reaction tube containing the collagenase digestion solution (Fig. 1o).
Repeat the procedure with the other leg.
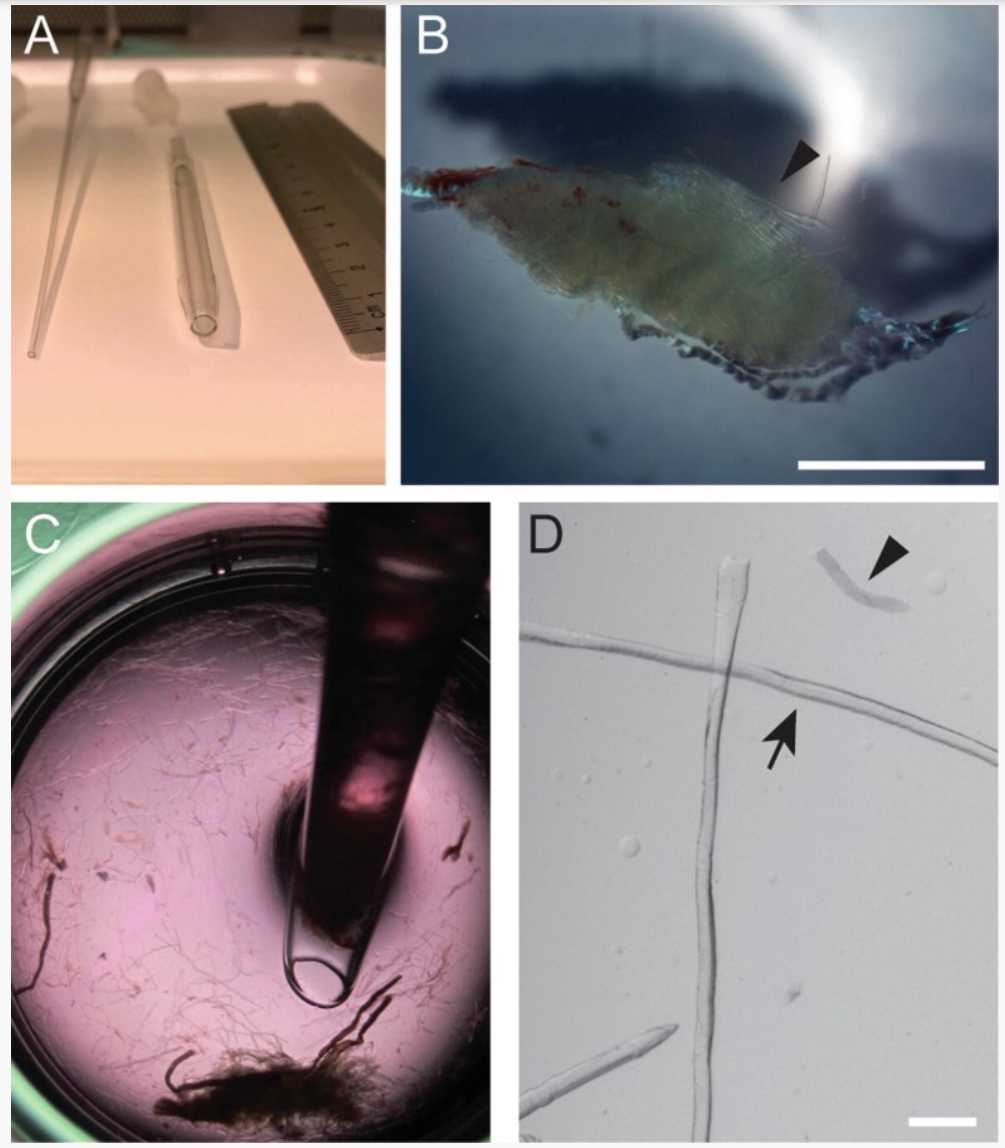
Transfer the reaction tube with the two EDL muscles from one mouse into the 37°C circulating water bath. Incubate until the myofibers are visible (Fig. 2b). The time of digestion is depending on collagenase activity, age of the mouse, and the amount of fibrosis. General digestion times are adult mouse (2–6 months of age), 1h 0m 0s, and aged mouse (18 months and older), 1h 30m 0s–2h 0m 0s, depending on the amount of fibrotic tissue.


3.2 Dissociation of Single Myofibers
Transfer the digested EDL muscles into a well of a 12-well plate filled with 2.5mL (equilibrated in the incubator for about 0h 30m 0s before use) using the large bore Pasteur pipette (Fig. 2a).
The next steps are done using a stereo binocular microscope with a 0.8–5-fold magnification under a dissection bench (semi-sterile) ( see Note 7 ).
Dissociate the muscles until single myofibers come off using the large bore Pasteur pipette (Fig. 2c; see Notes 8 and 9 ).
When about 50 myofibers have come off the muscle, transfer non-contracted single myofibers (shiny bright myofibers; Fig. 2d) into a new well of a 12-well plate filled with equilibrated 2.5mL. Transfer the myofibers with the small bore Pasteur pipette (Fig. 2a) releasing them gently into the myofiber isolation medium ( see Notes 10–12 ).
Repeat Steps 13 and 14 until you have enough myofibers for your experiment ( see Note 12 ).
3.3 Culture of Single Myofibers and siRNA Transfection of MuSCs on Single Myofibers
Transfer about 50 non-contracted single myofibers into a well of a 24-well plate filled with 500µL.
Culture the single myofibers in a 37°C incubator with 5% CO2.
Transfection of MuSCs is done after4h 0m 0s of culture using Lipofectamine RNAiMAX: the final concentration of the siRNA equals 5 pmol. Add the reaction mix (25µL with the respective amount of siRNA in one reaction tube mixed with 25µL and 1.5µL , and then add the mixture to the 500µL). It is not necessary to change the myofiber culture medium. For longer culture periods (over 48h 0m 0s), a second transfection after 24h 0m 0s of culture might be considered.
3.4 Immunostaining of MuSCs on Single Myofibers
Perform the immunostaining using a stereo binocular microscope with a 0.8–5-fold magnification.
Fix the single myofibers with their adjacent MuSCs using 2% PFA for 0h 5m 0s at Room temperature. Therefore, remove the myofiber culture medium with a small bore pipette (HS coated) leaving a little bit of myofiber medium (about 150µL) in the well to allow the myofibers to float in the medium. Then carefully add 500µL. Perform all further steps in a 24 well coated with HS ( see Notes 13 and 14 ).
Wash the myofibers three times with PBS (500µLper washing step, 0h 5m 0s incubation time per washing step). Leave a little bit of solution in the 24 well to avoid sticking of the myofibers to the culture dish. Do this for all further steps unless stated otherwise.
Wash with PBS for 0h 5m 0s. (1/3)
Wash with PBS for 0h 5m 0s. (2/3)
Wash with PBS for 0h 5m 0s. (3/3)
Permeabilize the myofibers with permeabilization buffer (500µL) for 0h 10m 0s at Room temperature.
Block unspecific binding of antibodies by incubation with blocking solution (500µL–1mL) for 1h 0m 0s at Room temperature.
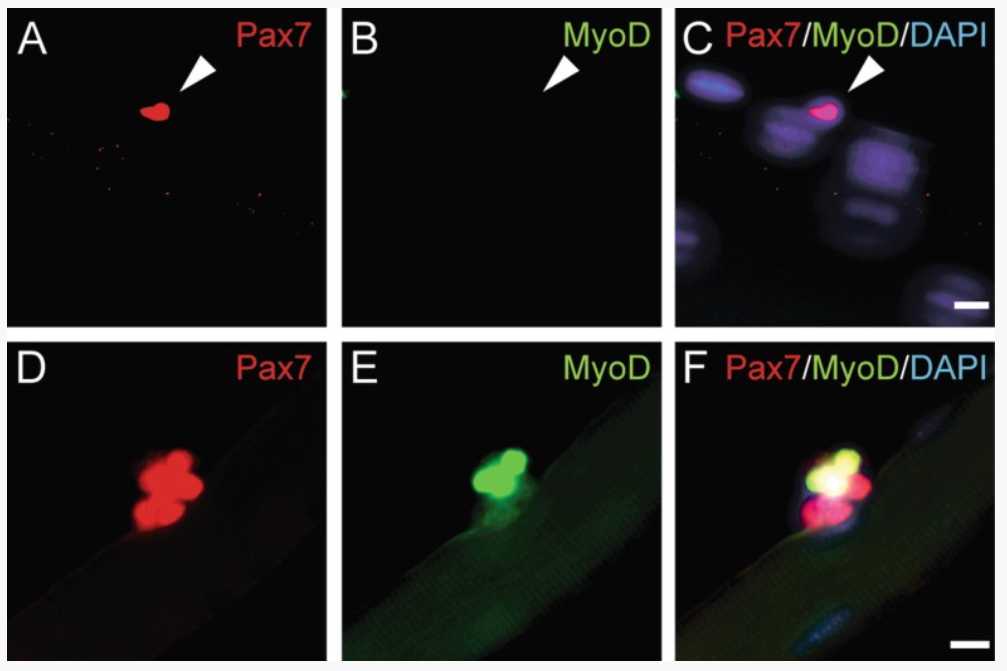
Dilute the MyoD antibody (clone 5F11, rat, 1:100, Merck-Millipore) in Pax7 antibody (PAX7 from Developmental hybridoma bank, mouse IgG1, undiluted), use 250µL per well of a 24-well plate, and incubate at 4°C.
Wash three times with PBS at Room temperature (0h 5m 0s per washing step).
Wash with PBS at Room temperature for 0h 5m 0s. (1/3)
Wash with PBS at Room temperature for 0h 5m 0s. (2/3)
Wash with PBS at Room temperature for 0h 5m 0s. (3/3)
Incubate with secondary antibodies (250µL per well, incubation for 1h 0m 0s at 4Room temperature in the dark, therefore use tin foil to wrap the culture plate). Dilute Alexa Fluor 546 goat anti-mouse IgG1 specific antibody and Alexa Fluor 488 goat anti-rat antibody in blocking solution (1:1000). Every following step should be done under light reduced conditions.
Wash twice with PBS at Room temperature (0h 5m 0s per washing step).
Wash with PBS at Room temperature for 0h 5m 0s. (1/2)
Wash with PBS at Room temperature for 0h 5m 0s. (2/2)
Perform DAPI staining (500µL per well, final concentration: 10 μg/ml) for 0h 5m 0s at 4Room temperature.
Wash twice with PBS at Room temperature (0h 5m 0s per washing step).
Wash with PBS at Room temperature for 0h 5m 0s. (1/2)
Wash with PBS at Room temperature for 0h 5m 0s. (2/2)
During the final washing steps, label the glass microscope slides on which the myofibers will be mounted. A PAP pen can be used to draw a hydrophobic circle around the edges of the glass slides, thereby avoiding spilling of myofiber containing liquid over the edges of the slide.
After the final washing step, transfer the stained myofibers to the glass microscope slide in the smallest volume possible. Make sure the single myofibers are spread out on the glass microscope slide, so you can count the MuSCs on each myofiber separately.
Remove the liquid with a 200 μl pipette. Make sure that the myofibers are not dragged over the slide; rather leave a little bit of liquid on the slide.
Add two to three drops of mounting medium, and apply a cover slip, thereby avoiding the generation of air bubbles ( see Note 15 ).
Let the slides dry at 4Room temperature for at least 0h 20m 0s–1h 0m 0s before analyzing them at the microscope. Make sure that the cover slip is not moving on the slide when counting the cells using a fluorescence microscope. If necessary let the mounting medium harden at 4°C ( see Notes 16–18 ).

