Improved Preservation of Mouse Intestinal Tissue Using a Formalin/Acetic Acid Fixative and Quantitative Histological Analysis Using QuPath
Wei Zhang, Wei Zhang, Tahmineh Kandelouei, Tahmineh Kandelouei, Madeline Houghton, Madeline Houghton, Beatrice Knudsen, Beatrice Knudsen, Bruce A. Edgar, Bruce A. Edgar
Abstract
The architecture and morphology of the intestinal tissue from mice or other small animals are difficult to preserve for histological and molecular analysis due to the fragile nature of this tissue. The intestinal mucosa consists of villi and crypts lined with epithelial cells. In between the epithelial folds extends the lamina propria, a loose connective tissue that contains blood and lymph vessels, fibroblasts, and immune cells. Underneath the mucosa are two layers of contractile smooth muscle and nerves. The tissue experiences significant changes during fixation, which can impair the reliability of histologic analysis. Poor-quality histologic sections are not suitable for quantitative image-based tissue analysis. This article offers a new fixative composed of neutral buffered formalin (NBF) and acetic acid, called FA. This fixative significantly improved the histology of mouse intestinal tissue compared to traditional NBF and enabled precise, reproducible histologic molecular analyses using QuPath software. Algorithmic training of QuPath allows for automated segmentation of intestinal compartments, which can be further interrogated for cellular composition and disease-related changes. © 2024 The Authors. Current Protocols published by Wiley Periodicals LLC.
Basic Protocol : Improved preservation of mouse intestinal tissue using a formalin/acetic acid fixative
Support Protocol : Quantitative tissue analysis using QuPath
INTRODUCTION
Fixation is a crucial process in histopathology because it preserves the integrity of tissues for comprehensive morphological and molecular analysis. Among the various commercially available fixatives, aldehyde-based compounds are the most commonly used for tissue preservation (Eltoum et al., 2001). The fixation mechanism is achieved by establishing covalent chemical bonds (cross-links) within specific protein regions to preserve tissue structure and integrity (Grizzle et al., 2008). Tissue permeabilization is essential for fixative penetration and subsequent immunohistochemistry. The effectiveness varies depending on the fixative and protocol, which affects the uniformity of staining. Some fixatives facilitate permeabilization, while others require additional optimization. Variations affect antigen retrieval and antibody binding and influence the reliability of experimental results.
Several factors play a role in determining the optimal fixation protocol for any specific sample and choosing the best protocol will affect how well the fixation process works. One key variable is how well the fixative diffuses through the tissue. Some substances, e.g., formalin and alcohols, spread quickly, while others, e.g., glutaraldehyde, spread more slowly (Howat & Wilson, 2014). If the thickness of the sample is <4 mm, most fixatives can penetrate quickly and evenly, but thicker tissues require longer fixation times and/or additional steps to improve tissue permeability. Finding the optimal concentration of fixative is crucial. Formaldehyde typically comes in the form of 10% (v/v) neutral buffered formalin (NBF), which contains 3.7% formaldehyde in phosphate-buffered saline (PBS). For pathologists, the standard fixation time in NBF for most tissue types is 24 hr (de Paula et al., 2018). However, for research applications, fixation times may vary depending on tissue size. Proper fixation time is also critical. Fixing a sample for too long can interfere with immunostaining or obscure important parts of the sample, while fixing for too short a time can create tissue morphology and cell integrity artifacts, and/or result in damage when the tissue is sectioned or stained (Singhal et al., 2016). Another important consideration is the compatibility of other quantitative analyses or intended sample staining with the fixation protocols used. For example, some fixatives allow for good tissue morphology but may not be compatible with immunostaining for certain antigens. Optimizing these factors will help to find the perfect protocol for experimental samples (Howat & Wilson, 2014).
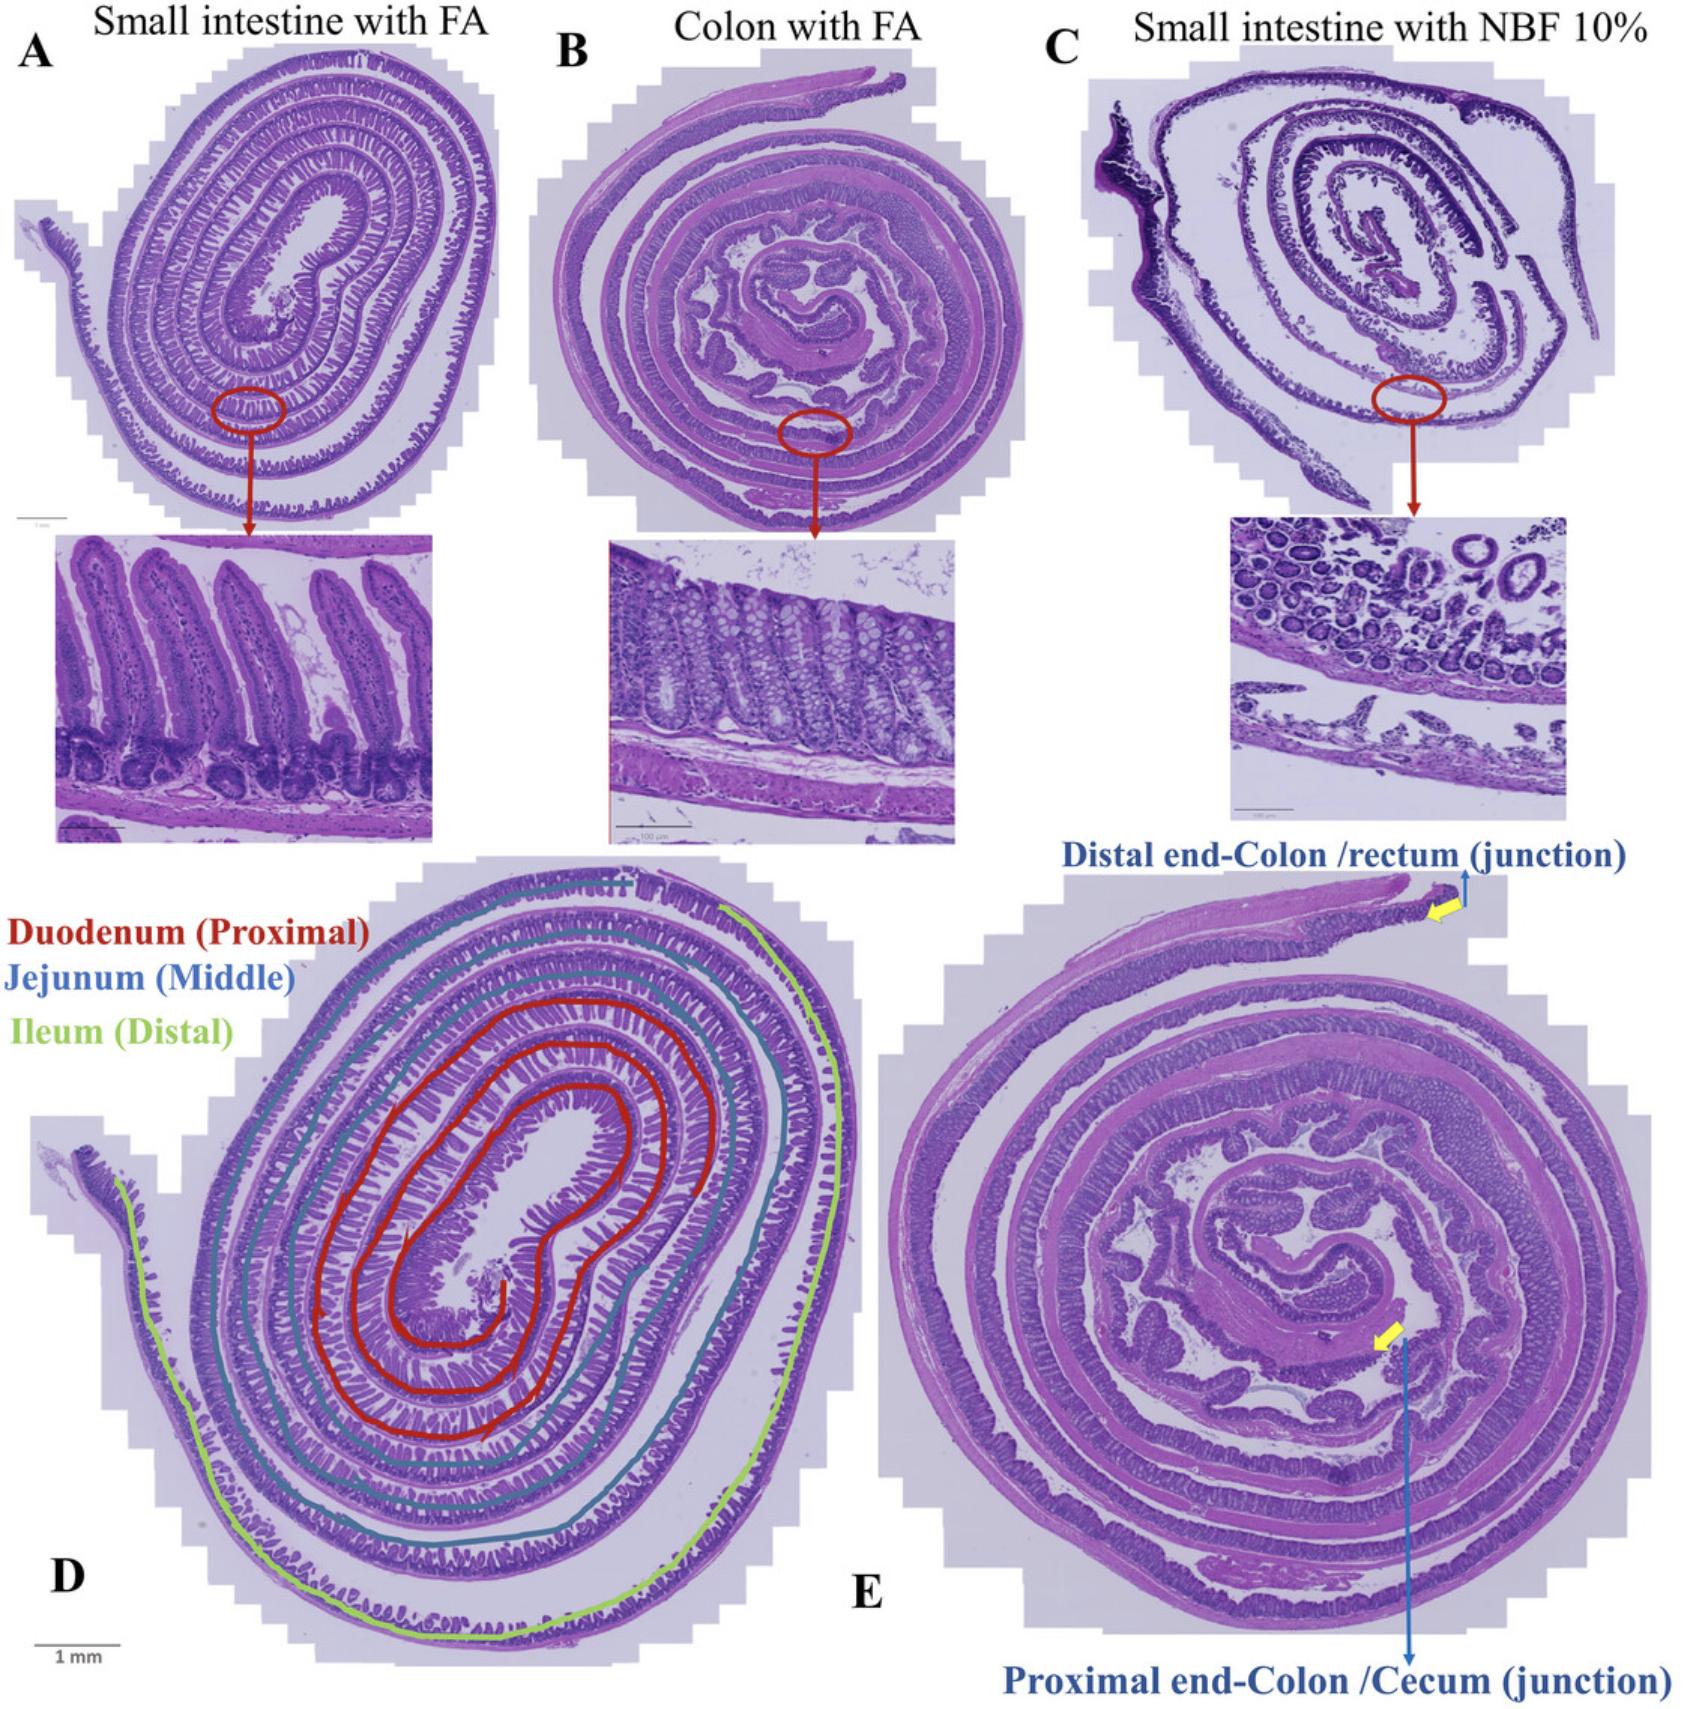
The vertebrate gastrointestinal tract is a complex tissue that includes regions with specific histochemical features, such as the small intestine, which is composed of the duodenum, jejunum, and ileum sections, and the large intestine, which consists of the cecum and colon (e Silva et al., 2019). All these areas have specific microscopic features. In the duodenum and jejunum (which form the posterior part of the small intestine) villi are numerous, whereas in the ileum, villi are smaller. In the upper region of the duodenum, villi appear as broad ridges, become long and leaf-shaped in the distal duodenum and proximal jejunum, and then gradually shorten to a finger-like shape in the distal jejunum and ileum. The function of the villi is to increase the surface area of the epithelium for better absorption of digested food. The luminal side of intestinal epithelium is covered by a layer of mucus that is very thick but is typically collapsed or washed away during fixation (Ermund et al., 2013) (see Support Protocol). There are no villi in the large intestine; instead, elongated crypts compensate for the absence of villi (Sirinukunwattana et al., 2017) (see Support Protocol).
Proper preparation of intestinal tissue is critical for accurate microscopic and molecular analysis. The “Swiss roll” technique, named after a popular spiral-rolled cake, has been widely used alongside formalin fixation. This technique allows examination of the entire length of the intestinal tissue in a compact format and can provide comprehensive microscopic sections for various measurements (Moolenbeek & Ruitenberg, 1981). The Swiss roll method, first introduced by Magnus (1937) and further developed by Moolenbeck and Ruitenberg (1981) and Park et al. (1987), simplifies the preparation and examination of small rodent intestinal tissue. One pitfall of using NBF for intestinal tissue is shrinkage, which is reported to occur in many other tissues (Rahman et al., 2022). We have observed that NBF-induced shrinkage disrupts villi in intestinal tissue, leading to rupture of the tissue, inaccurate measurement of villus or crypt length, and underestimations of morphologic changes of the epithelium in various assays. In searching for a suitable protocol, we tried most of the available formalin-based Swiss roll protocols, but we could not obtain sections that retained both intact intestinal tissue morphology throughout the tissue, and good immunostaining characteristics. We also experimented with a protocol that uses a modified Bouin's fixative containing 50% ethanol and 5% acetic acid in dH2O (Bialkowska et al., 2016). This modified Bouin's fixative yielded sections with excellent morphology but was not compatible for use with Ki-67 immunostaining. Hence, we optimized the existing Swiss roll protocols in order to obtain both high quality tissue morphology as well as strong, uniform detection of protein antigens (Ki-67, MCM) by immunohistochemistry.
This article describes, step-by-step, the improved preservation of mouse intestinal tissue using a formalin/acetic acid fixative (Basic Protocol) and quantitative tissue analysis (villus and crypt length, cell numbers and compositions) using QuPath (Support Protocol). Our optimized protocol is an improved version of the original Swiss roll method and ensures efficient and reliable tissue preparation for various quantitative analyses using 10% or 20% NBF with 5% acetic acid (Adeniran et al., 2021). The acetic acid has little effect on the proteins we detected, and promotes swelling by absorbing water, compensating for NBF-induced shrinkage, and thereby preserving tissue morphology (Baker, 1958). This updated approach facilitates the collection and preparation of intestinal sections for standard assays, such as immunohistochemistry for proliferation markers, quantitative Qupath analysis of various morphological measurements, e.g., villus and crypt length, and precise cell counting. Although we optimized this protocol for mice, it should be adaptable for use on the intestines of other similarly sized vertebrates.
NOTE : All protocols involving animals must be reviewed and approved by the appropriate Animal Care and Use Committee and must follow regulations for the care and use of laboratory animals.
Basic Protocol: IMPROVED PRESERVATION OF MOUSE INTESTINAL TISSUE USING A FORMALIN/ACETIC ACID FIXATIVE
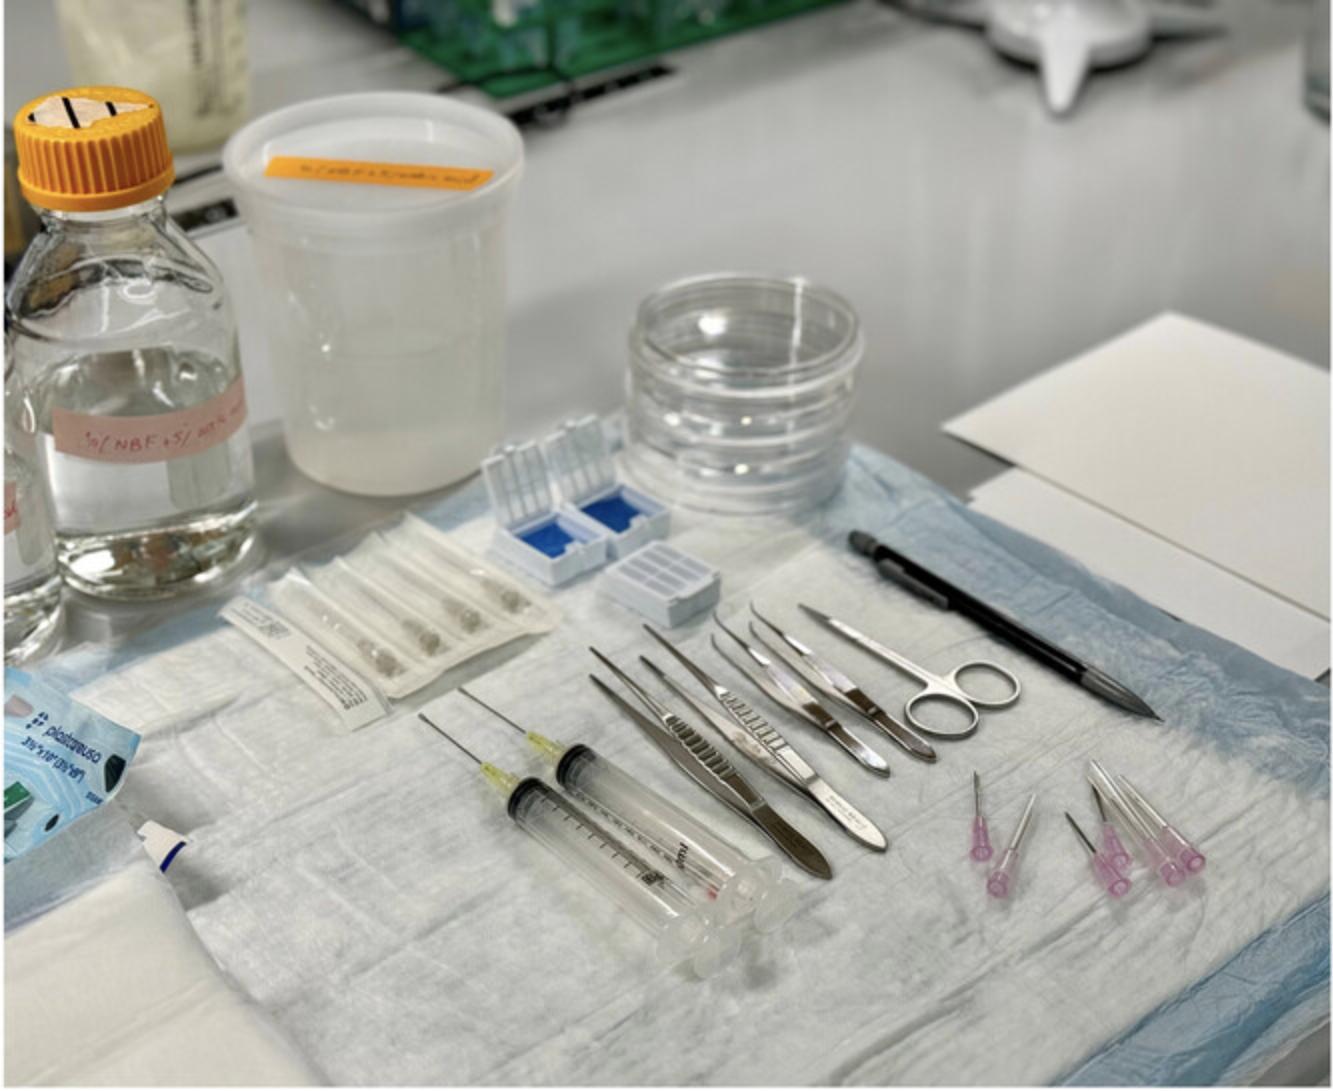
With this protocol, the entire length of the gastrointestinal tract of the mouse (small and large intestine) can be examined to detect and analyze any, and all, morphological changes in the epithelium, and to carry out quantitative examinations, such as counting cell numbers and cell type compositions. See Figure 1 for the materials used in this Basic Protocol.
Materials
-
C57BL/6 mice, provided by the Huntsman Cancer Institute (HCI) Preclinical Research Resource
-
Cold 1× phosphate-buffered saline (PBS) (Gibco, cat. no. 10010023)
-
FA fixative (see recipe)
-
100% ethanol
-
H2O, distilled
-
100% xylene
-
Paraffin
-
Euthanizing chamber connected to a CO2 gas source
-
Dissection mat or board
-
18G syringe needles
-
Tweezers
-
Operating scissors, straight, sharp-sharp, 4.5-in. length, 41-mm blade length (ROBOZ, cat. no. RS-6802)
-
Thumb dressing forceps, serrated, delicate, 5-in. length, 1.3-mm tip width (ROBOZ, cat. no. RS-8122)
-
Gerald micro dissecting forceps, curved, serrated, 7-in. length (ROBOZ, cat. no. RS-5271)
-
Surgical scissors, straight, sharp-blunt, 47-mm, 14.5-cm (Fine Scientific Tools, cat. no. 14001-01)
-
Petri dish, plastic, 150-mm × 15-mm
-
10-ml syringe equipped with gavage needle (straight, size 16G, 2-in. × 3-mm, ball)
-
Filter paper
-
27G syringe needles
-
Double-deep tissue cassette (I.H.C. World, cat. no. M512) (Fig. 1)
-
Labeled plastic containers for sample fixation
-
Foam biopsy pad (Globe Scientific, cat. no. 190195)
-
Solvent-resistant pencil
-
Vacuum oven
-
Tissue processing and microtome machines
-
Glass slides
-
Additional reagents and equipment for histological and immunohistochemical staining, and slide scanning or microscopy (Kinsey et al., 2019)
CAUTION : Xylene poses health risks and requires a work area with adequate ventilation (e.g., fume hood) and appropriate personal protective equipment.
Dissection
1.Euthanize the mice by CO2 asphyxiation by placing them in a chamber connected to a CO2 gas source and then perform cervical dislocation.
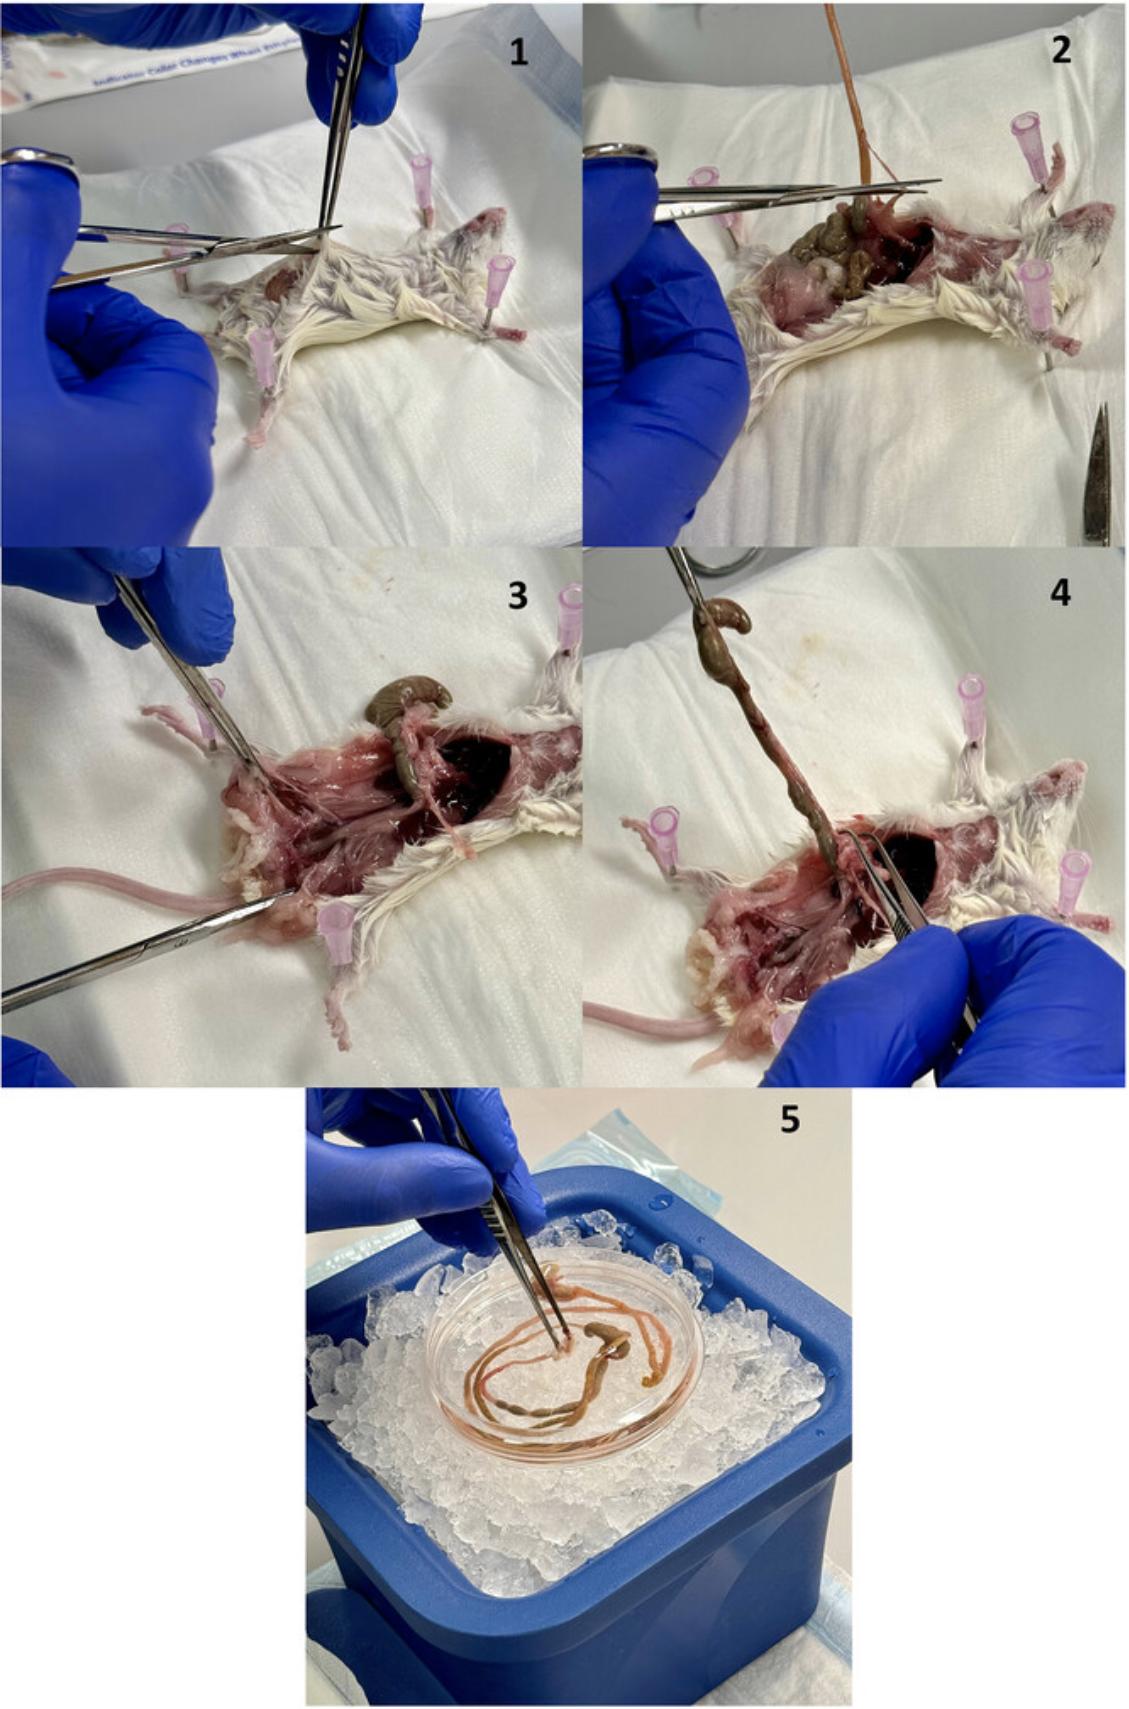
2.Place the mouse on the cutting board, fix it to the base with four 18G needles, and make a T-shaped incision in the abdominal skin with operating scissors (Fig. 2.1).
3.Lift the peritoneum with tweezers and carefully separate it using thumb dressing forceps, taking care not to damage the intestine. Make a precise incision with operating scissors in the peritoneal tissue, gradually removing the skin using thumb dressing forceps to expose the abdominal muscles. Carefully make an incision in the abdominal muscles with operating scissors and slowly remove them with thumb forceps to expose the intestine.
4.Free the intestine of any fatty tissue with thumb dressing forceps until you reach the stomach (Fig. 2.2).
5.To preserve the rectum and colon, remove the skin around the anus using operating scissors. Cut the colon towards the anus with operating scissors (Fig. 2.3).
6.Cut the esophagus above the stomach in the abdominal cavity with operating scissors (Fig. 2.4). At this step, the entire intestinal tract is free. Carefully remove it from the carcass with tweezers and place it in a Petri dish with 5 ml cold PBS (Fig. 2.5). Separate the small and large intestine with operating scissors
Intestinal flushing and pre-fixation
7.Hold a segment of intestine (small or large intestine), fill a 10-ml syringe with FA fixative and attach it to the gavage needle. Insert the needle ∼0.5 cm into the anterior opening of the intestinal segment.
8.Use thumb forceps or your fingers to apply even pressure to the intestinal segment to fix the swallowing needle. Meanwhile, with the syringe in the other hand, apply gentle, steady pressure to flush the bowel segment with the fixative (Figs. 3.2, 4.2). This procedure serves the dual purpose of cleaning the segment and initiating fixation immediately. Use a Petri dish to catch the residue that is flushed out. Confirm fixation by observing the color of the colon, which will become opaque in less than 1 min.
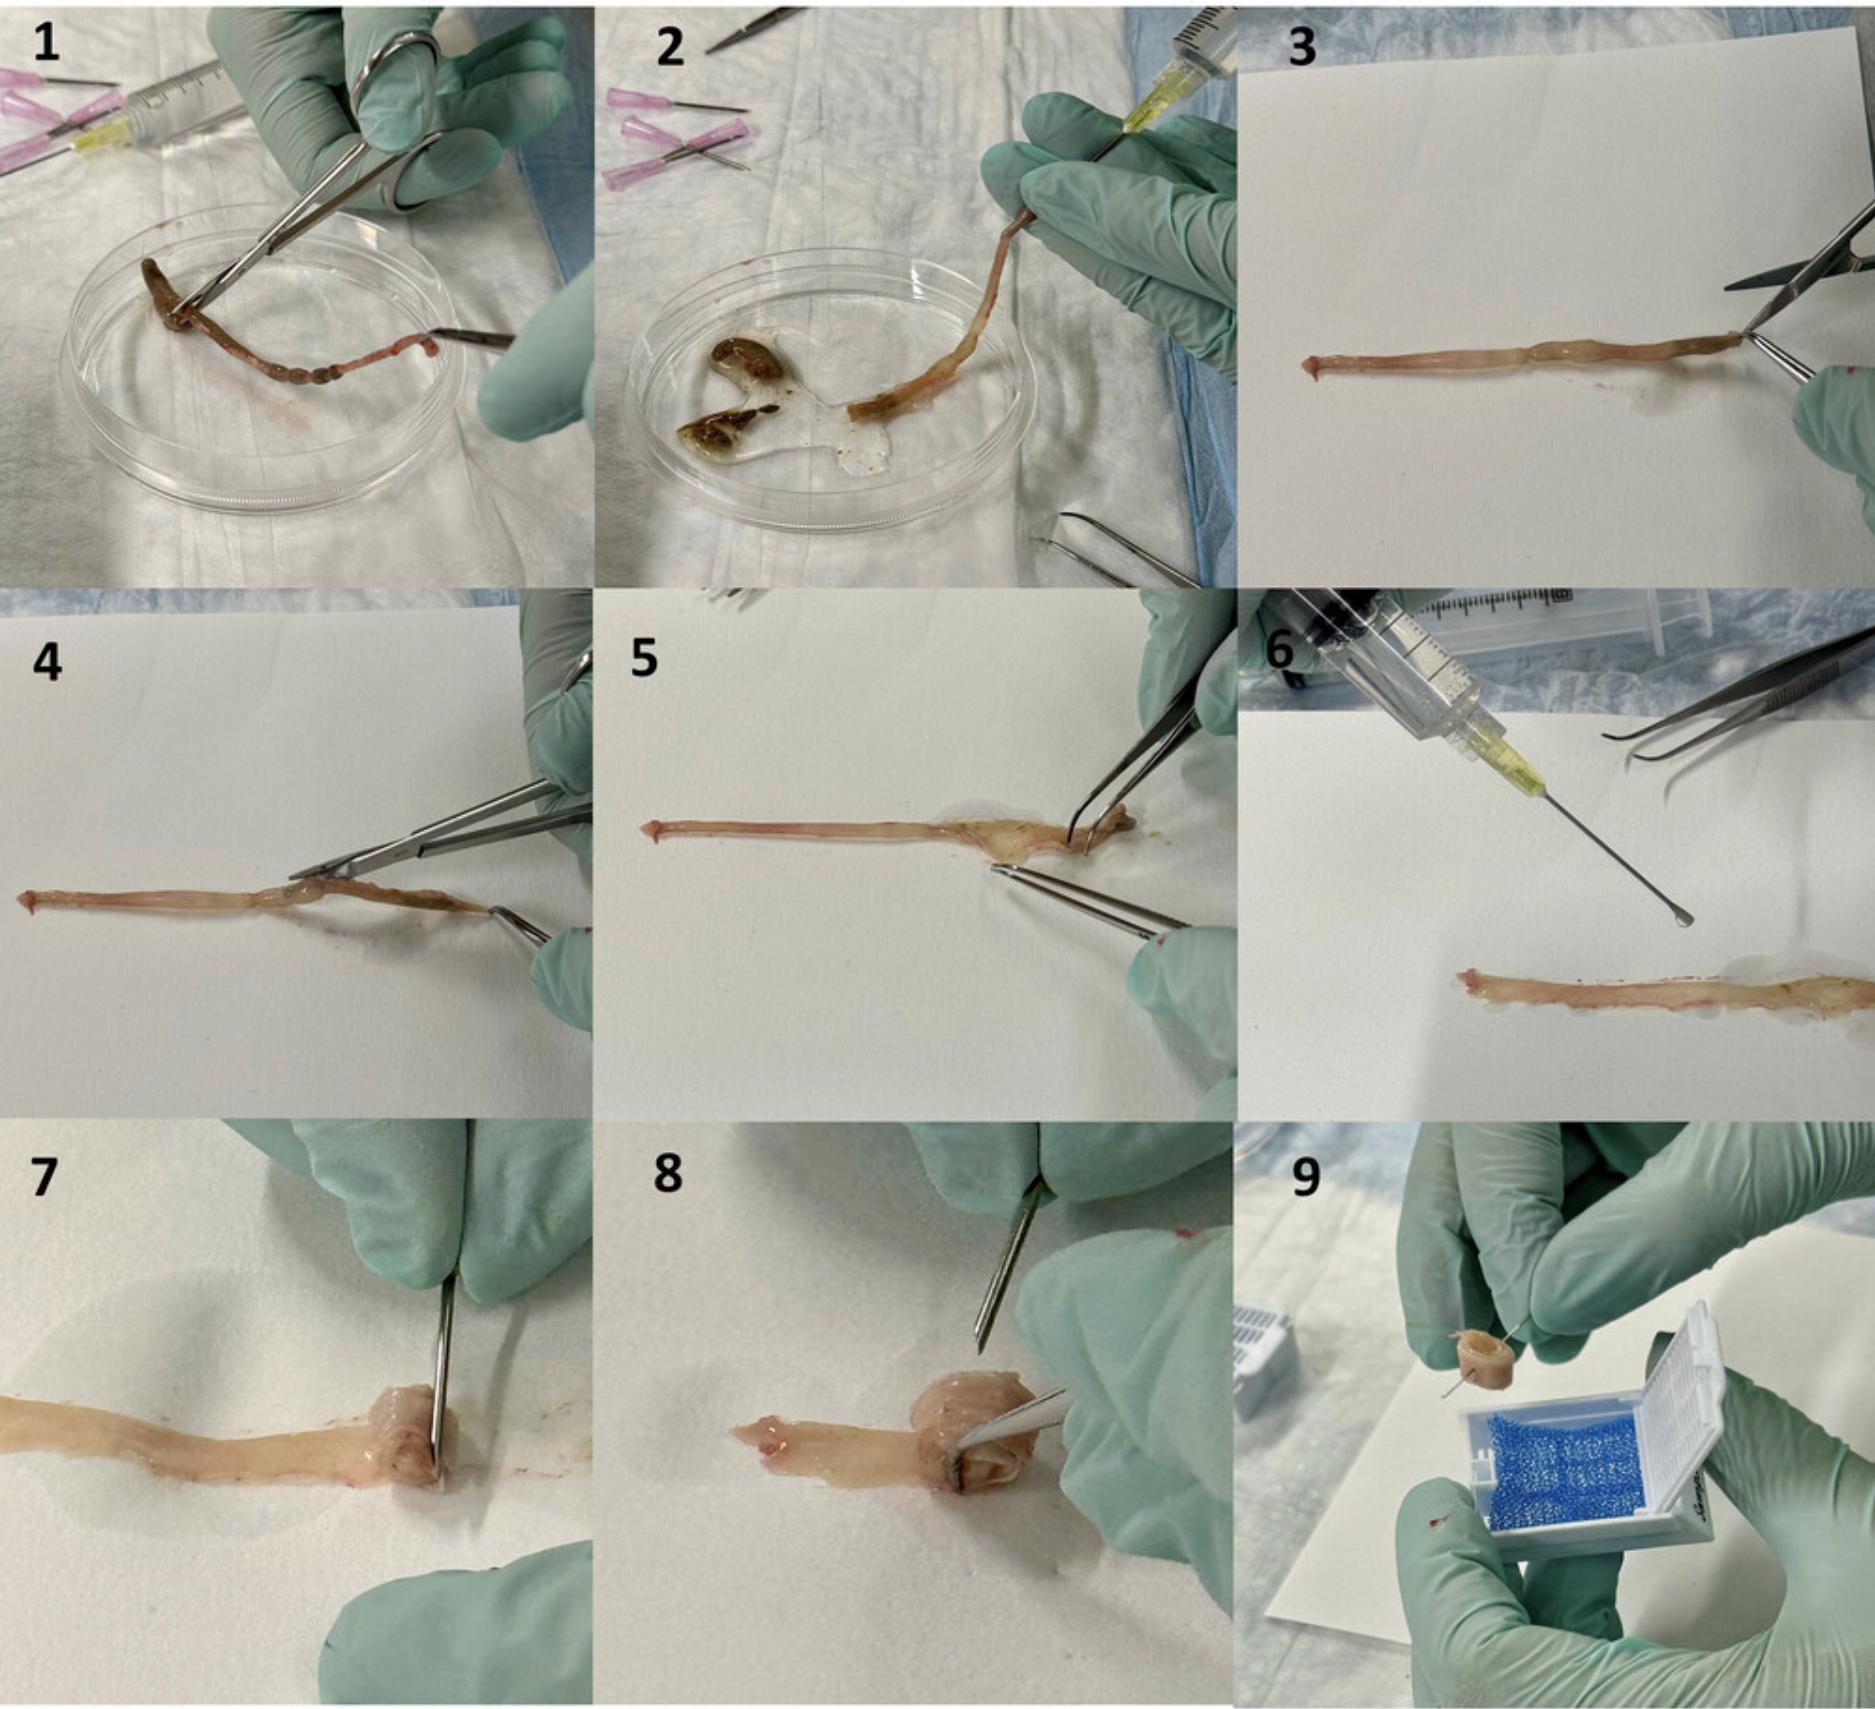
9.Cut the small intestine with operating scissors into three sections. The proximal section corresponds to the duodenum, the middle to the jejunum and the distal to the ileum (Fig. 4.1). The colon may be processed as one single section.
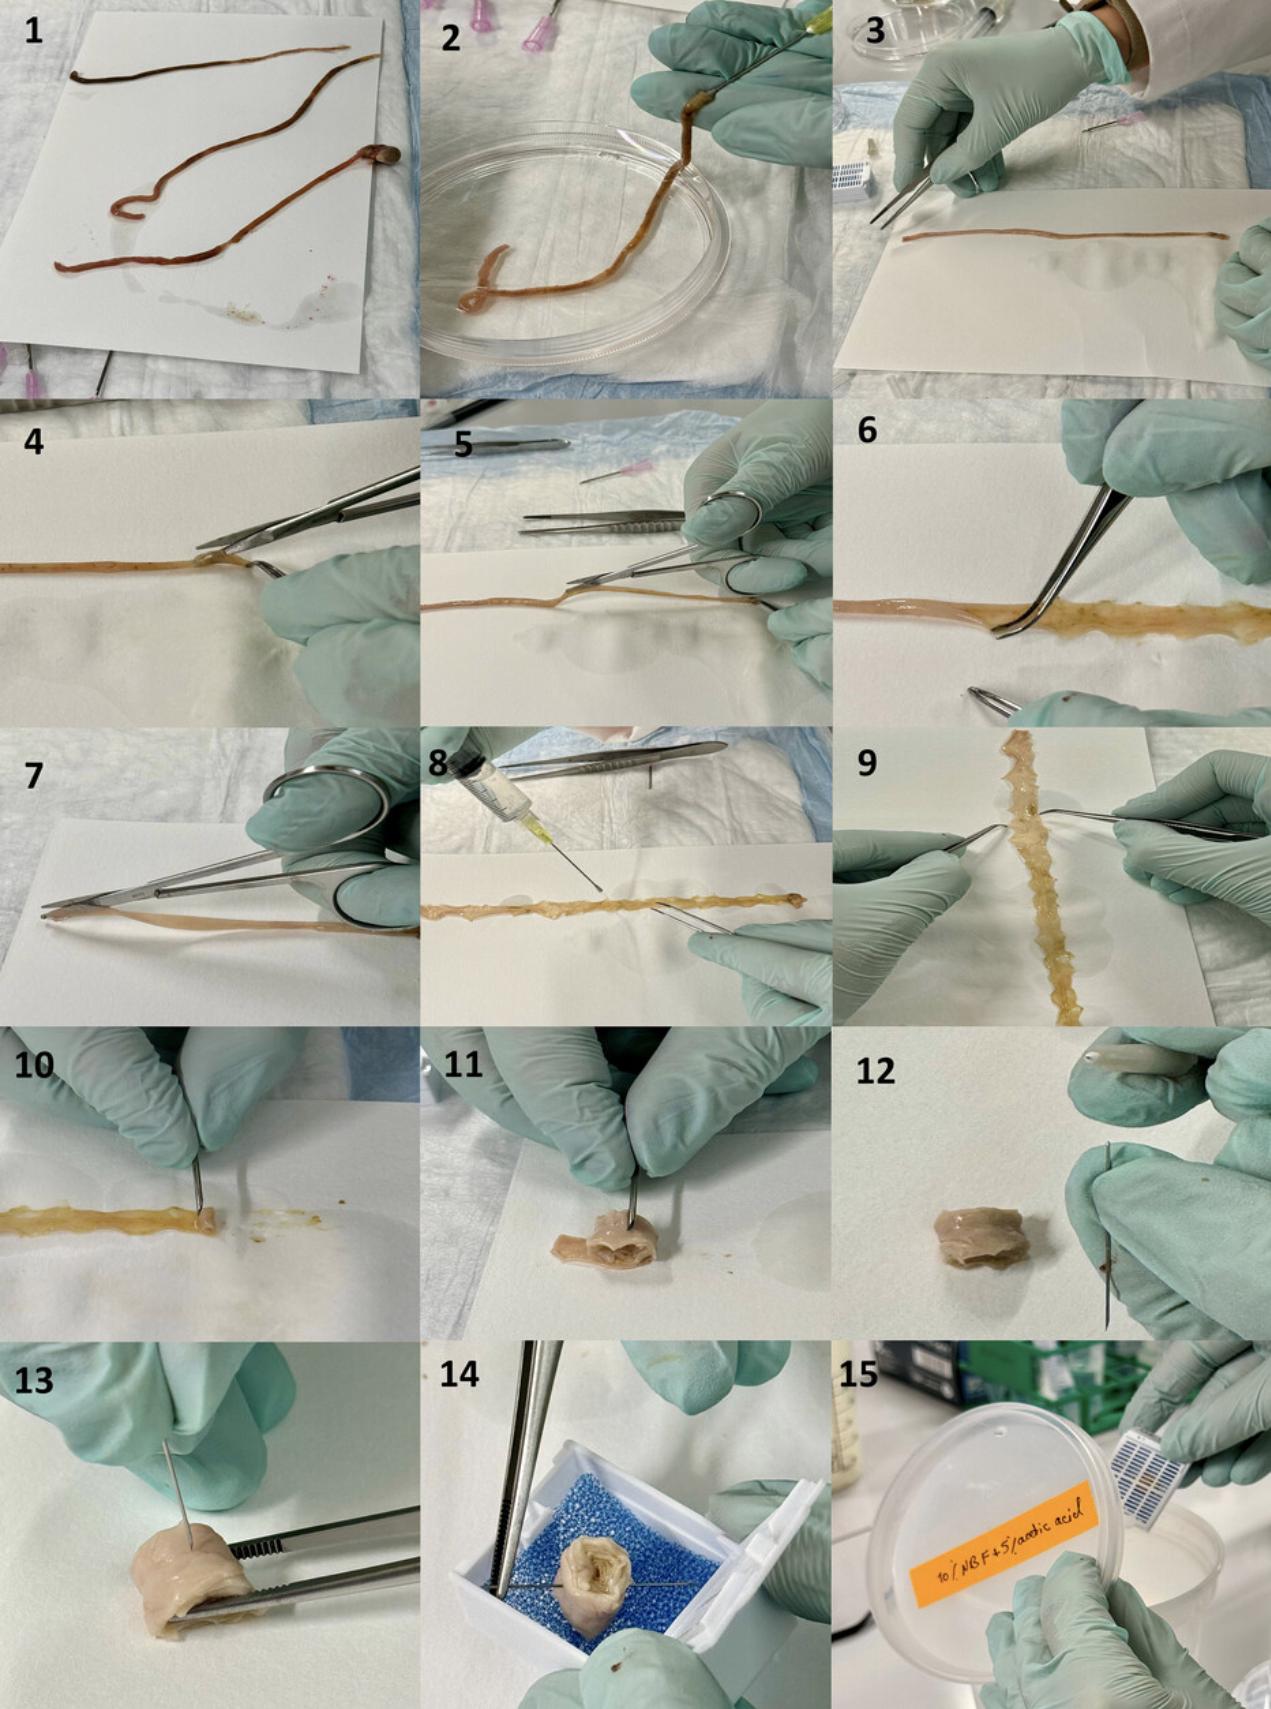
10.Place the intestinal segment on a piece of filter paper (Figs. 3.3, 4.3). While holding one end of the section with Gerald micro dissecting forceps, cut it lengthwise with surgical scissors, with the blunt end of the scissors inside the intestine on the luminal side (Fig. 3.3 to 3.5, Fig. 4.4 to 4.7). Fully rinse cut sample, which is now a ribbon, briefly again with FA to ensure quick thorough fixation.
11.Hold one end of the cut section with the surgical scissors and try to keep it flat on the filter paper after cutting. The luminal side should face up, and not lay against the filter paper (Fig. 4.9).
12.To identify the luminal side of the colon, look for variations or ridges that extend across the entire width of the colon and are particularly noticeable at the proximal end. There are longitudinal variations in the middle and distal areas. In the small intestine, you can recognize the luminal side by the rough surface, which indicates the presence of villi.
Rolling Swiss rolls
13.Flatten the opened intestinal segments on the filter paper using Gerald micro dissecting forceps.
14.The luminal side should face upwards. Using an 18G needle, wrap the starting end around the needle, fix it lightly against the needle and start rolling the segment towards its end (Figs. 3.7, 4.10), creating the spiral roll known as a “Swiss roll” (after the cake of the same name).
15.Handle one segment at a time, keeping the tissue ribbon flat with the luminal side up.
16.Once the entire length of the segment is rolled up, carefully slide the Swiss roll off the filter paper with Gerald micro dissecting forceps. Insert the 27G needle through the Swiss roll (Figs. 3.9, 4.12, 4.13) to prevent it from loosening of the layers, or un-rolling during the remaining steps of tissue preparation.
17.Label a double-deep cassette with sample ID using a solvent-resistant pencil. Place the Swiss roll into the double-deep cassette covered by a foam biopsy pad for subsequent tissue preparation (e.g., embedding for sectioning) (Figs. 4.14, 4.15). Soak the cassette in a plastic container filled with FA overnight at room temperature to complete the fixation.
Processing fixed tissues for paraffin embedding
18.While the tissue remains in the cassette, rinse it with PBS, three times for ∼3 to 5 min to ensure the fixative is thoroughly removed.
19.Dehydrate the tissue by immersing it in sequence in an ethanol concentration series. Start with 50% ethanol for 10 min, and then 70% ethanol for 10 min, 80% ethanol for 10 min, 95% ethanol for 10 min and finally three rinses with 100% ethanol for 10 min each.
20.Replace the ethanol with xylene using a series of rinses in the following order: 2:1 ethanol:xylene for 10 to 15 min, 1:1 ethanol:xylene for 10 to 15 min, 1:2 ethanol:xylene for 10 to 15 min, and three passes with 100% xylene for 10 to 15 min each.
21.Replace the xylene with paraffin using a vacuum oven set at 54° to 58°C. Immerse the sample in 2:1 xylene:paraffin for 30 min, 1:1 xylene:paraffin for 30 min, 1:2 xylene:paraffin for 30 min and two passes with 100% paraffin for 1 to 2 hr each or overnight.
22.Dip the tissue in fresh paraffin and arrange into the final desired position before the paraffin solidifies. With Swiss rolls, it is important to align each roll laterally (edge sides up and down) during paraffin embedding. This ensures that when cutting, sections are created that transect the entire spiral of tissue, revealing crypt-villus structures in cross-section along the entire length of the intestinal segment.
23.To prepare for histological or immunohistochemical staining, cut 4-μm thick sections with a microtome. Place these sections on glass slides and allow them to air dry or bake overnight at 65°C. As soon as they have reached room temperature, you can start the staining process (Bialkowska et al., 2016; e Silva et al., 2019; Williams et al., 2016).
Support Protocol: QUANTITATIVE TISSUE ANALYSIS USING QuPath
QuPath is open-source digital pathology software used for analyzing and quantifying cell and tissue morphology characteristics from images of tissues obtained by microscopy. It offers various tools for image analysis, including functions for cell recognition, tissue segmentation, object measurement and the analysis of biomarkers in tissue. QuPath is used in research and clinical settings for tasks, such as tumor analysis, biomarker quantification and histological assessments.
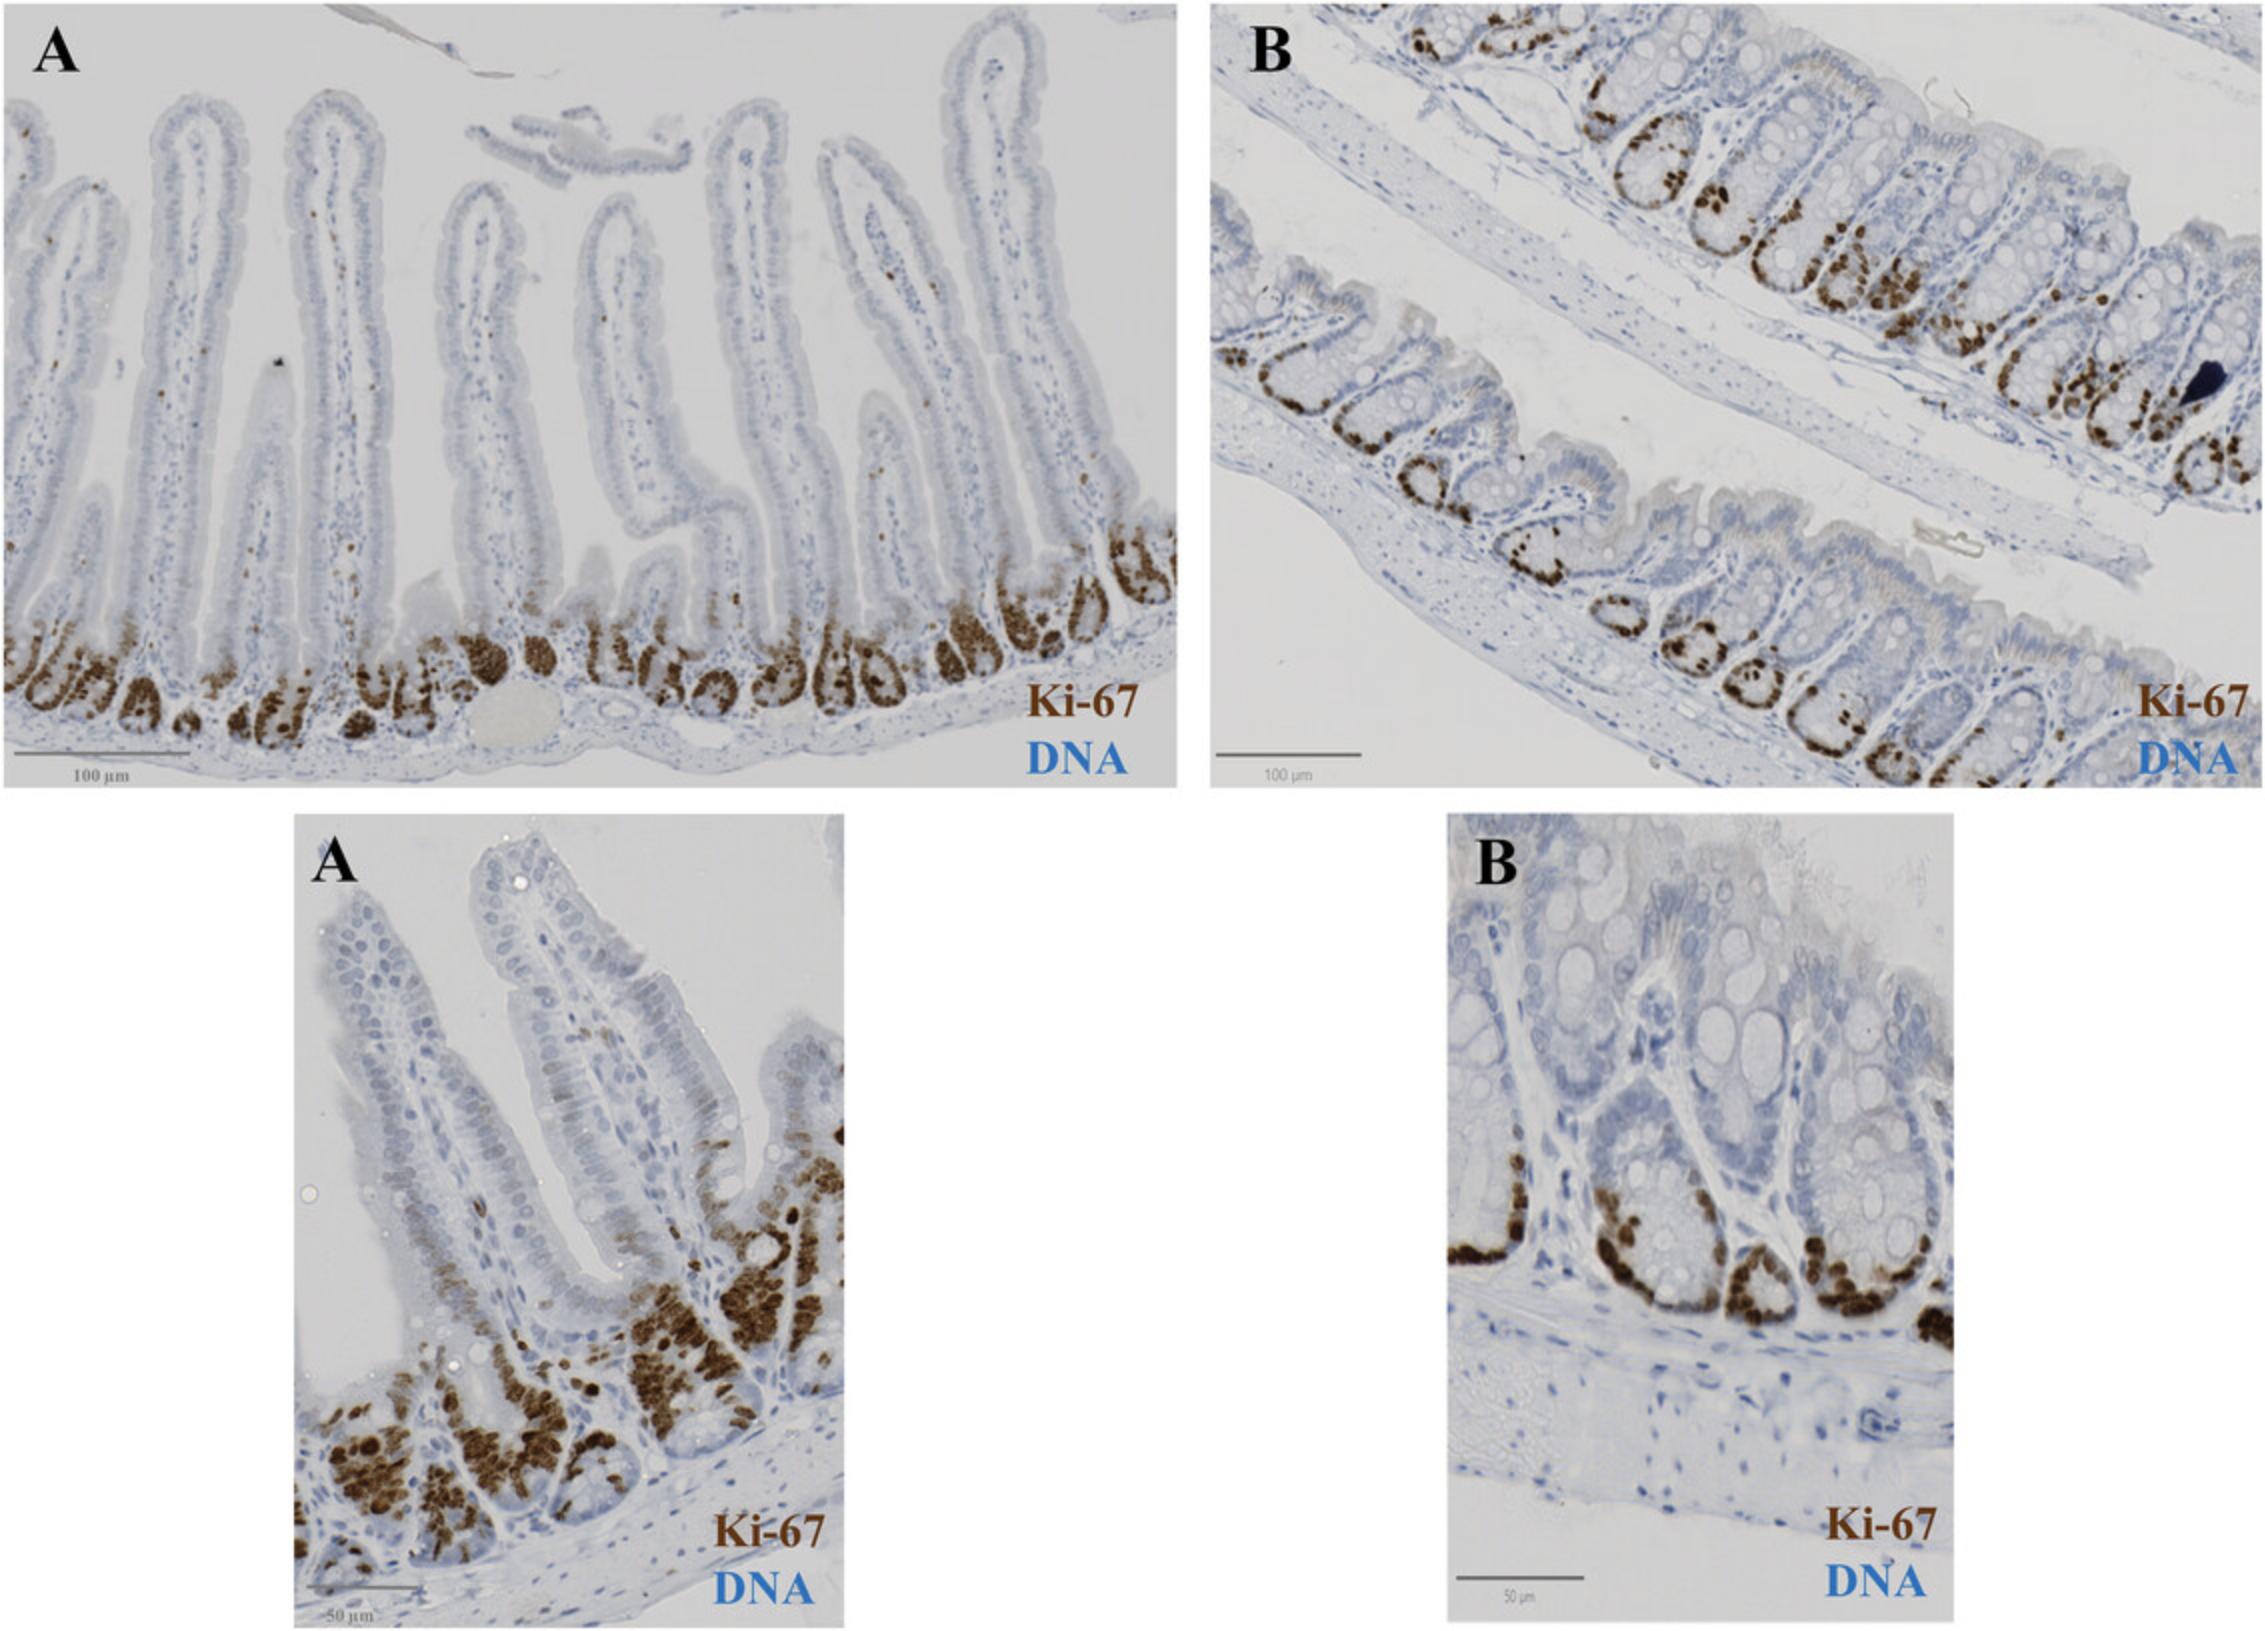
We analyzed images of hematoxylin and eosin (H&E)- and immunohistochemically (IHC)-stained intestinal tissue samples in QuPath (version 0.4.3) (Fig. 5 and Fig. 6). This is an open-source software for digital pathology and whole-slide image analysis. Briefly, the software was developed using Java 8, with a JavaFX interface for object annotation and visualization. QuPath has built-in algorithms for general tasks such as cell and tissue detection and interactive machine learning for object and pixel classification. The software supports several image formats through Bio-Formats and OpenSlide, including whole-slide images of IHC antibody stains (Fig. 6). We used the Zeiss AxioScan slide scanner to take images of tissue sections.
Materials
- High quality images of H&E-stained sections or immunohistochemically-stained slides scanned on a Zeiss Axioscan slide scanner (20× objective)
- Qupath software (or appropriate image analysis software)
Quantification of villi and crypt lengths, total cell numbers, and Ki-67 positive cell numbers
1.Create project in QuPath. Click “create project” and then select an empty folder. All files related to this project will be saved in this folder, including trained classifiers, scripts, and data outputs.
2.Upload images to QuPath. Simply drag and drop image files in the main window of QuPath.
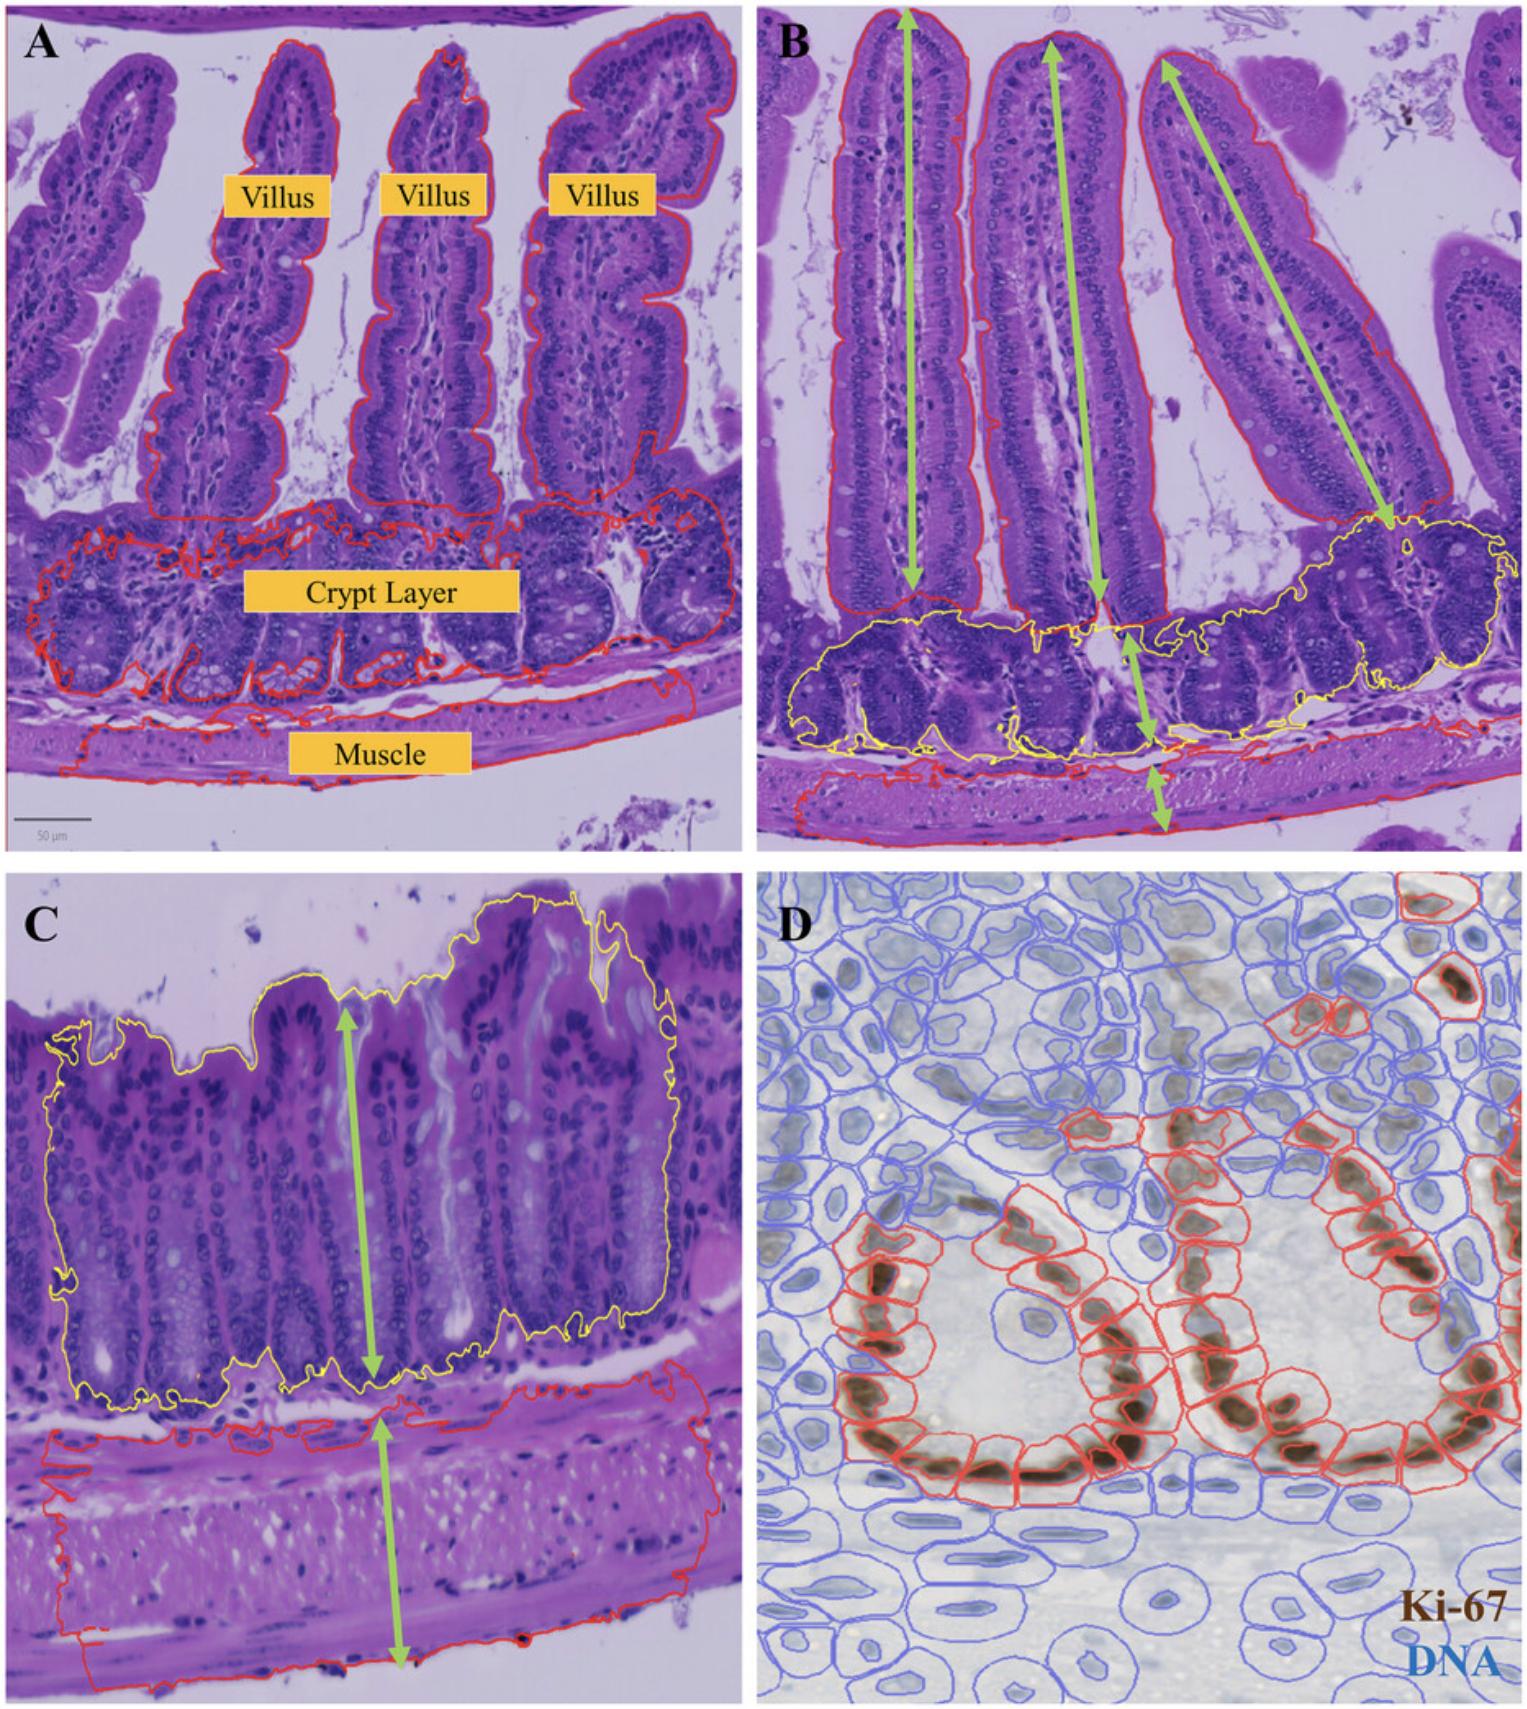
3.Use the Wand or Brush tool to annotate the villus, crypt, and muscle manually. See examples in Figure 7.You can repeat this step as many times as you want, usually ≥10 structures for each is enough. Remember to include background annotation as the “ignore” class.
4.Train the pixel classifier. Go to Classify > Pixel classifier > Train pixel classifier, select Random tree (RTrees) as the classifier in the popup window, select resolution at moderate, and include hematoxylin, eosin, and residual channels in the features. You can check the classification performance by clicking “Live prediction.” If not satisfied, you can manually annotate more structures to add more training data and improve the results. Remember to save the classifier at the end.
5.Select region of interest (ROI). Use Rectangle tool to draw a ROI and go to Classify > Pixel classifier > Load Pixel Classifier. In the popup window, select the classifier you saved earlier and select region as the annotation ROI, then click “create objects”. In the Create objects window, the Minimum object size is set at 10,000 µm2 and Minimum hole size is set at 10,000 µm2.
6.Select the created objects in the Annotations tab and go to Analyze > Calculate features > Add shape features, and then click “apply”.
7.Repeat step 5 and 6 in multiple ROIs.
8.Export measurements. Go to Measure > Show Annotation measurement. Save the measurement as a .txt file and open in Excel. Then you can calculate the depth for each object (depth = area/maximum diameter).
9.For cell segmentation, go to Analyze > Cell detection > Cell detection. In the popup window, use all default parameters, and click “Run” and process all annotations.
10.The cell count in each villus and crypt can be accessed in the detection measurement.
11.If working with Ki-67 IHC images, repeat all steps from 1 to 8.
12.In cell detection step, go to Analyze > Cell detection > Positive cell detection, use all default parameters but adjust the intensity threshold parameters and then click “Run”.
13.The total cell count and positive cell count can be accessed in the detection measurement.
REAGENTS AND SOLUTIONS
FA fixative
- 475 ml of 10% or 20% neutral buffered formalin (NBF) (Eperdia, cat. no. 22-050-104 and AZER Scientific, cat. no. 20NBF-1G, respectively)
- 25 ml of 100% acetic acid
- Store up to 6 months at room temperature
COMMENTARY
Critical Parameters
Successful application of this protocol depends on several factors, including but not limited to: (a) using the correct fixative (mixture of 10% or 20% NBF + 5% acetic acid); (b) avoiding tissue dryness during the preparation steps by reapplying fixative at various intervals to moisten the tissue while rolling on the filter paper; (c) proper use of forceps while rolling the tissue to ensure they do not come into contact with the luminal side and do not tear the villi and crypts; (d) minimizing procedure time to ensure that the dissected tissue is pre-fixed less than 3 min after dissection to avoid artifactual changes; and (e) ensuring that the tissue is in a suitable conformation prior to overnight fixation.
Troubleshooting
A troubleshooting table addresses potential problems through the experimental procedure and offers solutions to ensure smooth running and accurate data collection (Table 1).
| Problem | Possible cause | Solution |
|---|---|---|
| Poor tissue morphology (indistinct nuclei, stretched or sheared tissue, squashed villi, etc.) | Over-fixation or under-fixation of tissue | Adjust fixation duration and method (overnight, 8 to 24 fixations) |
| Inadequate tissue perfusion with fixative; delay in fixation after tissue collection | Ensure adequate perfusion or immersion of tissue in fixative | |
| Inadequate tissue processing or embedding | Optimize tissue processing and embedding steps | |
| Incorrect section thickness | Adjust microtome settings for optimal sections | |
| Inadequate antigen retrieval | Inappropriate retrieval buffer, or duration | Optimize antigen retrieval protocol |
| Tissue sections are too thick | Use 4-µm sections | |
| Weak or no staining | Poor antibody quality or concentration | Validate antibody and optimize concentration |
| Insufficient antigen exposure | Optimize antigen retrieval or incubation times | |
| Background staining | Non-specific binding of secondary antibody | Optimize blocking and wash steps |
| Inadequate washing of slides of tissue sections | Increase the number of wash steps or duration | |
| Cross-reactivity of primary antibody | Validate antibody specificity |
Understanding Results
A pixel classifier for tissue detection was first trained to annotate the outline of tissue regions. To enable identification of tissue type, ten examples of villi, crypts, and muscle were manually annotated as training input (see example in Figure 7). Then a random tree-based pixel classification model was trained to detect villi, crypts, and muscle (Fig. 7A). Our model was able to detect most individual villi, but the crypts were mostly connected together. Because of this, we changed our detected target objects to individual villi and layers of crypts, in order to measure the lengths of individual villi and the depth of the crypt layer overall, within a region. Due to the irregular shape of each object, villi lengths were estimated by area divided by maximum width (Fig. 7B and C).
After the detection of villi and crypts, a watershed-based nuclear segmentation was applied. To obtain cell borders, we expanded the nuclear outlines by 5 µm.
For Ki-67 stain images (Graefe et al., 2019), the DAB staining in each nucleus was used to classify cells into positive and negative classes (Fig. 7D). The hematoxylin counter stain can be used to define the total cell number with QuPath. A threshold value of 0.5 (with a mean DAB intensity per nucleus of 0.20) was applied across all samples. The percent of positive cells in each region of interest (ROI) was reported as the final output for comparison among groups.
The described approach should provide numerous high quality intestinal sections that allow effective staining with H&E or immunohistochemical methods. This will facilitate the acquisition of qualitative and quantitative data from these tissues, particularly in the context of research into intestinal diseases in mouse models.
Time Considerations
The entire Basic Protocol can take 15 to 20 min per mouse for experienced users. This includes tissue removal and Swiss roll preparation. It is advisable to practice the technique several times before using it for precious experimental samples. 8 to 24 hr is recommended for adequate fixation of the tissue in the fixative. The use of QuPath is simple and straightforward for image processing. The semi-automated quantitative analysis described here can save a trained user a large amount of time, and will also yield more extensive, more accurate data.
Acknowledgments
This work was supported by N.I.H. Grant R01 DK125745 to B.A.E. We thank the HCI Preclinical Research Resource (PRR) for providing mice and helping with the dissection procedure.
Author Contributions
Tahmineh Kandelouei : Data curation; formal analysis; investigation; methodology; software; validation; visualization; writing original draft. Wei Zhang : Methodology; software; validation; visualization. Madeline Houghton : Writing review and editing. Beatrice Knudsen : Software; validation; writing review and editing. Bruce Edgar : Conceptualization; funding acquisition; project administration; supervision; writing review and editing.
Conflict of Interest
The authors declare no conflict of interest.
Open Research
Data Availability Statement
All data relevant to the manuscript have been included here, including figures and tables. The corresponding author is willing to provide further details on request, if necessary.
Literature Cited
- Adeniran, B., Bjarkadottir, B., Appeltant, R., Lane, S., & Williams, S. (2021). Improved preservation of ovarian tissue morphology that is compatible with antigen detection using a fixative mixture of formalin and acetic acid. Human Reproduction , 36(7), 1871–1890. https://doi.org/10.1093/humrep/deab075
- Baker, J. R. (1958). Principles of biological microtechnique. A study of fixation and dyeing. Principles of biological microtechnique. A study of fixation and dyeing.
- Bialkowska, A. B., Ghaleb, A. M., Nandan, M. O., & Yang, V. W. (2016). Improved Swiss-rolling technique for intestinal tissue preparation for immunohistochemical and immunofluorescent analyses. Journal of Visualized Experiments: JoVE , (113), 54161. https://doi.org/10.3791/54161
- de Paula, R. C., Babinski, M. A., Pereira-Sampaio, M. A., Pires, L. A. S., & Fernandes, R. M. P. (2018). The use of fixative solutions throughout the ages: A comprehensive review. Acta Scientiae Anatomica , 1(1), 21–28.
- e Silva, A. P., Lourenço, A. L., Marmello, B. O., Bitteti, M., & Teixeira, G. A. P. B. (2019). Comparison of two techniques for a comprehensive gut histopathological analysis: Swiss roll versus intestine strips. Experimental and Molecular Pathology , 111, 104302. https://doi.org/10.1016/j.yexmp.2019.104302
- Eltoum, I., Fredenburgh, J., Myers, R. B., & Grizzle, W. E. (2001). Introduction to the theory and practice of fixation of tissues. Journal of Histotechnology , 24(3), 173–190. https://doi.org/10.1179/his.2001.24.3.173
- Ermund, A., Schütte, A., Johansson, M. E., Gustafsson, J. K., & Hansson, G. C. (2013). Studies of mucus in mouse stomach, small intestine, and colon. I. Gastrointestinal mucus layers have different properties depending on location as well as over the Peyer's patches. American Journal of Physiology-Gastrointestinal and Liver Physiology , 305(5), G341–G347. https://doi.org/10.1152/ajpgi.00046.2013
- Graefe, C., Eichhorn, L., Wurst, P., Kleiner, J., Heine, A., Panetas, I., Abdulla, Z., Hoeft, A., Frede, S., Kurts, C., Endl, E., & Weisheit, C. K. (2019). Optimized Ki-67 staining in murine cells: A tool to determine cell proliferation. Molecular Biology Reports , 46, 4631–4643. https://doi.org/10.1007/s11033-019-04851-2
- Grizzle, W. E., Fredenburgh, J. L., & Myers, R. B. (2008). Fixation of tissues. Theory and Practice of Histological Techniques , 6, 53–74. https://doi.org/10.1016/B978-0-443-10279-0.50011-7
- Howat, W. J., & Wilson, B. A. (2014). Tissue fixation and the effect of molecular fixatives on downstream staining procedures. Methods , 70(1), 12–19. https://doi.org/10.1016/j.ymeth.2014.01.022
- Kinsey, C. G., Camolotto, S. A., Boespflug, A. M., Guillen, K. P., Foth, M., Truong, A., Schuman, S. S., Shea, J. E., Seipp, M. T., Yap, J. T., Burrell, L. D., Lum, D. H., Whisenant, J. R., Gilcrease, G. W. 3rd, Cavalieri, C. C., Rehbein, K. M., Cutler, S. L., Affolter, K. E., Welm, A. L., … McMahon, M. (2019). Protective autophagy elicited by RAF→ MEK→ ERK inhibition suggests a treatment strategy for RAS-driven cancers. Nature Medicine , 25(4), 620–627. https://doi.org/10.1038/s41591-019-0367-9
- Magnus, H. A. (1937). Observations on the presence of intestinal epithelium in the gastric mucosa. The Journal of Pathology and Bacteriology , 44(2), 389–398. https://doi.org/10.1002/path.1700440214
- Moolenbeek, C., & Ruitenberg, E. (1981). The ‘Swiss roll’: A simple technique for histological studies of the rodent intestine. Laboratory Animals , 15(1), 57–60. https://doi.org/10.1258/002367781780958577
- Park, C. M., Reid, P. E., Walker, D. C., & MacPherson, B. R. (1987). A simple, practical ‘swiss roll’ method of preparing tissues for paraffin or methacrylate embedding. Journal of Microscopy , 145(1), 115–120. Portico. https://doi.org/10.1111/j.1365-2818.1987.tb01321.x
- Rahman, M. A., Sultana, N., Ayman, U., Bhakta, S., Afrose, M., Afrin, M., & Haque, Z. (2022). Alcoholic fixation over formalin fixation: A new, safer option for morphologic and molecular analysis of tissues. Saudi Journal of Biological Sciences , 29(1), 175–182. https://doi.org/10.1016/j.sjbs.2021.08.075
- Singhal, P., Singh, N. N., Sreedhar, G., Banerjee, S., Batra, M., & Garg, A. (2016). Evaluation of histomorphometric changes in tissue architecture in relation to alteration in fixation protocol–an invitro study. Journal of Clinical and Diagnostic Research , 10(8), ZC28–ZC32. https://doi.org/10.7860/JCDR/2016/19007.8236
- Sirinukunwattana, K., Pluim, J. P. W., Chen, H., Qi, X., Heng, P. A., Guo, Y. B., Wang, L. Y., Matuszewski, B. J., Bruni, E., Sanchez, U., Böhm, A., Ronneberger, O., Cheikh, B. B., Racoceanu, D., Kainz, P., Pfeiffer, M., Urschler, M., Snead, D. R. J., & Rajpoot, N. M. (2017). Gland segmentation in colon histology images: The glas challenge contest. Medical Image Analysis , 35, 489–502. https://doi.org/10.1016/j.media.2016.08.008
- Williams, J. M., Duckworth, C. A., Vowell, K., Burkitt, M. D., & Pritchard, D. M. (2016). Intestinal preparation techniques for histological analysis in the mouse. Current Protocols in Mouse Biology , 6(2), 148–168. https://doi.org/10.1002/cpmo.2
Internet Resources
- https://qupath.github.io/
- QuPath download link.

