Fabrication of laser inscribed graphene (LIG) 3-electrode plug-and-play chip
Geisianny AM Moreira, Eric S McLamore, Yifan Tang, Diana Vanegas, Lisseth Casso-Hartmann
Disclaimer
Research reported in this publication was supported by the National Institute on Alcohol Abuse and Alcoholism of the National Institutes of Health under Award Number U01AA029328 (DV). The content is solely the responsibility of the authors and does not necessarily represent the official views of the National Institutes of Health. Additional support was provided by the COVID Research Seed Grant Program, Clemson University (Award #2021001151), and the Startup Funding from the Department of Environmental Engineering and Earth Sciences of Clemson University (DV). NIH P20GM121342 supported sequencing efforts (DD). The funders had no role in study design, data collection and analysis, decision to publish, or preparation of the manuscript.
Abstract
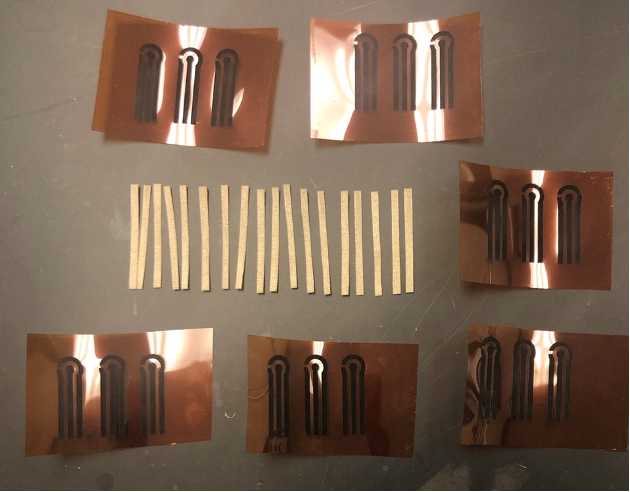
Laser inscribed graphene (LIG) is a versatile material that is commonly used to prepare electrochemical sensors (Moreira et al 2023). This protocol describes the fabrication of a 3-electrode plug-and-play chip system based on LIG. The design is compatible with a female USB-A connector which can be modified for connection to any potentiostat using the protocol here. The complete process requires approximately 60 min to complete, including fabrication of USB-A connector ( Fig 1 ).

Before start
Ensure ample table space is available, and located in a well ventilated area.
Steps
Step 1) Fabrication of USB-A Adapter
- Heat the soldering iron, and prepare a wet sponge and solder wick.
- See the following for an introduction to soldering techniques (link)
- Solder one 28AWG jumper wire to each of the two outer contacts in the USB-A adapter.
- Create an electrical connection (i.e., “jump”) the two inner contacts in the USB-A adapter.
- Solder one 28AWG jumper wire to the “jumped” inner contact(s) in the USB-A adapter
- Place the plastic cover on the USB-A Female adapter
- Turn off soldering iron, and clean station when finished
Step 2) Preparation of Materials for LIG chip
- LIG should be prepared using the protocol developed for a 3-electrode sensor (link)
- Using scissors, cut conductive polyester metal tape into 0.3 cm by 3.5 cm strips (one strip per LIG electrode)
- Fig. 1 shows an example of a batch of 18 LIG electrodes with 18 metal tape strips
- For each LIG chip, cut a 1cm by 5 cm strip of PVC to act as the chip base
- Ample table space should be cleared to prepare the LIG chips

Step 3) Adhesion of Bonding Pads to LIG
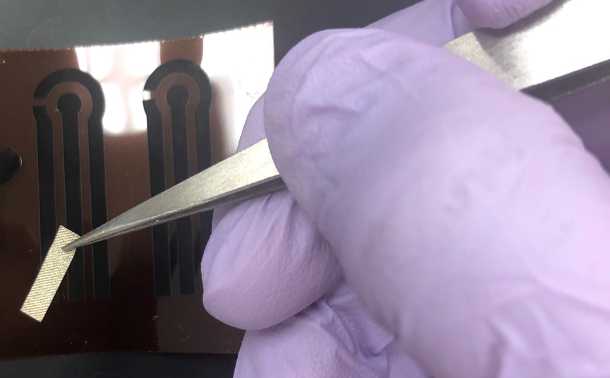
- Using steel tweezers, hold the metal tape and carefully remove the adhesive backing
- Carefully position the metal tape over one of the bonding pads on the printed LIG chip
- After coating the LIG reference electrode, the tweezers should be used to lightly squeeze the material and ensure good contact.
- Repeat the process for all three electrodes in the LIG chip ( Fig 2 )

Step 4) Coating of LIG Reference Electrode
- The reference electrode may be coated with Ag/AgCl ink, or with a small 0.3 cm by 0.5 cm strip of polyester metal tape (as shown here)
- After coating the LIG reference electrode, the tweezers should be used to lightly squeeze the material and ensure good contact.
- If Ag/AgCl ink is used to coat the reference electrode, the material should be allowed to cure at room temperature for at least 15 min
Step 5) Passivation of LIG Electrodes
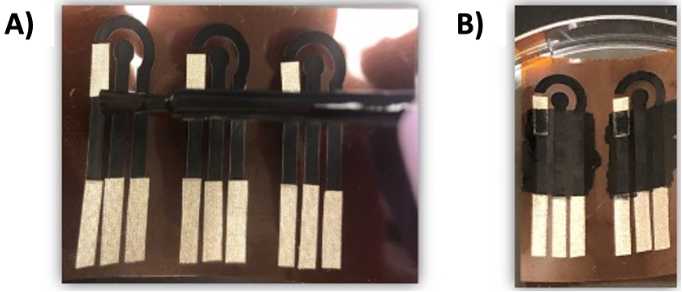
- Use poly gel acrylic nail polish to passivate the electrodes between the bonding pad and the functional electrode area ( Fig 3A ).
- The passivation may cover a small portion of the polyester metal tape if used as reference electrode coating material ( Fig 3B )

Figure 3. Passivation of LIG electrodes for creating functional electrode area and bonding pads.
Step 6) Mounting LIG chip to PVC Base
- Using scissors, cut a strip of double sided tape and adhere to the back of the LIG material ( Fig 4A ).
- Mount the LIG material to the PVC base and use scissors to trim any excess tape.
- The final chip should have clearance with exposed, unmodified PVC which may be handled without touching the LIG or other coating materials ( Fig 4B )
- The three electrode system is composed of working, counter, and reference electrodes. The passivation area and bonding pad are easily discernable ( Fig 4C )

Step 7) Clean up laboratory
- Any excess polyamide, metal tape, or PVC sheet should be discarded in a labeled container on the counter.
- Turn off soldering iron, and clean station
- If storing electrodes, place in a sealed Petri dish with desiccant.

