EEL FISH
Lars E. Borm
EEL
smFISH
RNA
spatial
spatial transcriptomics
transcriptomics
FISH
in situ
in situ hybridization
single molecule
electrophoresis
electricity
fluorescent
EEL FISH
Abstract
Protocol to perform RNA transfer to a surface using the EEL method and detection with an automated fluidics and imaging machine called ROBOFISH.
Paper title: Scalable in situ single-cell profiling by electrophoretic capture of mRNA
Website: mousebrain.org
Instructions to build the ROBOFISH system:
Code for the ROBOFISH system
Before start
The protocol lists a number of buffer that can be prepared beforehand:
30% formamide hybridization mix. Step 33.
10% formamide hybridization mix. Step 39.
PCD stock solution. Step 39.
DBA stock solution. Step 39.
TROLOX stock solution. Step 39.
Steps
ITO glass cleaning
Place ITO slides in a beaker glass and submerge them in Acetone. Cover the beaker glass with aluminium foil and
sonicate 0h 20m 0s on high power.
Discard the Acetone and submerge the slides in 2-Propanol. Replace the water in the sonicator if it has warmed up. Cover the beaker glass with aluminium foil and sonicate 0h 20m 0s on high power.
Discard the 2-Propanol and submerge the slides in dH2O. Replace the water in the sonicator if it has warmed up. Cover the beaker glass with aluminium foil and sonicate 0h 20m 0s on high power.
Discard the dH2O and replace with fresh dH2O. The slides should be stored in water. Wait at least a couple of days before using. The slides can be used for up to a month, after which they might show white discoloring and should not be used.
Surface functionalization
Place the slides in a rack and let them dry. Optional use compressed air or nitrogen gas to remove larger droplets.
In a dedicated glass staining jar, prepare300mL of 2% volume GPTMS ((3-Glycidyloxypropyl)Trimethoxysilane) in anhydrous acetone. Put the jar in a box/bag with a steady nitrogen gas flow so that the coating is performed under an inert environment.
Submerge the rack with slides into the Functionalization solution for 2h 0m 0s under nitrogen atmosphere.
Pour out the acetone GPTMS mix. Submerge the slides with acetone to wash them, then discard the acetone.
Dry the slides with nitrogen gas.
Capture slide coating
Find the conductive side of the ITO glass using a multimeter set to measure resistance. Add 40µL of Poly-T spotting solution and incubate 1h 0m 0s at 25°C under a 24x24mm plastic coverslip (Hybrislip - Grace biolabs). Optionally, with a solvent prove marker (like Moist Mark Plus, Cancer Diagnostics Inc.) indicate the area of the Poly-T coating.
| A | B | C | D |
|---|---|---|---|
| Component | Final concentration | Stock concentration | Quantity for 45 ul |
| Poly-T | 10 uM | 100 uM | 4.5 ul |
| Schot spotting solution | 1X | 2X | 22.5 ul |
| dH2O | - | - | 18 ul |
Poly-T coating solution. Make fresh. Expected usage for 1 slide: 40ul.Sequence: /5AmMC6/UUUUGACTCGTTTTTTTTTTTTTTTTTTTTTTTTTTTTTTT/iSuper-dT/TTTTTTTTTTTTTTTTTTTTTTTTTTT/iSuper-dT/TT (ordered from IDT)
To remove the plastic coverslip without damaging the coating, place a couple of drops of SSC 2X on the edge of the plastic cover slip. Wait until the SSC has moved under the plastic coverslip and then lift the corner with a forceps.
Wash the slide 5 times with SSC 2X by pipetting it onto the coated area and aspirating it from one of the corners.
Wash the the slide twice with dH2O.
Block remaining epoxy 0h 30m 0s with 60µL 0.1Mass / % volume Poly-D-Lysin in dH2O at room temperature. (The PDL mix should spread out over the oligo-dT coated area and does not need to be covered by a plastic coverslip.)
Wash 3 times with dH2O.
Mix Europium doped beads small (200nm) and big (1um) 1:333 each in dH2O and place ~100µL on the slide, and make sure it covers the full area. Incubate 0h 3m 0s .
Pipett off the bead mixture from a corner of the coated area and let the slide dry to the air. Avoid residue in the capture area and do not touch the surface. Proceed to tissue capture.
Tissue sectioning
Make a 10 µm cryosection of the tissue sample and catch it on the slide onto the capture area, and let it dry for a few minutes.
Place slide in a container, like a petri dish, so that frost can not accumulate on the sample.
Store at -80°C until further use.
Reference imaging (optional)
Thaw the section and on the back side make two reference crosses on either side of the tissue section using a solvent prove and non-fluorescent marker pen (like Moist Mark Plus, Cancer Diagnostics Inc.). These crosses will serve as the reference to find the sample area after the tissue has been digested.
Stain the nuclei for 0h 5m 0s with 1ug/ml Propidium Iodide in SSC 2X.
Wash 5 times with 200µL SSC 2X.
Cut a gasket out of parafilm and place it around the tissue section and reference crosses. Close the open top with a 24x32mm glass coverslip (or any other fitting size). Make sure no air bubbles are present on the tissue or crosses by adding sufficient SSC 2X to the sample. When closed, drain the excess SSC 2X from a side with a paper towel.
When using the provided microscope Job for Nikon microscopes running NIS Elements software, follow the steps in the Job. Select the New Experiment option.
When using other software:
- Make a quick overview image with a low power objective (like 10X) to generate points for Nuclei imaging and RNA signal imaging later on.
- Generate points for imaging the RNA signal of the sample with a high power objective (like 60X). This is Point_set_1
- Generate points to image the nuclei with a medium power objective (like 40X). This is Point_set_2.
- Image the nuclei with the medium power objective using Point_set_2. These images will be used for segmentation. It is important to also image the beads in this step so that the images can be aligned.
- With the high power objective add the locations of the crosses to the previously generated Point_set_1 and save. Typically we make bright-field images of the 4 armpits of the crosses. Because the relative location between the sample and the crosses is now known, they can be used to find the sample area later on.
Electrophoresis
Remove the top coverslip, gasket and SSC 2X.
Permeabilize the sample for 0h 5m 0s in permeabilization buffer:
| A | B | C | D |
|---|---|---|---|
| Component | Final concentration | Stock concentration | Quantity for 1ml |
| Dithiothreitol (DTT) | 10 mM | 100 mM | 100 ul |
| Triton X-100 | 0.1 % | - | 1 ul |
| TBE | 1X | 10X | 100 ul |
| dH2O | - | - | 799 ul |
Permeabilization buffer. Make fresh. Expected usage for 1 experiment: 200ul.
Wash 5 time with TBE 1X.
Assemble the electrophoresis setup:
- Stick a short wire to the sample ITO coverslip using copper tape with conductive adhesive (Anode).
- Do the same on a clean uncoaded ITO slide to make the other electrode (Cathode).
- Place the coverslip with the sample in the EEL holder and slide the wire in one of the slits to keep the slide in place.
- Place two 1.5 mm thick PDMS strips on either side of the sample.
- Cover with the top electrode perpendicular to the sample slide, and slide the wire in one of the slits. Make sure the conductive side is facing the sample.
- Optionally place a weight on top of the sample to keep the slides neatly stacked.
- Connect the power source to the two wires. The capture slide with the sample should be connected to the positive pole making the Anode. The top electrode should be connected to the negative pole, making the Cathode.
- Add the electrophoresis buffer:
| A | B | C | D |
|---|---|---|---|
| Component | Final concentration | Stock concentration | Quantity for 1ml |
| Dithiothreitol (DTT) | 10 mM | 100 mM | 100 ul |
| Urea | 1 M | 10 M | 100 ul |
| TBE | 1X | 10X | 100 ul |
| dH2O | - | - | 700 ul |
Electrophoresis buffer. Make fresh. Expected usage for 1 experiment: 400 - 600 ul.
 with the red wire and the coper tape. Two PDMS spacer separate the sample with the top electrode, which is connected to the negative pole with the black wire and coper tape. Pipett the electrophoresis buffer intbetween the glasses.")
Turn on the power source set to 10 Volts/cm and electrophorese for 0h 20m 0s . When using 1.5 mm PDMS spacer set to 1.5V. We recomend to use a laboratory power supply but a 1.5V battery will work.
Tissue digestion
Turn off the power source, disconnect the wires and remove the electrophoresis buffer with a paper tissue. Now, remove the electrophoresis sandwich from the EEL holder and place on a flat surface. Carefully remove the top electrode and the PDMS spacers, clean these later for re-use. While pushing the capture slide onto a flat surface, carefully remove the wire and copper tape. Keep forces horizontal in order to not break the glass. Place glass in a petri dish.
Incubate the sample 0h 5m 0s in 6X SSC.
Wash the sample two times with 2X SSC.
Digest the tissue 3 times for 0h 10m 0s with 200µLof digestion buffer at 30°C. The tissue should visibly digest over the incubation steps.
Make sure no buffers with SDS come under the glass slide, they will dissolve the ink of the reference crosses.
| A | B | C | D |
|---|---|---|---|
| Component | Final concentration | Stock concentration | Quantity for 1ml |
| Proteinase K (NEB) | 1 U/ml | 2 ul | |
| SDS | 1% | 20% | 50 ul |
| Tris HCl pH 7.4 | 20 mM | 1 M | 20 ul |
| Superase | 5 ul | ||
| dH2O | - | - | 923.50 ul |
Digestion buffer for mouse adult brain tissue. Make fresh. Expected usage for 1 experiment: 600 ul.
| A | B | C | D |
|---|---|---|---|
| Component | Final concentration | Stock concentration | Quantity for 1ml |
| Proteinase K (NEB) | 3.2 U/ml | 4 ul | |
| SDS | 1% | 20% | 50 ul |
| Tris HCl pH 7.4 | 20 mM | 1 M | 20 ul |
| Superase | 5 ul | ||
| dH2O | - | - | 921 ul |
Digestion buffer for human adult brain tissue. Make fresh. Expected usage for 1 experiment: 600 ul.
Adjust the digestion protocol for each type of tissue. The concentration of Protinase K, the incubation time or number of washes can be adjusted. Under-digestion, will leave tissue on the capture slide, which can be seen as increased background signal and signal distributed in the Z-axis during imaging. Over digestion can lead to reduced RNA capture (Presumably because the PDL gets degraded).
Wash 3 times 0h 5m 0s with 5% SDS in SSC 2X at 30C. Place the 5% SDS in SSC at 30C beforehand and during these steps.
Wash 5 times with SSC 2X.
Fix the RNA for 0h 10m 0s with 4% PFA in 1X PBS.
Wash 5 times with SSC 2X.
Encoding probe hybridization
Using a Speed Vac, dry the probe stock solution in a low binding Eppendorf tube and afterwards dissolve in 20µL of 30% formamide hybridization mix. Probes should be hybridized at 1nanomolar (nM) per individual probe. (If you have 1000 individual probes, the total concentration should be 1000 nM to have 1nM per individual probe)
| A | B | C | D |
|---|---|---|---|
| Component | Final concentration | Stock concentration | Quantity for 10ml |
| dH2O | - | - | 5.58 ml |
| SSC | 2X | 20X | 1 ml |
| Dextran sulfate | 0.1 g/ml | - | 1 gram |
| Mix the above and vortex untill Dextran is dissolved | |||
| E. Coli tRNA | 1 mg/ml | 40 mg/ml | 250 ul |
| RVC | 2 mM | 200 mM | 100 ul |
| BSA | 200 ug/ml | 30 % (w/v) | 66.75 |
| Formamide | 30% (v/v) | - | 3 ml |
30% Formamide Hybridization mix. Can be stored at -20C. Expected usage for 1 experiment: 20 ul
Add a paper tissue to a petri dish and wet with some SSC 2X. Cover with a piece of parafilm and place two spacers on top. Place the slide on the spacers. The spacers are there to ensure that the liquid can not drain out during the incubation.
Remove as much of the liquid from the slide as possible. Add the Hybridizaion mix, be careful not to cause bubbles. Cover with a plastic coverslip (Hybrislip, Grace Biolabs). Close the petridish and place a few paper towels on top to prevent condensation on the lid during the incubation.
Incubate at least 40h 0m 0s at 38.5°C in the humidified petridish.
Automatic system
Take the slide out of the incubator. Place some SSC 2X on the edge of the plastic coverslip and wait until it is adsorbed, to safely remove the plastic coverslip.
Mount the slide in the Flow cell.
Place the flow cell on the microscope stage and connect to the fluidic system. Connect outlet to the waste bottle and connect the temperature control cable and hoses. Using the manual prime port, prime the chamber with SSC 2X using a syringe.
Make buffers for 16 rounds of readout imaging and place them in the system.
Hybridization mixes with fluorescent probes.
| A | B | C | D |
|---|---|---|---|
| Component | Final concentration | Stock concentration | Quantity for 40ml |
| dH2O | - | - | 30.33 ml |
| SSC | 2X | 20X | 4 ml |
| Dextran sulfate | 0.1 g/ml | - | 4 gram |
| Mix the above and vortex untill Dextran is dissolved | |||
| E. Coli tRNA | 1 mg/ml | 40 mg/ml | 1 ml |
| RVC | 2 mM | 200 mM | 400 ul |
| BSA | 200 ug/ml | 30 % (w/v) | 267 ul |
| Formamide | 30% (v/v) | - | 4 ml |
10% Formamide Hybridization mix. Can be stored at -20C. Aliquot 700 ul. Expected usage for 1 experiment: 16 aliquots or ~12 ml
For all 16 rounds add the fluorescent probes tot the 10% formamide hybridiation mix.
| A | B | C | D |
|---|---|---|---|
| Component | Final concentration | Stock concentration | Quantity for 700 ul |
| 10% Hybridization mix | - | - | 700 ul |
| Fluorescent probe | 50 nM | 100 uM | 0.35 ul |
Probe mix. Make 700 ul mix for each round and put in system.
Wash buffer. 20% formamide.
| A | B | C | D |
|---|---|---|---|
| Component | Final concentration | Stock concentration | Quantity for 70 ml |
| SSC | 2X | 20 X | 7 ml |
| Formamide | 20% (v/v) | - | 14 ml |
| dH2O | - | - | 49 ml |
20% formamide wash buffer. Prepare fresh in 250 ml Nalgene bottle. Expected usage ~60 ml
Wash buffer. 30% formamide.
| A | B | C | D |
|---|---|---|---|
| Component | Final concentration | Stock concentration | Quantity for 20 ml |
| SSC | 2X | 20 X | 2 ml |
| Formamide | 30% (v/v) | - | 6 ml |
| dH2O | - | - | 12 ml |
30% formamide wash buffer. Prepare fresh in 250 ml Nalgene bottle. Expected usage ~10 ml
Imaging buffer stock solutions:
Protocatechuate 3,4-Dioxygenase (PCD) enzyme stock solution 2 uM
| A | B | C | D |
|---|---|---|---|
| Component | Final concentration | Stock concentration | Quantitiy for 1.5ml |
| Glycerol | 50% | - | 750 ul |
| KCl | 50 mM | 1M | 75 ul |
| EDTA | 1 mM | 0.5 M | 3 ul |
| Tris-Hcl pH8.0 | 100 mM | 1 M | 150 ul |
| dH2O | - | - | 522 ul |
| Add 1.42 ml of above mix to the 2mg PCD enzyme bottle. |
Enzyme storage buffer. Add 1.42 ml to the dry PCD enzyme, gently mix and aliquot into 120 ul aliquots. Store at -20C.
3,4-Dihydroxybenzoic acid (DBA) stock solution 50mM
| A | B | C | D |
|---|---|---|---|
| Component | Final concentration | Stock concentration | Quantity for 20 ml |
| 3,4-Dihydroxybenzoic acid | 50 mM | - | 154 mg |
| dH2O | - | - | 19 ml |
| NaOH | 50 mM | 1 M | 1 ml |
DBA stock solution. Aliquot to 1ml and store at -20C.
6-Hydroxy-2,5,7,8-tetramethylchromane-2-carboxylic acid (TROLOX) stock solution 200 mM
| A | B | C | D |
|---|---|---|---|
| Component | Final concentration | Stock concentration | Quantity for 5 ml |
| TROLOX | 250 mg | ||
| EtOH | - | Absolute | 5 ml |
TROLOX stock solution. Aliquot to 120ul aliquotes and store at -20C. Flush TROLOX bottle with Nitrogen gas before closing.
Imaging buffer.
| A | B | C | D |
|---|---|---|---|
| Component | Final concentration | Stock concentration | Quantity for 12 ml |
| SSC | 2X | 20X | 1.2 ml |
| Trolox | 2 mM | 200 mM | 120 ul |
| 3,4-Dihydroxybenzoic acid (DBA) | 5 mM | 50 mM | 1.2 ml |
| dH2O | - | - | 9.36 ml |
| Degas the buffer in a vacuum chamber. | |||
| Protocatechuate 3,4-Dioxygenase (PCD) | 20 nM | 2 uM | 120 ul |
| Degas the buffer in a vacuum chamber. | |||
| Add 700 ul mineral oil to cover the imaging buffer |
Imaging buffer. Prepare fresh in 15ml glass vial with septum cap. Stick a thin needle through the septum to bleed air. Expected usage ~10ml.
Stripping buffer
| A | B | C | D |
|---|---|---|---|
| Component | Final concentration | Stock concentration | Quantity for 50 ml |
| SSC | 2X | 20X | 5ml |
| TCEP | 100mM | 0.5M | 5ml |
| dH2O | - | - | 40ml |
| Degass the buffer in a vacuum cahmber. | |||
| Add 3ml of mineral oil to cover the stripping buffer |
Stripping buffer. Prepare fresh in 60ml glass vial with septum cap. Stick a thin needle through the septum to bleed air. Expected usage ~ 45ml.
Once buffers are placed in the system, Start the ROBOFISH_user_program.py program by pasting the below command in an Anaconda command prompt:
python ROBOFISH_user_program.py
```Enter "all" to update the experimental information. This will open Notepad++ wih the system info file.

Edit the information with all experimental metadata under Parameters.


<img src="https://static.yanyin.tech/literature_test/protocol_io_true/protocols.io.t92er8e/gcjpique6.jpg" alt="Screenshot example of the info file with experimental metadata." loading="lazy" title="Screenshot example of the info file with experimental metadata."/>


Give the names of the buffers connected to the various ports.


<img src="https://static.yanyin.tech/literature_test/protocol_io_true/protocols.io.t92er8e/gcjtique3.jpg" alt="Port numbers and buffer names" loading="lazy" title="Port numbers and buffer names"/>


Then fill in the volumes of the buffers that were placed in the system.


<img src="https://static.yanyin.tech/literature_test/protocol_io_true/protocols.io.t92er8e/gcjxique7.jpg" alt="Screenshot example of the info file with buffer volumes." loading="lazy" title="Screenshot example of the info file with buffer volumes."/>


Fill in the codes of the hybridization mixes. The code is C<chamber number>_<round number>. So chamber one hybridization round 6 is "C1_06".


<img src="https://static.yanyin.tech/literature_test/protocol_io_true/protocols.io.t92er8e/gcj3ique4.jpg" alt="Screenshot example of the info file with hybridization numbers." loading="lazy" title="Screenshot example of the info file with hybridization numbers."/>


Optionally add the names of the genes or detection probe code to the Targets. The System will take this information and put it in a round specific info file that will be placed with the images, so that downstream the targets and images can be matched.


<img src="https://static.yanyin.tech/literature_test/protocol_io_true/protocols.io.t92er8e/image.png" alt="Screenshot example of the info file with the round targets. In this example Round 1 will contain 5 genes in different channels of the microscope. "Cux2" is labeled with a green probe and is imaged with the FITC channel. " loading="lazy" title="Screenshot example of the info file with the round targets. In this example Round 1 will contain 5 genes in different channels of the microscope. "Cux2" is labeled with a green probe and is imaged with the FITC channel. "/>


<img src="https://static.yanyin.tech/literature_test/protocol_io_true/protocols.io.t92er8e/gcjfique8.jpg" alt="Screenshot example of the info file with the round targets. This is the codes we use for barcoded EEL experiments. The 1 or two indicates the bit location in the brcode." loading="lazy" title="Screenshot example of the info file with the round targets. This is the codes we use for barcoded EEL experiments. The 1 or two indicates the bit location in the brcode."/>


After saving and closing the info file, and pressing enter in the ROBOFISH_user_program, a pop-up will open where you can tick the boxes of new buffers that need to be primed.


<img src="https://static.yanyin.tech/literature_test/protocol_io_true/protocols.io.t92er8e/gcjjique5.jpg" alt="Screenshot example of the priming tickbox. In this case the Washbuffer (WB) and Imaging buffer (IB) will be primed. (Only prime newly connected buffers and never prime hybridization mixes!)" loading="lazy" title="Screenshot example of the priming tickbox. In this case the Washbuffer (WB) and Imaging buffer (IB) will be primed. (Only prime newly connected buffers and never prime hybridization mixes!)"/>
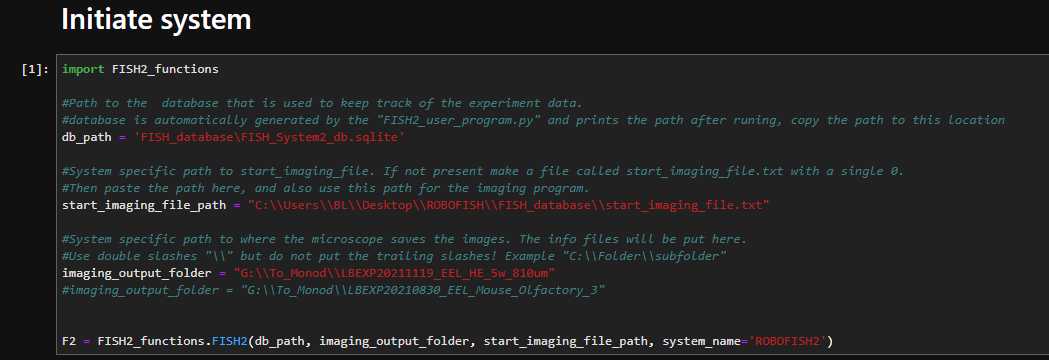
Open a new terminal and start the Jupyter lab. In the first cell make sure that all the paths to the different folders and files are correct. Then, edit the fluidics program to your needs and start the scheduler to start the detection cycles. The program will notify the microscope when to start imaging.
See the full documentation of the ROBOFISH programs on the Github page:
Labeling first round
The system will perform the labeling. These are the steps it will perform.
Wash 4 times 15 minutes with 30% formamide wash buffer at 47C.
Wash 4 times with SSC 2X.
Manually Inject 1ml of 4% PFA in 1X PBS into the chamber and fix for 10 minutes at 22C.
Manually wash with >5ml of SSC 2X at 22C.
Hybridize 10 minutes with the fluorescent probes at 37C.
Wash 3 times 3 minutes with 20% formamide washing buffer at 37C.
Wash 4 times with SSC 2X at 37C.
Set temperature to 22C and inject imaging buffer.
Imaging
The fluidics system should now have performed the first labeling and injected the imaging buffer into the flow cell.
Correct Point_set_1 using the reference crosses.
- Find one of the reference crosses and go to exactly the same part of the cross that was imaged before. Use the previously made picture to go to the same spot.
- Now correct the Point_set_1 positions and save the points.
When using the provided microscope Job for Nikon microscopes running NIS Elements software, follow the steps in the Job. Select the Readout option and load the corrected Point_set_1 for the imaging. Make sure the path to the Start Imaging file is correct. This can be found in the Job, in the N LOOP under the "MacroReadValueInFile" and in the "Reset_start_file". Both need to be correct.
Set up the perfect focus to focus on the surface.
Then start the imaging.
When using other software:
Make a program that can read the Start_imaging_file located in the "ROBOFISH/FISH_databse" folder and start imaging the corrected Point_set_1 when the value in the file is changed to 1 by the ROBOFISH program. When it is done imaging it should reset it to 0, so that the ROBOFISH program knows it can start the next round of labeling.
Labeling repeat round
This section can be repeated for as many rounds as needed. Followed by imaging.
Wash 4 times with SSC 2X at 22C.
Strip the fluorophores 2 times 10 minutes with the stripping buffer at 22C
Wash 6 times with SSC 2X.
Hybridize 10 minutes with the fluorescent detection probes at 37C.
Wash 3 times 3 minutes with 20% formamide washing buffer at 37C.
Wash 4 times with SSC 2X at 37C.
Set temperature to 22C and inject imaging buffer.
Image the signal.
Then:
