Cryo-fixation and resin embedding of biological samples for electron microscopy and chemical imaging
Benoit GALLET, Christine Moriscot, Guy Schoehn, Johan Decelle
electron microscopy
cell biology
ultrastructure
microalgae
high-pressure freezing
freeze substitution
Abstract
Electron microscopy and chemical imaging are now essential in life science to access the interior of a cell and unveil its structural and chemical landscape at nanoscale. Because of the high vacuum conditions required to visualize subcellular structures, organisms need to be fixed, dehydrated, and sectioned/milled. For fixation, the use of aldehydes at room temperature alters the ultrastructure and the chemistry of the cell creating major osmotic changes. Therefore, rapid freezing methods such as high-pressure freezing superiors in preserving native-state cell structure and chemistry at a fast rate (a scale of milliseconds compared with minutes for chemical fixation).
Here, we present the workflow starting from rapid freezing (high pressure freezing) and ending with resin embedding (using freeze substitution) in order to prepare biological samples (cells or tissues) for 2D or 3D electron microscopy (Transmission/Scanning Electron microscopy, and FIB-SEM: Focused Ion Beam Scanning Electron Microscope) and chemical imaging.
Before start
Cool down the HPF machine.
Cool down the FS machine to -90°C.
Prepare all the chemicals and the material nedded.
Wear all the individual safety equipement required for chemical or cryogenic risk.
Steps
Sample preparation of cells and tissue
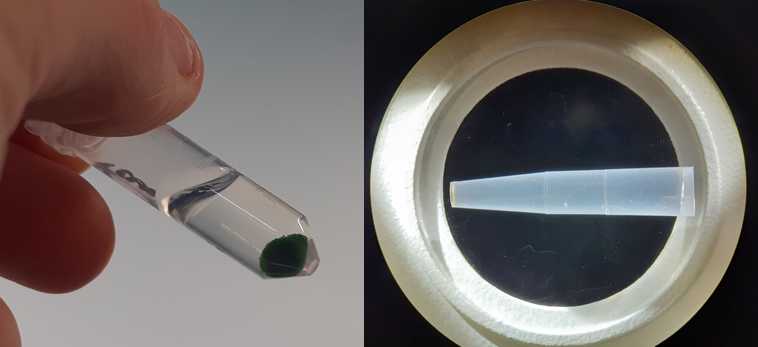
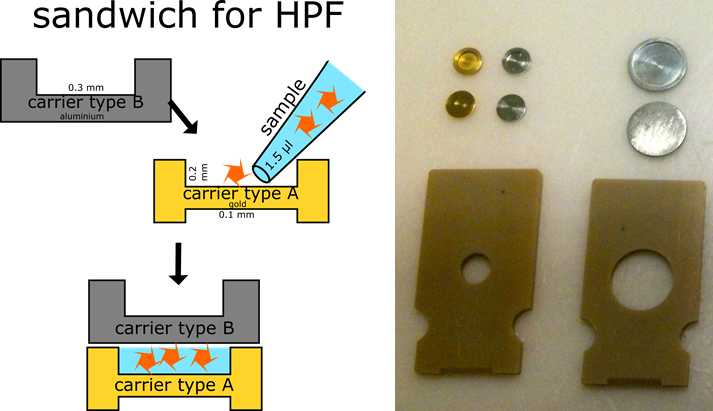
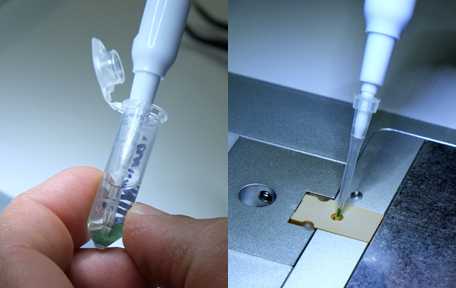
Cells in suspensions (e.g. microalgae, bacteria, mammal cells): Concentration of cells before freezing is an essential step in order to maximize the number of cells in the resin block and so the downstream microscopy observation of multiple cells. The challenge is to concentrate cells in suspension in order to have the highest density in a volume of 1.4 µl (max volume in the 3mm HPF carrier, Figures 1 and 2). This concentration procedure has to be rapid and gentle to avoid any damage and ultrastructure modification of the cells. Different concentration methods can be tested, such as centrifugation or filtration (on mesh fabrics). These preliminary tests are recommended since it could be specific to the type of cells. Typically a gentle centrifugation can be performed during 2 to 10 min at 2000 g. Swing mode is better in order to have the pellet at the bottom of the tube (1-5% Pluronic acid can be used). Pipetting can be achieved with a pipette and cut tips (Figure 1).
If the cell density (in culture) is low and a pellet cannot be obtained, a specific “home-made” mounting can be tested (Figure 1, right). Pipette tips can be cut and plugged on a 3 mm HPF carrier. As an option, you can coat the HPF carrier with Poly-L-Lysine so cells will stick to them and can be recovered. The tip-carrier mounting can be placed in a 1.5 ml Eppendorf tube for centrifugation. In principle, cells will sediment and go directly into the carrier, which can be recovered for high-pressure freezing.
Tissue : A thin piece of a tissue (multicellular organism, brain etc..) needs to be obtained to fit a 3mm or 6mm HPF carrier. Thickness should not be more than 200 microns. Under a binocular, punch and/or razor blade can be used to dissect the biological sample. Vibratome sections of 200 microns is however the best approach to ensure good sample thickness.
Cryofixation by High-pressure freezing
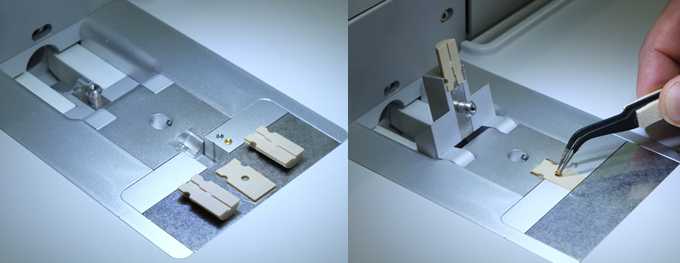
In theory, all samples with thickness <200 µm can be cryofixed by high pressure freezing (Studer et al. - 2008). First step is to position the two half cylinders and the middle plate in the loading place of the high pressure freezing machine (Leica system) (Figure 2). Then, under a binocular, the live sample (concentrated cells or dissected tissue) can be loaded in one 3 mm gold carrier (type A) in the 200 µm deep well (Figure 2). The filling and assembly of the different carriers is schematized in Figure 2. The specimen carrier must be completely filled with an embedding fluid (e.g. seawater, culture medium with cryo protectant if needed, see 4-Notes) without any air spaces. The level of water needs to be controlled since overfilling or under-filling the carriers can lead to poor freezing results. Excess of water can be slowly removed by capillarity using a dental stick (absorbent paper points) under a binocular (surface needs to be flat). Then, one 3 mm HPF carrier in aluminum (type B) is placed with its flat side towards the sample. So, the space between two carriers is 200 µm. If you have a large sample/tissue, 6 mm carriers can be used. (Figure 2). Once the assembly of the two carriers is obtained, it can be transferred with thin tweezers and inserted into the loading place (the middle plate) of the HPF instrument (Figures 2 and 3). Alternatively, Type A carrier can be already placed into the middle plate before sample loading. Manipulation of the sample should be as fast and gentle as possible, to avoid any damage and physiological stress of the samples.
Notes Notes: High density of cells is necessary for downstream image acquisition but also to create a “dense” matrix to keep the cells in the carrier during the freeze substitution. At low concentration, cells are more susceptible to “escape'' or be lost during the different washing steps occurring during the freeze substitution (see below the Freeze substitution). To improve the freezing efficiency (and avoid ice crystals), yeast or cryoprotectants (McDonald et al. - 2010) can be added to the samples. In addition, labeling/etching the carrier type A containing the sample could be useful to identify on which side is the sample (especially for low concentrated and uncolored samples since it is difficult to see the frozen sample in the carrier). Hexadecene can be used to easily detach the carriers/planchettes (McDonald et al. - 2010).
Sample recovery: After freezing, it is mandatory to keep the samples in liquid nitrogen (or at liquid nitrogen temperature) to maintain vitrification. At this stage, the aim is to recover the carrier type A containing the samples and transfer it for the freeze substitution or to store it in a styrofoam cryobox.
Freeze substitution
Principles of the Freeze substitution
After high pressure freezing that generates vitrified samples, freeze substitution is a dehydration step in which the vitreous ice is slowly replaced by an organic solvent (e.g. acetone, diethyl ether DEE) at a very low temperature (from −90°C to −30°C for acetone). A specific substitution protocol is used. Very low temperature is used to avoid any important artifacts and damage in cells. Acetone is generally used (diethyl ether is extremely slow, taking about 3 weeks). Chemical fixatives, such as osmium, tannic acid, acrolein, or aldehydes, can be used during the first part of the freeze substitution at low temperature to contrast and stabilize cellular structures. At the end, a resin-embedding step is then necessary for FIB-SEM and/or to obtain thin sections for TEM/SEM. The freeze substitution protocol can be adapted depending on the imaging modality. For volume electron microscopy such as FIB-SEM, contrast of cells need to be optimal so concentration of osmium/uranyl acetate can be increased. It is important to use dried solutions. If the fluorescence (correlative CLEM) needs to be preserved, a specific freeze substitution protocol can be used (see Ronchi et al 2021: https://doi.org/10.1083/jcb.202104069).
Preparation of the Freeze substitution cocktail
Freeze substitution cocktail with acetone: Prepare the cocktail mix under the hood using a glass pasteur pipettes and gloves (follow all the precautions for using osmium) (see Figure 5). For traditional TEM, a mixture of dried acetone containing 2% osmium tetroxide can be prepared in a small plastic bottle: 0.1 g osmium dissolved in 5 ml dried acetone, providing a 2% (w/vol) solution. For FIB-SEM, in order to increase the contrast, a cocktail mix containing 2% osmium tetroxide and 0.5% uranyl acetate can be prepared in acetone. Molecular sieves (beads) can be used to dry the acetone, which is recommended for chemical imaging. Other contrasting agents can be used such as tannic acid (Jiménez et al. - 2009). Once the cocktail mix is ready, the bottle is cooled down in the freeze substitution machine at -90°C.
#尊敬的用户,由于网络监管政策的限制,部分内容暂时无法在本网站直接浏览。我们已经为您准备了相关原始数据和链接,感谢您的理解与支持。
https://lh7-us.googleusercontent.com/FeEJ6ffdY1Jw1AsWKA4HGVy1FNvKfcv0N1bCGjTM2mXlbFOByB5MCztQdz0ZcIk4xbVbjXCZsylahlZuuXDCs2LlTon77gTj3gLTcssJg8pzKk6NK3o5z5of4l7s8LevroViYDNBHcSb
Sample transfer
Place the bucket with 10 compartments (see Figure 6) in the freeze substitution machine and cool down. Vitrified samples stored in liquid nitrogen now can be transferred by placing each HPF carrier into individual compartments of the bucket face up, keeping record of the different samples and their corresponding position (see Figure 6). Once the bucket is filled with up to 10 carriers, a minimum of 2.5 ml of the cocktail mix (at -90°C) can be gently injected in the middle hole (and not directly on top of the samples) using a pre-cooled glass pasteur pipette. The cocktail mix will diffuse slowly to each of the 10 sample compartments, which minimize the loss of cells.
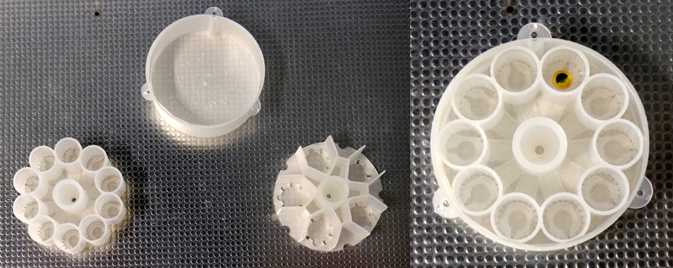
Freeze substitution program
The FS machine is programmed as follows:
- Step 1: 30 to 80 h at −90 °C, heating rate of 2 °C h−1 from -90 °C to −60 °C (15 h) adjust the duration of this step to fit personal schedule (end of FS on monday morning).
- Step 2: 10 to 12 h at −60 °C, heating rate of 2 °C h−1; from -60 °C to −30 °C (15 h)
- Step 3 : 10 to 12 h at −30 °C, quickly heated to 0 °C for 1 h to enhance the staining efficiency of osmium tetroxide (and uranyl acetate) and then back to −30 °C. This step is essential for osmium reactivity and can be adjusted regarding the reactivity and sensitivity of the sample: increasing temperature to 10 or 20°C and increasing time to 2 to 10h (Wild et al. - 2001).
- Step 4 : The cells are then washed several times in anhydrous acetone for 20 min at -30°C.
Resin Embedding
In the freeze substitution machine, samples are then gradually embedded in anhydrous araldite, a resin that contains negligible levels of the elements and is used in different chemical imaging studies. Epoxy resin can also be used for morphological studies (TEM and FIB-SEM imaging). Other resins (Lowicryl = HM20) that preserve the fluorescence can be used but not explained here. A graded resin/acetone (v/v) series was used (30, 50 and 70% resin) with each step lasting 2 h at increasing temperature:
- Step 5: 30% resin/acetone bath from -30°C to -10°C.
- Step 6: 50% resin/acetone bath from -10°C to 10°C.
- Step 7: 70% resin/acetone bath from 10°C to 20°C.
- Samples are then removed from the FS machine and placed under the hood in 100% resin for 8-10 h, at least 3 times, and in 100% resin with accelerator (2.5% BDMA is recommended) for 8 h at room temperature.
- Resin polymerization finally occurred at 65°C for 48 hours. Resin blocks are stored in dry conditions before sectioning and/or imaging.
- At the end of the polymerisation step, the carrier can be removed using the trimming machine; or a heating plate.
Sectioning and imaging
After the trimming of the resin block, the sample is ready to be processed for imaging:
- TEM imaging after ultrathin sectioning and on section staining (optional)
- SEM imaging after thin or semi-thin sectioning on silicon wafers
- FIB-SEM imaging using specific preparation
- Mass spectrometry imaging (NanoSIMS or TOF-SIMS) after thin or semi-thin sectioning on silicon wafers

