Biological sample lysis and extraction using the Covaris LE220+ for LC-MS
ronan o'cualain
Protein extraction
Covaris LE220+
Sample lysis
biological
clinical
sample preparation
LC-MS
ultrasonication
mass spectrometry
proteomics
microproteomics
tissue
cells
sonication
Abstract
This protocol details the procedure of sample lysis and protein extraction using the Covaris LE220+ ultrasonicator.
Before start
Initial preparation:
Before you begin:
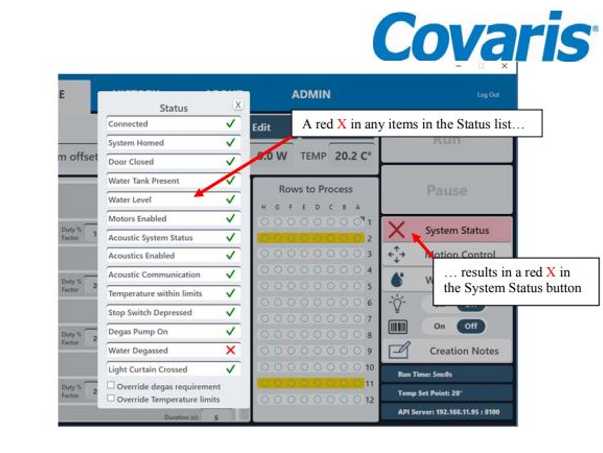
Log onto the LE220+ and check that the “run” box in the top right hand corner is green. If not, it may be that the system is not at temperature. Click the “System status” box on the right hand side – if a red “X” is next to temperature, then you must wait until the system reaches the temperature that you have set the system to in your method before you begin. The default temperature for the system is 10°C.
Attachments
Steps
Preparing samples and LE220+
You will need to dilute the S-Trap lysis buffer to a working stock concentration.
Using the 1mL pipette, add 500µL of 2x stock of S-Trap lysis buffer to 500µL of LCMS grade water.
This is the working stock concentration (5% SDS, 50millimolar (mM) TEAB 7.5).
Add S-Trap lysis buffer (5% SDS with 50millimolar (mM) TEAB 7.5).
If using the 520045 tubes, add approximately 50µL to 130µL of buffer, the final volume will depend on the amount of sample already present in the tube.
If using the 520185 tubes, add up to 500µL of buffer , again this is dependent on the amount of sample that you wish to process.
Add the Covaris tubes to the respective stainless steel rack.

Clamp the lid on the rack finger-tight, and keep the samples in the rack On ice until you are ready for processing.
Sonolab 8.2 software
On initial training, we will provide you with a general method that should be sufficient to lyse your sample. At the end of the process, if you feel that your sample would benefit from more treatment, simply run the program again.


How will you know if your sample is ready?
With cell suspensions, the sample will turn from opaque to transparent, a sign that the cells have lysed.
With tissue, after a quick centrifuge spin, you will see that your pellet is less than before.
Sonolab will automatically select the last method run by the user.
To select an alternative method, use the drop-down menu to load an alternative method, it is located on the HOME tab, in the top left corner.
To specify the rows of the plate that you wish to process, click “edit”.
This will open up the edit parameters page.
If you have two rows of tubes to process, click on the process in the left hand side.
Click on the two rows that you wish to process.
Click save and return to the main menu.
The Run method will remain grey and inactive until a method is selected and all necessary conditions are met.
On the right hand side, in the “Home” tab, take a look at the “System status” tab – if it is shaded red and contains a red X, then a starting parameter(s) has not been achieved – click on the button to see the issue.
If your method is set to 6°C, simply wait until the temperature has been reached.
Running your method
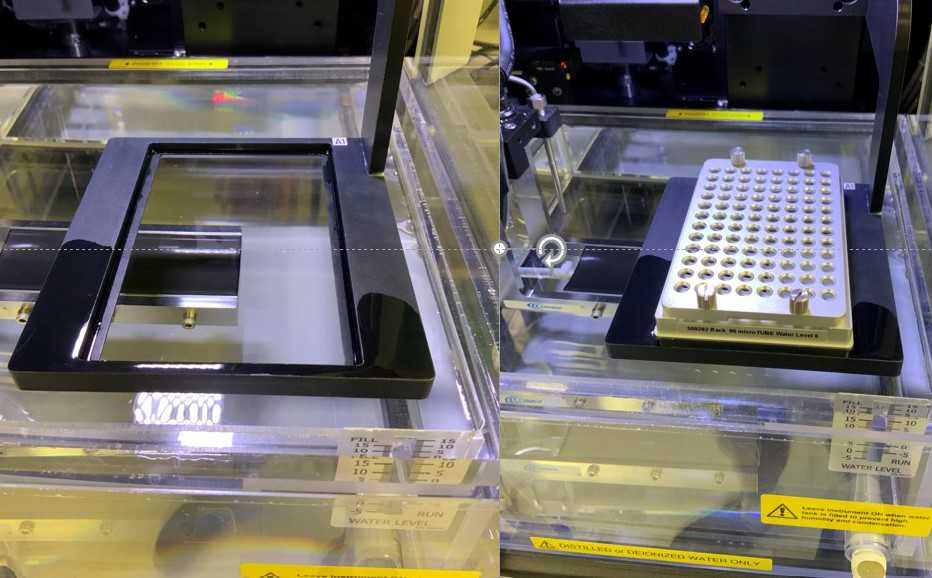
Click on the “Motion Control” box, and click on “load”, the plate holder will move to the front of the LE220+ for plate loading.
Open the door of the LE220+ by simultaneously pressing the green door lock button while gently pulling the handle of the safety enclosure Perspex door.
Load the plate with the orientation that you specified in the method.
When the “Run” button is green, the selected method may be started. Click the “Run” button.
When the method has finished, the message “Method Complete” is displayed. Click “OK”, then press the green door lock button and open the safety enclosure door. Remove the treated sample plate and place On ice.
Label 0.5mL or 1.5mLtubes for each 520045 or 520185 tube that you are processing, and transfer the lysed sample extract to the labelled tube.
If finished, logout of the Sonolab software and return the rack to the side of the LE220+ for the next user.
")
