Centriflaken: an automated data analysis pipeline for assembly and in silico analyses of food-borne pathogens from metagenomic samples
Narjol Gonzalez-Escalona, Kranti Konganti, Vishal Thovarai, Meghan Maguire, Julie A. Kase
Disclaimer
DISCLAIMER – FOR INFORMATIONAL PURPOSES ONLY; USE AT YOUR OWN RISK
The protocol content here is for informational purposes only and does not constitute legal, medical, clinical, or safety advice, or otherwise; content added to protocols.io is not peer reviewed and may not have undergone a formal approval of any kind. Information presented in this protocol should not substitute for independent professional judgment, advice, diagnosis, or treatment. Any action you take or refrain from taking using or relying upon the information presented here is strictly at your own risk. You agree that neither the Company nor any of the authors, contributors, administrators, or anyone else associated with protocols.io, can be held responsible for your use of the information contained in or linked to this protocol or any of our Sites/Apps and Services.
Abstract
Rapid and comprehensive analysis of metagenomic data from any sample is of importance in food safety. Also important is the need for automated analysis pipelines allowing rapid and effective construction of metagenomic assembled genomes (MAGs) to enable bacterial source-tracking from metagenomic data. We developed a precision metagenomics approach for detecting and classifying shiga toxin-producing Escherichia coli (STEC) in enrichments of agricultural water using Oxford Nanopore long read sequencing where the bioinformatics data analysis employed many sequential manual steps (Maguire et al, 2021). Here we present centriflaken, a suite of automated data analysis workflows enabled by Nextflow, which takes metagenomic data and generates MAGs and performs in silico- based analysis as described in Maguire et al, 2021. The final summary plots and tables can be downloaded from the provided MultiQC HTML report generated as part of the pipeline. The centriflaken pipeline was validated with data from our previously published method and was able to replicate the detection and classification of STECs for each sample. We tested the pipeline with nanopore data obtained from 21 additional enriched samples from irrigation water and was able to perform the entire precision metagenomics analysis in less than 5 hours. We have further expanded this precision approach to include any user supplied taxa of interest ( Listeria monocytogenes or Salmonella ) not only STECs.
Before start
Purpose:
This protocol will show step-by-step instructions on how to run the Centriflaken pipeline on GalaxyTrakr.
Steps
Create GalaxyTrakr Account and Login
Create an account and Login:
If you do not already have an account on GalaxyTrakr, please create one by visiting this URL: https://account.galaxytrakr.org/Account/Register
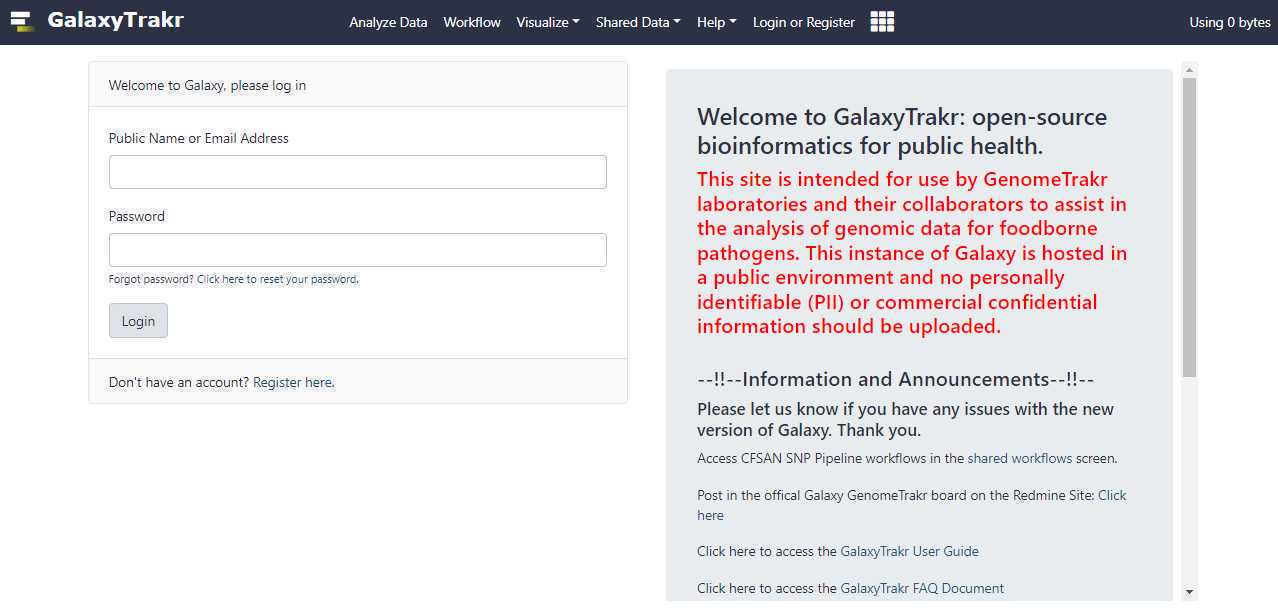
Once your account is activated, login by visiting https://galaxytrakr.org.
Create New History
Create a new history:
If you need additional space you can contact galaxytrakrsupport@fda.hhs.gov and request additional storage.
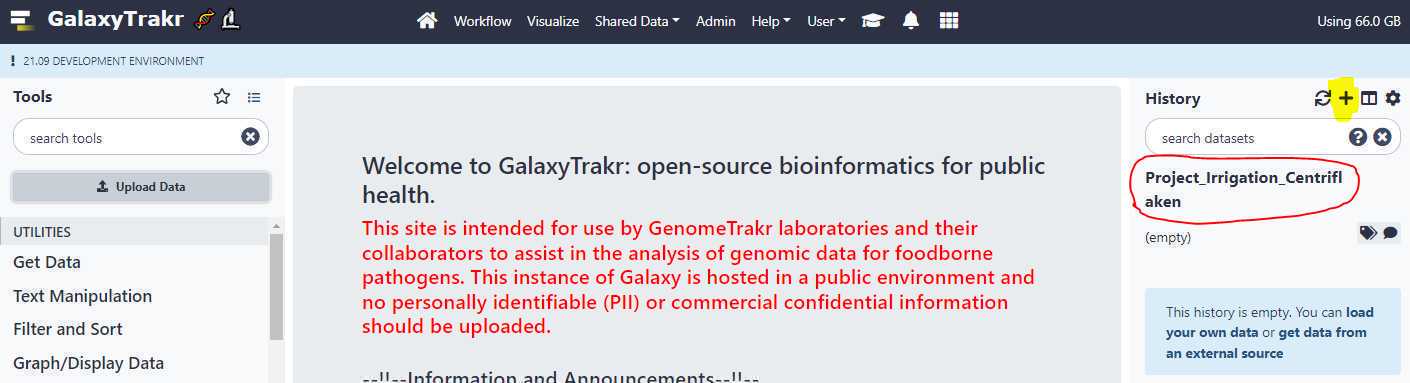
Create a new history using the " + " symbol in the upper right hand corner. Name your history and press " Enter " on your keyboard to save the name.
Upload FASTQ
Upload unpaired data sets via Galaxy web interface:
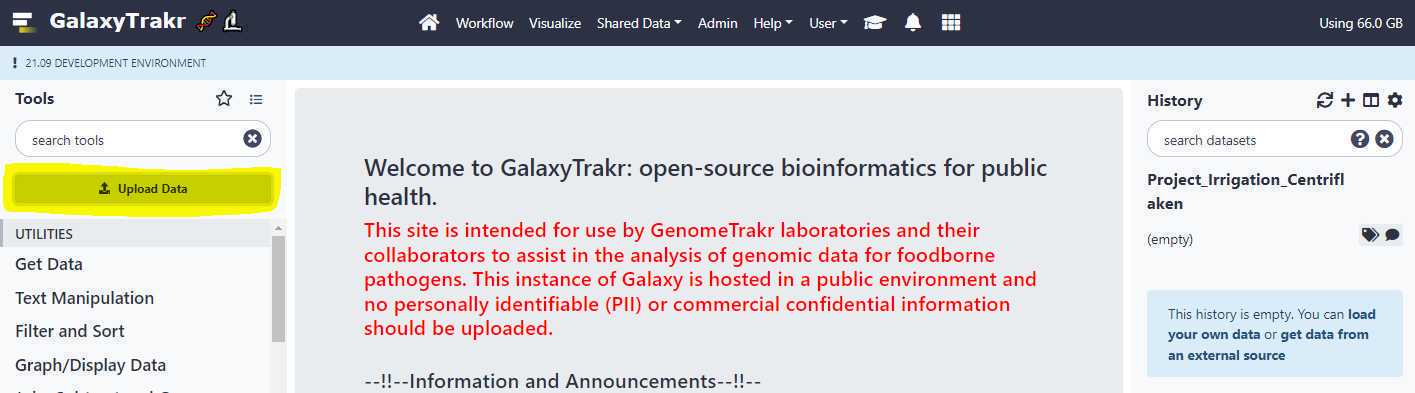
To upload files without using FTP protocol , click on the " Upload Data " button located on upper left of the page as shown below.
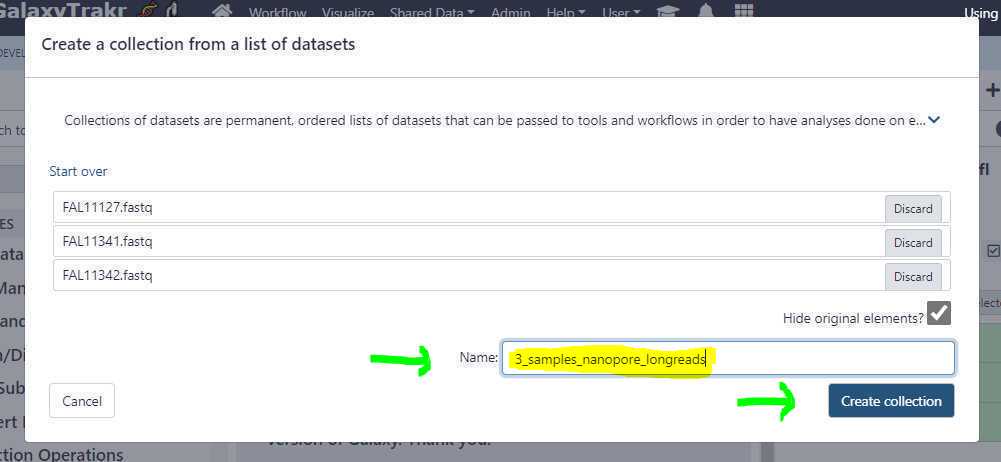
This will bring up a window where you should name the this collection of data sets and click on " Create Collection " to save it to your history.
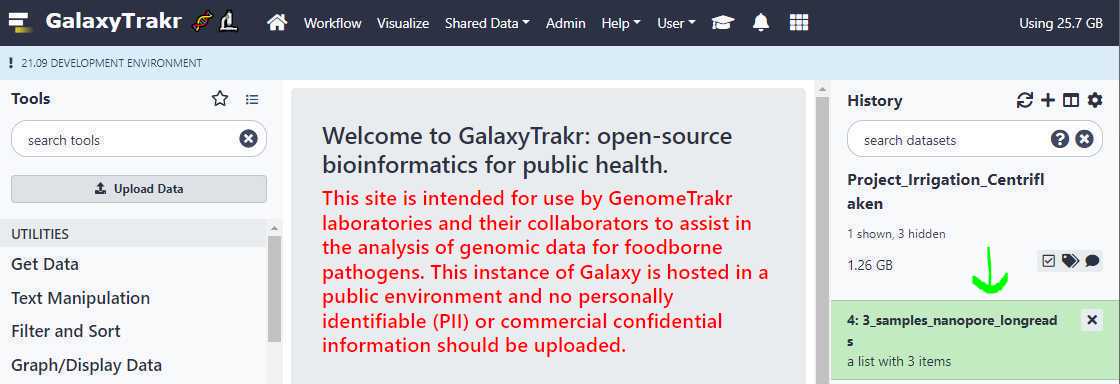
The newly named collection of long read data sets should now appear in your history.
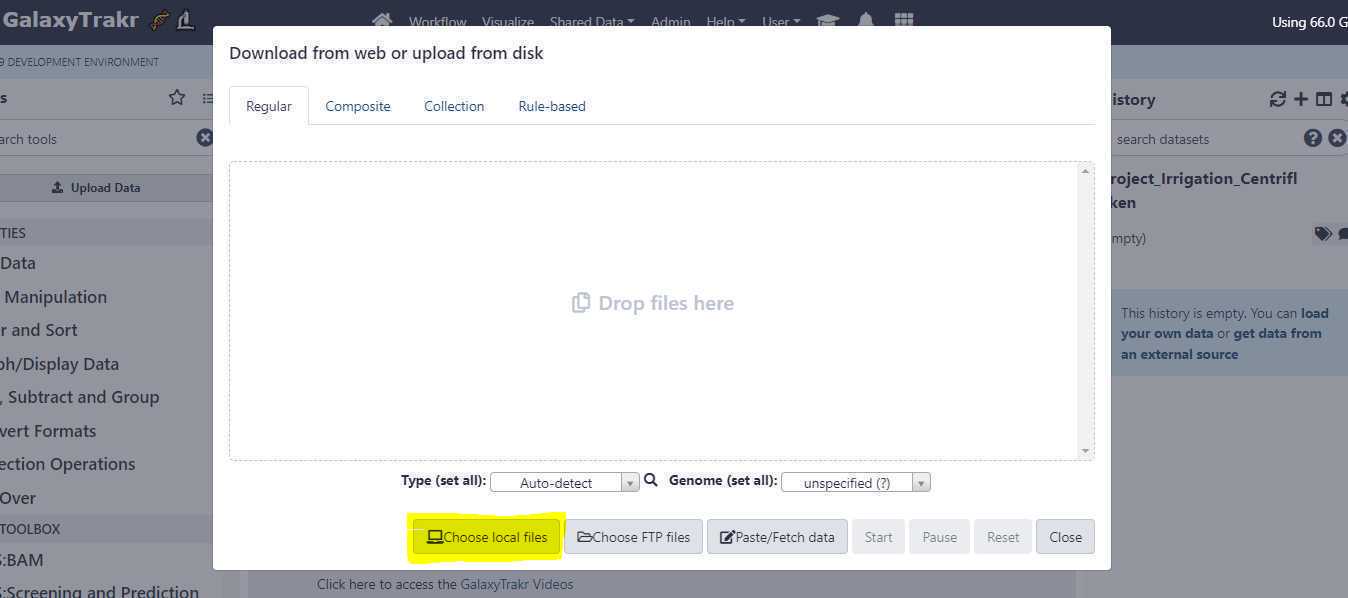
A window will appear in the middle of your screen. This is where you select your files using the " Choose local files " button at the bottom of the window.
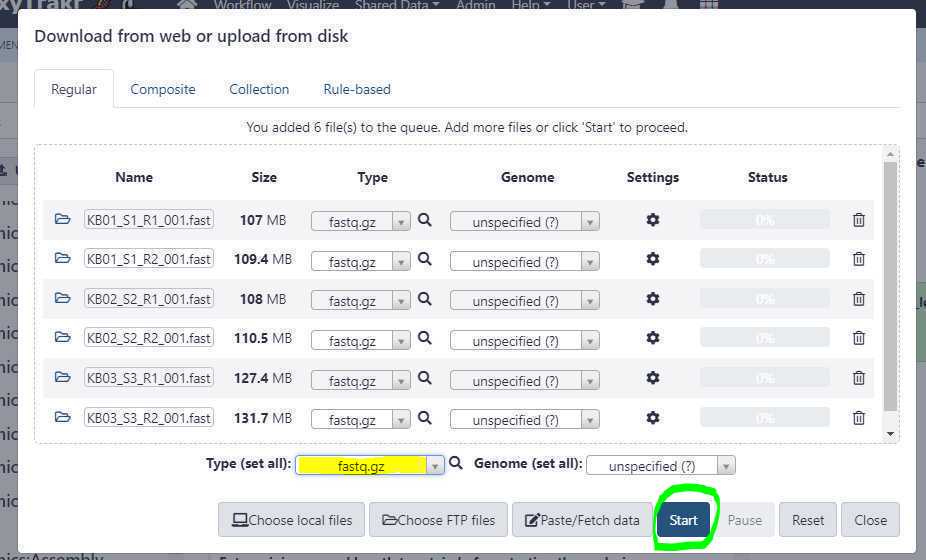
Set the appropriate " Type (set all) " extension.
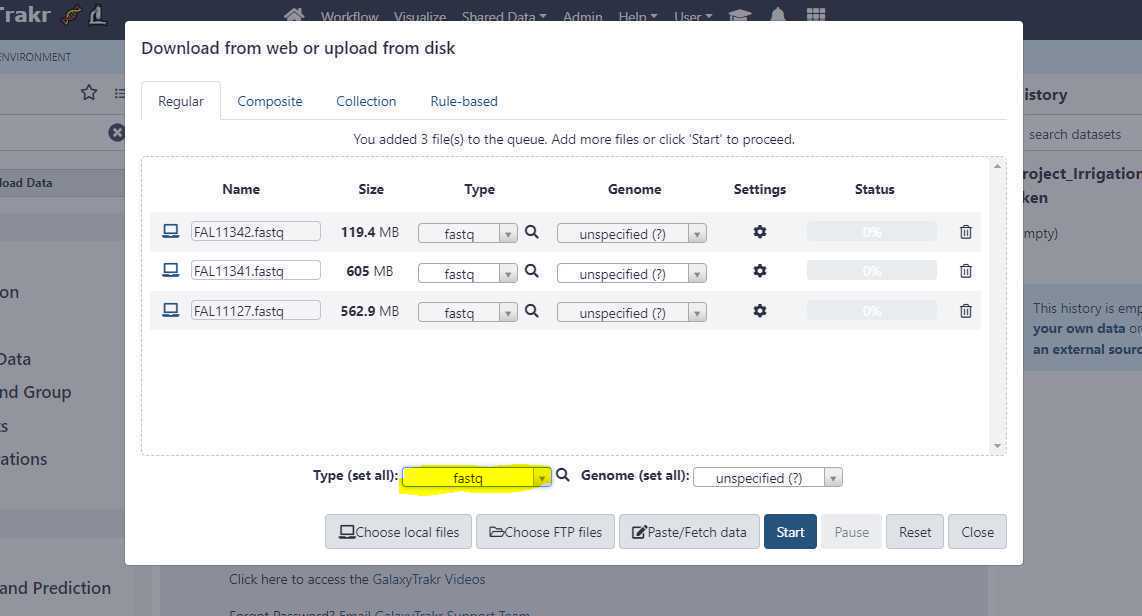
Once you have correctly set the " Type (set all) " option, click on " Start " button to start the upload of FASTQ files from your local workstation or desktop to GalaxyTrakr.
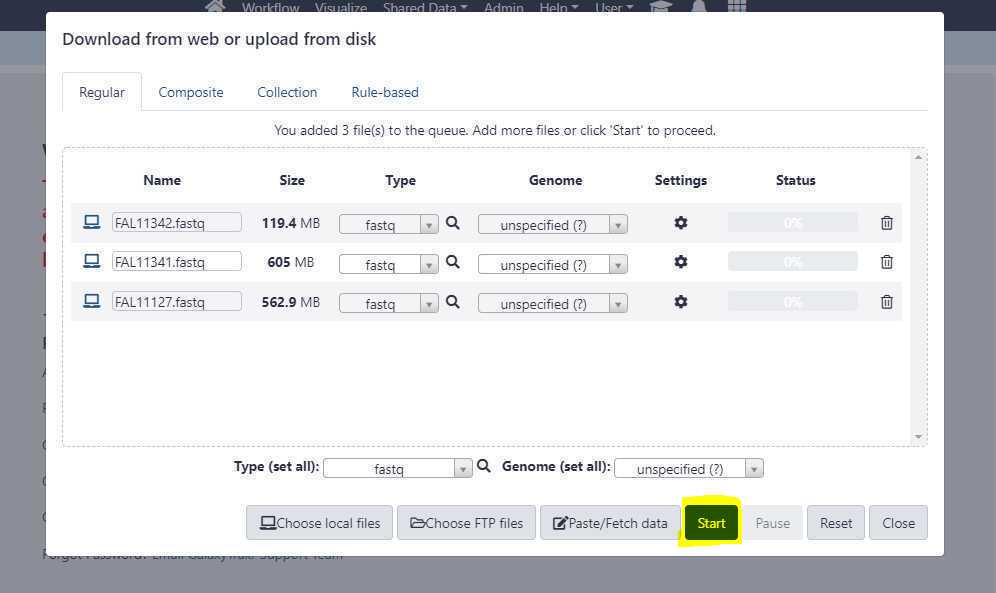
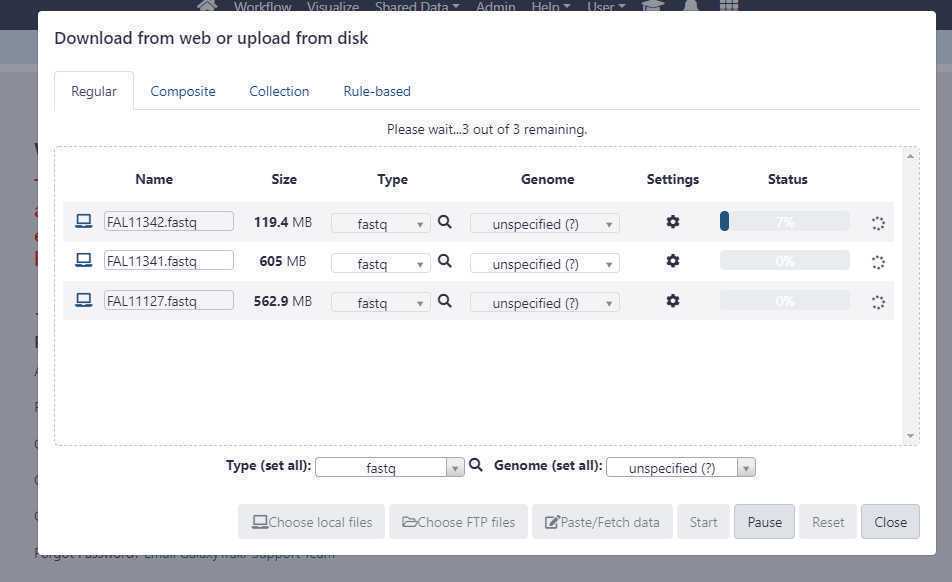
The " Status " bar changes to show the progress of the upload.
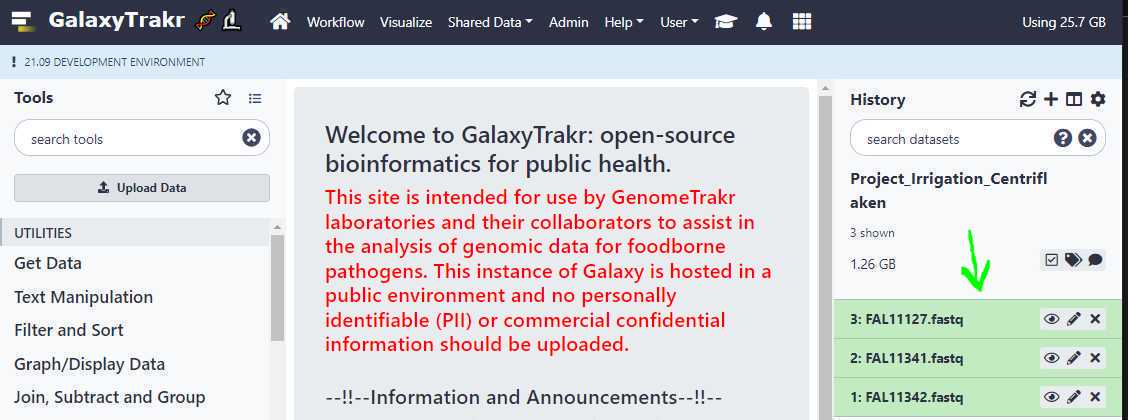
Once, the uploads are complete, they should appear in your history as shown below.
We need to create a data set list to run Centriflaken pipeline.
For single-end or long reads, we create an unpaired data set list and for paired-end reads we create a list of data set pairs.
Create an unpaired data set collection:
Using the above uploads as an example, we need to create a list unpaired data sets as these are Oxford Nanopore long reads.
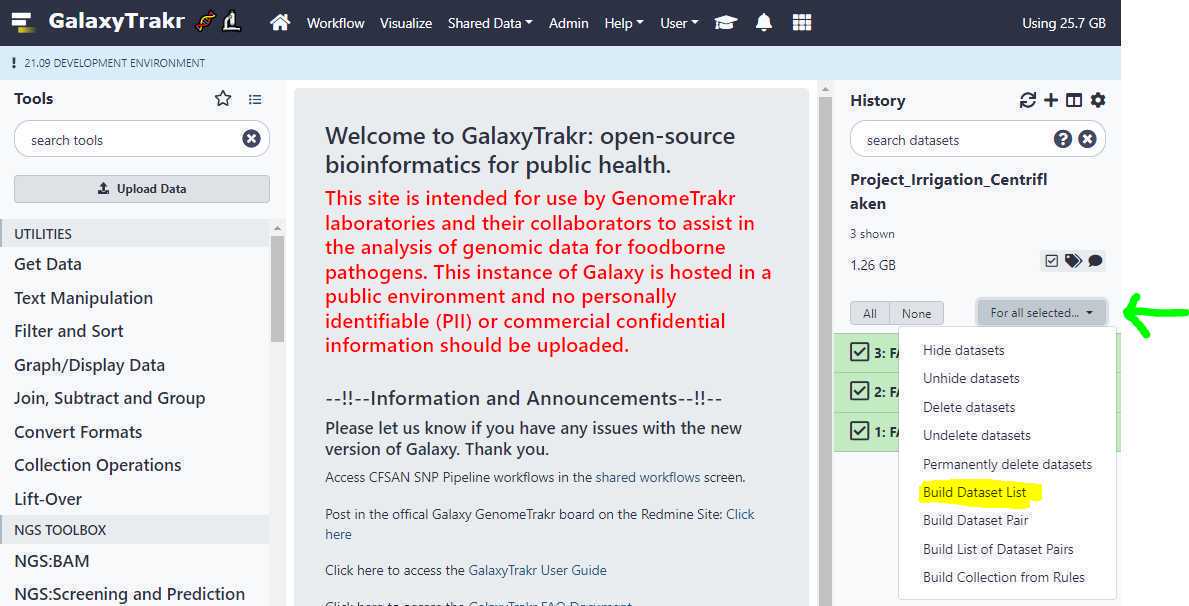
First, go to your history and click on the " Checkbox " icon as highlighted in yellow below. This will put check boxes in front of the data sets to select.
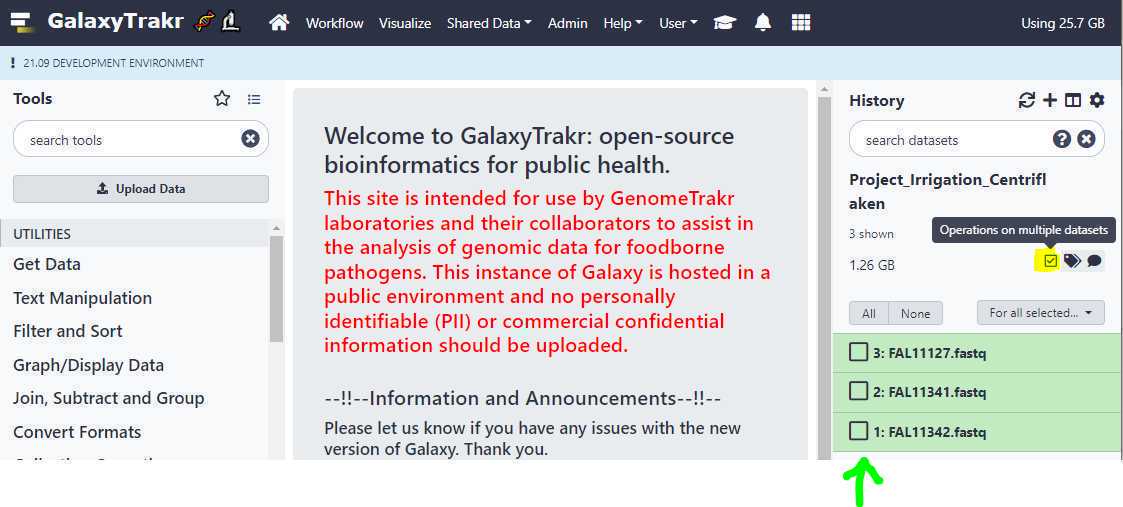
Now, select the data sets for which you want to create an unpaired data set list and click on the dropdown menu as show below and select the option " Build dataset list ".
Upload FASTQ via FTP
Upload paired-end data sets via FTP protocol :
Please refer to the section 3.2.1 in the User Guide below and follow the directions to upload the data sets using the FTP protocol to GalaxyTrakr.
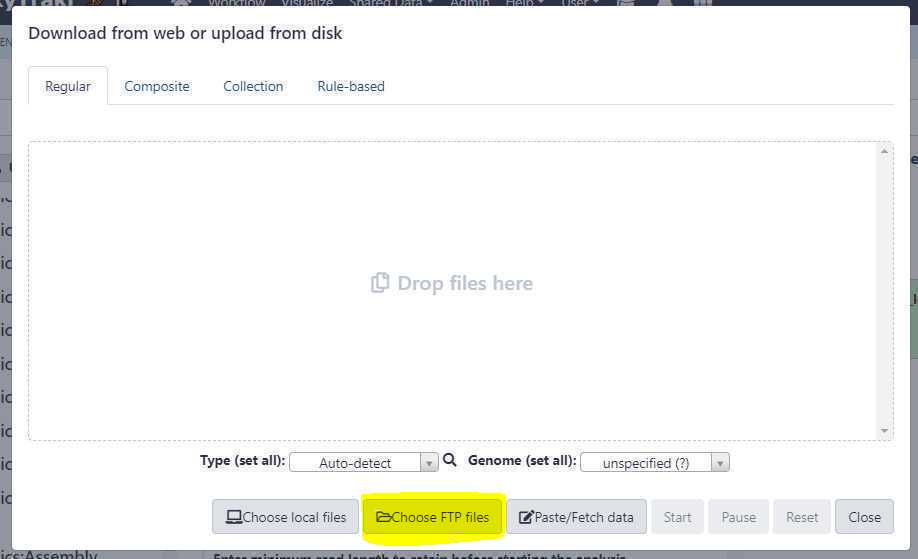
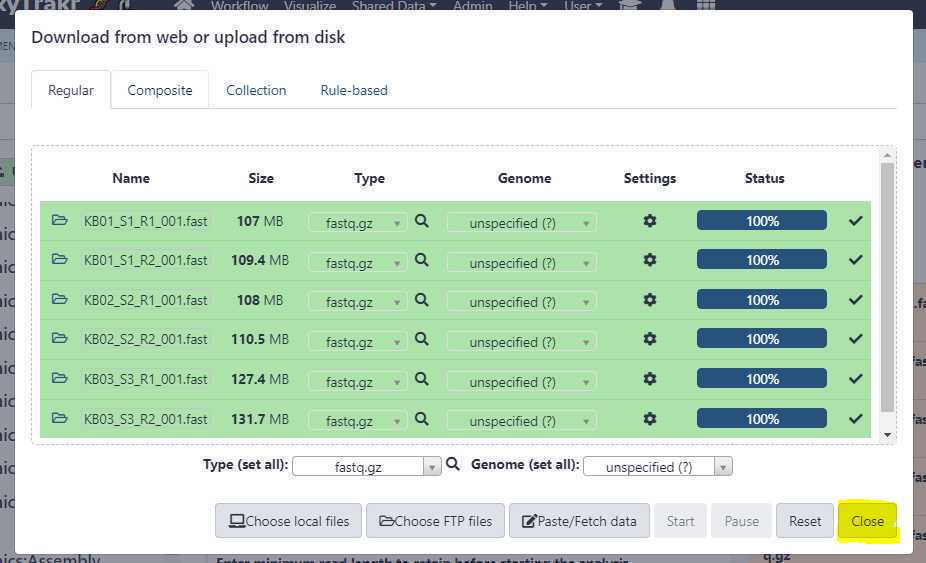
Once your paired-end data sets are uploaded, go to GalaxyTrakr and click on the " Upload Data " button. This should bring up the upload window overlay, and this time, click on the the " Choose FTP files " button as shown below.
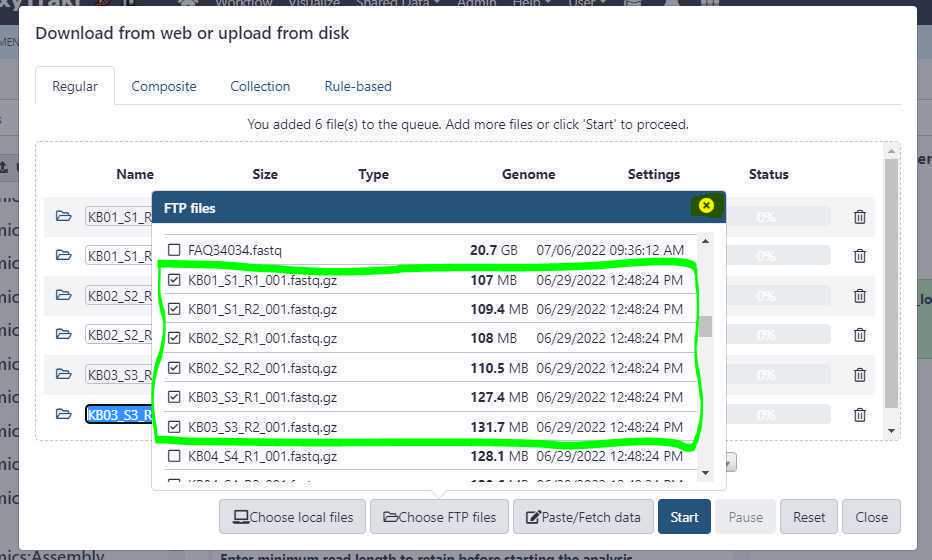
Now, select the relevant files you uploaded via FTP protocol. In the example below, we are selecting 3 samples (circled in green) which equals to 6 files to be uploaded.
Then, first close the " FTP files " window (highlighted in yellow).
Since the files were pre-uploaded using an FTP client, the upload from the GalaxyTrakr interface should finish relatively quickly. Next, close the upload window by clicking on " Close " button.
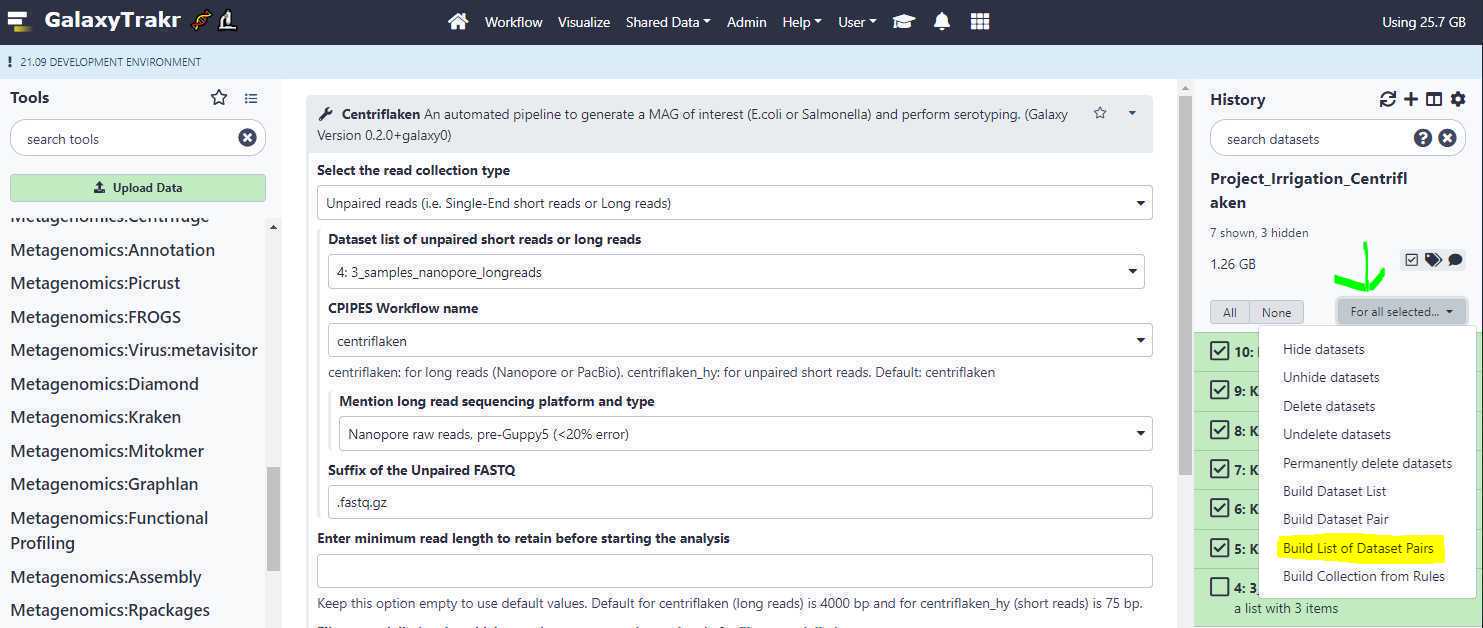
Now the FTP uploaded files should appear in your history. We will create a new list of data pairs collection using these 6 files (3 samples).
Similar to step 3.8 , we click on the " Checkbox " to select our 6 data set files (3 samples) and this time, we click on " Build List of Dataset Pairs " (highlighted in yellow) from the dropdown menu (green arrow).
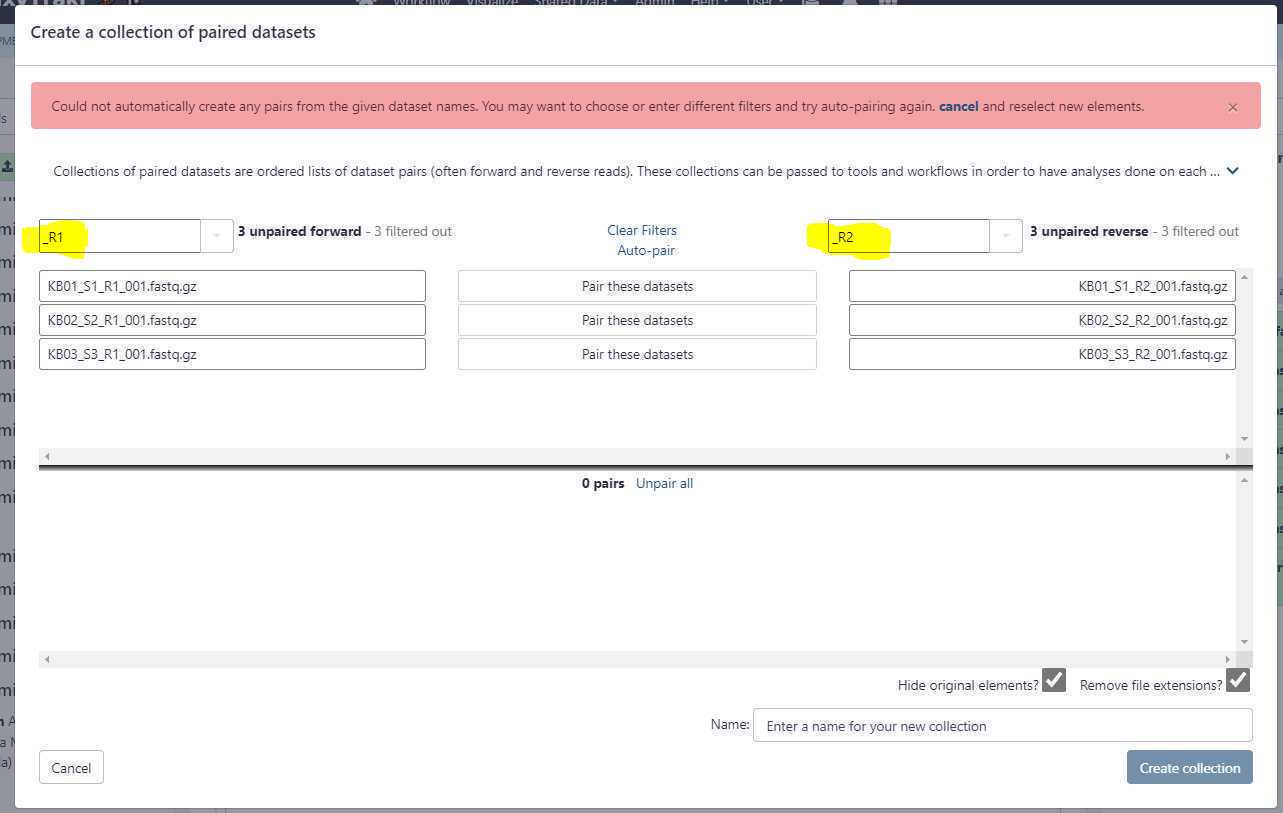
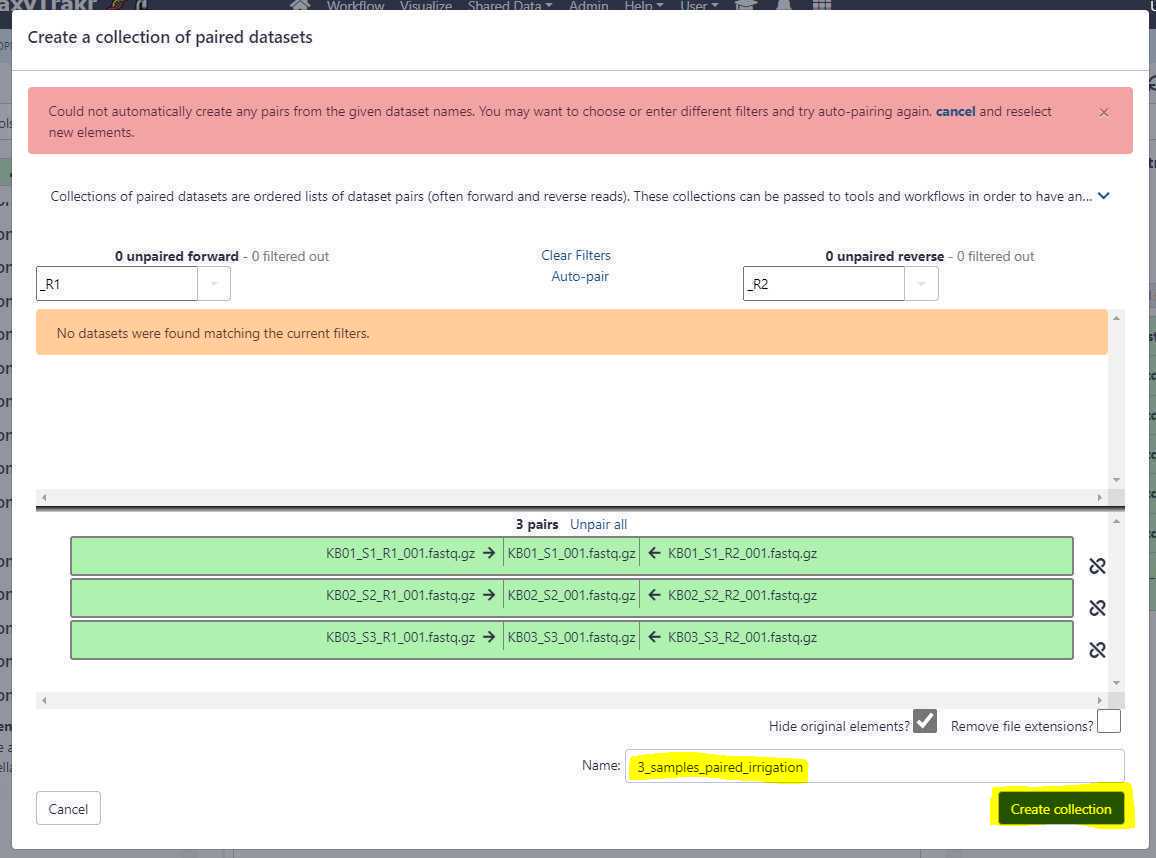
Since the file names of our uploaded data sets ended in the following suffixes: _R1_001.fastq.gz and _R2_001.fastq.gz , we select _R1 to indicate our forward read and _R2 to indicate our reverse read from the drop down menus (highlighted in yellow).
Next, click on " Auto-pair " to pair these data set files.
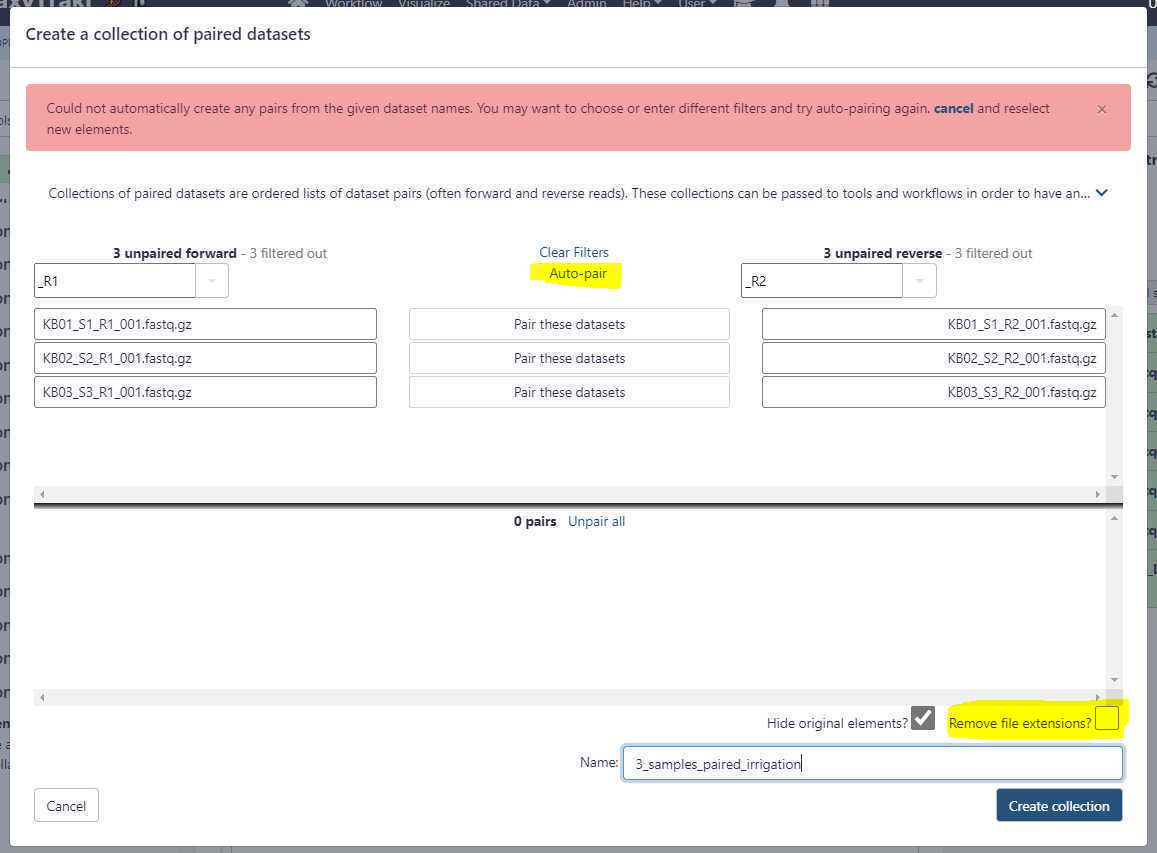
Finally, create a name for the collection and click on " Create collection " button.
Run Centriflaken on Long Reads
Run Centriflaken pipeline on long reads:
Now, choose " Centriflaken " pipeline from the tool navigation menu on the left under " CPIPES: Metagenomics ".

Selecting the " Centriflaken " under " Metagenomics:CPIPES " will bring up the job submission form in GalaxyTrakr. Here we set a few required parameters to run the pipeline on our created collection of long read data sets.
Select the read collection type:
Unpaired reads (i.e. Single-End short reads or Long reads) : Select this option if your newly created data set collection contains Single-End short reads or Long reads. Based on the data set collection we created in the example above, we will be selecting this option (highlighted in yellow; see below).
Paired-End reads : Select this option if your newly created data set collection contains Paired-End short reads.
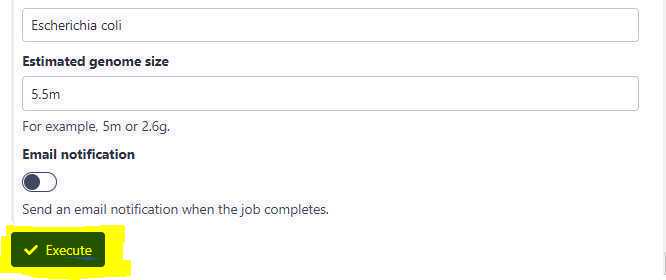
Estimated genome size:
This option is only required if the input is long reads as FLYE assembler requires this information to perform a de novo assembly. For short reads, the value in this field is ignored.
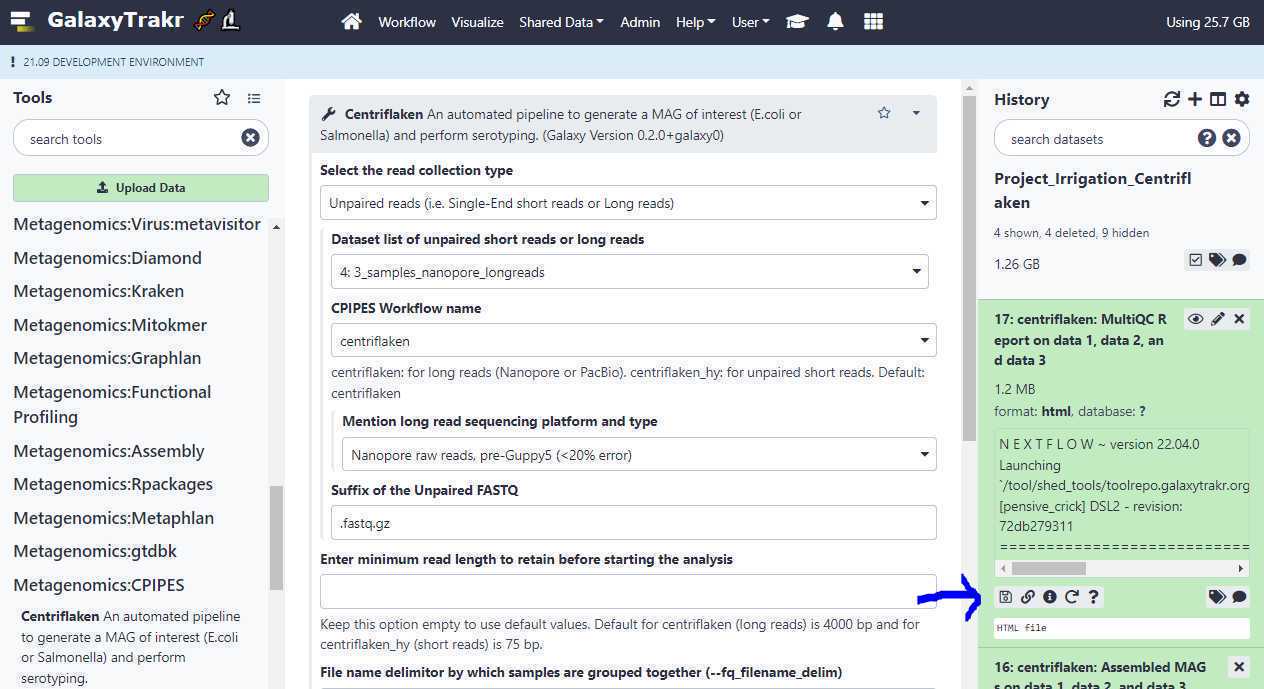
Dataset list of unpaired short reads or long reads : This is where we point to our created data set collection. Based on the example above, the collection name " 3_samples_nanopore_longreads " is selected (green arrow; see below).
CPIPES Workflow name: Select " centriflaken " if your data set collection contains long reads and select " centriflaken_hy " if your data set collection contains short reads, either single-end or paired-end (blue arrow; see below)
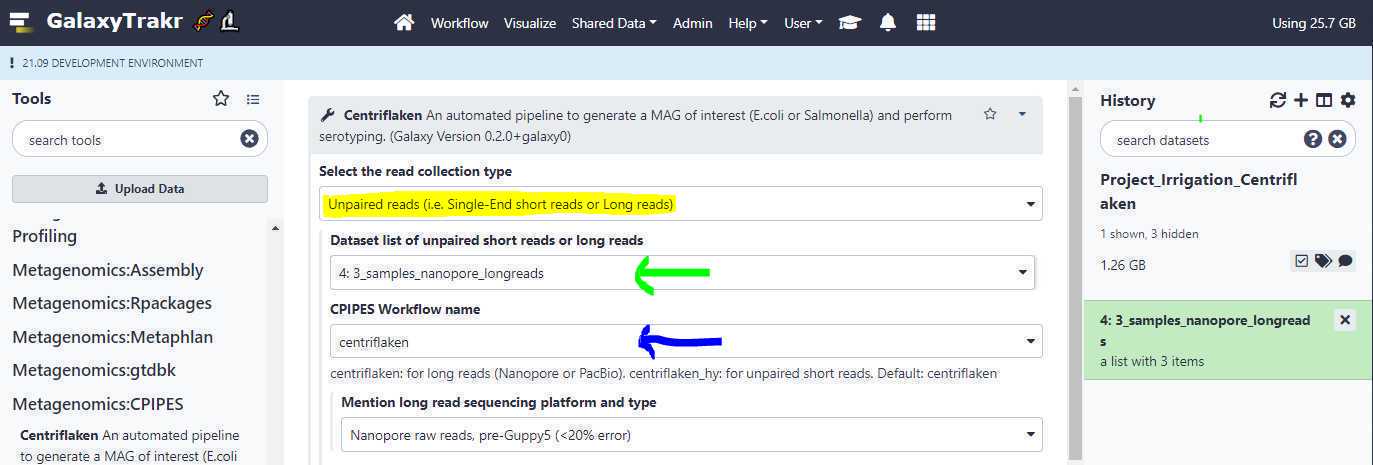
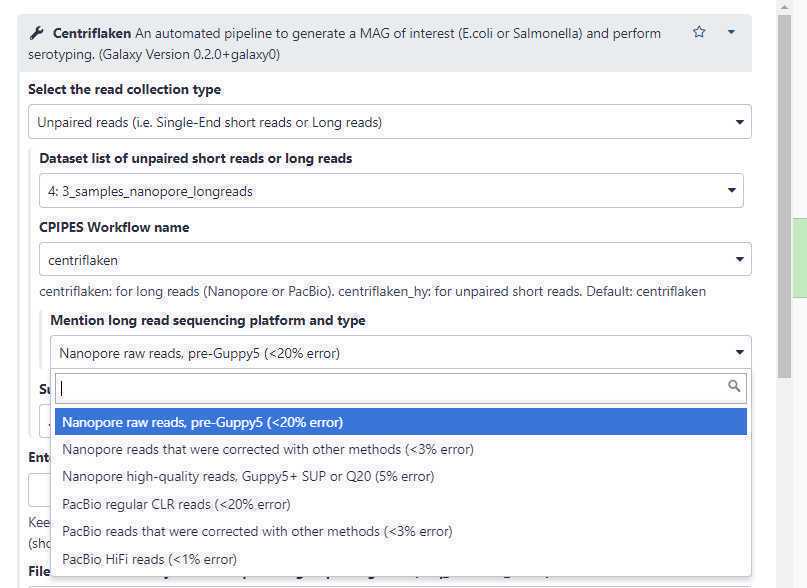
Mention long read sequencing platform and type: Use this option to select the type of long reads that were uploaded or present in your read collection. For the example above, we uploaded raw Oxford Nanopore reads and that option is selected below.
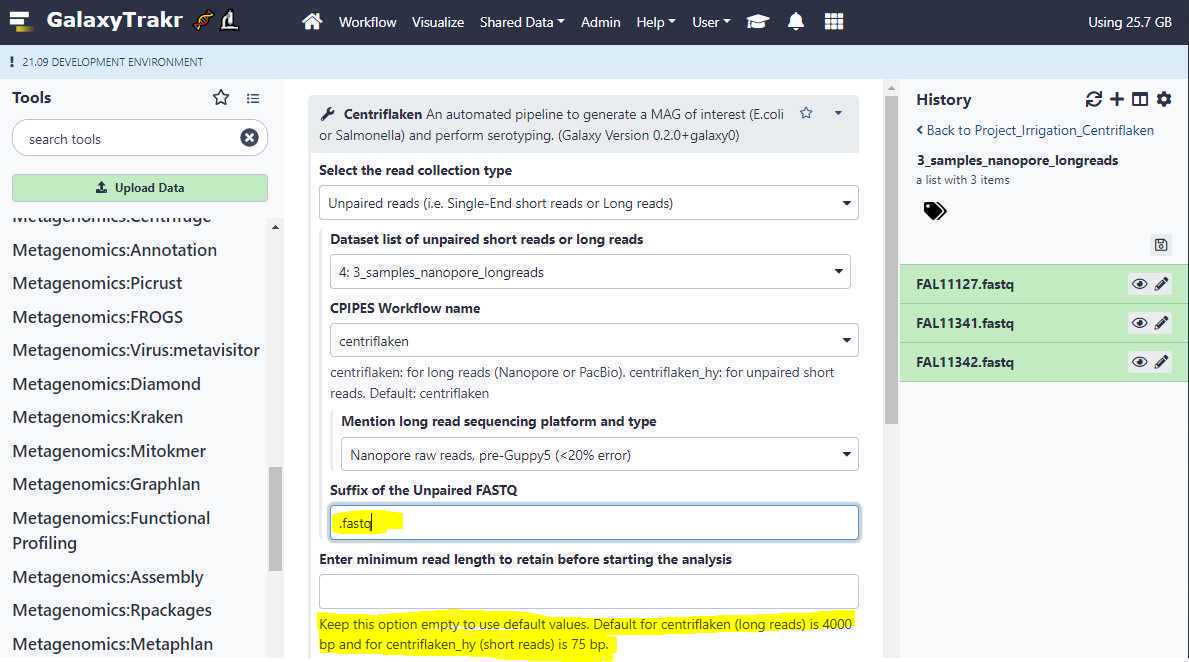
Suffix of the Unpaired FASTQ:
Since the extensions of the FASTQ files we originally uploaded was .fastq (Ex: FAL11127.fastq, FALL11341.fastq etc.), we change this option from the default value of " .fastq.gz " to " .fastq ".
Enter minimum read length to retain before starting the analysis:
Enter the minimum length of the FASTQ reads to keep before starting the analysis. Leave this box empty to use the default values. It is 4000 bp for long reads and 75 bp for short reads.
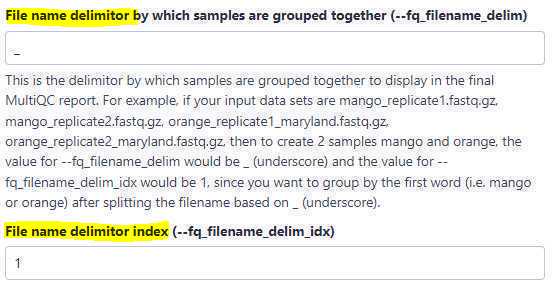
File name delimitor:
Use this option to perform sample grouping. Sample grouping is entirely based on file names of the uploaded FASTQ files. The suffixes of the file names of the uploaded files are first removed based on the entry in the " Suffix " field and then the sample grouping is performed.
For example, if the uploaded FASTQ files are as below:
- KB01_biological_replicate1.fastq
- KB01_biological_replicate2.fastq
- KB02_biological_replicate1.fastq
- KB02_biological_replicate2.fastq
- KB03_biological_replicate1.fastq
- KB03_biological_replicate2.fastq
- KB04_biological_replicate1.fastq
- KB04_biological_replicate2.fastq
Here, we have 2 biological replicates per sample. Now, to create 4 sample groups, KB01, KB02, KB03 and KB04, we set the " File name delimitor " to _ (an underscore character), because, if you split the file names above (after removing the suffix .fastq ) by an underscore character, you end up with the following words for each file name:
- KB01 biological replicate1
- KB01 biological replicate2
- KB02 biological replicate1
- KB02 biological replicate2
- KB03 biological replicate1
- KB03 biological replicate2
- KB04 biological replicate1
- KB04 biological replicate2
File name delimitor index:
Following the above example, now to create 4 sample groups (KB01, KB02, KB03 and KB04), we need to select the first word and therefore we set the value to 1.
Suffix of the paired-end FASTQ:
Changing the " Select the read collection type " (highlighted in yellow; see below) to " Paired-End reads " dynamically changes the form fields and auto-selects the " centriflaken_hy " (green arrow; see below) pipeline.
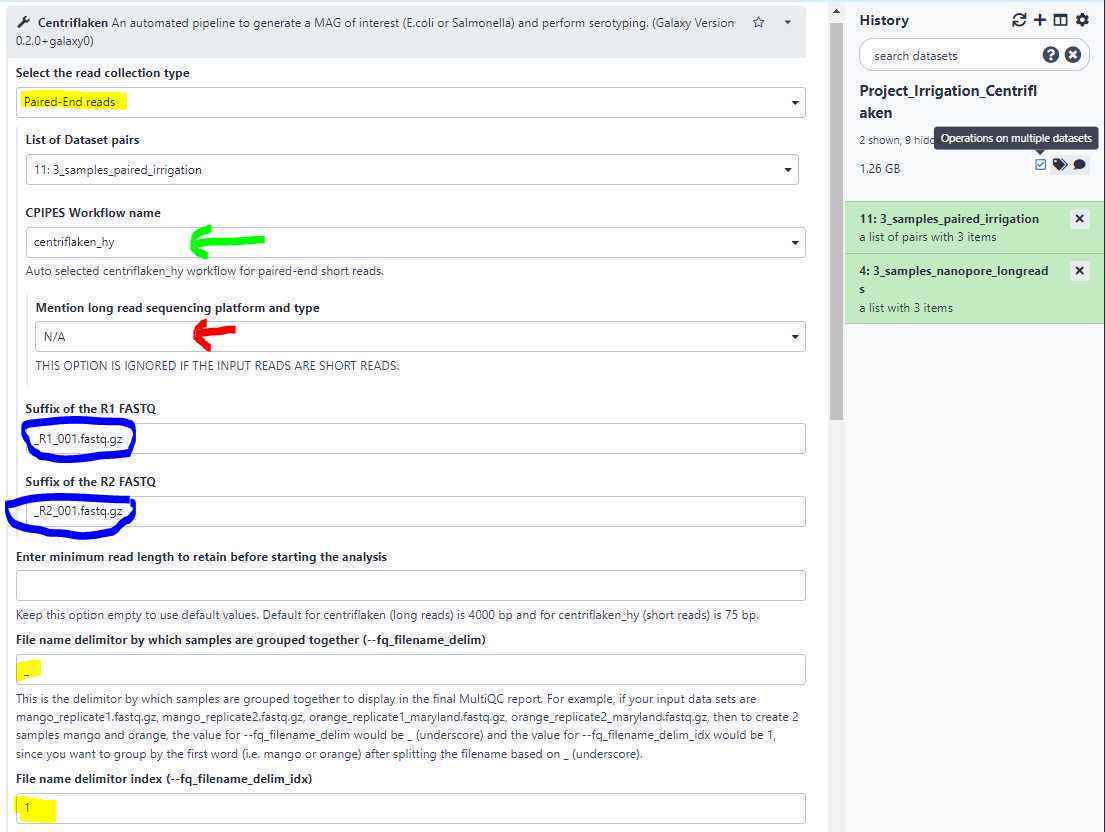
It also automatically disables the " Mention long read sequencing platform and type " field (red arrow; see above).
Remove duplicate sequences from FASTQ:
Sometimes it is useful to remove identical sequences (ex: PCR duplicates or Optical duplicates) from the Illumina reads. Select this option to " yes " to remove duplicate sequences (highlighted in yellow below).
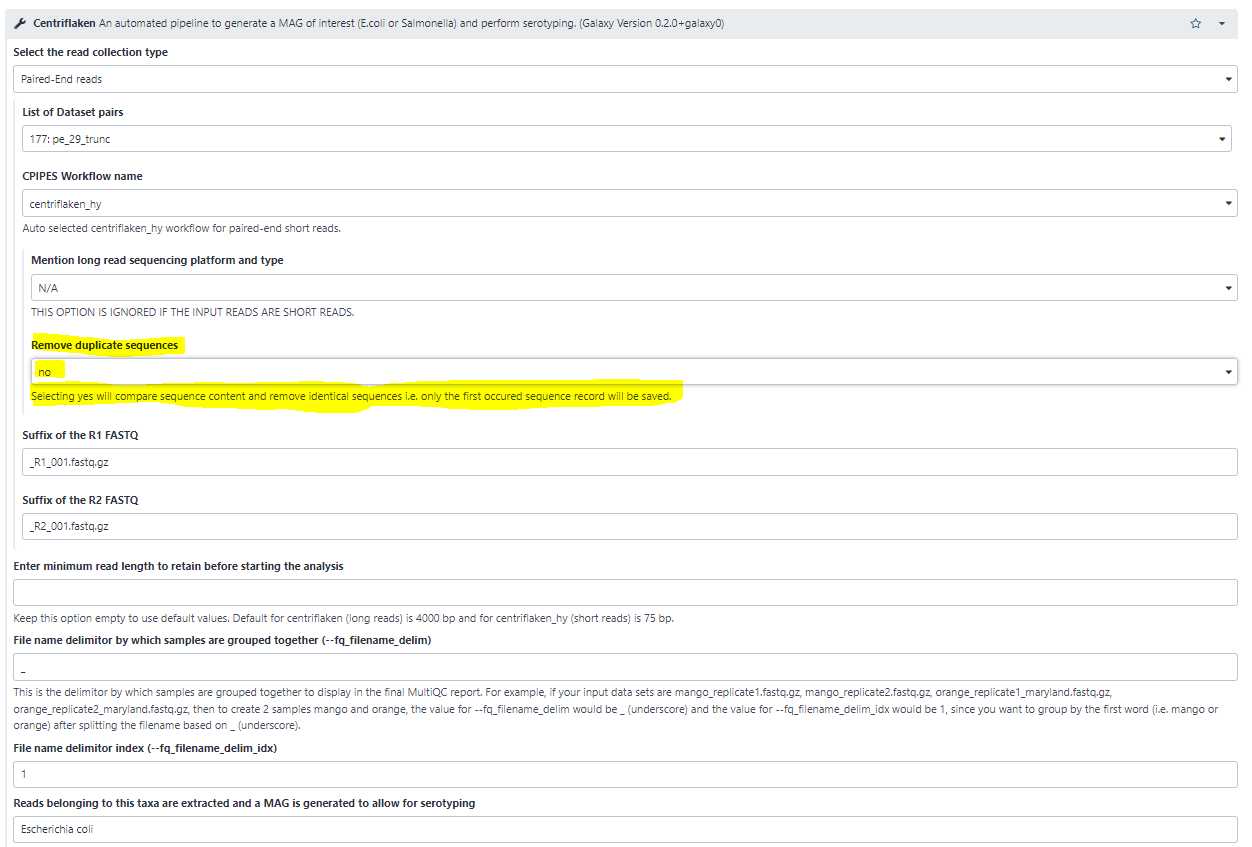
Reads belonging to this taxa are extracted and a MAG is generated to allow for serotyping:
Use this option to set the name of a taxa for which the reads belonging to the set taxa are extracted, de novo assembled and further serotyping and AMR analyses are performed.
Submit Centriflaken Job(s)
Submit the Centriflaken pipeline for execution:
Finally, click on the "Execute" button to submit the pipeline for analysis.
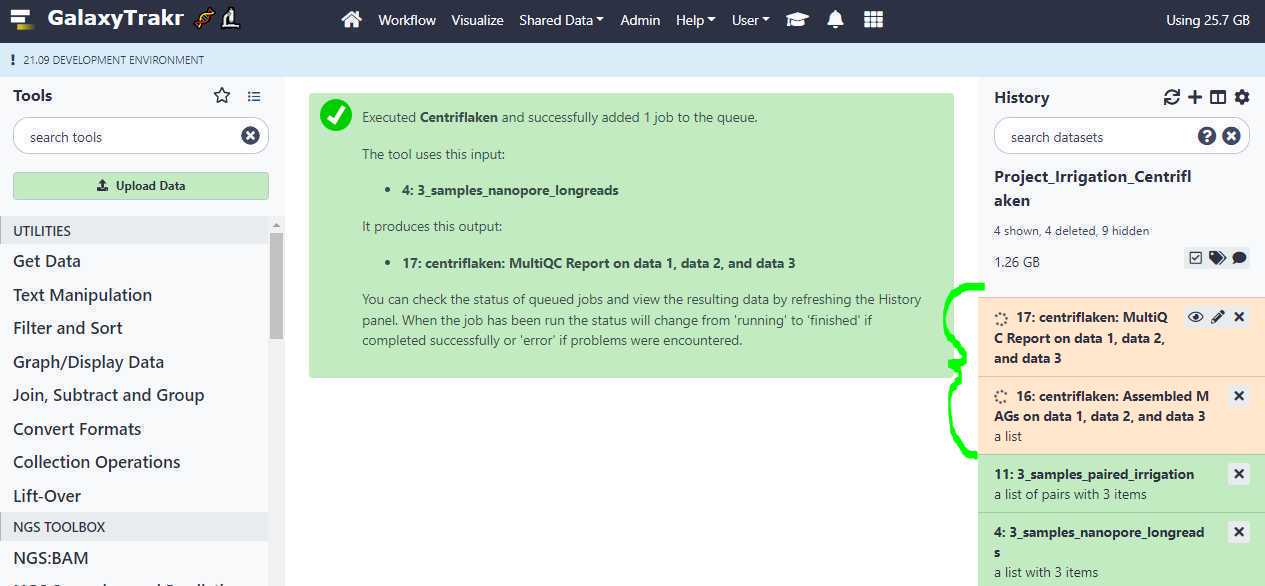
After the job is submitted, your history should indicate that the job is running with 2 expected outputs: one, a MultiQC HTML report and another: a collection of assembled MAG s ( Metagenomically assembled genomes ) in FASTA format as shown below (highlighted in curly green bracket).
Download Results
Download results:
If the pipeline finishes successfully, your history will have 2 outputs: one, a MultiQC HTML report , which contains brief summary about the quality of your raw reads and any results from the analysis, which should be downloaded by first clicking on the results tab to expand the section (highlighted in yellow) as shown below.

Next click on the " floppy " icon to download the MultiQC HTML report (blue arrow) as shown below.
The downloaded HTML report can be opened in your web browser directly by double-clicking on it.
See an example report generated by the Centriflaken pipeline :
Example Data
Example data sets:
You can use the following example data sets to try out the Centriflaken pipeline.
Oxford Nanopore long reads (Escherichia coli):
Troubleshoot
Troubleshooting process failures:
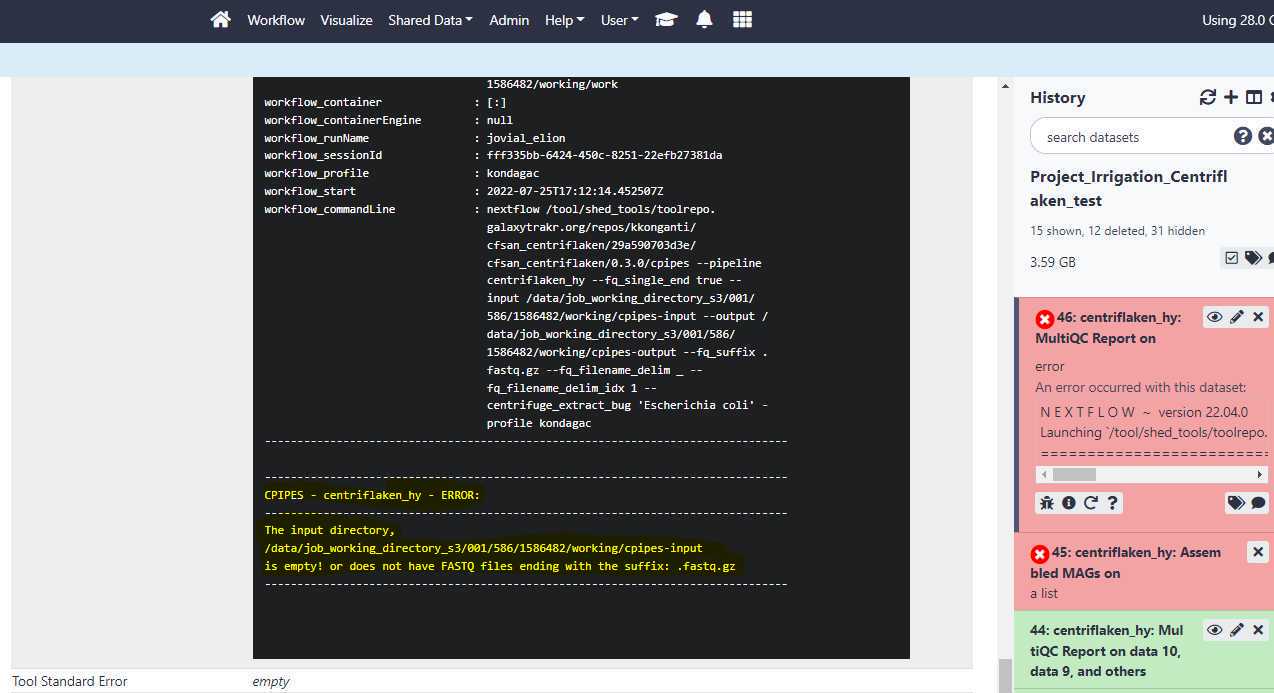
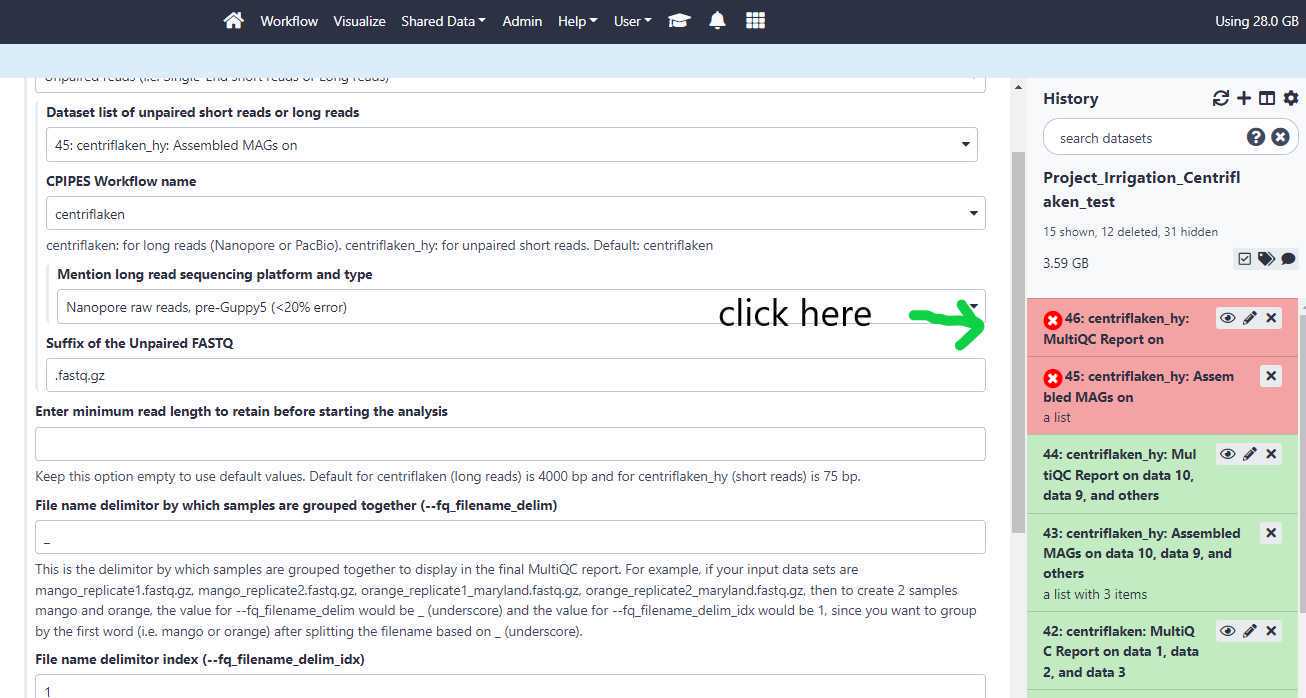
When the status for the centriflaken or centriflaken_hy jobs on GalaxyTrakr turns to red color (see below), you can investigate the probable cause for failure by clicking on the " i " icon and then expanding the tool standard output by clicking on it. Click on your failed job history (see below)
Then, click on the " i " icon.
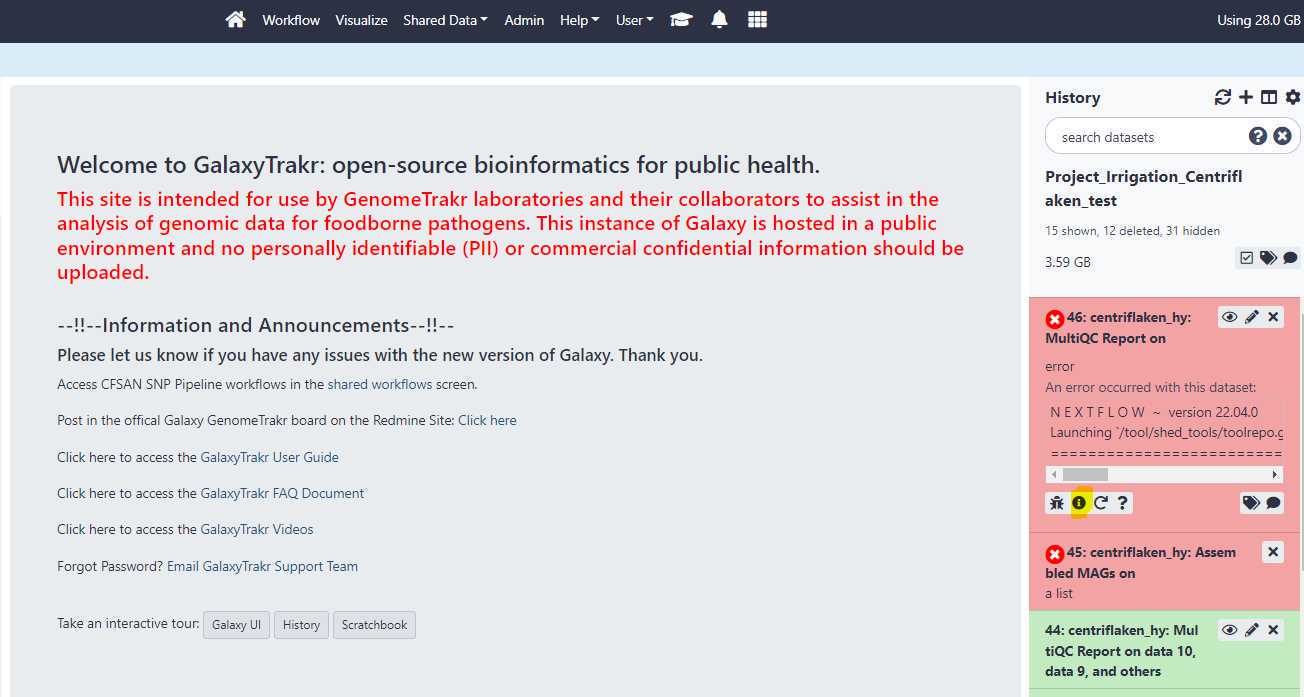
Click on the " Tool Standard Output " to expand and then scroll down for any error messages.
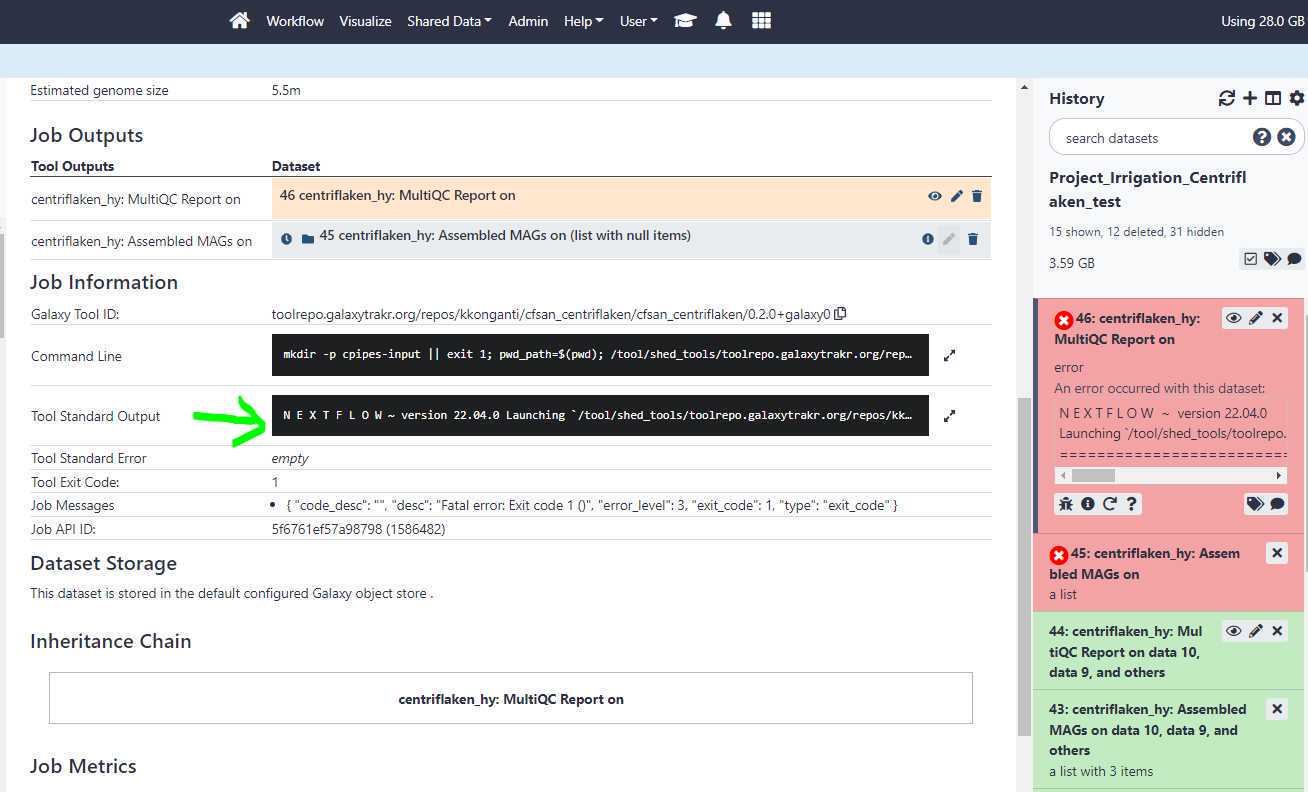
The centriflaken_hy workflow failed due to empty data set list i.e. no input files.