OT-2 Custom Mixing with Single or Multi-Channel Pipette
Ana Mariya Anhel, Ángel Goñi-Moreno, Paula Mugica-Galan
Abstract
This protocol is created to help efficiently produce high-throughput plates with different reagents using either a single or multi-channel pipette controlled by an Opentrons OT-2 robot. By running this script, users can achieve a precise layout of reagents in specified volumes across the final plate(s) using a single-channel or multi-channel pipette based on a customizable Excel input file.
The protocol uses a Python script for the Opentrons OT-2 robot in conjunction with an Excel file that contains all the necessary parameters and will be processed by the Python script.
This Excel file contains customizable variables such as the number of final plates, transfer volumes, plate types, and the type of pipette used.
This method ensures the accurate distribution of reagents based on user-defined configurations, making the high-throughput process more efficient.
This protocol has been used in our laboratory to check how different quorum sensing systems work in P. putida KT2440. P. putida KT2440.
This protocol is a set of instructions or description of the LAP repository entry LAP-CustomReagentMixingMultiSinglePip-OT2-1.0.0
You can find the script and complementary information for this specific version of the protocol in this LAP entry link and GitHub Link to LAP entry documents
Steps
Files Preparation
Preparing Customized Template
Preparing the template (a .xlsx) with the specific variables for each experiment.
Attached is a template of the variable file with several sheets and a PDF file explaining each variable:
- GeneralVariables: These are variables mainly related to the labware to be used, optimization for the source plate, and sterility variables.
- PipetteVariables: These are variables related to the pipettes to be used.
- FinalPlatesVariables: variables related to the specifications of each final plate to be created, such as the maps associated with this final plate, the number of replicas to make and the type of pipette used to create each.
- MapsReagents: These are the sheets that are established in variables in FinalPlatesVariables that define the layout of reagents to transfer/distribute to each one of the final cells
- MapsVolumes: These are the sheets established in variables in FinalPlatesVariables that define the layout of volumes of each reagent defined in MapReagents to transfer/distribute to each of the final cells.
TemplateVariablesCustomMixing.xlsx
CustomMixingInstructions_v100.pdf
Fill the template with the corresponding values
Save it with the name VariablesCustomMixing.xlsx
Setting the robot
Prepare the system of the robot to run the protocol
For this protocol to work, we need to transfer the file VariablesCustomMixing.xlsx to the directory /data/user_storage of the OT system we will use to perform the protocol.
Also, if we use custom labware, we must upload it to the OT App and send it to the directory /data/labware/v2/custom_definitions/custom_beta if the labware is not there yet.
Finally, we must ensure the package openpyxl is installed in the robot system.
We can do this by following the protocol Setting and Customizing OT-2 for LAP Entries with the specifications in the text above.
Running protocol
Load script in OT-App
Now that we have transferred the variable files to the robot, we can import the script and run it in the selected robot
Software
| Value | Label |
|---|---|
| Opentrons App | NAME |
| Windows >=10, Mac >=10 | OS_NAME |
| , Ubuntu >=12.04 | OS_VERSION |
| https://opentrons.com/ot-app/ | REPOSITORY |
| Opentrons | DEVELOPER |
Load the script in the App
Protocols -> Import -> Drag Python script
This protocol version was developed when the last version of LAP-CustomReagentMixingMultiSinglePip-OT2 was 1.0.0; the script is attached.
The name of the Python file is the user's choice; it will work with any name in the app.
Software
| Value | Label |
|---|---|
| LAP Repository | NAME |
| www.laprepo.com | REPOSITORY |
| https://biocomputationlab.com/ | DEVELOPER |
Select Robot to Perform Script
Click in the protocol -> Start setup -> Choose the OT where the file VariablesCustomMixing.xlsx is -> Proceed To Set to overpour to account for any pipetting errors slightly up
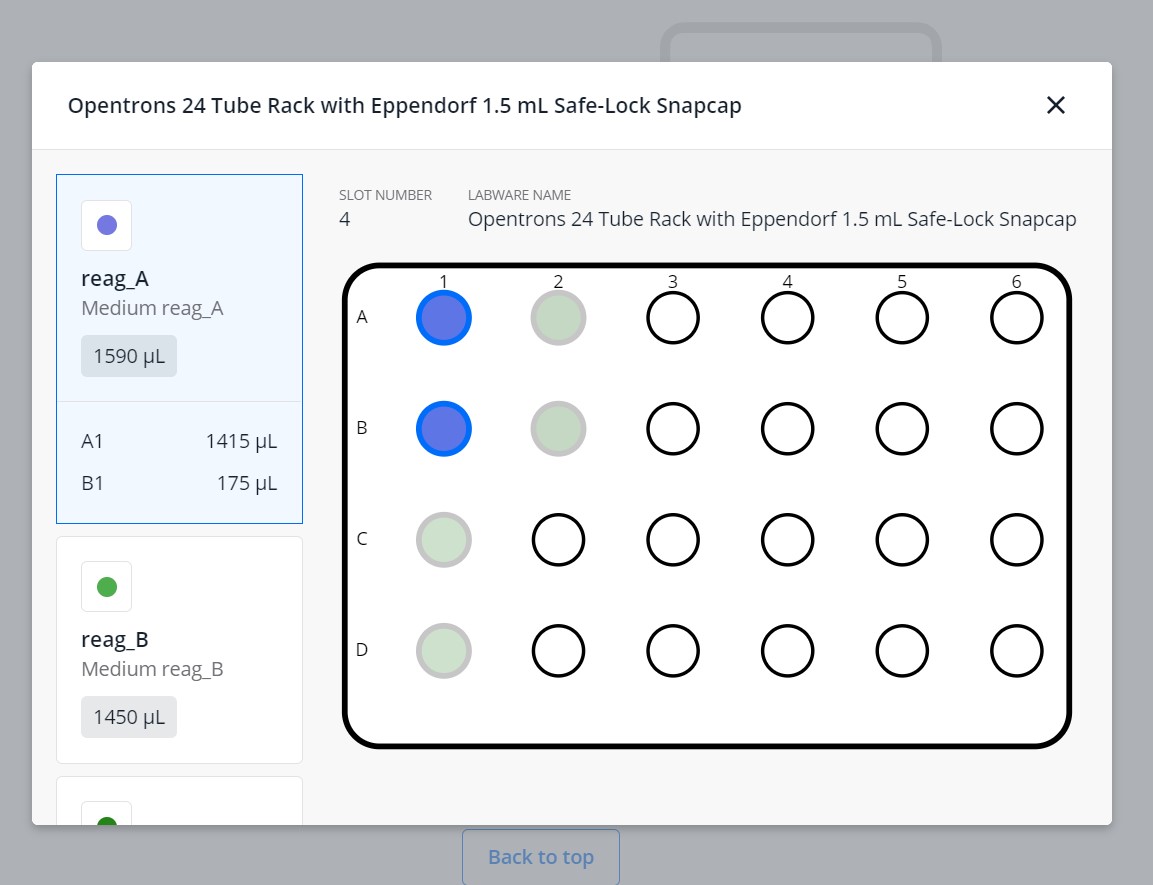
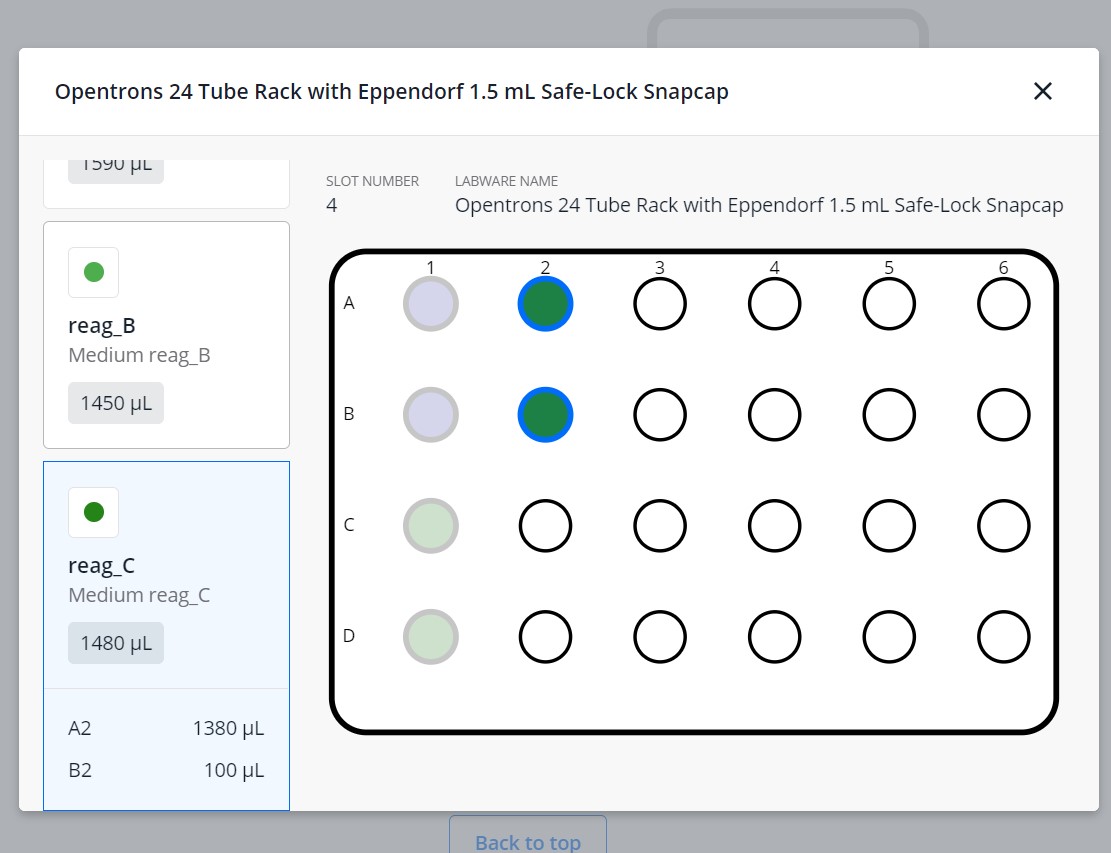
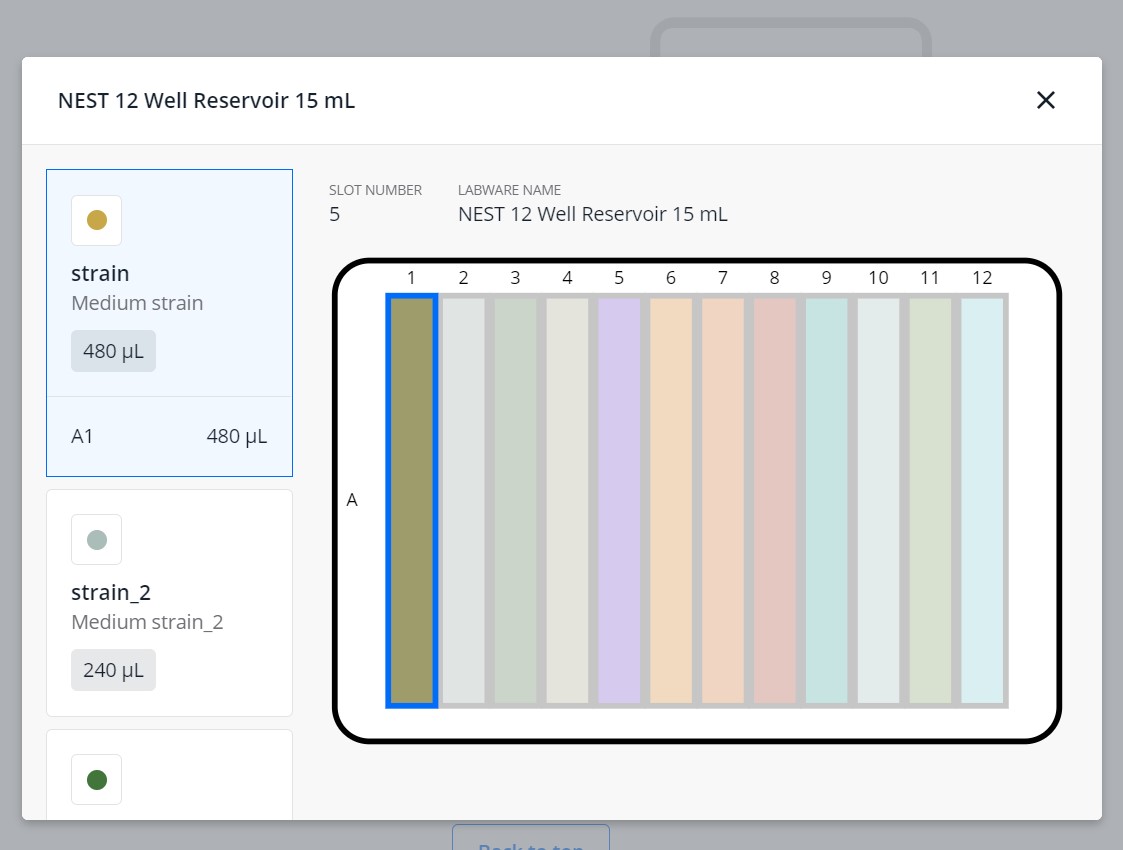
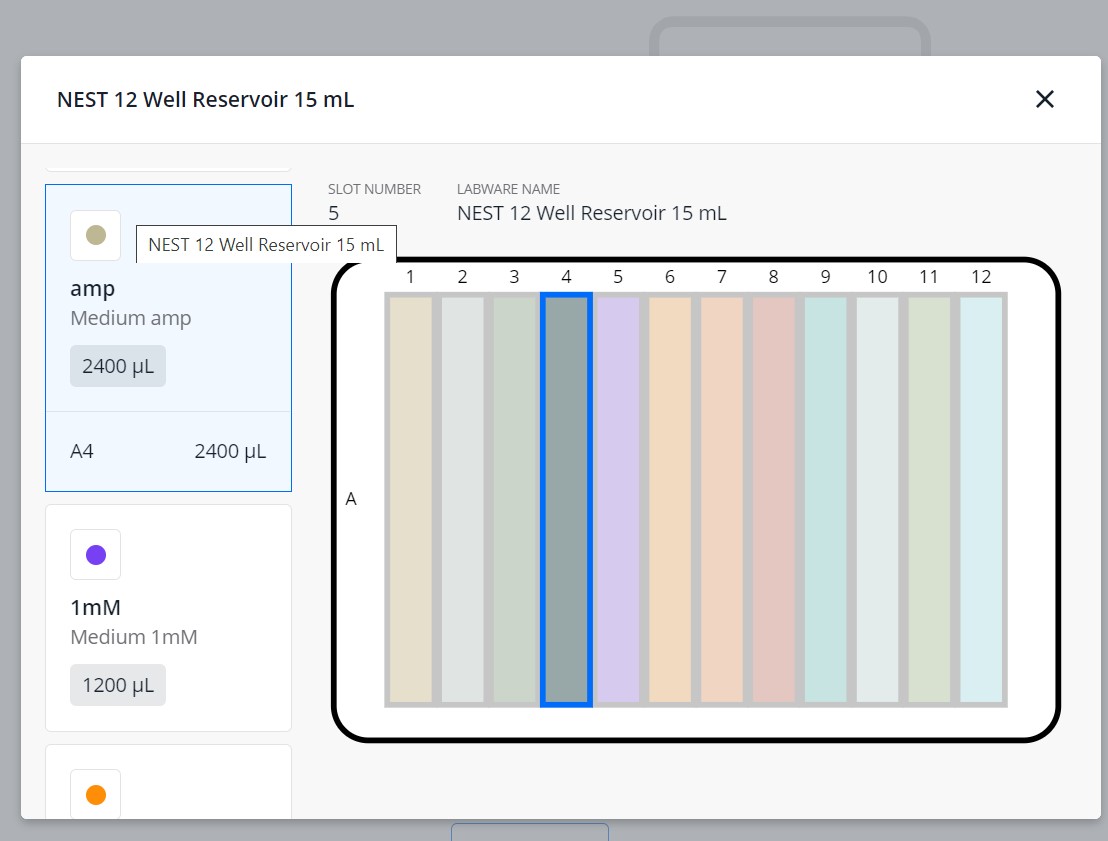
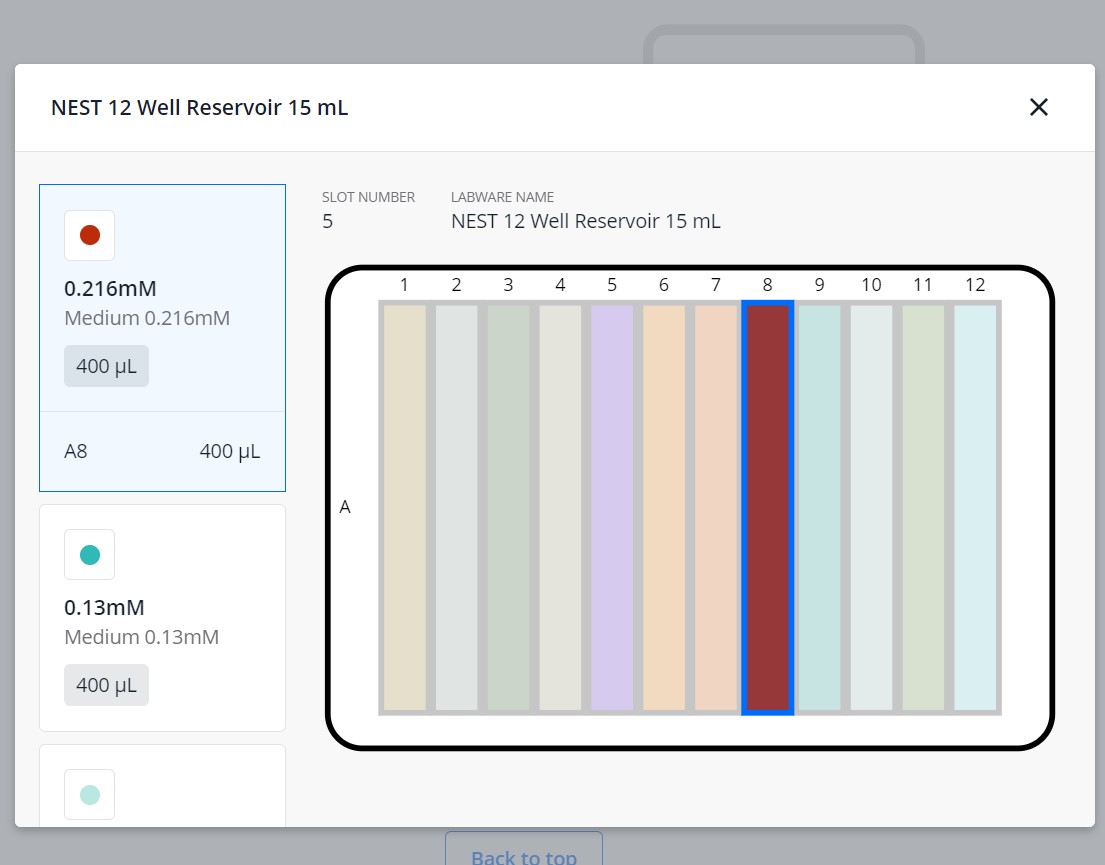
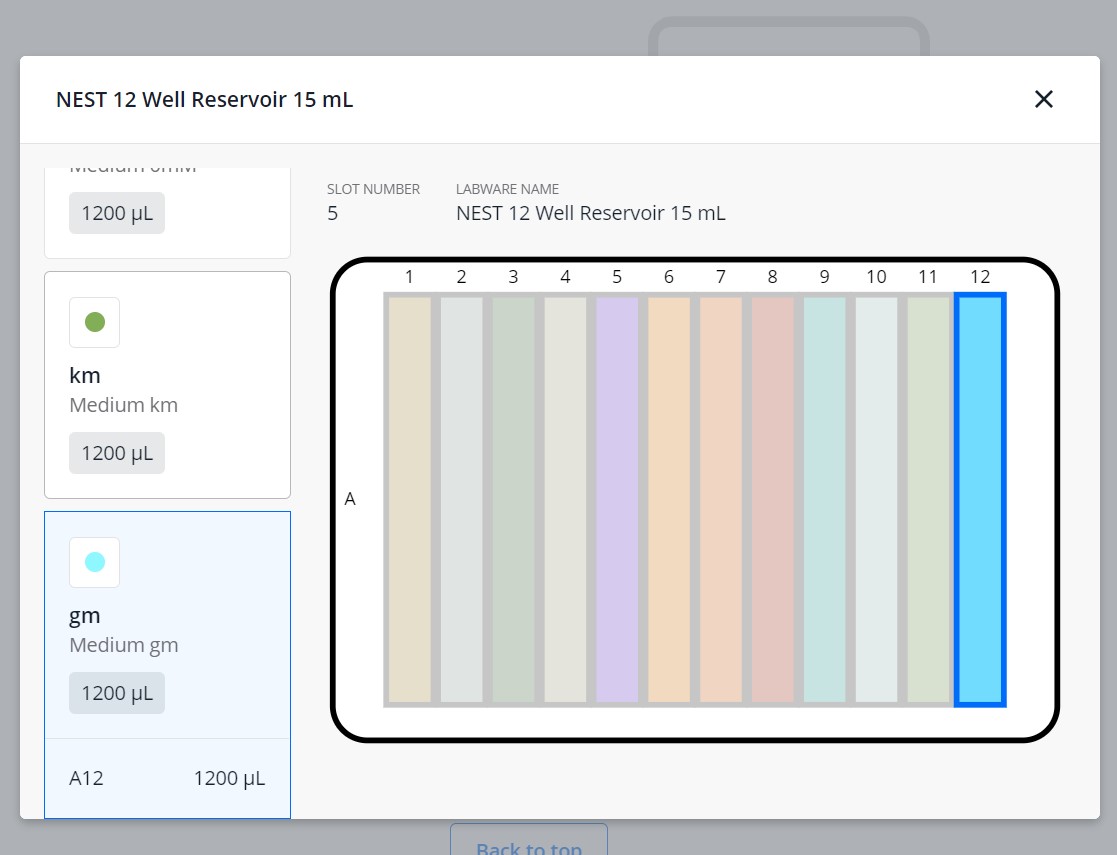
After clicking on Proceed to Setup, you should obtain the labware's positions in the Labware tab and in the Liquids tab , the reagents and their corresponding volume.
If the protocol with the set variables cannot run, an error will occur during the simulation's run in the app after Start setup . Many errors are already contemplated and have a specific message that hints tothe user what could have gone wrong.
Run Protocol in OT
Make sure the needed calibrations are done
Pipettes, tip racks and tip length calibrations need to be done for the items used in this run
Labware position check is performed (if required)
Turn the HEPA Filter on
Clean the surface of the robot with 70% ethanol to clean and disinfect the surfaces
Set the labware and reagents as shown in the OT-App
Start Run
The procedure that the robot is going to do is mainly divided into 2 parts:
- Distribute reagents with single-channel if any final plate is set to be created with it.
- Distribute reagents with multi-channel if any final plate is set to be created with it.
After-running
Retrieve labware from the OT
Example
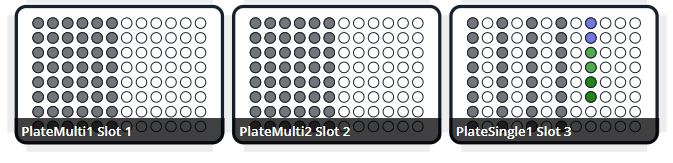
We want to create three plates: 1 with a single-channel pipette and 2 with a multi-channel pipette.
The two plates filled with the multi-channel will have different concentrations of IPTG and certain bacteria. At the same time, the single-channel pipette will create a plate with varying combinations of reagents.
The multi-channel reservoir source's optimization will be low, and the reservoir will have 15 columns and 1 row.
The tip will be changed every time a reagent is changed, and the liquids will be dispensed at the top so the source reagents are not contaminated.
We will use a computer with a Windows 10 system.
Prepare variable file
Excel template that we can find filled and saved with the name
VariablesCustomMixing.xlsx
Start Run
.


Retrieve Labware from the robot
Upload custom labware to app
We are using a custom labware called vwrblueprintdepth105_96_wellplate_390ul that has been created with the labware creator that opentrons offers (https://labware.opentrons.com/create/)
vwrblueprintdepth105_96_wellplate_390ul.json
We upload it to the opentrons app (make sure that it is in the robot app) and the robot system as stated in the protocol in step
Export the Excel file to the robot
Export the VariablesCustomMixing.xlsx file to the /data/user_storage directory in the robot where the script is going to be played following the instructions in
Import the script to the robot
ScriptMixingReagents_v100_example1.py

Run the protocol
ScriptMixingReagents_v100_example1.py ScriptMixingReagents_v100_example1.py -> Start setup -> Select the robot in which we are going to run the protocol
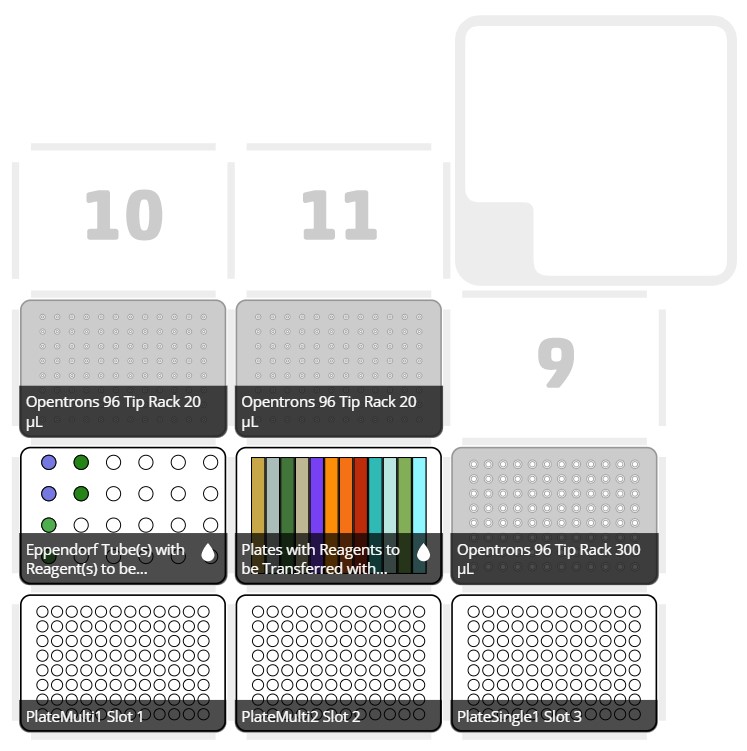
If we do not have any errors, the output should look similar to the following pictures


Turn the HEPA filter on
Clean the deck
Perform calibrations if needed
Prepare all reagents and labware
The places and volumes should correspond to the ones shown in the pictures.
Place everything, taking into account the notes in step
